ClearPath IX Systems Installation and Configuration Guide
ClearPath IX Systems Installation and Configuration Guide ClearPath IX Systems Installation and Configuration Guide
Introduction and Installation Overview OS 2200 Node 2200 System Application External Communications Interface Private Interconnect External Communications Interface Intel Node Client Application Intel Node Operating System Intel Node Client Application Intel Node Operating System Figure 1–3. Single OS 2200 Node with Multiple Intel Nodes (Up to Four) 1–10 Version 009B (Web Only) 7850 5104–009
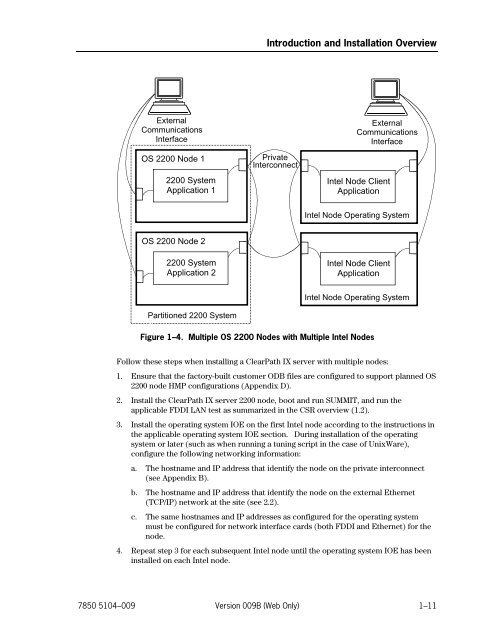
External Communications Interface OS 2200 Node 1 2200 System Application 1 OS 2200 Node 2 2200 System Application 2 Partitioned 2200 System Introduction and Installation Overview Private Interconnect External Communications Interface Intel Node Client Application Intel Node Operating System Intel Node Client Application Intel Node Operating System Figure 1–4. Multiple OS 2200 Nodes with Multiple Intel Nodes Follow these steps when installing a ClearPath IX server with multiple nodes: 1. Ensure that the factory-built customer ODB files are configured to support planned OS 2200 node HMP configurations (Appendix D). 2. Install the ClearPath IX server 2200 node, boot and run SUMMIT, and run the applicable FDDI LAN test as summarized in the CSR overview (1.2). 3. Install the operating system IOE on the first Intel node according to the instructions in the applicable operating system IOE section. During installation of the operating system or later (such as when running a tuning script in the case of UnixWare), configure the following networking information: a. The hostname and IP address that identify the node on the private interconnect (see Appendix B). b. The hostname and IP address that identify the node on the external Ethernet (TCP/IP) network at the site (see 2.2). c. The same hostnames and IP addresses as configured for the operating system must be configured for network interface cards (both FDDI and Ethernet) for the node. 4. Repeat step 3 for each subsequent Intel node until the operating system IOE has been installed on each Intel node. 7850 5104–009 Version 009B (Web Only) 1–11
- Page 1 and 2: Unisys e-@ction ClearPath Enterpris
- Page 3 and 4: Unisys e-@ction ClearPath Enterpris
- Page 5 and 6: Unisys e-@ction ClearPath Enterpris
- Page 7 and 8: Contents About This Guide .........
- Page 9 and 10: Contents 4.4. Installing and Config
- Page 11 and 12: Contents 8.4. Installing the UnixWa
- Page 13 and 14: Contents 11.6. Configuring the FTP
- Page 15 and 16: Contents 14.4. Installing DSPER ...
- Page 17 and 18: Appendix D. Configuring the FDDI In
- Page 19 and 20: Figures 1-1. ClearPath IX Server Co
- Page 21 and 22: Tables 1-1. Operating System Levels
- Page 23 and 24: Examples 14-1. A Minimum CMS 1100 C
- Page 25 and 26: About This Guide Purpose Scope This
- Page 27 and 28: How to Use This Guide About This Gu
- Page 29 and 30: About This Guide Section 15. Instal
- Page 31 and 32: About This Guide ClearPath HMP IX S
- Page 33 and 34: About This Guide This guide gives c
- Page 35 and 36: About This Guide OS 2200 Exec Syste
- Page 37 and 38: Notation Conventions About This Gui
- Page 39 and 40: Section 1 Introduction and Installa
- Page 41 and 42: Table 1-2. ClearPath IX Server Comp
- Page 43 and 44: 1.2.2. Installation Procedure Overv
- Page 45 and 46: Introduction and Installation Overv
- Page 47: • Configure a resilient 2200 node
- Page 51 and 52: Section 2 Installation Checklists a
- Page 53 and 54: Table 2-1. General Installation Inf
- Page 55 and 56: Component Windows 2000 or Windows N
- Page 57 and 58: 2.3. Installation Tips Caution Inst
- Page 59 and 60: Finding Correct UnixWare and EBRS L
- Page 61 and 62: 2.4.1. DEPCON Workstation Requireme
- Page 63 and 64: Caution Installation Checklists and
- Page 65 and 66: Installation Checklists and Tips 3.
- Page 67 and 68: Section 3 Installing Windows 2000 A
- Page 69 and 70: Installing Windows 2000 Advanced Se
- Page 71 and 72: Installing Windows 2000 Advanced Se
- Page 73 and 74: Installing Windows 2000 Advanced Se
- Page 75 and 76: Installing Windows 2000 Advanced Se
- Page 77 and 78: Installing Windows 2000 Advanced Se
- Page 79 and 80: Installing Windows 2000 Advanced Se
- Page 81 and 82: Installing Windows 2000 Advanced Se
- Page 83 and 84: Installing Windows 2000 Advanced Se
- Page 85 and 86: Installing Windows 2000 Advanced Se
- Page 87 and 88: Installing Windows 2000 Advanced Se
- Page 89 and 90: Installing Windows 2000 Advanced Se
- Page 91 and 92: Installing Windows 2000 Advanced Se
- Page 93 and 94: Installing Windows 2000 Advanced Se
- Page 95 and 96: Section 4 Installing Windows NT Ser
- Page 97 and 98: Installing Windows NT Server, Enter
External<br />
Communications<br />
Interface<br />
OS 2200 Node 1<br />
2200 System<br />
Application 1<br />
OS 2200 Node 2<br />
2200 System<br />
Application 2<br />
Partitioned 2200 System<br />
Introduction <strong>and</strong> <strong>Installation</strong> Overview<br />
Private<br />
Interconnect<br />
External<br />
Communications<br />
Interface<br />
Intel Node Client<br />
Application<br />
Intel Node Operating System<br />
Intel Node Client<br />
Application<br />
Intel Node Operating System<br />
Figure 1–4. Multiple OS 2200 Nodes with Multiple Intel Nodes<br />
Follow these steps when installing a <strong>ClearPath</strong> <strong>IX</strong> server with multiple nodes:<br />
1. Ensure that the factory-built customer ODB files are configured to support planned OS<br />
2200 node HMP configurations (Appendix D).<br />
2. Install the <strong>ClearPath</strong> <strong>IX</strong> server 2200 node, boot <strong>and</strong> run SUMMIT, <strong>and</strong> run the<br />
applicable FDDI LAN test as summarized in the CSR overview (1.2).<br />
3. Install the operating system IOE on the first Intel node according to the instructions in<br />
the applicable operating system IOE section. During installation of the operating<br />
system or later (such as when running a tuning script in the case of UnixWare),<br />
configure the following networking information:<br />
a. The hostname <strong>and</strong> IP address that identify the node on the private interconnect<br />
(see Appendix B).<br />
b. The hostname <strong>and</strong> IP address that identify the node on the external Ethernet<br />
(TCP/IP) network at the site (see 2.2).<br />
c. The same hostnames <strong>and</strong> IP addresses as configured for the operating system<br />
must be configured for network interface cards (both FDDI <strong>and</strong> Ethernet) for the<br />
node.<br />
4. Repeat step 3 for each subsequent Intel node until the operating system IOE has been<br />
installed on each Intel node.<br />
7850 5104–009 Version 009B (Web Only) 1–11


