Designing forms for auto field detection in Adobe ... - Adobe Blogs
Designing forms for auto field detection in Adobe ... - Adobe Blogs
Designing forms for auto field detection in Adobe ... - Adobe Blogs

You also want an ePaper? Increase the reach of your titles
YUMPU automatically turns print PDFs into web optimized ePapers that Google loves.
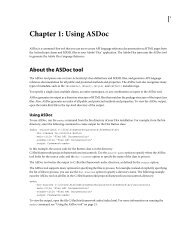
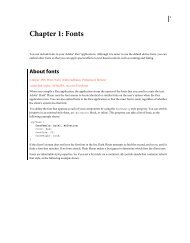
Object Design considerations<br />
Underl<strong>in</strong>e<br />
First Name Last Name<br />
• Do not place dashes or slashes on top of the underl<strong>in</strong>es,<br />
-------------------------------------------------------------------<strong>for</strong><br />
example:<br />
First Name Last Name<br />
.................................................................................<br />
Name:<br />
First Name Last Name<br />
Text box<br />
Check box<br />
High School Diploma<br />
Trade Certificate<br />
Associate’s Degree<br />
Bachelor’s Degree<br />
Master’s Degree<br />
Professional Degree<br />
Radio button<br />
Group label<br />
Salutation<br />
Mr<br />
Mrs<br />
Ms<br />
Miss<br />
Dr<br />
Signature area<br />
Signature<br />
Group label<br />
• Use a solid, dashed, dotted, or dash-dot pattern <strong>for</strong> underl<strong>in</strong>es.<br />
You can create them with graphic l<strong>in</strong>es, underscores, dashes, or<br />
dot characters.<br />
• To create multiple <strong>field</strong>s from a s<strong>in</strong>gle underl<strong>in</strong>e, place text labels<br />
underneath that are well separated.<br />
• Put text labels to the left of or below underl<strong>in</strong>es, without lett<strong>in</strong>g<br />
them touch the underl<strong>in</strong>es; they will be used to create the<br />
<strong>field</strong> names.<br />
• Do not use drop shadows or decorative flourishes. Use fills <strong>in</strong>stead<br />
of wide strokes.<br />
• Make sure text boxes do not touch other graphical elements <strong>in</strong><br />
the <strong>for</strong>m.<br />
• Watch po<strong>in</strong>t sizes <strong>in</strong> your designs; the text <strong>field</strong> height is<br />
determ<strong>in</strong>ed by adjacent objects, up to 36 po<strong>in</strong>ts. A multil<strong>in</strong>e text<br />
<strong>field</strong> will be created if the text box area is taller than 36 po<strong>in</strong>ts.<br />
• Put text labels <strong>in</strong> the text box or to the left of or above the box;<br />
they will be used to create the <strong>field</strong> names. For side-by-side<br />
boxes, the text label must be <strong>in</strong> the left box with an empty box<br />
to the right.<br />
• Use stroked square-, circular-, or diamond-shaped objects to<br />
designate check boxes.<br />
• Make graphic objects symmetrical and uni<strong>for</strong>m <strong>in</strong> appearance.<br />
• You can use special characters from fonts such as Symbol, Zapf<br />
D<strong>in</strong>gbats, W<strong>in</strong>gd<strong>in</strong>gs, and Webd<strong>in</strong>gs.<br />
• Put text labels to the right of check box objects; they will be used to<br />
create the <strong>field</strong> names.<br />
• Use circular objects or numbered buttons to <strong>in</strong> a s<strong>in</strong>gle row or<br />
column to <strong>in</strong>dicate radio buttons.<br />
• Use group labels to the left of or above each radio button<br />
group—otherwise they will default to check boxes. Field names<br />
are determ<strong>in</strong>ed from the group labels and <strong>in</strong>dividual button<br />
labels from the text to the right of each button.<br />
• Use the follow<strong>in</strong>g text labels to have radio buttons created<br />
<strong>auto</strong>matically: Yes/No, M/F, Male/Female, Jr/Sr, Mr/Mrs/Ms/<br />
Miss/Dr.<br />
• Use one of the follow<strong>in</strong>g group labels to have radio buttons created<br />
<strong>auto</strong>matically: Salutation, Sex, Occupation.<br />
• Place the word Signature adjacent to an underl<strong>in</strong>e or text box to<br />
have a signature <strong>field</strong> created.<br />
4