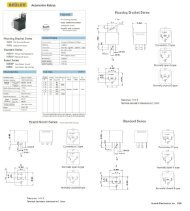
RS505 Operation Instruction
RS505 Installation Instruction Manual
RS505 Installation Instruction Manual

Create successful ePaper yourself
Turn your PDF publications into a flip-book with our unique Google optimized e-Paper software.
INSTALLATION INSTRUCTIONS v2.0 PART # <strong>RS505</strong><br />
WIRELSS KEYPAD TYPE KEYLESS ENTRY<br />
CODE LEARNING => FOR FOUR BUTTON TRANSMITTER (Optional Item - RS500TX)<br />
* To replace lost or stolen transmitters. Please have all desired transmitter ready and follow the steps below<br />
1.0 Put the DIP SWITCH 1 to ON (UP) position. The parking light will flash TWICE to indicate the module<br />
is in code learning mode.<br />
2.0 Press and hold for 2 seconds any button on the transmitter. The parking lights will flash FOUR times to confirm<br />
the NEW transmitter has been learned<br />
3.0 Put the DIP SWITCH 1 to OFF (DOWN) position to exit the code-learning mode.<br />
Note 1 : All Keypad LEDs must remain Illuminated during each step of the Code Learning<br />
or Pin Code Changing Procedures<br />
CODE LEARNING FOR REPLACEMENT KEYPAD TRANSMITTER (Will Only Accept One Keypad)<br />
* The Key Pad That Comes with The System Is Already Coded<br />
To replace a lost or stolen transmitter please have the NEW keypad ready and follow the steps below.<br />
(Each Keypad Has Its Own 4-Digit Code Number. Make Sure You Have The 4-Digit<br />
Code Numbers Ready Before You Begin The Code Learning Process)<br />
1.0 Put the DIP SWITCH 1 to ON (UP) position. The parking light will flash TWICE to indicate the module<br />
is in code learning mode (Reference Note 1)<br />
2.0 Enter the 4-digit code then press 3/4 button on the keypad. The parking light will flash FOUR times to confirm<br />
the NEW code has been learned. If the parking light does not flash after inputting, the 4-digit code and press the<br />
3/4 button. These means the NEW code has not been learned. Please double check the codes and try again.<br />
3.0 After the NEW code has been learned into the system. Put the DIP SWITCH 1 on main module to OFF<br />
(DOWN) position to exit the code-learning mode.<br />
CHANGE THE PIN CODE :<br />
1.0 Put the DIP SWITCH 1 to ON (UP) position. The parking light will flash TWICE to indicate the module<br />
is in code learning mode (Reference Note 1)<br />
2.0 Press and hold the button 9/0 on the keypad for 3 seconds. The LED on button 9/0 will flash THREE times<br />
and back ground light will flash TWICE very quickly to confirm the module is now in code-learning mode.<br />
3.0 Enter the OLD 4 digit user code, in the last digit press and hold for 2 second. If the OLD user code is correct,<br />
the LED light and background light on button 9/0 will flash ONCE. If the LED light and background light on<br />
9/0 flash TWICE to indicate the old user code is incorrect and will exit the code-learning mode.<br />
4.0 Please repeat the steps above and try again.<br />
5.0 Note : New PIN codes cannot end with a 0 or 9 number.<br />
Enter the NEW PIN code (3-7 digits), hold down the last digit for 2-seconds. If the NEW PIN code is accepted<br />
the LED light and background light on button 9/0 will flash ONCE to indicate the NEW PIN code is learned.<br />
6.0 Repeat Step 5 again. After the 9/0 flashes once it will turn OFF to indicate the NEW PIN code was learned.<br />
7.0 If the NEW PIN code is NOT accepting. Please repeats Steps 1 - 5 and try again.<br />
8.0 After the NEW PIN code has been accepted into the system. Please write down the NEW PIN code and keep it<br />
in a safe place. If the NEW PIN code is lost there is NO-WAY to retrieve the new pin code your entered.<br />
2021.11.16<br />
Accele Electronics Tech Support : 800.788.1210 ext. 170 Page 1
INSTALLATION INSTRUCTIONS v2.0 PART # <strong>RS505</strong><br />
OPERATION MODE (With Keypad <strong>Operation</strong>)<br />
1.0 Enter the 4-digit PIN code then press button 1/2 on the keypad momentarily. The module will send<br />
a signal to UNLOCK all the doors. The parking light will flash TWICE to confirm the operation.<br />
2.0 Enter the 4-digit PIN code then press button 3/4 on the keypad momentarily. The module will send<br />
a signal to LOCK all the doors. The parking light will flash ONCE to confirm the operation.<br />
3.0 (A) Enter the 4-digit PIN code then press button 5/6 on the keypad momentarily. The module will send<br />
a negative signal to the YELLOW / BLACK wire on the harness to control an external relay<br />
(B) Enter the 4-digit PIN code then press and hold button 5/6 on the keypad momentarily. The module will<br />
send a continuous a negative signal to the YELLOW / BLACK wire on the harness to control an external relay<br />
* THE SIGNAL WILL BE CONTINUOUS AS LONG AS THE BUTTON 5/6 IS PRESSED AND<br />
HELD DOWN<br />
(C) Enter the 4-digit PIN code then press button 5/6 on the keypad momentarily. The module will send<br />
a LATCHED negative signal to the YELLOW / BLACK wire on the harness to control an external relay. This signal<br />
will stay LATCHED until you enter the 4-digit PIN code, then press button 5/6 again to tun this signal OFF.<br />
* THE DIP SWITCH #3 MUST BE SET TO ON (UP) POSITION TO SELECT THIS OPERATION<br />
FUNCTION<br />
* WARNING : IF THIS OPERATION MODE IS SELECTED. MAKE SURE THIS CHANNEL IS<br />
TURNED OFF BEFORE LEAVING THE VEHICLE. FAILURE TO TURN OFF THIS FEATURE<br />
WILL RESULT IN A DEAD BATTERY UPON RETURN TO YOUR VEHICLE.<br />
4.0 (A) Enter the 4-digit PIN code then press button 7/8 on the keypad momentarily. The module will send<br />
a negative signal to the PURPLE wire on the harness to POP the trunk open or to control an external relay.<br />
* ONLY IF THIS OPTION IS SELECTED. SOME VEHICLES MAY REQUIRE EXTRA PARTS<br />
AND ALBOR. PLEASE SEE YOUR DEALER FOR DETAIL.<br />
(B) Enter the 4-digit PIN code then press and hold button 7/8 on the keypad. The module will<br />
send a continuous a negative signal to the PURPLE wire on the harness to control an external relay<br />
* THE SIGNAL WILL BE CONTINUOUS AS LONG AS THE BUTTON 7/8 IS PRESSED AND<br />
HELD DOWN<br />
(C) Enter the 4-digit PIN code then press button 7/8 on the keypad momentarily. The module will send<br />
a LATCHED negative signal to the PURPLE wire on the harness to control an external relay. This signal<br />
will stay LATCHED until you enter the 4-digit PIN code, then press button 7/8 again to tun this signal OFF.<br />
* THE DIP SWITCH #4 MUST BE SET TO ON (UP) POSITION TO SELECT THIS OPERATION<br />
FUNCTION<br />
* WARNING : IF THIS OPERATION MODE IS SELECTED. MAKE SURE THIS CHANNEL IS<br />
TURNED OFF BEFORE LEAVING THE VEHICLE. FAILURE TO TURN OFF THIS FEATURE<br />
WILL RESULT IN A DEAD BATTERY UPON RETURN TO YOUR VEHICLE.<br />
2021.11.16<br />
Accele Electronics Tech Support : 800.788.1210 ext. 170 Page 2
INSTALLATION INSTRUCTIONS v2.0 PART # <strong>RS505</strong><br />
OPERATION MODE (With Four Buttons Remote Control)<br />
1.0 Press button #1 on the remote (LOCK SYMBOL) momentarily. The module will send a signal to<br />
LOCK all the doors. The parking light will flash ONCE to confirm the operation<br />
2.0 Press button #2 on the remote (UNLOCK SYMBOL) momentarily. The module will send a negative to<br />
UNLOCK all the doors. The parking light will flash TWICE to confirm the operation.<br />
3.0 (A) Press button #3 on the remote (TRUNK SYMBOL) momentarily. The module will send a negative<br />
signal to the PURPLE wire on the harness to pop the trunk open or to control an external relay.<br />
* ONLY IF THIS OPTION IS SELECTED, SOME VEHICLES MAY REQUIRE EXTRA PARTS<br />
AND LABOR. PLEASE SEE YOUR DEALER FOR DETAILS<br />
(B) Press and hold the button #3 on the remote. The module will send a continuous negative signal to<br />
the PURPLE wire on the harness to control an external relay.<br />
* THE SIGNAL WILL BE CONTINUOUS AS LONG AS THE BUTTON IS HELD DOWN.<br />
* THIS FEATURE IS NOT RECOMMENED FOR TRUNK POP OPERATION<br />
(C) Press button #3 on the remote (TRUNK SYMBOL) momentarily. The module will send a LATCHED<br />
negative signal to the PURPLE wire on the harness to control an external Relay. This signal will<br />
stay LATCHED until you press button #3 on the remote again to turn it OFF.<br />
* THE DIP SWITCH #4 MUST BE SET TO ON (UP) POSITION TO SELECT THIS OPERATION<br />
FUNCTION<br />
* WARNING : IF THIS OPERATION MODE IS SELECTED. MAKE SURE THIS CHANNEL IS<br />
TURNED OFF BEFORE LEAVING THE VEHICLE. FAILURE TO TURN OFF THIS FEATURE<br />
WILL RESULT IN A DEAD BATTERY UPON RETURN TO YOUR VEHICLE.<br />
4.0 (A) Press the button "*" on the remote momentarily. The module will send a negative signal to the<br />
YELLOW / BLACK wire on the harness to control an external relay.<br />
(B) Press and hold button "*" on the remote. The module will send a continuous negative signal to the<br />
YELLOW / BLACK wire on the harness to control an external relay.<br />
* THE SIGNAL WILL BE CONTINUOUS AS LONG AS THE BUTTON IS HELD DOWN<br />
(C) Press THE button "*" ON THE REMOTE MOMENTARILY. The module will send a LATCHED negatrive<br />
signal to YELLOW / BLACK wire on the harness to control an external relay.<br />
* THE DIP SWITCH #3 MUST BE SET TO ON (UP) POSITION TO SELECT THIS OPERATION<br />
FUNCTION<br />
* WARNING : IF THIS OPERATION MODE IS SELECTED. MAKE SURE THIS CHANNEL IS<br />
TURNED OFF BEFORE LEAVING THE VEHICLE. FAILURE TO TURN OFF THIS FEATURE<br />
WILL RESULT IN A DEAD BATTERY UPON RETURN TO YOUR VEHICLE.<br />
TO PROGRAM SINGLE OR DOUBLE PULSE DOOR UNLOC<br />
1.0 Flip the dip switch #1 ON, OFF, ON, OFF, ON, Off, ON, Off, ON, Off, ON, OFF, and back ON<br />
("ON" should be cycled 7 times) within 3-seconds<br />
2.0 The parking light will flash 3 times to confirm the module has been changes to double unlock pulse.<br />
If the parking light flash 1 time ONLY. Repeat step 1 again to program for double pulse unlocks pulse.<br />
3.0 Flip the dip switch #1 back to OFF mode to exit the programming mode.<br />
2021.11.16<br />
Accele Electronics Tech Support : 800.788.1210 ext. 170 Page 3