Pro Photo West Summer 2021
Professional Photographers of California Pro Photo West Magazine Summer 2021 Edition
Professional Photographers of California Pro Photo West Magazine Summer 2021 Edition

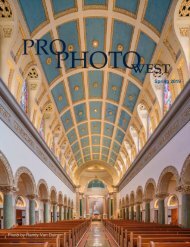
Create successful ePaper yourself
Turn your PDF publications into a flip-book with our unique Google optimized e-Paper software.
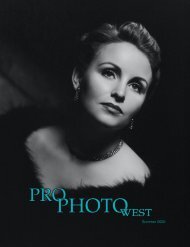
<strong>Summer</strong> <strong>2021</strong><br />
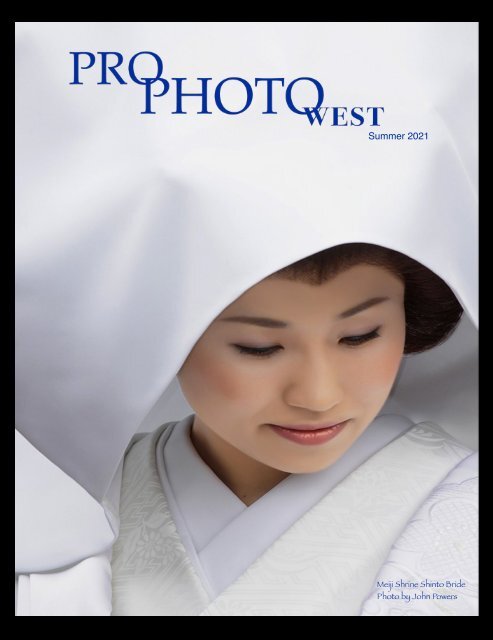
Meiji Shrine Shinto Bride<br />
<strong>Photo</strong> by John Powers
From the Editor<br />
Welcome to the <strong>Summer</strong> <strong>2021</strong> Edition of <strong>Pro</strong> <strong>Photo</strong> <strong>West</strong> Magazine!<br />
In this issue, we continue, the “Large Format” article from Roger Daines, this is part 2 of<br />
3. From the Smoker features “Smoked Duck” and John Powers takes us to Tokyo to<br />
coincide with the <strong>Summer</strong> Olympic Games! Also Michael Collins continues his<br />
“<strong>Photo</strong>shop - Zero To 60” series.<br />
This year is quickly winding down and we will have one more issue before we start 2022.<br />
If you have any ideas or want to share some of your work and write about it, please do<br />
so. We would love to publish your work. Your article needs to be in a Word document,<br />
not a PDF or other type. Use 12 point font, single spacing and no more than 1,000 words<br />
(if you can). Any associated images must be jpegs at 4,000 pixels on the longest side at<br />
300 dpi. You can send them to: editor@ppconline.com and use wetransfer.com to send<br />
your images. wetransfer.com lets you send up to 2 gigabytes for free and that should be<br />
enough for at least 20 images.<br />
<strong>Pro</strong> <strong>Photo</strong> <strong>West</strong> Magazine is “Your” magazine and it will only be as good as the content<br />
that you send in. Please participate and help this magazine reah its full potential. It can<br />
only happen if you all help out.<br />
Until next time,<br />
Kevin<br />
ON THE COVER<br />
Waiting to marry - A Meiji Shrine Shinto Bride - Story and <strong>Photo</strong>s by<br />
John Powers<br />
2<br />
<strong>Pro</strong>fessional <strong>Photo</strong>graphers of California
A Huge Thank You to Our<br />
www.prophotoca.com<br />
Your Support is Greatly Appreciated!<br />
<strong>Summer</strong> <strong>2021</strong><br />
3
INSIDE THIS ISSUE<br />
6 Meet Your Executive Team<br />
President’s<br />
8 Message 9<br />
From the Smoker<br />
14<br />
Large Format is For Beginners 24<br />
<strong>Photo</strong>shop Zero to Sixty<br />
4<br />
<strong>Pro</strong>fessional <strong>Photo</strong>graphers of California
<strong>Summer</strong> <strong>2021</strong><br />
22<br />
Meet your Affiliates<br />
28 Travel <strong>Photo</strong>graphy Tokyo<br />
32 <strong>West</strong> Coast School<br />
www.prophotoca.com <strong>Summer</strong> <strong>2021</strong><br />
5
<strong>2021</strong> OFFICERS<br />
PRESIDENT<br />
Jim Trapp, M.<strong>Photo</strong>g.Cr, CPP,<br />
S-PPC<br />
president@ppconline.com<br />
FIRST VICE PRESIDENT<br />
Larry Skibiski, M.<strong>Photo</strong>g.Cr, CPP<br />
firstvp@ppconline.com<br />
SECOND VICE PRESIDENT<br />
Karna Roa<br />
<strong>Pro</strong>fessional <strong>Photo</strong>graphers of California, Inc. is a non-profit, 501(c)6<br />
trade association of professional photographers, employees, suppliers<br />
and others allied to the profession. <strong>Pro</strong>fessional <strong>Photo</strong>graphers of<br />
California offers a variety of opportunities and benefits to its Members and<br />
is one of the largest state affiliates of <strong>Pro</strong>fessional <strong>Photo</strong>graphers of<br />
America. <strong>Pro</strong> <strong>Photo</strong> <strong>West</strong> is the official publication of <strong>Pro</strong>fessional<br />
<strong>Photo</strong>graphers of California and is published quarterly for the purpose of<br />
keeping Members informed of photographic information, news and<br />
activities of the state. Subscription is included with Member dues.<br />
Articles, with or without photographs, are welcome for review for inclusion<br />
in this publication. However the Editor reserves the right to edit and use<br />
articles on a space-available basis. Materials will not be returned unless a<br />
postage paid envelope is provided. Letters and contributions must include<br />
Name, email and phone number. Send all communication, articles or<br />
advertising to the Editor. Articles appearing in <strong>Pro</strong> <strong>Photo</strong> <strong>West</strong> reflect the<br />
opinions of the writer. They do not necessarily represent those of the<br />
Editor or <strong>Pro</strong>fessional <strong>Photo</strong>graphers of California. Permission to reprint<br />
contents of this magazine is granted to similar photographic publications,<br />
provided the author, <strong>Pro</strong>fessional <strong>Photo</strong>graphers of California and <strong>Pro</strong><br />
<strong>Photo</strong> <strong>West</strong> are credited as the source.<br />
secondvp@ppconline.com<br />
SECRETARY<br />
Kevin Karzin<br />
secretary@ppconline.com<br />
TREASURER<br />
Robin Swanson, M.<strong>Photo</strong>g.Cr, CPP,<br />
F-PPC, S-PPC, CPA, CGMA<br />
treasurer@ppconline.com<br />
CHAIRMAN OF THE BOARD<br />
Diane Costello, M.<strong>Photo</strong>g.Cr, CPP,<br />
M-PPC, S-PPC<br />
cob@ppconline.com<br />
STAFF<br />
EXECUTIVE<br />
ADMINISTRATOR<br />
Mel Carll, M.<strong>Photo</strong>g, S-PPC<br />
exec_admin@ppconline.com<br />
DIRECTOR,<br />
WEST COAST SCHOOL<br />
Michelle Pennings, CPP<br />
director@westcoastschool.com<br />
6<br />
<strong>Pro</strong>fessional <strong>Photo</strong>graphers of California
www.prophotoca.com <strong>Summer</strong> <strong>2021</strong> 7
President’s Message<br />
July <strong>2021</strong><br />
How exciting is this new edition of our PPC Magazine – full of interesting and informative articles on our<br />
favorite subjects! I hope you enjoy these member submissions and consider offering your articles and<br />
images for future editions.<br />
As your <strong>2021</strong> president, I wanted to extend a warm thank you to our membership. You have supported this<br />
organization through a very trying year and a half, from March of 2020 to the present. You stayed active<br />
with us through a very challenging time and on behalf of your Board of Directors and myself, I would like to<br />
express our gratitude for your support. All of us who are members of PPC are stakeholders in this<br />
organization and through your continued involvement, we will succeed in providing growth, education, and<br />
inspiration to our membership.<br />
PPC would not exist if it were not for a tremendous amount of behind-the-scenes activity that involves<br />
volunteers giving their time and efforts. Volunteerism is the lifeblood of <strong>Pro</strong>fessional <strong>Photo</strong>graphers of<br />
California. Every year, we face unique challenges and every year, our membership steps up to the plate<br />
and helps out. That said, we have more challenges down the road, so as your president, I’m reaching out<br />
to you again.<br />
We have key position within our organization that we need to fill. Our first priority is finding a new Director<br />
for the 2022 sessions of our <strong>West</strong> Coast Schools. I personally wanted to say ‘thank you’ to Michelle<br />
Pennings for an outstanding job during a very difficult year. <strong>West</strong> Coast School had to remain in a virtual<br />
environment for <strong>2021</strong>, and under Michelle’s leadership, this was successful from both an instructor and<br />
student standpoint.<br />
We are also looking for an Image Competition Chairperson for 2022. If you have interest in either position,<br />
please contact Mel in the PPC office. Our California workshops have been the icing on the cake for <strong>2021</strong> in<br />
peer-to-peer education.<br />
Our best news yet is that we are moving from a virtual environment to in-person workshops, beginning with<br />
Tim Myers workshop in September, which will be held in Southern California. I look forward to celebrating<br />
the success of future workshops as the year progresses.<br />
James Trapp<br />
8<br />
<strong>Pro</strong>fessional <strong>Photo</strong>graphers of California
FROM THE SMOKER……..<br />
by Mel Carll, M.<strong>Photo</strong>g., S-PPC, BA-PPC<br />
KCBS Certified BBQ Judge<br />
Today we thought we would take our smoking up a notch. So today, we are going to smoke a couple of ducks.<br />
YES, DUCK….. Some are afraid of duck, as if it is not cooked well, can be very greasy. But using this recipe,<br />
not only is it NOT greasy, it’s also so good, you will put this in your regular rotation.<br />
The list of items needed is very small and it is SOOOO easy to make.:<br />
Duck - pat dry<br />
Salt<br />
Olive oil<br />
1/4 cup thick maple syrup<br />
salt over the entire bird. Then coat the entire duck with maple syrup.<br />
That’s it. Prep work is done. Now put the duck on your 250 degree smoker, and relax.<br />
Now, every 45 minutes, baste the duck with maple syrup, which develops the flavor and helps to crisp the skin.<br />
Continue to do this until the internal temperature reaches about 160 degrees. Once it does, pull off the smoker and<br />
place on a cutting board, tent with foil, and let rest for about 10 minutes. This lets the juices filter into the entire duck,<br />
so that when you slice, you don’t lose all that great flavor.<br />
Slice the duck and serv. We added some rice pilaf and Brussels sprouts sauted with bacon and onion as sides and<br />
paired dinner with a lovely bottle of Pinor Noir - simply perfect!<br />
So get out of your confort zone and try smoking a duck!<br />
<strong>Photo</strong>s by Kevin Karzin<br />
KCBS Certitied BBQ Judge<br />
We made two ducks, as duck doesn’t have a lot of<br />
meat and what you have is all dark meat, so keep<br />
that in mind as you plan.<br />
So while we are prepping the duck, get your<br />
smoker up to temp. We cooked the duck at 250<br />
degrees. Remember poultry takes on smoke really<br />
easy, so be careful not to use too much in the area<br />
of added smoke. Cherry or apple works great, but<br />
you decide.<br />
While the smoker is coming to temp, take the<br />
duck and make 4 or 5 slices into the skin of the<br />
duck. This allows the fat to cook out and baste the<br />
duck with flavor. HOWEVER, be careful not to cut<br />
into the meat of the duck. Next, take the duck and<br />
sprinkle plenty of salt in the cavity. Next, brush the<br />
duck with olive oil, then sprinkle a light amount of<br />
www.prophotoca.com<br />
<strong>Summer</strong> <strong>2021</strong><br />
9
Above: Prepping the duck, after piercing the skin<br />
to allow the fat to render, apply salt and maple<br />
syrup before putting it on the smoker.<br />
Right: Every 45 minutes re-apply the maple syrup<br />
as this adds flavor and helps the skin darken to a<br />
golden brown color.<br />
Above: Letting the duck rest a few minutes before<br />
carving. Right Middle: Getting ready to pull the<br />
ducks applying a little more maple syrup as the<br />
ducks finish.<br />
Along with duck we had grilled brussle sprouts and wild rice.<br />
10<br />
<strong>Pro</strong>fessional <strong>Photo</strong>graphers of California
Top Left: Use a mixture of lump<br />
charcoal and apple wood to last<br />
about 3 to 4 hours. Top Right:<br />
Starting the charcoal.<br />
Middle: Both ducks have been<br />
prepped and put into smoker when<br />
the temperature reaches around<br />
250 degrees then close and cover<br />
the smoker. Every 30 minutes<br />
baste the duck with the maple<br />
syrup until finished. Approximately<br />
3 to 3 1/2 hours.<br />
www.prophotoca.com<br />
<strong>Summer</strong> <strong>2021</strong><br />
11
12<br />
California
Workshops<br />
13
Large Format<br />
14<br />
<strong>Pro</strong>fessional <strong>Photo</strong>graphers of California
for Beginners<br />
Roger B. Daines, M. <strong>Photo</strong>g, Cr. <strong>Photo</strong>g, CPP,<br />
CaM. <strong>Photo</strong>g, API, RPS<br />
<br />
<br />
www.prophotoca.com <strong>Summer</strong> 202 15
Badwater Basin, Death Valley, California<br />
Part 2 of 3<br />
Starting With Large Format<br />
You will need to decide what LF camera you want, 4x5, 5x7, or 8x10. A lens for a 4x5 needs to have the<br />
covering power of a 5x7 camera to ensure there is no corner cut-off on the image. Most lenses will be<br />
ok. Used lenses are fine, (I purchased 2 from KEH many years ago and they’re still working fine today).<br />
The standard lens for the LF size of 4x5 is 150mm mounted on a lens board. You will need a lens<br />
spanner tool to change lenses on lens board if you only have one lens board, (my camera uses a Copal<br />
0 lens board), film holder(s), light meter (preferably with spot metering), loupe for focusing the image on<br />
the ground glass. (I like to use a 7x loupe), a cable release, dark cloth or ground glass hood, a sturdy<br />
tripod and lots of patience! I’ve added a Fresnel screen to my ground glass back as it disperses the<br />
light more evenly and makes the image brighter. Not essential, but a great help. A ground glass<br />
protector is also a good investment against scratches or other damage to the ground glass. This seems<br />
like you’ll need a Sherpa to carry everything, but my LF outfit, including the roll film and digital camera<br />
adapter, weighs 15 lbs and takes up no more than my DSLR and three zoom lenses.<br />
The Cost<br />
So, what does it cost to use a 4x5 view camera for all of this? My 4x45 equipment cost me<br />
approximately $3,200 with one lens. My D850 plus a standard lens has cost me about the same. The<br />
large difference is the cost of film, but this can be offset by not needing zoom lenses if you don’t shoot<br />
wildlife or sports. Because film is not used so much, the price has risen and it’s tougher to get all the<br />
different types. I’ve always loved using Fuji transparency film. It’s not hard to get and a lot more<br />
expensive. BUT, after some research I’ve found I can get the film from Japan, on Amazon Japan! It’s<br />
less expensive, genuine Fuji film and the postage is minimal. You can view the site in English on<br />
Amazon.Jpn. If we purchase more Fuji film, then maybe Fuji will start manufacturing and distributing in<br />
USA/UK?<br />
16<br />
<strong>Pro</strong>fessional <strong>Photo</strong>graphers of California
Film<br />
My color film of choice has always been Velvia 50, but it’s really hard to find now and very expensive, a<br />
pack of 20 sheets of 4x5 costs around $150.00, $7.50 a sheet before processing. Makes you stop and<br />
really think of the composition and exposure! But the resulting image pretty much negates all of that<br />
concern. Velvia is a great film for low contrast situations. It brings out the colors beautifully. In high<br />
contrast situations the shadows can get blocked up and the highlights get too bright. This can<br />
sometimes be seen in a sunset image.<br />
Loading Film Holders<br />
Film holders for LF cameras hold 2 sheets of film-one sheet in each side-which must be loaded in a light<br />
tight area, either a blacked out room or in a changing bag. I highly recommend you practice loading the<br />
holders with some exposed sheet film in the light; it will pay dividends when it comes to loading in the<br />
dark. If you are using a room to load film or unload exposed film, just stay in the room for 2-3 minutes<br />
and let your eyes get accustomed to the dark. This is when you will see if it is “light tight”. If it’s not,<br />
then you can seal up the areas where there are light leaks before you open the film box. Film will fog<br />
with the slightest amount of light. Changing bags are great for loading or unloading film in the field and<br />
putting the film back into the boxes. Sheet film comes in a box with three sections which allows you to<br />
have a light tight environment for the film. The film holder has a dark slide in each side and at the top of<br />
one side is a black strip; on the other side, it’s white. First thing I do with a new holder is give the white<br />
strip a number that is sequential and permanent, this way you can track your exposures. The white side<br />
also allows you to write on it the type of film you have in the holder. The white edge of the dark slide in<br />
the holder signifies it’s unexposed film, or empty. After you have exposed the film you then reverse the<br />
dark slide when you replace it. The dark slide with black edge showing tells you you have exposed film<br />
in the holder. How do you know if the holder is empty? There is only one fool-proof way and that is to<br />
pull the darkslide out! If there’s film in the white edge side, bummer, you’ve wasted a sheet of film. If<br />
there’s film in the black edge side, then start cussing, stomping up and down, throwing things ‘cause<br />
you just ruined the best image you’ve ever captured!! Pushing the darkslide back in quickly doesn’t<br />
help! Been there, done that!! When you unload film turn, the darkslide so the white strip is showing then<br />
www.prophotoca.com<br />
Navajo Octogenarian Couple<br />
<strong>Summer</strong> <strong>2021</strong><br />
17
at worst you’ll just waste a sheet of film, or leave the darkslide protruding an inch or so then you know<br />
there’s no film in the holder.<br />
Practice!<br />
My suggestion is to use an already exposed sheet of film if you have one and practice in the daylight a<br />
few times. Then practice in the dark. This will help eliminate any costly mistakes. It’s bad enough if you<br />
ruin a sheet of film before you capture an image, it’s even more frustrating to process the film and find<br />
you have ruined the perfect shot that you spent hours traveling to find, getting the perfect light and<br />
composition, only to find you loaded the film back to front or didn’t seat it correctly in the notches and<br />
you have a light leak! Been there and done that too!<br />
This will enable you to identify the film in the dark by feeling the notch. It is also important for loading<br />
into the holder with the correct orientation. Before loading, remove the darkslide and tap the holder on a<br />
hard surface a couple of times to remove any dust, clean the holder with a natural soft bristle brush to<br />
eliminate any fine dust, it’s also a good idea to use a can of air spray afterwards, but make sure there’s<br />
no damp residue. Clean the darkslide as well. Insert the darkslide part way into the holder with the<br />
white/silver side showing to inform you that it has been loaded with unexposed film. If you have<br />
removed the darkslide from the holder, you can identify the “white” side in the dark by feeling for the<br />
Braille “dimples” on the end of the strip. If you can’t feel them, then you need to turn the darkslide over<br />
before inserting it into the holder. Now’s the time to put all you need in your changing bag or darkroom.<br />
Remove a sheet of film from the box and “feel” for the notch. Open the flap on the holder and insert the<br />
film into slots either side of the holder. THE FILM NOTCH MUST BE ON THE RIGHT CORNER OF THE<br />
SHORT EDGE OF THE FILM WHEN LOADING! This will be the emulsion side of the film when you<br />
remove the darkslide for exposing. Once the film is securely in the holder, (check by trying to lift it with a<br />
finger nail, there’s a convenient hollow for your fingernail in the holder), close the flap and push the<br />
darkslide all the way in so that it locks into the flap. Indicate the type of film and ISO on the white/silver<br />
Salk Institute, San Diego, California<br />
18<br />
<strong>Pro</strong>fessional <strong>Photo</strong>graphers of California
strip edge, e.g. TMax 400, writing with a pencil. You can then erase it after you’ve unloaded the film if<br />
you are going to use a different emulsion. Repeat for the other side of the holder, then use the clips to<br />
lock the dark slides. For further protection after I’ve loaded the holders, I place a piece of artist tape<br />
over the top. This is triple protection from accidentally exposing film. For unloading the exposed film,<br />
remove the dark slides, open the flap at the bottom, lift the film box ready to receive the film. When you<br />
opened the box and removed the film, it was in a cardboard folder inside the plastic/paper pouch. Place<br />
the film in the folder, one at a time as you unload it with the same orientation, notches on the right side.<br />
This will minimize any scratching of the emulsion. Put it back in the pouch, place the pouch in the<br />
smallest section of the box, then cover it with the medium section and finally place the large top on the<br />
box. You now have a light tight environment ready to ship the film for processing or doing it yourself.<br />
DON’T MIX DIFFERENT TYPES OF FILM IN THE BOX! Write on the box EXPOSED FILM, the type of<br />
film, and how many sheets are in the box. Once you’ve exposed more film and processed it, you will<br />
accumulate boxes. This is a good thing!<br />
Exposure<br />
Transparency film is best exposed for the highlights. It favors slight underexposure and black and white<br />
film for the shadows as it tolerates some overexposure. You want detail in the highlights with<br />
transparency film and detail in the shadows for black and white. I use the Zone system to establish the<br />
exposure I need when on location, especially for landscapes.<br />
Metering<br />
Accurate metering is very important; for example, Valvia 50 has only just over 4 stops of latitude. This is<br />
when using the Zone system is important. The Zone system is broken up into 10 zones where zone 0 is<br />
black without any detail and zone 10 is white with no detail. Zone 5 is the mid tone. Velvia is best<br />
exposed between zones 3 to 7 to capture as much detail as possible. Spot metering of the scene is<br />
important to ensure you capture as much information as the film will record. This necessitates metering<br />
all the areas in the image and averaging the exposure to stay within a 4 to 5 stop range. If you are using<br />
E6 film, C41 and black and white emulsions have wider latitude.<br />
For black and white, I like to use TMax or Ilford HP5+ (why didn’t they just label it HP6?) or HP4. All<br />
have excellent density and crisp blacks and whites. Black and white film is more forgiving and can be<br />
exposed with a 7 stop range. Zone system metering takes a little practice, but if you have a spot meter<br />
that can save the different readings, it will render an average exposure as a starting point.<br />
Exposure Factor (bellows extension)<br />
If you are photographing an object, perhaps in the studio at life size, (a magnification of x1) you will be<br />
extending the bellows and need to calculate the new f/stop required to get a correct exposure as light<br />
from the lens to the film plane needs to travel further (inverse square law). If you are using a 150mm<br />
lens, it will focus on infinity at 150mm. For close up work you might need to extend the bellows to twice<br />
that length, 300mm. First you will need to make sure your bellows can extend that length on the rail,<br />
most field cameras will only extend to just over 300mm. A rule of thumb is that bellows extension that is<br />
twice the focal length of the lens you are using will need an exposure increase of 2 stops. For the<br />
photographers who just love the mathematics the formula is {magnification +1}2. So 1+1=2, 2 squared<br />
(2x2) = 4. That will be the exposure factor. So if the meter calls for a 2 second exposure at f/16 the<br />
new exposure would be 2 seconds x4 (the exposure factor), 8 seconds, or a 2 f/stop increase if the<br />
depth of field is ok, f/5.6.<br />
Don’t worry; there is an app for that! Why are these calculations important? In the “good ole days?”<br />
www.prophotoca.com <strong>Summer</strong> <strong>2021</strong> 19
that length, 300mm. First you will need to make sure your bellows can extend that length on the rail, most<br />
field cameras will only extend to just over 300mm. A rule of thumb is that bellows extension that is twice<br />
the focal length of the lens you are using will need an exposure increase of 2 stops. For the photographers<br />
who just love the mathematics the formula is {magnification +1}2. So 1+1=2, 2 squared (2x2) = 4. That will<br />
be the exposure factor. So if the meter calls for a 2 second exposure at f/16 the new exposure would be 2<br />
seconds x4 (the exposure factor), 8 seconds, or a 2 f/stop increase if the depth of field is ok, f/5.6.<br />
Demon Tree<br />
Don’t worry; there is an app for that! Why are these calculations important? In the “good old days” we<br />
had Polaorids to use to check the composition, sharpness and exposure before committing to using film.<br />
Alas, Polaroids is no longer available, so to ensure we don’t waste film it’s necessary to do the<br />
computations or use an app. There is a new “Polaroid” on the market, made by a new company. It’s called<br />
“NEW F/N 55”. The film is a positive/negative which you peel apart after the processing. I’ve watched a<br />
few videos on this film on You Tube and am not really impressed with the results; it probably needs some<br />
more developing (no pun intended). The film is not inexpensive either, about $15 a sheet!<br />
See the Fall <strong>2021</strong> issue to complete the article!<br />
20<br />
<strong>Pro</strong>fessional <strong>Photo</strong>graphers of California
Splash!<br />
Ankor Wat, Cambodia<br />
www.prophotoca.com <strong>Summer</strong> <strong>2021</strong> 21
A F F I L I A T E S H I G H L I G H T S<br />
CIPPA - Channel Islands <strong>Pro</strong>fessional <strong>Photo</strong>graphers<br />
Larry Skibiski<br />
President<br />
www.cippa.org<br />
Michael Mercadante<br />
Vice President<br />
GCPPA - Gold Coast <strong>Pro</strong>fessional <strong>Photo</strong>graphers<br />
Sandra Cortez Nancy Snyder<br />
President<br />
Vice President<br />
cortezphotography805@gmail.com<br />
IEPPV - Inland Empire <strong>Pro</strong>fessional <strong>Photo</strong>graphers<br />
David Schulman<br />
President<br />
ieppv.com<br />
Kim Shapiro<br />
Vice President<br />
PPLAC - <strong>Pro</strong>fessional <strong>Photo</strong>graphers of Los Angeles County<br />
Eleanor Gray<br />
President<br />
pplac.org<br />
John Powers<br />
Vice President<br />
PPWC - <strong>Pro</strong>fessional <strong>Photo</strong>graphers of Wine Country<br />
Karna Roa.<br />
President<br />
ppwc-online.org<br />
Norah Burrows<br />
Vice President<br />
22<br />
<strong>Pro</strong>fessional <strong>Photo</strong>graphers of California
PPOC - <strong>Pro</strong>fessional <strong>Photo</strong>graphers of Orange County<br />
John Aranas<br />
President<br />
ppoc.org<br />
Ana Montgomery<br />
1st Vice President<br />
PPSDC - <strong>Pro</strong>fessional <strong>Photo</strong>graphers of San Diego County<br />
Janet Bark<br />
President<br />
ppsdc.com<br />
Yaneck Wasiek<br />
Vice President<br />
PPSV - <strong>Pro</strong>fessional <strong>Photo</strong>graphers of Sacramento Valley<br />
Suzanne Hambleton<br />
President<br />
ppsv.org<br />
Kimberly Olker<br />
Vice President<br />
PPSCV - <strong>Pro</strong>fessional <strong>Photo</strong>graphers of Santa Clara Valley<br />
Roberto Gonzalez<br />
President<br />
John Gayler<br />
Vice President<br />
https://www.ppscv.net<br />
www.prophotoca.com<br />
<strong>Summer</strong> <strong>2021</strong><br />
23
<strong>Photo</strong>shop Zero to Sixty<br />
Michael Collins, M. <strong>Photo</strong>g., CR., CPP, M-PPC,<br />
S-PPC, BA-PPC, F-PPC<br />
<strong>Photo</strong>shop has 27 different layer blend modes available to change the color or luminance of the layers you are<br />
working on. They are broken down into 6 different groups (Normal, Darken, Lighten, Mid-tones, Contrast,<br />
Comparative and Composite Modes). Although each group of modes has anywhere from 2 to 7 different options/<br />
modes, I will only talk about one or two in each group as those are the main ones I use. Although I am only touching<br />
on a few of these, please play with the others and see what they will do.<br />
The first group of Blend Modes are the “Normal” modes (the ones at the top above the first dividing line) that<br />
contain two blend modes: Normal, Dissolve<br />
Normal<br />
This is the default mode. Pixels don’t blend. Results are as expected – the contents of a layer are displayed without<br />
any blending. A photo will appear as the original or, if you paint with a color, the result color is the color that you<br />
chose. In other words, everything is normal.<br />
The second group of Blend Modes are the darken modes: (Darken, Multiply, Color Burn, Linear Burn and Darker<br />
Color)<br />
Multiply<br />
Looks at the color information in each channel and multiplies (darkens) the base color by the blend color. The result<br />
color is always a darker color. Multiplying any color with black produces black. Multiplying any color with white<br />
leaves the color unchanged. When you’re painting with a color other than black or white, successive strokes with a<br />
painting tool produce progressively darker colors. The effect is similar to drawing on the image with multiple<br />
marking pens.<br />
The third group of Blend Modes are the lighter modes:<br />
(Lighten, Screen, Color Dodge, Linear Dodges and<br />
Lighter Color).<br />
Screen<br />
Looks at each channel’s color information and multiplies<br />
the inverse of the blend and base colors. The result color is<br />
always a lighter color. Screening with black leaves the<br />
color unchanged. Screening with white produces white.<br />
The effect is similar to projecting multiple photographic<br />
slides on top of each other.<br />
Multiply<br />
Screen<br />
24<br />
<strong>Pro</strong>fessional <strong>Photo</strong>graphers of California
The fourth group of Blend Modes work with the mid-tones. They have a neutral color of 50% gray. (Overlay, Soft<br />
Light, Hard Light, Vivid Light and Linear Light).<br />
Overlay<br />
Multiplies or screens the colors, depending on the base color. Patterns or colors overlay the existing pixels while<br />
preserving the highlights and shadows of the base color. The base color is not replaced, but mixed with the blend<br />
color to reflect the lightness or darkness of the original color.<br />
Soft Light<br />
If the blend color (light source) is lighter than 50% gray, the pixels are lightened as if they were dodged. If the blend<br />
color is darker than 50% gray, the pixels are darkened as if they were burned in. Painting with pure black or white<br />
produces a distinctly darker or lighter area, but does not result in pure black or white.<br />
Soft Light<br />
www.prophotoca.com<br />
<strong>Summer</strong> <strong>2021</strong><br />
25
26<br />
<strong>Pro</strong>fessional <strong>Photo</strong>graphers of California
The fifth group of Blend Modes are “Comparative” and have a neutral color of black. This means that black as a<br />
blend color will have no effect on the result color. The Divide blend mode has a Neutral color of white. (They are<br />
Difference, Exclusion, Subtract and Divide)<br />
Difference<br />
Looks at the color information in each channel and subtracts either the blend color from the base color or the base<br />
color from the blend color, depending on which has the greater brightness value. Difference is great for comparing<br />
layers when doing head swap or eye swaps. By placing the layer you want to line up on top and changing it to the<br />
Difference mode, and have the layers lined up the result is a black layer. If the layers are not lined up you can see<br />
where the “difference” is in almost psychedelic colors.<br />
The sixth group of Blend Modes have no<br />
neutral colors. They work in a hue, saturation,<br />
luminance space.<br />
Color<br />
Creates a result color with the luminance of the<br />
base color and the hue and saturation of the<br />
blend color. This preserves the gray levels in<br />
the image and is useful for coloring<br />
monochrome images and for tinting color<br />
images. Said more simply you can change the<br />
color of what you are painting with without<br />
changing the luminance (light/dark). So you<br />
can keep shadows and highlights and change<br />
the color. This mode is great for painting black<br />
and white images. HOWEVER – you<br />
CANNOT paint on pure black or pure white<br />
even on a color image.<br />
Difference<br />
NOTE:<br />
Only the Normal, Dissolve, Darken, Multiply, Lighten, Linear Dodge (Add), Difference, Hue, Saturation, Color,<br />
Luminosity, Lighter Color, and Darker Color blending modes are available for 32bit images.<br />
Michael will be returning to teach a weeklong <strong>Photo</strong>shop - Zero to Sixty in a Week class at <strong>West</strong> Coast School, June<br />
5-10, 2022. You can sign up at http://www.westcoastschool.com. Students at ALL levels will learn in this class. Sign<br />
up today.<br />
www.prophotoca.com<br />
<strong>Summer</strong> <strong>2021</strong><br />
27
Tokyo<br />
By John Powers<br />
The largest metropolis in the world is Tokyo, with over 37 million people contained within its boundaries.<br />
According to Wikipedia (“I read it on the internet so it must be true!”), that makes Tokyo the largest<br />
populous in the world! More people are amassed in this one area than anywhere else on earth with Dehli<br />
being a distant second with 28 million people. Okay, you didn’t come here to read a geography lesson.<br />
But you need to know this fact so that when I say that the photo opportunities in Tokyo are incredible,<br />
you understand that it is not an exaggeration!<br />
There are a myriad of books dedicated to Tokyo, chock full of wonderous photographs from all the iconic<br />
and traditional sites one comes to expect. So, I won’t bore you by displaying my copies of those images,<br />
too. What I would like to share are some of the sites that people normally don’t see, a behind-thescenes<br />
look at life in Tokyo. When the borders open up once again for travel (hopefully later in the year), if<br />
you make your way there, please keep these images in mind and create some photographs that will be<br />
both unique and personal for you. Here are just a few suggestions:<br />
Sunday afternoons I love to go to Yoyogi Park in downtown Tokyo. Around 2 PM every Sunday (it’s like<br />
clockwork!), anywhere from half a dozen to a dozen young “rockabillies” gather to dance to the sound of<br />
50s rock and roll. They are attired in their black leather jackets and jeans, pompadour hairdos, and a<br />
swagger right out of Marlon Brando’s “The Wild Ones.” They look tough, they look mean, but they are<br />
truly kind and polite. They don’t mind you taking their photos as they dance, just don’t invade their<br />
space. Be respectful. And I can guarantee, you will get some amazing photos that you just won’t see<br />
anywhere else! I could do a whole series just on the images I have captured on those Sunday<br />
afternoons.<br />
28<br />
Nearby Yoyogi Park is<br />
Meiji Shrine, the largest<br />
and most venerated<br />
Shinto shrine in all of<br />
Tokyo. Be sure to stop<br />
by there any time on<br />
either Saturday or<br />
Sunday. It is the perfect<br />
place to photograph the<br />
processional of a Shinto<br />
wedding. You can get<br />
some great photos of<br />
Shinto brides in all their<br />
regalia and the wedding<br />
parties all dressed up<br />
for this special<br />
occasion. Again, keep<br />
a respectful distance<br />
but take all the photos<br />
you like.<br />
One of the rockabillies with an exaggerated pompadour hairdo.<br />
<strong>Pro</strong>fessional <strong>Photo</strong>graphers of California
Above: Two of the rockabilies taking a break from their dancing. Below Left: Even a few of the young<br />
ladies don the attire of the rockabilities, certainly bringing a more glamorous look with it.<br />
Another venture: many people talk about it but few make their<br />
way to an actual sumo tournament. Go! The seating is<br />
cramped, the lighting is dark, but there are always strong lights<br />
above the dohyo (where the actual matches take place) so you<br />
can get some powerful photos. Yes, you are allowed to bring in<br />
your camera and take all the photos you want … but only from<br />
your seat. It’s not like a baseball game where you can get up,<br />
move to an aisle or move down closer for a shot. You must stay<br />
seated. But, with a telephoto lens and a wide or large aperture<br />
(f/2.8 in my case) you can get some great photos. I try to keep<br />
my ISO as low as possible but you can adjust it accordingly<br />
when you are there; remember, you need to be fast enough to<br />
capture the quick moves and sorry, no tripods allowed!<br />
John Powers, M.<strong>Photo</strong>g., CPP<br />
www.prophotoca.com <strong>Summer</strong> <strong>2021</strong> 29
Above: A Shinto bride contemplates as she<br />
waits for the wedding ceremony to begin.<br />
Right: A close up of a Shinto bride with the<br />
all-white hood called the wataboshi.<br />
Another venture: many people talk<br />
about it but few make their way to an<br />
actual sumo tournament. Go! The<br />
seating is cramped, the lighting is<br />
dark, but there are always strong<br />
lights above the dohyo (where the<br />
actual matches take place) so you<br />
can get some powerful photos. Yes,<br />
you are allowed to bring in your<br />
camera and take all the photos you<br />
want … but only from your seat. It’s<br />
not like a baseball game where you<br />
can get up, move to an aisle or move<br />
down closer for a shot. You must<br />
stay seated. But, with a telephoto<br />
lens and a wide or large aperture (f/<br />
2.8 in my case) you can get some<br />
great photos. I try to keep my ISO<br />
as low as possible but you can<br />
adjust it accordingly when you are<br />
there; remember, you need to be fast<br />
enough to capture the quick moves<br />
and sorry, no tripods allowed!<br />
30<br />
Tokyo Sumo Ryoguku Kokugikan - Each sumo bout happens so quickly, on average lasting less than six seconds. Blink and you can miss it!<br />
<strong>Pro</strong>fessional <strong>Photo</strong>graphers of California
I love randomly walking around various neighborhoods in the middle of the afternoon. I know, the sun is<br />
up high and this is normally not the best lighting when photographing outdoors. However, it is the prime<br />
time in capturing the children getting out of school and heading home. But it’s not just about<br />
photographing the children, but the uniforms they wear. That is its beauty and distinctiveness. But<br />
please be respectful. If there is a parent present, I always ask permission first to photograph their child,<br />
and most times they are happy for you to do it; it’s seen as an honor that you would like to highlight their<br />
child in such a manner. If there is no parent present, as is the case usually when the kids get out of<br />
school, then I photograph them from behind so that they retain their anonymity.<br />
Speaking of walking around randomly, you never know what you will come across on the streets of<br />
Tokyo. In Shibuya, where one of the busiest intersections in the world is laid out, you will run in to<br />
people from all over the world. Just a mile or two away is Harajuku where the anime fashions of the<br />
youth parade down the streets. Or, you may see Buddhist monks collecting alms nearby. Take the<br />
subways to get around and you will see so much more! The city is a kaleidoscope of unique styles,<br />
fashions, fads, and fancies!<br />
Be sure to dedicate a day to either Tokyo Disneyland or it’s neighboring DisneySea (another Disneybased<br />
theme park filled with other rides and adventures unique to Disney like Aladdin’s home town, the<br />
Little Mermaid’s life under the sea, etc.). Here some of the visitors like to dress up as their favorite<br />
characters, walking around the park and having a good time. All of them love to have their photos taken<br />
and unlike here in the USA, it is permitted to dress up in Disney characters so it’s a unique opportunity to<br />
capture some photos you won’t see at any of the other Disney resorts around the world.<br />
We just skimmed the surface of this multi-faceted city. Tokyo is one of the most unique places on the<br />
face of the earth, therefore, one of the most enticing locations to exercise your photographic skills and<br />
take some of the most compelling images possible all in one place! Now, get ready to get out there and<br />
take lots of photos! Sayonara!<br />
Four junior high students leave their Yasakuni school, heading to the subway and on their way home.<br />
www.prophotoca.com <strong>Summer</strong> <strong>2021</strong> 31
<strong>West</strong> Coast<br />
32<br />
<strong>Pro</strong>fessional <strong>Photo</strong>graphers of California
School <strong>2021</strong><br />
www.prophotoca.com <strong>Summer</strong> <strong>2021</strong> 33
34 <strong>Pro</strong>fessional <strong>Photo</strong>graphers of California www.prophotoca.com
www.prophotoca.com <strong>Summer</strong> <strong>2021</strong><br />
35
36<br />
<strong>Pro</strong>fessional <strong>Photo</strong>graphers of California<br />
www.prophotoca.com
www.prophotoca.com <strong>Summer</strong> <strong>2021</strong> 37
38<br />
<strong>Pro</strong>fessional <strong>Photo</strong>graphers of California<br />
www.prophotoca.com
www.prophotoca.com <strong>Summer</strong> <strong>2021</strong> 39
40<br />
<strong>Pro</strong>fessional <strong>Photo</strong>graphers of California<br />
www.prophotoca.com
www.prophotoca.com <strong>Summer</strong> <strong>2021</strong> 41
42<br />
<strong>Pro</strong>fessional <strong>Photo</strong>graphers of California <strong>Summer</strong> <strong>2021</strong>
www.prophotoca.com <strong>Summer</strong> <strong>2021</strong> 43
<strong>Pro</strong>fessional <strong>Photo</strong>graphers of California <strong>Summer</strong> <strong>2021</strong>