- Seite 1 und 2:
Select your language German siehe S
- Seite 3 und 4:
INHALT 1 Einleitung................
- Seite 5 und 6:
1 EINLEITUNG 1.1 Allgemeine Informa
- Seite 7 und 8:
Grundrahmen Dient zur Stabilisierun
- Seite 9 und 10:
Zur sicheren Arbeit sind ordnungsge
- Seite 11 und 12:
Hinweis Falls die angegebene Nennla
- Seite 13 und 14:
2 INSTALLATION Die Maschine muss du
- Seite 15 und 16:
2.3 Lieferumfang Inhalt Anzahl Pake
- Seite 17 und 18:
Standort Zeichnung 1000 2000 6000 2
- Seite 19 und 20:
Montage der Single Lift 25M Install
- Seite 21 und 22:
Schraube M10 x 25 Der Zylinder befi
- Seite 23 und 24:
Einstellung des oberen Endschalters
- Seite 25 und 26:
5. Halten Sie die Senken Taste ca.
- Seite 27 und 28:
3 BETRIEB 3.1 Betriebsanweisung Fir
- Seite 29 und 30:
■ ■ ■ Heben Sie die Bühne an
- Seite 31 und 32:
4 WARTUNG Um einen sicheren Betrieb
- Seite 33 und 34:
4.2 Sicherheitsbestimmungen für Ö
- Seite 35 und 36:
4.4 Fehlersuche bzw. Fehleranzeige
- Seite 37 und 38:
Symptome Ursache Lösung Ungewöhnl
- Seite 39 und 40:
5 EG- EU KONFORMITÄTSERKLÄRUNG Se
- Seite 41 und 42:
6.2 Hydraulikschaltplan 9 8 4 5 7 3
- Seite 43 und 44:
7.1 Umfang der Produktgarantie Fün
- Seite 45 und 46:
8.1 Aufstellungs- und Übergabeprot
- Seite 47 und 48:
Prüfung 1 2 3 4 5 6 Datum Zustand
- Seite 49 und 50:
Sichtprüfung (Befugte sachkundige
- Seite 51 und 52:
Sichtprüfung (Befugte sachkundige
- Seite 53 und 54:
Sichtprüfung (Befugte sachkundige
- Seite 55 und 56:
CONTENT 1 Introduction.............
- Seite 57 und 58:
1 INTRODUCTION 1.1 General informat
- Seite 59 und 60:
Base frame Used to stabilize the li
- Seite 61 und 62:
Use the vehicle manufacturer's spec
- Seite 63 und 64:
1.6 Load distribution P1 P2 Q P1 Q
- Seite 65 und 66:
2 INSTALLATION The machine must be
- Seite 67 und 68:
2.3 Scope of delivery contents Numb
- Seite 69 und 70:
Standort Zeichnung 1000 2000 6000 2
- Seite 71 und 72:
Mounting the Single Lift 25M Instal
- Seite 73 und 74:
The cylinder is located in the cent
- Seite 75 und 76: Setting the upper limit switch Advi
- Seite 77 und 78: 5. Press and hold the lowering butt
- Seite 79 und 80: 3 OPERATION 3.1 Operating instructi
- Seite 81 und 82: ■ ■ Make sure that the vehicle
- Seite 83 und 84: 4 MAINTENANCE To ensure safe operat
- Seite 85 und 86: 4.2 Safety regulations for oil ■
- Seite 87 und 88: 4.4 Troubleshooting or error displa
- Seite 89 und 90: Symptoms Cause Solution Unusual lou
- Seite 91 und 92: 5 EC- EU DECLARATION OF CONFORMITY
- Seite 93 und 94: 6.2 Hydraulic circuit diagram 9 8 4
- Seite 95 und 96: 7.1 Scope of the product warranty F
- Seite 97 und 98: 8.1 Installation and handover proto
- Seite 99 und 100: Testing 1 2 3 4 5 6 Date Condition
- Seite 101 und 102: Visual inspection (authorized exper
- Seite 103 und 104: Visual inspection (authorized exper
- Seite 105 und 106: Visual inspection (authorized exper
- Seite 107 und 108: CONTENU 1 Introduction.............
- Seite 109 und 110: 1 INTRODUCTION 1.1 Informations gé
- Seite 111 und 112: Cadre de base Utilisé pour stabili
- Seite 113 und 114: Un entretien et des inspections app
- Seite 115 und 116: Warning 2 La pression de travail r
- Seite 117 und 118: 1.7 Dessin coté 115-1870 2912 274
- Seite 119 und 120: Données relatives à la machine ha
- Seite 121 und 122: Capacité Emballé dans un cadre en
- Seite 123 und 124: 2.6 Raccordement hydraulique Avant
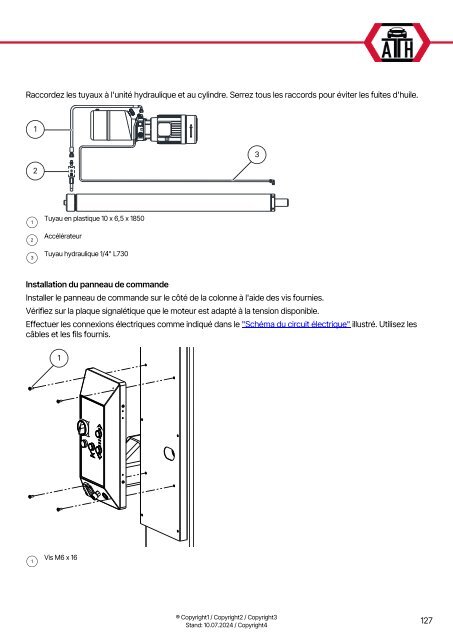
- Seite 125: Circlip D.16 Fixer les bras télesc
- Seite 129 und 130: Installation du couvercle supérieu
- Seite 131 und 132: 5. Retirez le tuyau et fermez le bo
- Seite 133 und 134: 3.2 Notes de base ■ ■ ■ ■
- Seite 135 und 136: 4. 5. Tournez lentement la vis d'ab
- Seite 137 und 138: Nettoyage Exigences minimales Netto
- Seite 139 und 140: 4.3 Plan de maintenance ou d'entret
- Seite 141 und 142: Symptômes Cause Solution La plate-
- Seite 143 und 144: Advice Nettoyez le réservoir et le
- Seite 145 und 146: 6 ANNEXE 6.1 Schéma du circuit él
- Seite 147 und 148: 7 CARTE DE GARANTIE Adresse du conc
- Seite 149 und 150: 8 LIVRE D'ESSAI Advice Ce protocole
- Seite 151 und 152: 8.2 Plan de test Tests 1 2 3 4 5 6
- Seite 153 und 154: 8.3 Rapport d'inspection Inspection
- Seite 155 und 156: Inspection visuelle (expert agréé
- Seite 157 und 158: Inspection visuelle (expert agréé
- Seite 159 und 160: Manual de Instrucciones Elevador 1
- Seite 161 und 162: 7 Tarjeta de garantía.............
- Seite 163 und 164: 1.2 Descripción tapa superior 1 11
- Seite 165 und 166: 1.4 Instrucciones de seguridad Inst
- Seite 167 und 168: 1.5 Datos técnicos Tipo Max. Capac
- Seite 169 und 170: 1.7 Dibujo acotado 115-1870 2912 27
- Seite 171 und 172: Datos de la máquina altura Tempera
- Seite 173 und 174: Capacidad Embalado en bastidor de a
- Seite 175 und 176: ■ ■ Para garantizar el funciona
- Seite 177 und 178:
Arandela de seguridad D.16 Fije los
- Seite 179 und 180:
Compruebe que todas las piezas no e
- Seite 181 und 182:
Instalación de la cubierta superio
- Seite 183 und 184:
5. Retire la manguera y cierre el t
- Seite 185 und 186:
3.2 Notas básicas ■ ■ ■ ■
- Seite 187 und 188:
4. 5. Gire lentamente el tornillo d
- Seite 189 und 190:
Limpieza Requisito mínimo Limpiado
- Seite 191 und 192:
4.3 Plan de mantenimiento o cuidado
- Seite 193 und 194:
Problemas durante el descenso Sínt
- Seite 195 und 196:
6. Suba y baje el elevador y compru
- Seite 197 und 198:
6 APÉNDICE 6.1 Esquema del circuit
- Seite 199 und 200:
7 TARJETA DE GARANTÍA Dirección d
- Seite 201 und 202:
8 LIBRO DE PRUEBAS Advice Este regi
- Seite 203 und 204:
8.2 Plan de pruebas Pruebas 1 2 3 4
- Seite 205 und 206:
8.3 Informe de inspección Inspecci
- Seite 207 und 208:
Inspección visual (experto autoriz
- Seite 209 und 210:
Inspección visual (experto autoriz
- Seite 211 und 212:
Oryginalna instrukcja Obsługi Podn
- Seite 213 und 214:
7 Karta gwarancyjna................
- Seite 215 und 216:
1.2 Opis osłony górnej 1 11 2 10
- Seite 217 und 218:
1.4 Wskazówki bezpieczeństwa Ogó
- Seite 219 und 220:
Podczas montażu lub demontażu ci
- Seite 221 und 222:
P2 Maks. 2/5 x Q 3/2 Rozkład obci
- Seite 223 und 224:
Dane maszyny Temperatura przechowyw
- Seite 225 und 226:
Pojemność Pakowane w stalową ram
- Seite 227 und 228:
■ ■ W celu zapewnienia prawidł
- Seite 229 und 230:
Pierścień zabezpieczający D.16 P
- Seite 231 und 232:
Podłącz węże do jednostki hydra
- Seite 233 und 234:
Montaż górnej pokrywy 2 3 1 4 6 5
- Seite 235 und 236:
4. Nacisnąć przycisk “Lift” n
- Seite 237 und 238:
3.2 Podstawowe informacje ■ ■
- Seite 239 und 240:
4. 5. Powoli obrócić śrubę awar
- Seite 241 und 242:
Czyszczenie Wymagania minimalne Car
- Seite 243 und 244:
4.3 Plan konserwacji lub pielęgnac
- Seite 245 und 246:
Symptomy Przyczyna Rozwiązanie Pod
- Seite 247 und 248:
Advice Wyczyść zbiornik i filtr o
- Seite 249 und 250:
6 ZAŁĄCZNIK 6.1 Schemat obwodu el
- Seite 251 und 252:
7 KARTA GWARANCYJNA Adres dealera:
- Seite 253 und 254:
8 KSIĄŻKA BADAŃ Advice Niniejszy
- Seite 255 und 256:
PROTOKÓŁ POŚWIADCZENIA MONTAŻU
- Seite 257 und 258:
Testowanie 1 2 3 4 5 6 Data Stan /
- Seite 259 und 260:
Oględziny (upoważniony ekspert) R
- Seite 261 und 262:
Oględziny (upoważniony ekspert) R
- Seite 263 und 264:
Oględziny (upoważniony ekspert) R
- Seite 265 und 266:
OBSAH 1 Úvod......................
- Seite 267 und 268:
1 ÚVOD 1.1 Obecné informace Tento
- Seite 269 und 270:
Základní rám Slouží ke stabili
- Seite 271 und 272:
Při zvedání vozidla používejte
- Seite 273 und 274:
1.6 Rozložení zátěže P1 P2 Q P
- Seite 275 und 276:
2 INSTALACE Stroj musí být instal
- Seite 277 und 278:
2.3 Rozsah dodávky mm obsah Počet
- Seite 279 und 280:
Standort Zeichnung 1000 2000 6000 2
- Seite 281 und 282:
Montáž jednoduchého zvedáku 25M
- Seite 283 und 284:
Válec je umístěn ve středovém
- Seite 285 und 286:
Nastavení horního koncového spí
- Seite 287 und 288:
5. Po dosažení nejnižšího bodu
- Seite 289 und 290:
3 OPERACE 3.1 Návod k obsluze Spol
- Seite 291 und 292:
■ ■ Ujistěte se, že je vozidl
- Seite 293 und 294:
4 ÚDRŽBA Pro zajištění bezpeč
- Seite 295 und 296:
4.2 Bezpečnostní předpisy pro ro
- Seite 297 und 298:
4.4 Řešení problémů nebo zobra
- Seite 299 und 300:
Příznaky Příčina Řešení Neo
- Seite 301 und 302:
5 ES- EU PROHLÁŠENÍ O SHODĚ Sé
- Seite 303 und 304:
6 DODATEK 6.1 Schéma elektrického
- Seite 305 und 306:
7 ZÁRUČNÍ LIST Adresa prodejce:
- Seite 307 und 308:
8 TESTOVACÍ KNIHA Advice Tento zku
- Seite 309 und 310:
Testování 1 2 3 4 5 6 Datum Stru
- Seite 311 und 312:
8.3 Inspekční zpráva Vizuální
- Seite 313 und 314:
Vizuální kontrola (autorizovaný
- Seite 315 und 316:
Vizuální kontrola (autorizovaný
- Seite 317 und 318:
Bedieningshandleiding 1-koloms lift
- Seite 319 und 320:
7 Garantiekaart....................
- Seite 321 und 322:
1.2 Beschrijving bovenklep 1 11 2 1
- Seite 323 und 324:
1.4 Veiligheidsinstructies Algemene
- Seite 325 und 326:
1.5 Technische gegevens Type Max. D
- Seite 327 und 328:
1.7 Maattekening 115-1870 2912 274
- Seite 329 und 330:
Gegevens machine hoogte Opslagtempe
- Seite 331 und 332:
Capaciteit Verpakt in stalen frame:
- Seite 333 und 334:
■ ■ Voor een goede en veilige w
- Seite 335 und 336:
Borgring D.16 Bevestig de telescopi
- Seite 337 und 338:
Controleer alle onderdelen op besch
- Seite 339 und 340:
Installeren van de afdekkap 2 3 1 4
- Seite 341 und 342:
5. Verwijder de slang en sluit de a
- Seite 343 und 344:
3.2 Basisnoten ■ ■ ■ ■ ■
- Seite 345 und 346:
4. 5. Draai de nooddaalschroef op h
- Seite 347 und 348:
Reiniging Minimumvereiste Caramba I
- Seite 349 und 350:
4.3 Onderhouds- of verzorgingsplan
- Seite 351 und 352:
Problemen tijdens het dalen Symptom
- Seite 353 und 354:
6. Breng de hefinrichting omhoog en
- Seite 355 und 356:
6 BIJLAGE 6.1 Elektrisch schema 5x1
- Seite 357 und 358:
7 GARANTIEKAART Adres van de dealer
- Seite 359 und 360:
8 TESTBOEK Advice Dit testlogboek (
- Seite 361 und 362:
8.2 Testplan Testen 1 2 3 4 5 6 Dat
- Seite 363 und 364:
8.3 Inspectierapport Visuele contro
- Seite 365 und 366:
Visuele controle (erkende deskundig
- Seite 367 und 368:
Visuele controle (erkende deskundig
- Seite 369 und 370:
Návod na Obsluhu 1-stĺpikový vý
- Seite 371 und 372:
7 Záručný list..................
- Seite 373 und 374:
1.2 Popis horný kryt 1 11 2 10 9 3
- Seite 375 und 376:
1.4 Bezpečnostné pokyny Všeobecn
- Seite 377 und 378:
1.5 Technické údaje Typ Max. Zať
- Seite 379 und 380:
1.7 Dimenzovaný výkres 115-1870 2
- Seite 381 und 382:
Údaje o stroji Teplota skladovania
- Seite 383 und 384:
Kapacita Počet balení dĺžka š
- Seite 385 und 386:
2.6 Hydraulické pripojenie Pred pr
- Seite 387 und 388:
Obvodový krúžok D.16 Pripevnite
- Seite 389 und 390:
1 3 2 Plastová hadica 10 x 6,5 x 1
- Seite 391 und 392:
Inštalácia horného krytu 2 3 1 4
- Seite 393 und 394:
5. Odstráňte hadicu a zatvorte sk
- Seite 395 und 396:
3.2 Základné poznámky ■ ■
- Seite 397 und 398:
4. 5. Pomaly otáčajte skrutku nú
- Seite 399 und 400:
Čistenie Minimálna požiadavka Ca
- Seite 401 und 402:
4.3 Plán údržby alebo starostliv
- Seite 403 und 404:
Problémy počas spúšťania Príz
- Seite 405 und 406:
7. V prípade potreby opatrne dopl
- Seite 407 und 408:
6 PRÍLOHA 6.1 Schéma elektrickéh
- Seite 409 und 410:
7 ZÁRUČNÝ LIST Adresa predajcu:
- Seite 411 und 412:
8 TESTOVACIA KNIHA Advice Tento pro
- Seite 413 und 414:
8.2 Plán testovania Testovanie 1 2
- Seite 415 und 416:
8.3 Správa z inšpekcie Vizuálna
- Seite 417 und 418:
Vizuálna kontrola (autorizovaný o
- Seite 419 und 420:
Vizuálna kontrola (autorizovaný o
- Seite 421 und 422:
Käyttöohje 1-pilarinostin ATH Sin
- Seite 423 und 424:
7 Takuukortti......................
- Seite 425 und 426:
1.2 Kuvaus top cover 1 11 2 10 9 3
- Seite 427 und 428:
1.4 Turvallisuusohjeet Yleiset turv
- Seite 429 und 430:
Tyyppi moottori Sulake ylävirtaan
- Seite 431 und 432:
1.7 Mitoitettu piirustus 115-1870 2
- Seite 433 und 434:
Koneen tiedot Varastointilämpötil
- Seite 435 und 436:
Kapasiteetti Pakkausten määrä pi
- Seite 437 und 438:
■ ■ Järjestelmän ja käytetty
- Seite 439 und 440:
Kiristysrengas D.16 Kiinnitä teles
- Seite 441 und 442:
1 3 2 Muoviletku 10 x 6,5 x 1850. K
- Seite 443 und 444:
Yläkannen asentaminen 2 3 1 4 6 5
- Seite 445 und 446:
5. Irrota letku ja sulje ruuvitulpp
- Seite 447 und 448:
3.2 Perusmuistiinpanot ■ ■ ■
- Seite 449 und 450:
4. 5. Käännä hitaasti hätäalen
- Seite 451 und 452:
Puhdistus Vähimmäisvaatimus Caram
- Seite 453 und 454:
4.3 Ylläpito- tai hoitosuunnitelma
- Seite 455 und 456:
Ongelmat laskun aikana Oireet Syy R
- Seite 457 und 458:
7. Täytä öljy tarvittaessa varov
- Seite 459 und 460:
6 LIITE 6.1 Sähköinen piirikaavio
- Seite 461 und 462:
7 TAKUUKORTTI Jälleenmyyjän osoit
- Seite 463 und 464:
8 TESTIKIRJA Advice Tämä testipö
- Seite 465 und 466:
8.2 Tarkastussuunnitelma Tarkastus
- Seite 467 und 468:
8.3 Tarkastuskertomus Silmämäär
- Seite 469 und 470:
Silmämääräinen tarkastus (valtu
- Seite 471 und 472:
Silmämääräinen tarkastus (valtu
- Seite 473 und 474:
Bruksanvisning 1-pelarlyft ATH Sing
- Seite 475 und 476:
7 Garantikort......................
- Seite 477 und 478:
1.2 Beskrivning topplock 1 11 2 10
- Seite 479 und 480:
1.4 Säkerhetsanvisningar Allmänna
- Seite 481 und 482:
Typ Styrspänning Motor Säkring up
- Seite 483 und 484:
1.7 Dimensionerad ritning 115-1870
- Seite 485 und 486:
Maskinens data Förvaringstemperatu
- Seite 487 und 488:
Kapacitet Antal förpackningar län
- Seite 489 und 490:
■ ■ För att säkerställa att
- Seite 491 und 492:
Låsring D.16 Fäst teleskoparmarna
- Seite 493 und 494:
1 3 2 Plastslang 10 x 6,5 x 1850 Ga
- Seite 495 und 496:
Montering av topplocket 2 3 1 4 6 5
- Seite 497 und 498:
5. Ta bort slangen och stäng skruv
- Seite 499 und 500:
3.2 Grundläggande anteckningar ■
- Seite 501 und 502:
5. När sänkningen är klar stäng
- Seite 503 und 504:
Rengöring Minimikrav Caramba Inten
- Seite 505 und 506:
4.3 Plan för underhåll eller vår
- Seite 507 und 508:
Problem vid sänkning Symtom Orsak
- Seite 509 und 510:
7. Fyll försiktigt på olja om det
- Seite 511 und 512:
6 BILAGA 6.1 Elektriskt kretsschema
- Seite 513 und 514:
7 GARANTIKORT Handlarens adress: F
- Seite 515 und 516:
8 TESTBOK Advice Denna testlogg (in
- Seite 517 und 518:
8.2 Testplan Testning 1 2 3 4 5 6 D
- Seite 519 und 520:
8.3 Inspektionsrapport Visuell insp
- Seite 521 und 522:
Visuell inspektion (auktoriserad ex
- Seite 523 und 524:
Visuell inspektion (auktoriserad ex
- Seite 525 und 526:
Βιβλίο οδηγιών ανυ
- Seite 527 und 528:
7 Κάρτα εγγύησης......
- Seite 529 und 530:
1.2 Περιγραφή άνω κά
- Seite 531 und 532:
Κλειδώσιμος κύριος
- Seite 533 und 534:
Κατά την τοποθέτησ
- Seite 535 und 536:
1.6 Κατανομή φορτίου
- Seite 537 und 538:
2 ΕΓΚΑΤΆΣΤΑΣΗ Το μη
- Seite 539 und 540:
2.3 Πεδίο εφαρμογής
- Seite 541 und 542:
Standort Zeichnung 1000 2000 6000 2
- Seite 543 und 544:
Τοποθέτηση του Single
- Seite 545 und 546:
Βίδα M10 x 25 Ο κύλινδρ
- Seite 547 und 548:
Ρύθμιση του διακόπ
- Seite 549 und 550:
5. Πατήστε και κρατή
- Seite 551 und 552:
Έλεγχος της σωστής
- Seite 553 und 554:
3.2 Βασικές σημειώσε
- Seite 555 und 556:
4. 5. Γυρίστε αργά τη
- Seite 557 und 558:
Καθαρισμός Ελάχιστ
- Seite 559 und 560:
4.3 Σχέδιο συντήρηση
- Seite 561 und 562:
Συμπτώματα Αιτία Λ
- Seite 563 und 564:
Έλεγχος στάθμης λα
- Seite 565 und 566:
5 ΔΉΛΩΣΗ ΣΥΜΜΌΡΦΩΣΗ
- Seite 567 und 568:
6.2 Διάγραμμα υδραυλ
- Seite 569 und 570:
7.1 Πεδίο εφαρμογής
- Seite 571 und 572:
8.1 Πρωτόκολλο εγκατ
- Seite 573 und 574:
Δοκιμές 1 2 3 4 5 6 Ημερ
- Seite 575 und 576:
Οπτική επιθεώρηση (
- Seite 577 und 578:
Οπτική επιθεώρηση (
- Seite 579 und 580:
Οπτική επιθεώρηση (
- Seite 581 und 582:
ЗМІСТ 1 Вступ............
- Seite 583 und 584:
1 ВСТУП 1.1 Загальна
- Seite 585 und 586:
Задні опорні важел
- Seite 587 und 588:
Для безпечної робо
- Seite 589 und 590:
Advice Якщо вказане но
- Seite 591 und 592:
2 ВСТАНОВЛЕННЯ Маши
- Seite 593 und 594:
2.3 Обсяг поставки в
- Seite 595 und 596:
Standort Zeichnung 1000 2000 6000 2
- Seite 597 und 598:
Монтаж одинарного
- Seite 599 und 600:
Циліндр знаходитьс
- Seite 601 und 602:
Встановлення верхн
- Seite 603 und 604:
5. Натисніть і утрим
- Seite 605 und 606:
3 ОПЕРАЦІЯ 3.1 Інстру
- Seite 607 und 608:
■ ■ ■ Підніміть пл
- Seite 609 und 610:
4 ТЕХНІЧНЕ ОБСЛУГОВ
- Seite 611 und 612:
4.2 Правила безпеки
- Seite 613 und 614:
4.4 Усунення несправ
- Seite 615 und 616:
Інші проблеми Симп
- Seite 617 und 618:
5 ДЕКЛАРАЦІЯ ВІДПОВ
- Seite 619 und 620:
6.2 Гідравлічна схем
- Seite 621 und 622:
7.1 Обсяг гарантії н
- Seite 623 und 624:
8.1 Протокол встанов
- Seite 625 und 626:
Тестування 1 2 3 4 5 6 Д
- Seite 627 und 628:
Візуальний огляд (у
- Seite 629 und 630:
Візуальний огляд (у
- Seite 631 und 632:
Візуальний огляд (у