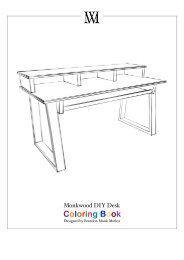
Monkwood DIY Desk Plans BETA version
Here's an 'as is' DIY desk with supplies and dimensions and some instructions. Fill in the blanks creatively and or consult a woodworker to create your own until full version is released. My client building schedule has been very intense and I have less help in the shop these days due to COVID. I aim to keep chipping away at these plans for release3 in the new year. For those who would like to get started I have made these BETA plans available. Thanks for your patience and interest in this project! Sincerely, Monk Please tag you pics with #monkwoodDIYdesk
Here's an 'as is' DIY desk with supplies and dimensions and some instructions. Fill in the blanks creatively and or consult a woodworker to create your own until full version is released.
My client building schedule has been very intense and I have less help in the shop these days due to COVID. I aim to keep chipping away at these plans for release3 in the new year.
For those who would like to get started I have made these BETA plans available.
Thanks for your patience and interest in this project!
Sincerely,
Monk
Please tag you pics with #monkwoodDIYdesk

You also want an ePaper? Increase the reach of your titles
YUMPU automatically turns print PDFs into web optimized ePapers that Google loves.
Finishing:<br />
A million ways to chase a cat. Here’s just a few...<br />
Paint Sample Wood Stain:<br />
A cheap way to get wood to look any color you want.<br />
1. Mix one 8oz (237ml) sample per quart (1L) of water<br />
2. Stir well<br />
3. test on off cuts till you get the right ratio for you<br />
4. add more water if too dark/opaque<br />
Brushing on Finish:<br />
Use brush to apply water based paint or stain. Use rag or small bristle brush to apply oil<br />
stain. Always put oily rags in water bucker after use for fire safety.<br />
1. Paint or stain top panels desired color with brush<br />
2. Paint or stain underframe parts desired color<br />
3. Paint or stain 2x4’s for bases desired color (can<br />
do this before or after making cuts - see Base<br />
section for more info)<br />
4. Lightly sand with 220<br />
5. Apply clear water based finish<br />
6. Sand with used 220 and add another coat if<br />
desired. I recommend 2 or 3 coats of clear for the<br />
desktop.<br />
7. Add second coat on tops