Quickstart â BACS Installation Safety instructions - Generex GmbH
Quickstart â BACS Installation Safety instructions - Generex GmbH
Quickstart â BACS Installation Safety instructions - Generex GmbH

You also want an ePaper? Increase the reach of your titles
YUMPU automatically turns print PDFs into web optimized ePapers that Google loves.
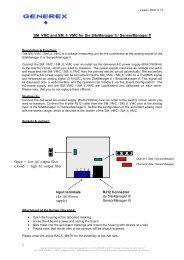
Note: The internal web-server takes a while to get started. Approximately 4 to 5 minutes after the first start of<br />
the WEBMANAGER; the UPS status LED should change from static red (boot phase) to green flashing. This<br />
indicates that the web-server is ready now.<br />
Now you can use a web-browser to connect to the <strong>BACS</strong> WEBMANAGER via http://10.10.10.10 and<br />
continue with your configuration, now using any Webbrowser<br />
Alternative: Follow this link to get the „Netfinder“ Software, which will scan your network<br />
environment:<br />
http://www.generex.de/generex/download/software/install/NetFinder.zip<br />
2.1.5 Setup the http-connection and login<br />
Connect with any web-browser (Recommend are MS-Internet Explorer or Mozilla) to the address<br />
http://10.10.10.10 to reach the configuration web-interface of the Webmanager. Use for the login the<br />
username „admin“ and the predefined password „cs121-snmp“.<br />
2.1.6 Configuration of IP Address/<strong>BACS</strong> System on <strong>BACS</strong> WEBMANAGER<br />
Basic Network Settings: Click the „Network & Security“ button. Set the “Local Address”, “Gateway Address”<br />
and “Subnet Mask” (“DNS-Server” if required). Click the “Apply” button to confirm your settings.<br />
Click the „Timeserver“ button. Set the IP address of a timeserver service. The timeserver settings are<br />
important; because of the logging data of events and alarms (if the web -adapter is not able to reach a<br />
timeserver, the default time is the first of January 1970). Click on every page the “Apply” button to confirm<br />
your changes.<br />
Finally click on “SAVE, EXIT & REBOOT” and wait 3-4 minutes until the web-browser looses the connection<br />
to the <strong>BACS</strong> WEBMANAGER.<br />
2.1.7 Switching into the Normal Mode<br />
After the <strong>BACS</strong> WEBMANAGER has rebooted, (takes about 5 minutes) it will respond again on IP address<br />
10.10.10.10. To activate now the new configured IP address, set the DIP-Switch 1 into the position ON and<br />
disconnect the power supply for a cold-boot (power cycle). This time the <strong>BACS</strong> WEBMANAGER will use the<br />
new, configured IP address and does not respond to IP address 10.10.10.10 anymore.<br />
Connect again now with a web-browser to the new configured IP address (http://