Quickstart â BACS Installation Safety instructions - Generex GmbH
Quickstart â BACS Installation Safety instructions - Generex GmbH
Quickstart â BACS Installation Safety instructions - Generex GmbH

Create successful ePaper yourself
Turn your PDF publications into a flip-book with our unique Google optimized e-Paper software.
1.1.4 FINISH Step 1: Finish the <strong>Installation</strong> of the <strong>BACS</strong> Hardware<br />
The installation of the <strong>BACS</strong> sensor, consisting of <strong>BACS</strong> measuring cables, <strong>BACS</strong> C modules, <strong>BACS</strong> bus<br />
cables, <strong>BACS</strong> SPLITTING BOX and <strong>BACS</strong> CONVERTER is now finished.<br />
At this point the <strong>BACS</strong> modules are not yet functional. The modules are not addressed yet generally. You<br />
can do this via the <strong>BACS</strong> PROGRAMMER Software (for Windows) or via the <strong>BACS</strong> WEBMANAGER directly.<br />
Now we have to configure the <strong>BACS</strong> WEBMANGER to set up the addressing of the Modules.<br />
The installation of the hardware is now finished. Please take a look into chapter 2 for the<br />
configuration of the <strong>BACS</strong> WEBMANAGER.<br />
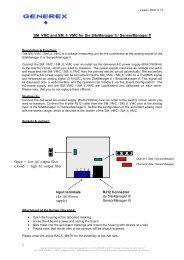
2. Configuration of the <strong>BACS</strong> WEBMANAGER<br />
<strong>BACS</strong>® WEBMANAGER BUDGET<br />
Figure 13: <strong>BACS</strong> WEBMANAGER BUDGET external, this is also available as SLOT card for UPS<br />
Description Function<br />
1 COM1 connector Connection w ith an UPS or another end-device via a RS232-cable.<br />
2 COM2 connector Connection for optional devices like a modem, multi sensor SENSORMANAGER, temperature sensor, humidity,<br />
field busses (MODBUS, RS232, Profibus, LONBus, etc.).<br />
3 LAN-Socket Ethernet 10/100 Mbit interface with integrated LEDs (green LED: connection to the network established, yellow<br />
LED: netw ork-activity).<br />
4 DC-Input Pow er supply 9-30VDC/250mA through external power supply, DC-connector inside (-) minus, outside (+) plus.<br />
5 COM 3 <strong>BACS</strong><br />
Bus<br />
6 LEDs (red and<br />
green)<br />
For the connection to the <strong>BACS</strong> ® CONVERTER, use only the original cable coming w ith the <strong>BACS</strong> Busconverter !<br />
Optical displays (red = Boot process/error, green = ok).<br />
7 DIP Sw itch For the switch between configuration mode (both switches off) and normal mode (sw itch 1 on, switch 2 off).<br />
8 Alarm LED Alarm LED of the integrated CONVERTER (BUDGET II only).<br />
Copyright of the European Union is effecti ve (Copyright EU) (c) 2012 GENEREX Systems <strong>GmbH</strong>, H amburg, Ger many, All rights reserved<br />
TEL +49( 40)22692910 - EMAIL gener ex@generex.de - WEB www.generex.de (This and all other product datasheets ar e available for downl oad.)