
Create successful ePaper yourself
Turn your PDF publications into a flip-book with our unique Google optimized e-Paper software.
<strong>Microsoft</strong><br />
<strong>Visual</strong> <strong>Basic</strong><br />
<strong>6.0</strong><br />
Applied Science<br />
Second class<br />
1
1. Introduction<br />
<strong>Visual</strong> <strong>Basic</strong> implements graphical user interface that allows the use of<br />
graphics for different applications. It provides visual interactive windows<br />
with user, like Dialogue box for (color, font ...), Input box, and Output box.<br />
Also it is able to create menu to simplify user application.<br />
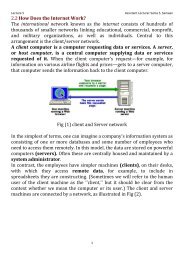
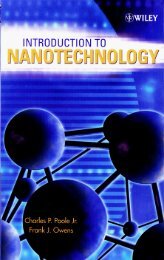
To run this program on user computer:<br />
Start>programs><strong>Microsoft</strong> <strong>Visual</strong> Studio <strong>6.0</strong>><strong>Microsoft</strong> <strong>Visual</strong> <strong>Basic</strong> <strong>6.0</strong>.<br />
It will appear on the computer screen as in the following picture.<br />
To exit from <strong>Visual</strong> <strong>Basic</strong> and return to Windows is like exit from most<br />
Windows applications. There are three ways to close the <strong>Visual</strong> <strong>Basic</strong> as<br />
stated below.<br />
1- Click on close button icon that appears in the upper-left corner of the<br />
screen.<br />
2- Press Alt+F4<br />
3- Select File >Exit<br />
1.2-The Importance of <strong>Visual</strong> <strong>Basic</strong> Program<br />
Languages like <strong>Basic</strong> and Pascal depend on variables and procedures to<br />
build the applications .This is why it is called procedural languages. The<br />
new approach is called object programming for visual programs like <strong>Visual</strong><br />
<strong>Basic</strong> and <strong>Visual</strong> C++ and others. In this programming approach every thing<br />
(form, command buttons, controls) is an object.<br />
The reasons for of implementing <strong>Visual</strong> <strong>Basic</strong> program are listed as<br />
follows:<br />
1- It uses integrated development environment (IDE) which is easier for<br />
the user to minimize code writing.<br />
2
a<br />
b<br />
c<br />
2- All visual programs follow the same concepts, therefore the user will<br />
become more familiar with visual approach for other visual languages.<br />
3- It provides Input box and Output box as an interactive windows with<br />
user.<br />
4- It is able to connect to Internet, and to call Explorer.<br />
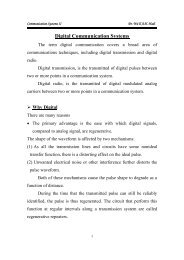
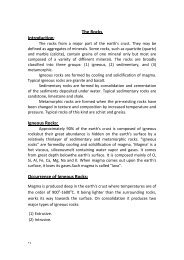
1.3- Elements of the Integrated Development Environment (IDE)<br />
The IDE environment consists of many elements. Some elements are<br />
displayed when <strong>Visual</strong> <strong>Basic</strong> is started (By default) as in the following<br />
figure. Other elements are displayed if the user requires them. We will list<br />
some of these elements.<br />
d<br />
g<br />
a- Menu Bar: It contains a standard command like: File, Edit, View,<br />
Window, Help menus, and specific command such as: Project, Format, or<br />
Debug menus.<br />
b- Toolbar: it contains the most commonly used commands (button), if<br />
clicked an action represented by that button is carried out.<br />
c- ToolBox: it contains a collection of tools that are needed for project<br />
design.<br />
3<br />
f<br />
e
d- form Designer: it is a window for each form to customize the designed<br />
interface of the application. Using the form designer, the user can add<br />
controls, graphics, and text to create the desired form appearance.<br />
e- Properties Window: it is a List of properties settings for a selected form or<br />
a control. Theseproperties are characteristics (such as size, visible, or color)<br />
of the selected object it provides an easy way to set properties.<br />
f- Project Explorer Window: it is a list of the forms and modules for the<br />
current projects. lt is a hierarchical tree- branch structure, where the<br />
project at top of tree and other parts like forms ,modules) descend from<br />
this tree.<br />
g- Form Layout Window: The Form Layout window is a small screen.<br />
Which is used to reposition the form of the application so that it appears<br />
in proper place when project is run.<br />
h- Code Editor Window: Code Editor Window is used to write a VB code<br />
for an application. For each form there is a separate code editor window.<br />
It is displayed when user clicks on form or object in form.<br />
To Create an Application<br />
The title of program includes the name of project, and when the user first<br />
starts the program it takes a defaulted value (projectl).It also includes resize<br />
4
icons. The following steps are required to create an application in <strong>Visual</strong><br />
<strong>Basic</strong> <strong>6.0</strong>:<br />
1- Select type of project New or Exciting. A form automatically appears in<br />
the form design .The basis for any application's interface is the form<br />
that user should create. User can add other forms to the project (to add<br />
another form select project menu>add form).<br />
2. To add objects (controls) to the form use the ToolBox.<br />
3. Set the properties for the objects through properties window.<br />
4. Write code. The <strong>Visual</strong> <strong>Basic</strong> Code consists of statements, and<br />
declarations.<br />
The code for an application can be written on the Code Editor window.<br />
In this window user can view and edit quickly any of the code.<br />
5. Run the Application. To run the application, click the Start button on<br />
the toolbar, or press F5.<br />
6. Stop. To stop running the application and return to visual basic program<br />
click on stop button in tool bar.<br />
7. Check if there is an error, return to step 3 ,otherwise continue.<br />
8. Save project.<br />
9. Exit.<br />
Exercises<br />
1-Define the following parameters:<br />
a-Toolbar.<br />
b-ToolBox.<br />
c-Form designer,<br />
d-form layout.<br />
e-project window,<br />
f-properties window.<br />
i- code editor window,.<br />
2- Explain the advantage of the <strong>Visual</strong> <strong>Basic</strong> program.<br />
5
Project<br />
Project is a program designed to user application that may be simple<br />
(like calculator program) or complex (like word program). <strong>Visual</strong> basic<br />
program can create many types of projects. The most important or usual<br />
project is the standard project (for window applications) and the DHTML<br />
project (for internet).<br />
Working with Standard Projects:<br />
The following working steps (create, save, add, open and delete)<br />
could be done:<br />
a) To create project:<br />
When program starts, project box appears-select Standard EXE ><br />
Project window appears.<br />
OR: File> New project> Box (select Standard EXE)> Project window<br />
appears<br />
b) To add project: Any number can be added.<br />
Project icon> Select Standard EXE> Project window appears.<br />
Note: Usually first project runs first, but user can change that by:<br />
Selecting project from project window > mouse list > Set as startup.<br />
c) To open an existing project:<br />
It is previously designed and saved on disc in a folder.<br />
File> Open project> Box (select existing and look for the project) ><br />
Project window<br />
d) To delete a project:<br />
Select project in Project window > Mouse list > Remove project.<br />
6
e) To save project:<br />
The visual basic can save the project on disc in two ways, as an<br />
executable type or a non- executable type.<br />
I- for project in non execution stage:<br />
There are many types of files summarized as follows:<br />
1- Project file: it consists of all files which are related to specific project,<br />
also some other information with it. This could be saved with extension<br />
(.VBP)<br />
2- The form Files: this contains form description and any Object or<br />
program related to it .This is saved with extension (.frm).<br />
To save project for first time:<br />
File>Save project (group) as>Box (project name)> forms saved then<br />
projects group saved.<br />
To resave project: to save previously saved project in same place<br />
File>save project (group)<br />
Note: If a form is modified it should be saved. To save a form:<br />
Select a form from Project window>File>Save project form1 as > Save<br />
box (select form name). OR: File>Save project forml.<br />
II- project for execution: This is the final stage so that it could be opened<br />
and run by Windows and no need for <strong>Visual</strong> <strong>Basic</strong> program. File> Make<br />
project.exe.<br />
Create<br />
project<br />
I t e m Action steps Remarks<br />
New File>New project The user can open any number of<br />
projects.<br />
Exist File>Open project Project was already designed and<br />
saved.<br />
Recent File>Open project Project was recently designed and<br />
7<br />
saved.<br />
Save project File>Save project group <strong>Visual</strong> <strong>Basic</strong> can deal with it (open<br />
as<br />
and modify).<br />
File>Make projectl.exe For execution by window.<br />
Delete project File> Remove project Select project before remove.
Forms<br />
1) Introduction to form<br />
The form is the most important visible object,without it no control can be<br />
displayed. It is a window that can be designed and modified to fit user<br />
applications. In the standard project the form Designer creates and<br />
modifies visual forms .When user starts visual <strong>Basic</strong> program a form is<br />
automatically displayed in Designer window. The designer can add any<br />
number of forms to the project of his application by pressing: add form<br />
from project menu.<br />
There are two modes: design mode and running mode. User can<br />
interchange between them, by pressing on start icon or stop icon<br />
on tool bar.<br />
The forms also have properties and events.<br />
2) Form properties<br />
Properties list has a predefined value (numeric or string) and could<br />
be changed, some properties could be rewritten like caption, and some<br />
could be selected from option list by pressing on down arrow on the side.<br />
Others could be rewritten or by browsing the computer files when<br />
the user clicks on the dotted button on the right side a dialogue box<br />
8
appears. The browsing button appears when the user clicks inside the<br />
box.<br />
The most important properties of the form are listed in the following<br />
table:<br />
Property<br />
Objective code Stage of<br />
name<br />
Changing<br />
Name Used to represent name of form<br />
in code<br />
Design<br />
Caption String appear in title of form Formno..caption= "any name" Design and run<br />
Backcolor Background color for form. Formno..Backcolor=Qbcolor(no.) Design and run<br />
Forecolor Color of text written on form. Formno..forecolor=Qbcolor(no.) Design and run<br />
Font Font style, type and size. Size: Formno..fontsize= no. Design and run<br />
Style:<br />
9<br />
� italic<br />
�<br />
font � bold<br />
�<br />
�underline<br />
Type: Form1.FontName = "arial"<br />
borderstyle 0-None borderless and<br />
captionless<br />
1-Fixed Single a nonresizable<br />
form<br />
2-Sizable (default), creates a<br />
resizable window,<br />
3-Fixed Dialog: nonresizable<br />
form without Minimize and<br />
Maximize buttons<br />
4-Fixed Tool window for a<br />
floating toolbox like form,<br />
5-Sizable Tool window<br />
Design<br />
Enabled The tools enable or disable. Formno.. Enabled =true or false Design and run<br />
Min button =true. The Minimize and Form1.MaxButton = True or Run<br />
Max button Maximize buttons are enabled.<br />
= false<br />
=false. The Minimize and Form1.MinButton = True or<br />
Maximize button are disabled.<br />
= false<br />
Start up 0- Manual ,use form layer<br />
Design<br />
position window to position Form<br />
1- Center owner<br />
2- at Center Screen<br />
3- Windowdefault.<br />
movable True or false to make form<br />
movable or unmovable<br />
Design<br />
Hide To hide the form Formno..hide Run<br />
show To show the form Formno..Show Run<br />
icon Change the icon on title bar of form (the icon must have the extension ico or cur)
3) Code form<br />
The code is written in code Form and it will be edited quickly by<br />
code editor .The codes are of two categories:<br />
1- Declaration is written before any procedure in the code<br />
2- Statements. The user selects the required event then code statements<br />
are written inside these event procedures.<br />
ﻦﺋﺎﻜﻟا<br />
رﺎﯿﺘﺧا<br />
5) Events:<br />
Events are like electrical switches. The electrical switches are of<br />
many types, so are the events.<br />
The forms and controls support events (generation, interaction with<br />
mouse and keyboard). The most important events for the form are<br />
described in the following table.<br />
Event Action taken when<br />
Click Single click on object.<br />
DbClick Double click on object.<br />
load Loading the object<br />
Examples:<br />
1- Design a form such that: in event load, when project runs, the form<br />
backcolor property changed (chose any color).<br />
sol:<br />
code:<br />
Private Sub Form_Load()<br />
Form1.BackColor = QBColor(12)<br />
End Sub<br />
2- Design a form such that: in event click on form, when project runs, the<br />
title of the form changed to applied science.<br />
10<br />
ةﺮﻔﺸﻟا<br />
ﺔﺑﺎﺘﻛ ﻢﺘﯾ ﺎﻨھ<br />
ﻦﺋﺎﻜﻟا<br />
ﻢﺳا<br />
ثﺪﺤﻟا عﻮﻧ
Exercises:<br />
Q1/ Design a standard project has three forms with backcolors red, blue<br />
and green.<br />
Q2/ design a standard project that has one form change the name from<br />
form1 to "students"<br />
Q3/ Create a standard project with one form the name of the project<br />
"market seals" and the name of the form "stock markets" and save project<br />
on desktop with name marketing .exe<br />
Q4/ Design a standard project with four forms when running project all<br />
forms appear on screen Note :use this code in form1 (form1.show,<br />
form2.show, form3.show, form4.show)<br />
11
Toolbox<br />
It is a window box that contains tools which could be used in the<br />
project. Tools are objects that could be selected from Toolbox to be placed<br />
on form. To show the toolbox, Press toolbox icon > the toolbox appear<br />
as in the following diagram.<br />
The toolbox includes many tools and in general they are:<br />
1) Pointer (not control) : used to select tools already on form<br />
2) Picture box : Used to display images in any of the following<br />
formats: BMP, DIB (bitmap), ICO (icon), CUR (cursor), WMF<br />
(metafile), EMF (enhanced metafile), GIF, and JPEG.<br />
3) Label : Fixed text appears on form for remark.<br />
4) Textbox : For text edit .Like note pad.<br />
5) Frame : To group tools together (container).<br />
6) Command button : Used as a switch (such as OK and Cancel) buttons. Code<br />
is written in the Click event procedure of this control<br />
7) Check box : For a yes/ no (true /false) selection.<br />
8) Option button : For selection as group. Many options are placed inside<br />
container (grouped) (a Frame control). One control is selected from the group all<br />
others of the group are automatically deselected.<br />
9) Combo box : consists of (list and arrow when clicked a small a list appears),<br />
if user selects item from the list, it will be displayed in TextBox. Vertical size is<br />
fixed.<br />
10) List box : For a list, user adds to and deletes from this list. It takes any size.<br />
11) Horizontal Scrollbar : Create stand-alone Horizontal scroll bars.<br />
12) Vertical Scrollbar : Create stand-alone vertical scroll bars.<br />
13) Timer : Used to control object movement.<br />
14) Drive List Box : It is a special ListBox filled automatically with names, of the<br />
files in a specified directory. It is a list invariant.<br />
15) Dir List Box : It is a special ListBox filled with drives (Hard disc, Flopy, CD)<br />
in the system. It is an invariant.<br />
16) File List Box : It is a special ListBox filled automatically with the names of all<br />
DirListBox. It is a list invariant.<br />
17) Shape : Used only to display rectangles, circles, and ovals on the forms. Never<br />
raises any events<br />
18) Line :Used only to display lines on the forms. It never raises any events.<br />
19) Image : Used instead of PictureBox because it consumes fewer system<br />
resources.<br />
20) Data : used for data base.<br />
21) OLE : used for joining with another programs.<br />
12
Tool Box and Form<br />
The user can place the tool on form and then work with the tool. To place the<br />
tool on form:<br />
Click on tool >Draw tool to Form> the tool appears on Form.<br />
Or: double click on it.<br />
Notes:<br />
a) Each tool has a property window .To see this window: Click on tool on form><br />
Property window appears.<br />
b) Property can be changed manually or by code and the effect of code appears in the<br />
run time (when user runs project).<br />
c) To put code for tool action:<br />
Double click on tool > code sheet of the Form appears (with code of corresponding<br />
tool is written) > User write the desired code inside tool event, or outside in Form<br />
event.<br />
Working With Tools<br />
The user can work with tool in the design stage.<br />
- To add tool: double click on tool. Tool appears on form or drags it to design<br />
part of page and draw it in the desired size.<br />
- To delete: click on element in page> press delete key of the key board or right<br />
click on object for mouse list> choose delete.<br />
- To display tool properties window: click on element> properties window<br />
appear.<br />
- To display code form: double click on tool code form for that element.<br />
Label:<br />
It is used to display fixed text on form<br />
Property<br />
name<br />
Objective Code Stage of Changing<br />
Caption String appear on label labelno..caption= "any name" Design and run<br />
Autosize To resize tool to fit text labelno..autosize= true or false Design and run<br />
Backcolor Background color for label labelno..Backcolor=Qbcolor(no.) Design and run<br />
Forecolor Color of text written on label labelno..forecolor=Qbcolor(no.) Design and run<br />
Font Font style, type and size Size: labelno..fontsize= no. Design and run<br />
Style:<br />
13<br />
� italic<br />
�<br />
font � bold<br />
�<br />
�underline<br />
visible The label appear<br />
Type: label.FontName = "arial"<br />
or Labelno.visible= true or false Design and run<br />
Enabled<br />
disappear<br />
The label enable or disable. label no.. Enabled =true or false Design and run<br />
Note: The available color numbers that used with QBcolor is the integers 0 to 15 only.
Textbox<br />
Example: Design a form contains label "ﺔﯿﻘﯿﺒﻄﺘﻟا مﻮﻠﻌﻟا" in size 14.<br />
Sol: the properties are:<br />
Running stage:<br />
14<br />
Label1<br />
caption Applied science<br />
fontsize 14<br />
The textbox is a box for entering and displaying text (characters or values) in<br />
user project. This tool is used frequently in most of the application. The textbox has<br />
property window, with no caption, but with space for text. The most important<br />
property of this tool is the text content which is described in the following:<br />
Property<br />
name<br />
Objective Code<br />
Stage<br />
Changing<br />
of<br />
Text String appear on textbox text no.. text = "any name" Design and run<br />
multiline To enter more than one line true or false Design<br />
Backcolor Background color for textbox. text no..Backcolor=Qbcolor(no.) Design and run<br />
Forecolor Color of text written on textbox. text no..forecolor=Qbcolor(no.) Design and run
Label1<br />
Font Font style, type and size. Size: text no..fontsize= no.<br />
15<br />
Style:<br />
� italic<br />
�<br />
font � bold<br />
�<br />
�underline<br />
Design and run<br />
visible<br />
Type: label.FontName = "arial"<br />
The textbox appear or disappear text no.visible= true or false Design and run<br />
Enabled The textbox enable or disable. text no.. Enabled =true or false Design and run<br />
passwordchar A row of symbols appear Textno.passwordchar=(symbol) Design and run<br />
Setfocus<br />
instead of letters<br />
Put the focus on the specified Textno.setfocus<br />
textbox<br />
Run<br />
Change text manually: change text property from property window, click<br />
inside textbox and add text.<br />
Change text by code:<br />
1- Text1.text=" "<br />
2- Text1.text=" ﺺﻧ "<br />
3-Text1.text=text2.text<br />
4- Text1.text=label1.caption<br />
5- Text1.text = inputbox ("ﺺﻧ")<br />
Example: Design a form to enter username and password such that the title of the<br />
form is VB.<br />
Sol: design stage<br />
Text1<br />
Label2 Text2<br />
Form1<br />
caption V.B<br />
Text1<br />
text<br />
Text2<br />
Text<br />
Label1<br />
caption username<br />
Label2<br />
caption password
Example: Design a form with one textbox, set the text properties so that this massage<br />
appears when project runs (welcome to visual basic world).<br />
Sol: There are two methods:<br />
First method: changing property by code:<br />
Private Sub Form_Load()<br />
Text1.Text = "welcome to visual basic world"<br />
End Sub<br />
Second method: by properties window<br />
Running stage<br />
Command button<br />
Text1<br />
16<br />
Text1<br />
text Welcome to visual basic world<br />
It acts as a switch. To deal with tool property> click on command button> property<br />
window appear> change setting of any desired property. Usually change set its<br />
caption property to a suitable string.<br />
To make the button functional, the user should add some code. To do this: click on<br />
command tool> code form appears with click event procedure. Write code in this<br />
event or other events like press key event.<br />
Write code here
The most familiar properties that are needed for the command button are stated in the<br />
table below.<br />
Property<br />
name<br />
Objective Code Stage of Changing<br />
Caption String appear on command commandno..caption="any name" Design and run<br />
style Determine the style of 1-graphical<br />
Design<br />
command<br />
0-standard<br />
Backcolor Background color for commandno..Backcolor=Qbcolor( Design and run<br />
command<br />
no.)<br />
Forecolor Color of text written on commandno..forecolor=Qbcolor( Design and run<br />
command<br />
no.)<br />
Font Font style, type and size Size: commandno..fontsize= no. Design and run<br />
Style:<br />
17<br />
� italic<br />
�<br />
font � bold<br />
�<br />
�underline<br />
visible The command appear<br />
Type: commandno.FontName =<br />
"arial"<br />
or commandno.visible= true or false Design and run<br />
disappear<br />
Enabled The command enable or commandno.. Enabled =true or Design and run<br />
disable.<br />
false<br />
Example: Design a form with label, such that when click on the command button<br />
"name" your name appears on label (at running stage).<br />
sol:<br />
caption<br />
Label1<br />
Command1<br />
caption name<br />
Private Sub Command1_Click()<br />
Label1.Caption = "Ahmad"<br />
End Sub<br />
Example: Design a form to appear your name and department in textbox, when click<br />
on command button "name" and "department" respectively so that you can clear these<br />
informations when click on command "clear" and stop project when click on<br />
command "exit".<br />
Label1<br />
Command1
Text1<br />
text<br />
Command1<br />
caption name<br />
Command2<br />
caption department<br />
Command3<br />
caption Clear<br />
Command4<br />
caption exit<br />
Private Sub Command1_Click()<br />
Text1.text="Muna"<br />
End Sub<br />
Private Sub Command2_Click()<br />
Text1.text="Science"<br />
End Sub<br />
Private Sub Command3_Click()<br />
Text1.text=" "<br />
End Sub<br />
Private Sub Command4_Click()<br />
end<br />
End Sub<br />
Example: Design a form contains two textbox so that when click on command button<br />
"copy" the text copied from first textbox to the second textbox but in size (28).<br />
Sol:<br />
Text1<br />
Command1<br />
Command3<br />
Text1<br />
text<br />
Text2<br />
Text<br />
Command1<br />
caption copy<br />
18<br />
Command2<br />
Command4
Private Sub Command1_Click()<br />
Text2.Text = Text1.Text<br />
Text2.FontSize = 28<br />
End Sub<br />
At run stage this window appear<br />
If the user enter by example the text (ABC) in first textbox and click on<br />
command (copy) the same text appear on the second textbox but in size 28.<br />
Exercise:<br />
1- Design a form to display your name in specific color and size.<br />
2- Write the following design steps with details<br />
19
Shape: Shape is a tool used to draw geometric shape (circle, rectangle, square ,etc). It<br />
has property window. It has no events like other tools (such as click, dblclick, etc.).<br />
Property<br />
name<br />
Objective Stage of Changing<br />
shape To determine a specific shape:<br />
0-rectangle<br />
1-square<br />
2-oval<br />
3-circle<br />
4-rounded rectangle<br />
5-rounded square<br />
Design and run<br />
backstyle 0-trancsparence<br />
1-opaque<br />
Design<br />
Backcolor colored the Background for shape, appear after Design and run<br />
backstyle changed to value 1-opaque<br />
bordercolor Colored the Border of shape Design and run<br />
Example: Design a form contains a specific shape then write the name of this shape<br />
on form.<br />
Label1<br />
caption circle<br />
Shape1<br />
shape 3- circle<br />
List box: The user can't write directly in ListBox . He can add item to the ListBox<br />
property or by code in the form.<br />
Property name Objective and code<br />
sorted True , to sort the elements alphabetically<br />
False , elements without sort.<br />
Style To determine the style of list:<br />
0-standard<br />
1-checkbox<br />
Clear list To clear all elements of the list:<br />
Listno.Clear<br />
Add items to list:<br />
a) Change property list from properties window. When click on arrow, write<br />
items (elements).<br />
20<br />
Shape1<br />
Label1
) Add elements by code using the property additem as follows::<br />
Listno.additem ("first element ")<br />
Listno.additem ("second element ")<br />
.<br />
.<br />
.<br />
Listno.additem ("last element")<br />
Example: Design a form contains label to display your department and two command<br />
buttons "show" and "hide" such that when click on command1, form2 appears and<br />
when click on command2, form2 disappears. In form2 design a list to contain the<br />
name of departments� branches which appears after click on command button<br />
"display".<br />
Form1<br />
Label1: caption="applied science"<br />
Command1: caption="show"<br />
Command2: caption="hide"<br />
Command<br />
1<br />
Form2<br />
Command1: caption="display"<br />
List1: list= غرﺎﻓ<br />
21<br />
List1<br />
Label1<br />
Comman<br />
Command<br />
2
Example: Design a form contains a sorted list alphabetically such that the user can<br />
add the item from text to the list after click on command button "add".<br />
Sol:<br />
List1<br />
list<br />
sorted true<br />
command1<br />
caption add<br />
Text1<br />
text<br />
Private Sub Command1_Click()<br />
list1.AddItem (Text1.Text)<br />
Text1.Text = " "<br />
End Sub<br />
Option button: Used only as a group of buttons. When the user selects one of them<br />
the others are deselected automatically.<br />
All other properties of this control are similar to those in form and command<br />
button where they are fully discussed which are caption, font, enabled, backcolor and<br />
visible beside an important property which is value that takes true or false and it used<br />
with if statement. The option button usually takes click event.<br />
Example: Design a form with three option buttons " red ", " green " and " blue "<br />
such that when we click on options the color of the form colored by red, green and<br />
blue respectively.<br />
option1:caption<br />
option2: caption<br />
option3: caption<br />
green<br />
blue<br />
red<br />
Private Sub Option1_Click()<br />
Form1.BackColor = vbGreen<br />
End Sub<br />
Private Sub Option2_Click()<br />
Form1.BackColor = vbBlue<br />
End Sub<br />
Private Sub Option3_Click()<br />
Form1.BackColor = vbRed<br />
End Sub<br />
22
Check box:<br />
Any number of check boxes can be used on a form. They work independently.<br />
Its Property value could be changed in design stage manually, or in running stage by<br />
code.<br />
Example: Design a form with one text box and three check boxes such that when<br />
click on boxes the following is done: change typing to bold, italic, underline.<br />
Sol:<br />
Text1<br />
Text ﻍﺭﺎﻓ<br />
Check1<br />
Text1<br />
caption Bold<br />
Check2<br />
Check1<br />
caption Italic<br />
Check3<br />
Check2<br />
caption underline Check3<br />
Private Sub Check1_Click()<br />
Text1.FontBold = Check1.Value<br />
End Sub<br />
Private Sub Check2_Click()<br />
Text1.FontItalic = Check2.Value<br />
End Sub<br />
Private Sub Check3_Click()<br />
Text1.FontUnderline = Check3.Value<br />
End Sub<br />
Run stage:<br />
23
Timer<br />
Timer returns the time in millisecond. It may be used to measure execution time of<br />
code (program efficiency).<br />
Property name Objective and code<br />
interval To repeat the code according to event. It takes an<br />
integer values (0-65535) and measured in millisecond<br />
enabled timerno.. Enabled =true or false<br />
Ex: design electronic clock to display the time in seconds.<br />
sol:<br />
Timer1<br />
interval 1000<br />
Label1<br />
Caption<br />
Private Sub Timer1_Timer()<br />
Label1.Caption = Time<br />
End Sub<br />
Example: Design a form to display "applied science" such that when click on<br />
command button "start" the color of "applied science" changed randomly every<br />
second.<br />
Sol:<br />
Timer1<br />
interval 1000<br />
enabled false<br />
Label1<br />
Caption مﻮﻠﻌﻟا<br />
ﺔﯿﻘﯿﺒﻄﺘﻟا<br />
Command1<br />
caption أﺪﺑا<br />
Private Sub Command1_Click()<br />
Timer1.Enabled = True<br />
End Sub<br />
Private Sub Timer1_Timer()<br />
t = Rnd * 15<br />
Label1.ForeColor = QBColor(CInt(t))<br />
Label1<br />
Timer1<br />
24<br />
Label1<br />
Timer1<br />
Command
End Sub<br />
Run stage:<br />
When click on command button أﺪﺑا the color of the font will be changed every second<br />
randomly in integer no. (0-15).<br />
Note: the function (Cint) used to convert to integer no.<br />
And (Rnd) used to generate a random no. in a range (0-1)<br />
Input - output boxes<br />
There are two types of dialog boxes which are inputbox and messagebox. The first is<br />
used to input variable and the second to output variable or message. Both needs code<br />
and appear at run time.<br />
a) Inputbox<br />
Inputbox used to input value or characters for one variable from keyboard at running<br />
stage.<br />
This box needs a code in code sheet and could be written in any event or command<br />
X=inputbox(" prompt or remark", "title")<br />
Example: enter value of x using inputbox<br />
Sol:<br />
Private Sub Form_Load()<br />
X=Inputbox("enter value of x", "calculation")<br />
End Sub<br />
25
Message box<br />
It is used to output a message to the user (at running stage) the code needed could be<br />
written in code sheet and in any event or command.<br />
The available icons for message box<br />
structure<br />
vbcritical<br />
vbquestion<br />
vbexclamation<br />
vbinformation<br />
The available commands for message box<br />
structure<br />
value<br />
Vbokonly<br />
0<br />
Vbokcancel<br />
1<br />
vbAbortRetryIgnor<br />
2<br />
vbYesNoCancel<br />
3<br />
vbYesNo<br />
4<br />
vbRetryCancel<br />
5<br />
value<br />
16<br />
32<br />
48<br />
64<br />
26<br />
icon<br />
Commands<br />
Ok<br />
Ok, Cancel<br />
Abort, Retry, Ignore<br />
Yes, No, Cancel<br />
Yes, No<br />
Retry, Cancel<br />
For example if we write the following statement then a message box will be appear as<br />
shown below<br />
MsgBox "please close your program", 16, "Error"<br />
or<br />
MsgBox "please close your program", vbcritical, "Error"<br />
Example: show what appear after running the following statement<br />
MsgBox "are you sure you want to delete this file", 32 + 4, "delete"<br />
or<br />
MsgBox "are you sure you want to delete this file",vbQuestion+vbYesNo,"delete"<br />
Sol:
Example: write a program to move the text (excellent) from textbox to message box<br />
and change the color of the text after click on command button (display).<br />
Sol:<br />
Text1: text="excellent"<br />
Command1: caption="ضﺮﻋ"<br />
Private Sub Command1_Click()<br />
MsgBox (Text1.Text)<br />
Text1.BackColor = QBColor(9)<br />
Text1.Text = " "<br />
End Sub<br />
Or we can write the following code:<br />
Private Sub Command1_Click()<br />
X= Text1.Text<br />
MsgBox (X)<br />
Text1.BackColor = QBColor(9)<br />
Text1.Text = " "<br />
End Sub<br />
27
Exercises<br />
Q1/design a form contains specific title such that when we click on command1 the<br />
color of the font will change and we click on command2 the size of the font will be<br />
change.<br />
Q2\design a form contains shape and command buttons "what is this" such that when<br />
click on the command button the name of this shape appears in message box.<br />
Q3/enter a text in label1 such that this text copied to label2 after click on command<br />
button "copy" and delete from label2 after click on command button "delete".<br />
Q4/ design a form contain command button such that when we click on command,<br />
form2 will be appear and form1 will be disappear.<br />
Q5/design a form "at run stage" the title of form1 will be change to "visual basic" and<br />
the back color of form1 will change too.<br />
Q6/design a form with two shapes, red and blue ,write code to replace the color every<br />
between two shapes.<br />
Q7/ design a form contain list box and two command buttons:<br />
1- add: to add the element to the list from input box<br />
2- delete: to delete the list elements<br />
28
<strong>Visual</strong> basic statements<br />
In visual basic program (code) there are four basic parts, i.e. it is contains<br />
the following statements:<br />
1- Declaration of variables and constants<br />
2- Inputting variables<br />
3- Operators for variables<br />
4- Outputting variables<br />
1- Declaration of a variable and constants<br />
The declaration means defining the data type (variable or constant).<br />
� Variables<br />
A variable is a space in memory filled with data (value, character, time<br />
or date).<br />
Notes:<br />
- Variable name must start with character (not number or function) and<br />
maximum length 256 character, and does not contain point or symbol.<br />
- Variable name must not repeat for other values.<br />
The variable has to be declared. Variable type is defined by its content .The<br />
content may be data as numeric or character or string or Boolean or date, or<br />
any type of data (called variant), these types declared as:<br />
Dim variable name as type<br />
Or<br />
Global variable name as type<br />
Note: The Dim declaration written in general part of the form or in any<br />
place in form or sub procedure which used for one form. While Global<br />
declaration used for all forms<br />
The types of variables that are allowed in visual basic are stated in the table<br />
below.<br />
Types of variables<br />
Type Value range Declaration<br />
1-Integer -32768
5-String 65535 characters Dim x as string<br />
6-Boolean True or false Dim x as Boolean<br />
7-Date Computer time and date<br />
Jan 100
2- Inputting variables<br />
There are methods to input variable x as stated in the following:<br />
Method of input For all type of variable<br />
In text tool X=textno.text<br />
In input box X=inputbox("prompt","title")<br />
Note: To enter many variables we usually use the second method with loop.<br />
3- Operators for variables<br />
The operators that are used for variable are described in the following<br />
table<br />
Arithmetic operators<br />
Relational operators<br />
+ addition<br />
- subtraction<br />
* multiplication<br />
/ division<br />
mod Modulus –rest of division<br />
^ exponent<br />
= equal<br />
< Less than<br />
Greater than<br />
>= Greater or equal<br />
Not equal<br />
Note: The order of operations when executing arithmetic operation is:<br />
Exponentiation - multiplication division and mod - finally addition and<br />
subtraction.<br />
The mathematical representation must be written as visual basic<br />
representation in the code as following examples:<br />
Mathematical representation<br />
3(x+4y)<br />
X<br />
2<br />
� 4 � 2<br />
4 3<br />
2 3<br />
16 � 3 �10<br />
� 5�<br />
4 � 3 � 2<br />
5y<br />
� x �1<br />
2<br />
x � 4<br />
2<br />
e x<br />
cos( 2x)<br />
�<br />
sin( x)<br />
31<br />
Programming representation<br />
3*(x+4*y)<br />
X ^2 � 4 / 2<br />
16^ ( 1/<br />
4)<br />
� 3^3<br />
�10<br />
� ( 5*<br />
4)<br />
/ 3^2<br />
�<br />
(5*y)/(x^2-4)+x-1<br />
Exp(2*x)/(cos(2*x)+sin(x))<br />
2^3
Assignment statement<br />
There are many statements ways to fill a variable as follows:<br />
Variable = expression<br />
Expression may include variables, operations and functions as follows:<br />
1- Numerical variable. For example: i=3<br />
2- Mathematical relation. For example: x=a/b<br />
3- Characters variable (string). For example: t="abc"<br />
4- Boolean variable (logical). For example: p=true<br />
Functions for variables<br />
The numeric and string variables are the most common used variables<br />
in programming, therefore V.B provides the user with many functions to be<br />
used with a variable to perform certain operations or type convention. The<br />
most common functions for numerical variable x<br />
Function Description<br />
Abs(x) Absolute of x<br />
Sqr(x) Square root of x<br />
Int(x) Integer of x<br />
Exp(x) Exponential of x (e x )<br />
Fix(x) Take the integer part<br />
Sin(x), cos(x), tan(x) Trigonometric functions<br />
Log(x) Natural logarithms<br />
Len(x) Number of character of variable x<br />
Lcase(x) Change the text x to small letters<br />
Ucase(x) Change the text x to capital letters<br />
Cint(x) Convert x to integer<br />
Clong(x) Convert x to long integer<br />
Cdbl(x) Convert x to double precision<br />
Cstr(x) Convert variable x to string<br />
Val(x) Convert string x to numerical variable<br />
Note: the last five functions are called conversion functions.<br />
The following functions for different x are given for comparison.<br />
Function output<br />
X=lcase("MY NAME IS") my name is<br />
X=ucase("my name is") MY NAME IS<br />
int(2.5) 2<br />
Int(-2.5) -3<br />
Fix(2.5) 2<br />
Fix(-2.5) -2<br />
32
4- Outputting variables<br />
There are methods to output variable x as stated in the following:<br />
Method of output For all type of variable<br />
On form Print x<br />
Note: in load event we must use the statement:<br />
(form1.show)<br />
to text tool textno.text =X<br />
to label tool Labelno.caption=x<br />
By message box msgbox (x)<br />
Or msgbox ("remark"& x)<br />
The instruction print could be very helpful to display data and used as<br />
follows:<br />
Code Description example<br />
print To leave one line and<br />
print on next<br />
Print "a", "b", "c" Use (,) to print a distance<br />
between outputs<br />
a b c<br />
Print "a"; "b"; "c" Use (;) to print the abc<br />
Print "a","b";<br />
Print "c"<br />
outputs adjacent<br />
Print a, b then print c on<br />
the same line<br />
Example1: write a program to enter any text and compute its length. Put<br />
suitable design.<br />
Sol:<br />
Design stage:<br />
Form1<br />
Caption String length<br />
Command1<br />
caption Click here<br />
Label1<br />
Caption Length=<br />
Text1<br />
Text<br />
33<br />
abc
Code stage:<br />
Dim s As String<br />
Private Sub Command1_Click()<br />
s = InputBox("inter string")<br />
L = Len(s)<br />
Text1.Text = CStr(L)<br />
End Sub<br />
Running stage:<br />
Example2: write a program to add and subtract two integer numbers after<br />
putting a suitable design. Use message box for outputting.<br />
Design stage:<br />
34<br />
form<br />
caption calculator<br />
Command1<br />
caption<br />
+<br />
Command2<br />
Caption<br />
-<br />
Label1<br />
Caption Enter no.1<br />
Label2<br />
Caption Enter no.2<br />
text<br />
ﺔﻴﺼﺎﺨ ﻥﻤ text1, text2 ﻍﺭﻔﻨﻭ
Code stage:<br />
Dim x, y, z as integer<br />
Private sub command1_click ()<br />
X=val(text1.text)<br />
Y=val(text2.text)<br />
Z=x + y<br />
Msgbox("addition result="&z)<br />
End sub<br />
Private sub command2_click ()<br />
X=val(text1.text)<br />
Y=val(text2.text)<br />
Z=x - y<br />
Msgbox("subtraction result="&z)<br />
End sub<br />
Running stage<br />
Enter two values in text1 and text2. When click on command (+) or (-) the<br />
addition or subtraction result appears in message box.<br />
Example3: write a program to execute the four operations according to the<br />
following design.<br />
Label1<br />
Label2<br />
Label3<br />
Command6<br />
Code stage:<br />
Dim a,b, c as single<br />
Private sub command1_click ()<br />
a=val(text1.text)<br />
b=val(text2.text)<br />
c=a + b<br />
End sub<br />
35<br />
Command1<br />
Command2<br />
Command3<br />
Command4<br />
Command5
Private sub command2_click ()<br />
a=val(text1.text)<br />
b=val(text2.text)<br />
c=a - b<br />
End sub<br />
Private sub command3_click ()<br />
a=val(text1.text)<br />
b=val(text2.text)<br />
c=a * b<br />
End sub<br />
Private sub command4_click ()<br />
a=val(text1.text)<br />
b=val(text2.text)<br />
c=a / b<br />
End sub<br />
Private sub command5_click ()<br />
Text3.text=cstr(c)<br />
End sub<br />
Private sub command6_click ()<br />
Text1.text=" "<br />
Text2.text=" "<br />
Text3.text=" "<br />
End sub<br />
Example4: write a program to compute the functions: sine, cosine, integer<br />
value, square, absolute value.<br />
sol:<br />
Design stage:<br />
Dim x, y As Single<br />
Private Sub command1_click()<br />
x = Val(Text1.Text)<br />
y = Abs(x)<br />
Text1.Text = CStr(y)<br />
End Sub<br />
Private Sub Command2_Click()<br />
x = Val(Text1.Text)<br />
y = Sqr(x)<br />
Text1.Text = CStr(y)<br />
End Sub<br />
36
Private Sub Command3_Click()<br />
x = Val(Text1.Text)<br />
y = Int(x)<br />
Text1.Text = CStr(y)<br />
End Sub<br />
Private Sub Command4_Click()<br />
x = Val(Text1.Text)<br />
y = Sin(x * 3.14159 / 180)<br />
Text1.Text = CStr(y)<br />
End Sub<br />
Private Sub Command5_Click()<br />
x = Val(Text1.Text)<br />
y = Cos(x * 3.14159 / 180)<br />
Text1.Text = CStr(y)<br />
End Sub<br />
Running stage<br />
37
Q1/ Write a Program to compute the area of triangle with design.<br />
Q2/Write a program to enter the name of a student and two marks of any<br />
subject by input box then computes the average and display the name and<br />
average in two labels.<br />
Q3/ Write a program to enter a real number then find its square after putting<br />
suitable design.<br />
Q4/ Design a project with three forms, such that form1 contains two<br />
command buttons "Pethagors equation" and "area of triangle" such that<br />
when click on command1 "Pythagoras equation", form2 will be appear so in<br />
this form the third side of triangle will be compute with Pythagoras equation<br />
after enter the first and second side, and when click on "area of triangle" the<br />
third form displayed so that the area will be compute after entering the base<br />
and height. Use suitable output and input methods.<br />
Q5/ Write a program to display the message below after click on command<br />
button "run".<br />
Q6/Write a program to display the time and the date, put a suitable design.<br />
38
Menu<br />
The menu is a bar at the top of the form. The standard form is<br />
display without menu, but the user can add it. This menu could be<br />
included in form using menu editor. In next section the menu editor and<br />
the required code will be discussed.<br />
Menu Editor<br />
To use menu there are three ways:<br />
1- Press menu icon from toolbar .<br />
2- press (ctrl+E) from key board.<br />
3- click on: tools>Menu Editor.<br />
Menu editor box appears as shown below.<br />
Move item down<br />
Move item up<br />
Add …<br />
Remove …<br />
Move to next item in the list Delet item<br />
The steps of applying menu editor box are as follows:<br />
To add item Use menu editor as follows<br />
To add many items Use the menu Editor<br />
39<br />
Select<br />
short cut
Create sub Menu list Use menu Editor<br />
Create Shortcut Use & with caption and select shortcut<br />
Code for menu items<br />
Each item in menu or sub menu is considered as a command which<br />
takes the event click only. The user can add code for each item:<br />
click on item>code for that item appears on code sheet. Also code can be<br />
added to form: click on item >code for that item appears on code sheet.<br />
This is described in the following figure:<br />
Click on item<br />
Example: Design a form with menu and a label with a specific title. The<br />
menu contains one item color with sub menu items: red, green, blue and<br />
exit, to color the label in red, green, blue then exit from the program.<br />
Sol: put label1 with any caption for example (hello)<br />
Caption: color<br />
Name: command1<br />
Caption: red<br />
Name:command2<br />
Create standard menu (color) from menu<br />
editor>next<br />
Add sub menu items by pressing then enter<br />
the caption and name>next.<br />
40
Caption: green<br />
Name:command3<br />
Caption: blue<br />
Name:command4<br />
Caption: exit<br />
Name:command5<br />
Shortcut: ctrl+E<br />
Do the same thinks for other items>ok<br />
To programming these commands click on each one to open its code<br />
window and write the following code:<br />
Private sub command2_click ()<br />
Label1.backcolor=vbred<br />
End Sub<br />
Private sub command3_click ()<br />
Label1.backcolor=vbgreen<br />
End Sub<br />
Private sub command4_click ()<br />
Label1.backcolor=vbblue<br />
End Sub<br />
Private sub command5_click ()<br />
End<br />
End Sub<br />
41
Conditional statements<br />
There are two types of conditional statements:<br />
1- If statement<br />
2- Select case<br />
1- If statement: The comparison operations are used with conditional<br />
statements.<br />
The comparison operations are: (=, =, , and, or)<br />
There are four structures for if statement.<br />
a) Simple structure If.. then:<br />
Used for running one programming statement only if the required<br />
condition satisfied.<br />
The general form is: If condition then statement<br />
Example 1: write a program to enter a mark of a student then print (pass) if<br />
he successful.<br />
Sol:<br />
Dim x as integer<br />
Private sub command1_click()<br />
X= cint(text1.text)<br />
If x>= 50 then text2.text= "pass"<br />
End sub<br />
b) If block structure: Used for running many programming statements if<br />
the required condition satisfied.<br />
The general form is:<br />
If condition then<br />
Statements<br />
End if<br />
Example 2: write a program to enter a mark of a student then print (pass)<br />
in size 18 if he successful.<br />
Sol:<br />
Dim x as integer<br />
Private sub command1_click()<br />
X= cint(text1.text)<br />
If x>= 50 then<br />
text2.text= "pass"<br />
text2.fontsize=18<br />
end if<br />
End sub<br />
42
c) If.. Then.. Else structure: Used for running many programming<br />
statements if the required condition satisfied. And running another<br />
programming statements (after else) if the required condition not satisfied.<br />
The general form is:<br />
If condition then<br />
Statements<br />
Else<br />
Statements<br />
End if<br />
Example3: write a program to enter a mark of a student then print (pass) if<br />
he successful and print (fail) otherwise.<br />
Sol:<br />
Dim x As Integer<br />
Private Sub command1_click()<br />
x = CInt(Text1.Text)<br />
If x >= 50 Then<br />
Text2.Text = "pass"<br />
Else<br />
Text2.Text = "fail"<br />
End If<br />
End Sub<br />
d) If.. Then.. Elseif.. Else structure:<br />
Used if we have many conditions to be satisfied<br />
Example 4: write a program to enter a user name and display the message<br />
(hello) three times. The first one for (Muna), the second one for (Maha) and<br />
the third for any user as a guest.<br />
Sol:<br />
Dim x As String<br />
Private Sub command1_click()<br />
x = Text1.Text<br />
If x = "Muna" Then<br />
MsgBox "hello, Muna"<br />
ElseIf x = "Maha" Then<br />
MsgBox "hello,Maha"<br />
Else<br />
MsgBox "hello, guest"<br />
End If<br />
End Sub<br />
43
Example 5: Write a program to classify any entered number according to<br />
its sign and display the phrase (negative number) when the number is<br />
negative and the phrase (positive number) when the number is positive,<br />
otherwise display the phrase (neither positive nor negative).<br />
Sol:<br />
Dim x As Single<br />
Private Sub command1_click ()<br />
x = Val(Text1.Text)<br />
If x > 0 Then<br />
MsgBox "positive number"<br />
ElseIf x < 0 Then<br />
MsgBox "negative number"<br />
Else<br />
MsgBox "neither positive nor negative"<br />
End If<br />
End Sub<br />
Nested If statement:<br />
It can be takes the following structure:<br />
If condition then<br />
If condition then<br />
Statements<br />
End if<br />
End if<br />
�<br />
�<br />
�structure2<br />
�<br />
�<br />
44<br />
�<br />
�<br />
�<br />
�<br />
�structure<br />
1<br />
�<br />
�<br />
��<br />
Note: Any structure of if structures can be used insteade of structure 1<br />
and 2 above.<br />
Example 6: Write a program to enter two numbers and<br />
compute multiplication and division operations using<br />
option button with display the phrase (illegal division<br />
operation) when the denominator is zero.<br />
Sol:<br />
Dim a, b, c As Single<br />
Private Sub command1_click()<br />
a = Val(Text1.Text)<br />
b = Val(Text2.Text)<br />
If Option1.Value Then<br />
c = a * b<br />
Text3.Text = CStr(c)<br />
Else
If b 0 Then<br />
c = a / b<br />
Text3.Text = CStr(c)<br />
Else<br />
Text3.Text = "illegal division operation"<br />
End If<br />
End If<br />
End Sub<br />
Select statement<br />
Used for applying many statements depending on one variable. The<br />
general form is:<br />
Select case variable<br />
Case value1<br />
statements<br />
Case value2<br />
Statements<br />
.<br />
.<br />
.<br />
Case value n<br />
Statements<br />
Case else<br />
Statements<br />
End select<br />
Example 7: write a program to print the days of the week when we enter<br />
its number<br />
Sol:<br />
Dim x As Integer<br />
Private Sub Command1_Click()<br />
x = CInt(Text1.Text)<br />
Select Case x<br />
Case 1<br />
MsgBox ("Sunday")<br />
Case 2<br />
MsgBox ("Monday")<br />
Case 3<br />
MsgBox ("Tuesday")<br />
Case 4<br />
MsgBox ("Thursday")<br />
Case 5<br />
MsgBox ("Wednesday")<br />
45
Case 6<br />
MsgBox ("Friday")<br />
Case 7<br />
MsgBox ("Saturday")<br />
End Select<br />
End Sub<br />
Example 8: write a program to give the evaluation for different marks<br />
as follows:<br />
mark<br />
90-100<br />
80-89<br />
70-79<br />
60-69<br />
50-59<br />
0-49<br />
evaluation<br />
Excellent<br />
Very good<br />
Good<br />
Medium<br />
Pass<br />
Fail<br />
Dim x As Integer<br />
Private Sub Command1_Click()<br />
x = CInt(Text1.Text)<br />
Select Case x<br />
Case 90 To 100<br />
MsgBox ("excellent")<br />
Case 80 To 89<br />
MsgBox ("very good")<br />
Case 70 To 79<br />
MsgBox ("good")<br />
Case 60 To 69<br />
MsgBox ("medium")<br />
Case 50 To 59<br />
MsgBox ("pass")<br />
Case 0 To 49<br />
MsgBox ("fail")<br />
Case Else<br />
MsgBox "the range is 0-100", vbCritical, "error"<br />
End Select<br />
End Sub<br />
46
Exercises<br />
Q.1/ Design a form with three menus and label with a specific title.<br />
The menus contain sub menus as follows: color: red, blue, green, style:<br />
underline, bold, italic, size: 10, 20, 30 then write the code for each<br />
command.<br />
where<br />
Q.2/ Write a program to enter a value of x and compute the value of y<br />
� x<br />
y � �<br />
��<br />
x<br />
if x � 0<br />
if x � 0<br />
Q.3/ Write a program to find the root of first degree equation.<br />
Q4 / write a program to enter two numbers and print the largest<br />
number.<br />
Q.5/ Write a program to enter two numbers and compute<br />
multiplication and division operations using check box with displaying the<br />
phrase (illegal division operation) when the denominator is zero.<br />
Q.6/ Design a form with a text box. Use select statement so that when<br />
user enters g, b, r and y then form colored to green, blue, red, and yellow<br />
respectively.<br />
47
Loop statement:<br />
<strong>Visual</strong> basic supports statement to perform loops. The loops statements could<br />
have different structures as follows:<br />
1- Counter loop.<br />
2- Conditional loop.<br />
1- Counter loop:<br />
Loops apply programming statements for fixed number of times using counter<br />
(for… next) statement.<br />
The general form is:<br />
For variable = start value to end value step step value<br />
Statements<br />
Next variable<br />
Example1: Write a program to print (hello) five times.<br />
Sol:<br />
Dim i as integer<br />
Private Sub Command1_Click ()<br />
For i = 1 To 5<br />
Print "hello"<br />
Next i<br />
End Sub<br />
Example2: Write a program to print even numbers from 1 to 10.<br />
Sol:<br />
Dim i as integer<br />
Private Sub Command1_Click ()<br />
For i = 2 To 10 step 2<br />
Print i<br />
Next i<br />
End Sub<br />
Notes:<br />
1-The variable's value that we use as counter must be integer value (integer, long).<br />
2- If we don’t determined the step value then the assumed value is 1.<br />
3- If the final value smallest than the initial value, then the step value must be<br />
negative.<br />
2- Conditional loop<br />
Loops repeat programming statements according to specific condition. There are<br />
two types of conditional loop:<br />
1- Do while<br />
2- Do until<br />
1-Do while loop: In this loop the statements will be implemented and repeated when<br />
ever the condition satisfied. The general form is:<br />
48
Do while condition<br />
Statements<br />
Loop<br />
Example3: Write a program to print (hello) five times with its numbering using do<br />
while loop.<br />
Sol:<br />
Dim i as integer<br />
Private Sub Command1_Click ()<br />
i = 1<br />
Do while i
Example6: Write a program to find the summation of undetermined number of<br />
positive numbers such that the program will be stopped when we enter negative<br />
number.<br />
Sol:<br />
Dim x, sum As Single<br />
Private Sub command1_click()<br />
sum = 0<br />
x = Val(InputBox("enter x", "summation"))<br />
Do While x >= 0<br />
sum = sum + x<br />
x = Val(InputBox("enter x", "summation "))<br />
Loop<br />
MsgBox (CStr(sum))<br />
End Sub<br />
Example7: Write a program to find the summation of the numbers from 5 to 15.<br />
Sol:<br />
Dim I, sum as integer<br />
Private Sub command1_click ()<br />
sum = 0<br />
For i = 5 to 15<br />
Sum = sum + i<br />
Next i<br />
Label1.caption = "sum ="&cstr(sum)<br />
End Sub<br />
Example8: Write a program to find the summation of 10 numbers.<br />
Sol:<br />
Dim i as integer<br />
Dim x, sum as double<br />
Private Sub command1_click ()<br />
sum = 0<br />
For i = 1 to 10<br />
x = val(inputbox ("enter number"))<br />
Sum = sum + x<br />
Next i<br />
Label1.caption = "sum="& cstr(sum)<br />
End Sub<br />
Running stage:<br />
For example if we entered the numbers: 1, 5, -1, 3, 2, 0, -1, 3, 0, -4 then sum=8<br />
50
Example9: Write a program to find the average of n numbers.<br />
Sol:<br />
Dim i as integer<br />
Dim x, sum, av as Double<br />
Private Sub command1_click ()<br />
i = 1: sum = 0<br />
n = cint (text1.text)<br />
Do while i 50<br />
Print i<br />
i = i + 5<br />
Loop<br />
End Sub<br />
Example11: write a program to find the average of numbers that dividable by 3 (with<br />
out remainder) from 3 to 99.<br />
Sol:<br />
Dim I, n, sum as integer<br />
Dim av as Double<br />
Private Sub command1_click ()<br />
i = 3 : n = 0<br />
sum = 0<br />
Do while i
Example12: write a program to print (welcome) ten times, the first one with the<br />
ordinary size and color. Then make the color changed and the size bigger at each<br />
time.<br />
Sol:<br />
Dim i As Integer<br />
Private Sub Command1_Click()<br />
Print "welcome"<br />
For i = 1 To 9<br />
FontSize = 10 + i<br />
ForeColor = QBColor(i)<br />
Print "welcome"<br />
Next i<br />
End Sub<br />
Series:<br />
To compute the value of series, we use suitable loop statements according to the<br />
boundaries (limits) of each series.<br />
Example13: Find<br />
Sum=1+x+x 2 +x 3 +…+x n , where x is an integer.<br />
Sol:<br />
Dim I, n, x, sum as integer<br />
Private Sub command1_click ()<br />
sum = 1<br />
n=cint(text1.text)<br />
x=val(text2.text)<br />
For i = 1 To n<br />
Sum = sum +x^i<br />
Next i<br />
Text3.text=cstr(sum)<br />
End Sub<br />
Nested loop:<br />
The nested loops are the loops that are placed inside each other. The most inner<br />
loop will be executed first, then the outer ones. These loops should neither intersect,<br />
nor have the same index. As follows:<br />
For i = 1 To n<br />
For j = 1 To m<br />
Statements<br />
Next j<br />
Next i<br />
52
Example14: write a program to print the multiplication table.<br />
Sol:<br />
Dim I, j As Integer<br />
Private Sub command1_click()<br />
For I = 1 To 10<br />
For j = 1 To 10<br />
p = I * j<br />
Print I; "*"; j; "="; p,<br />
Next j<br />
Print<br />
Next I<br />
End Sub<br />
Example15: write a program to generate the numbers in the following form.<br />
1<br />
1 2<br />
1 2 3<br />
1 2 3 4<br />
1 2 3 4 5<br />
Sol:<br />
Dim I, j As Integer<br />
Private Sub command1_click()<br />
For I = 1 To 5<br />
For j = 1 To i<br />
Print j;<br />
Next j<br />
Print<br />
Next I<br />
End Sub<br />
53
Exercises:<br />
Q.1: write a program to find n factorial (n!)<br />
Q.2: write a program to enter n numbers and find the average of negative numbers<br />
only.<br />
Q.3: write a program to print the multipliers of 6 from 12 to 60, using do while first,<br />
then use do until loop secondly.<br />
Q.4: compute the value of y where:<br />
1 2<br />
y � 1�<br />
� � 2<br />
x x<br />
3<br />
��<br />
�<br />
3<br />
x<br />
n<br />
n<br />
x<br />
Q.5: Find the odd numbers from 1 to 100.<br />
Q.6: Write a program to generate the numbers as follows:<br />
5 5 5 5<br />
4 4 4<br />
3 3<br />
2<br />
Q.7: How many multipliers of 3 are there between 1 and 100? Write a program to find<br />
that.<br />
54