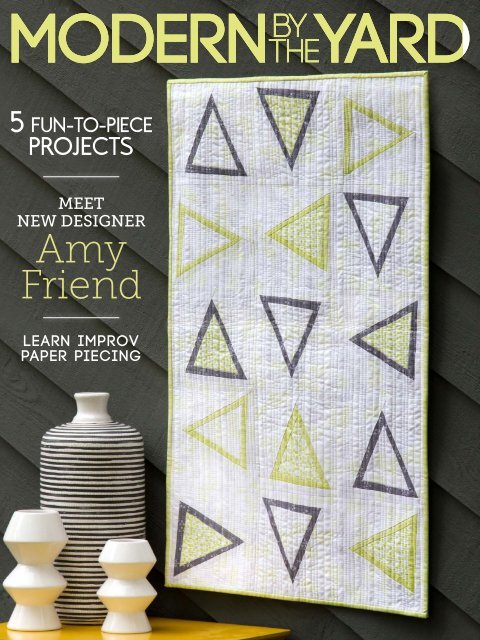
MBTY #6
This modern quilting e-zine showcases projects and fabric from Benartex.
This modern quilting e-zine showcases projects and fabric from Benartex.

You also want an ePaper? Increase the reach of your titles
YUMPU automatically turns print PDFs into web optimized ePapers that Google loves.
MODERN BY<br />
YARD<br />
THE<br />
5 FUN-TO-PIECE<br />
PROJECTS<br />
MEET<br />
NEW DESIGNER<br />
Amy<br />
Friend<br />
LEARN IMPROV<br />
PAPER PIECING
from the<br />
editor<br />
Zip It Up<br />
Trio<br />
Love at First Sight<br />
What attracts you to a quilting project? Is it the design? The colors?<br />
The technique? Chances are, it’s a little bit of everything, including<br />
that hard-to-describe initial impression of “I love it!” You’ll find plenty<br />
of variety in this issue—from a big block quilt design to a super simple<br />
table runner, and fun zippered pouches.<br />
We’re also thrilled to introduce you to Amy Friend and her new<br />
collection, Improv. Turn to p. 4 to learn more about Amy and her work,<br />
see the entire fabric line on p. 27, and then play around with her improv<br />
paper piecing technique in the Mod Triangles pattern on p. 6. And if<br />
you’re new to paper piecing, don’t worry—we have a beginner’s guide<br />
for you!<br />
Browse through our Gallery beginning on p. 25 to see our latest<br />
modern-leaning fabric lines (including those used in projects in this<br />
issue!) and don’t miss the free pattern links on p. 24. Sit back with your<br />
apple cider or pumpkin spice latte and enjoy all the inspiration this new<br />
issue has to offer!<br />
132 West 36th Street<br />
4th Floor<br />
New York, NY 10018<br />
T: 212.840.3250<br />
F: 212.921.8204<br />
E: info@benartex.com<br />
I: www.benartex.com<br />
Publisher: Benartex, LLC<br />
Editorial Director: Susan Neill<br />
Editor: Lisa Swenson Ruble<br />
Art Director: Rosemarie Wyer<br />
Photographer: Sarah Daisy Photography<br />
Tech Editor: Lucy Fazely<br />
Volume 2, Issue 2<br />
www.benartex.com<br />
Have you checked out our website?<br />
You’ll find all our latest fabrics (as well<br />
as old favorites) organized by our three<br />
studios: Benartex, Kanvas and Contempo.<br />
We also have a wide variety of free quilt<br />
patterns to download featuring our fabrics.<br />
Follow us on social media:<br />
Happy Sewing!<br />
Susan<br />
Susan Neill<br />
Do you follow our blog?<br />
Keep up-to-date on new fabric lines,<br />
magazine features, and blog hops, as well<br />
as chances to enter fabric giveaways, at<br />
http://sewinlovewithfabric.blogspot.com<br />
Interested in submitting a project or<br />
article idea for our next issue?<br />
Email modernbytheyard@gmail.com<br />
2
contents<br />
MODERN BY THE YARD<br />
18.<br />
25.<br />
Fabric gallery<br />
NEW COLLECTIONS<br />
TO ASK FOR AT YOUR<br />
LOCAL QUILT SHOP<br />
Projects<br />
6. MOD TRIANGLES<br />
Amy Friend shares a simple<br />
paper piecing design in<br />
a cool palette<br />
12. LET YOUR STAR SHINE<br />
An oversized block within<br />
a block!<br />
16. ZIP IT UP TRIO<br />
Who doesn’t love a zipper<br />
pouch? We’ve got three<br />
for you<br />
4. DESIGNER PROFILE:<br />
MEET AMY FRIEND<br />
A look inside the<br />
world of a modern<br />
fabric and quilt designer<br />
9. STOCK YOUR STUDIO<br />
Ready, set shop! Fun finds<br />
for your sewing room<br />
23. SEWCIAL MEDIA<br />
Inspiring sites, feeds and<br />
boards that we’ve found<br />
20. FALL FLEURISH<br />
This table topper pairs rich<br />
prints with negative space<br />
Features<br />
2. EDITOR’S NOTE<br />
24. PROJECT GALLERY<br />
Add these free quilt<br />
patterns to your sewing<br />
to-do list<br />
32. LOOKING FOR MORE?<br />
Keep in touch and<br />
don’t miss an issue of<br />
Modern by the Yard<br />
On the cover AMY FRIEND PLAYS WITH PAPER PIECING IN HER<br />
MOD TRIANGLES QUILT.<br />
3
MEET<br />
AMY<br />
FRIEND<br />
This blogger and designer is<br />
one of the faces of modern quilting.<br />
Anyone who has ever had young children can<br />
appreciate the name of Amy Friend’s blog, During<br />
Quiet Time. Stealing those precious minutes while<br />
the kids are napping, or having “quiet time” to do<br />
something for yourself—it’s feels both deserved and<br />
luxurious at the same time. Starting in 2009, Amy used<br />
her kids’ nap and rest time to sew, jumping right into<br />
the modern quilting aesthetic and the blogging world.<br />
“Traditional quilting never drew me in, but I loved the<br />
graphic, bold designs” of modern quilting,” she says.<br />
Quilting: A Natural Fit<br />
A self-taught quilter, Amy studied studio art and art<br />
history in college, and always enjoyed the repetitive<br />
design of print making. Prior to having kids, she<br />
worked as a museum curator. Now the collections she<br />
works with are closer to home—she’s the author of two<br />
quilting books, Intentional Piecing and Improv Paper<br />
Piecing (Lucky Spool Media, 2016 and 2017), a variety<br />
of commercial patterns, and her newest venture,<br />
a fabric line with Contempo Studio.<br />
Amy’s designs are primarily paper pieced, and her<br />
focus the last few years has been on improv paper<br />
piecing. “Paper piecing has so much design potential.<br />
I sketch a shape, and then use paper piecing to repeat<br />
it,” she says. “Then I’ll often rotate the blocks or use<br />
negative space to create a more modern layout.” Amy<br />
designed the Mod Triangles quilt for this issue using<br />
improv paper piecing techniques.<br />
Improv, Amy’s fabric collection, fits in perfectly with<br />
her style. “I tend to work in a minimal palette, and<br />
I wanted to create a few little subgroups—grays,<br />
peaches, citron, and burgundy with rose,” she says. The<br />
prints began with doodles Amy creates while on the<br />
phone—cross hatch sketching, triangles, and little mole<br />
hills. She chose designs with paper piecing in mind—<br />
the molehole hill print could work for shingles, scales,<br />
and grass—little detailed areas in larger designs. Many<br />
of the prints feature asymmetry and negative space<br />
for a more modern feel. Having Improv fabrics in<br />
hand has helped Amy come full circle in her quilting.<br />
“I always enjoyed the whole process of completing a<br />
quilt. This added the last step—a quilt made in my own<br />
fabric designs, using my design.”<br />
Visit Amy’s website: Duringquiettime.com<br />
Read a longer interview with Amy here.<br />
4
“Caged” uses light<br />
and dark prints in gray<br />
and rose to create<br />
a three-dimensional<br />
looking quilt.<br />
(Top) “Coneflower<br />
with Butterfly”<br />
pillow beautifully<br />
showcases the<br />
Improv fabrics in<br />
a detailed paper<br />
piecing design.<br />
(Bottom) Amy’s Owl<br />
Pillow is included in<br />
her Improvisational<br />
Paper Piecing book.<br />
A few of Amy’s Improv fabrics.<br />
Improv is available in quilt shops<br />
now. See the whole collection<br />
on p. 27.<br />
Tranquil is Amy’s free quilt<br />
pattern, available here. Amy<br />
says, “I was trying to bridge<br />
the gap between a traditional<br />
audience and modern quilting<br />
in this design.”<br />
5
ModTriangles<br />
Paper piecing creates<br />
perfect triangles that<br />
twist and turn in your<br />
own improv design!
Diagram 1<br />
easy<br />
3"<br />
8-1/2"<br />
A5<br />
A5<br />
Cut 8<br />
rectangles<br />
as shown<br />
Diagram 1<br />
3”<br />
Designed by:<br />
Amy Friend; During Quiet Time<br />
Finished Size: 21-1/2" x 35-1/2"<br />
Finished Count & Block Size: (15) 7" square<br />
Fabric: Improv by Amy Friend for Contempo, Benartex<br />
8-1/2"<br />
3"<br />
A5<br />
A5<br />
3”<br />
3"<br />
Cut 8<br />
rectangles<br />
as shown<br />
8-1/2"<br />
A5<br />
Diagram 1<br />
8-1/2"<br />
A5<br />
3”<br />
A6<br />
3"<br />
A6<br />
Cut 8<br />
rectangles<br />
as shown<br />
Quilt Cut Layout 8 Diagram<br />
rectangles<br />
as shown<br />
Materials<br />
• 1-1/2 yards White/Citron Screen (#3605-09)<br />
• 1/4 yard Dark Gray Triangle Toss (#3604-11)<br />
• 1/4 yard Citron Beans Crosshatch (#3601-43)<br />
• 1/2 yard Citron Twisted Screen, includes<br />
binding (#3603-43)<br />
• 3/4 yards backing fabric<br />
• 27" x 41" piece of batting<br />
Cutting/Preparation<br />
From White/Citron Screen:<br />
(8) 5" x 6" pieces (A1)<br />
(16) 9" x 8-1/2" pieces (A5 and A6)<br />
(15) 2" x 8" pieces (A7)<br />
From Dark Gray Triangle Toss:<br />
(9) 1-1/2" x 6" pieces (A2)<br />
(9) 1-1/2" x 7" pieces (A3)<br />
(9) 1-1/2" x 6-1/2" pieces (A4)<br />
From Citron Beans Crosshatch:<br />
(7) 5" x 6" pieces (A1)<br />
From Citron Twisted Screen:<br />
(6) 1-1/2" x 6" pieces (A2)<br />
(6) 1-1/2" x 7" pieces (A3)<br />
(6) 1-1/2" x 6-1/2" pieces (A4)<br />
(4) 2-1/4" x 42" strips for binding<br />
Download the foundation pattern here. Make 15 copies.<br />
(Double check the size—the block should measure 7-1/2"<br />
square, including the printed seam allowance.)<br />
Make the Blocks<br />
1. Position (2) 9" x 8-1/2" White/Citron Screen pieces<br />
right sides up and (2) right sides down. Cut through<br />
this stack with the ruler positioned 3" from the upper<br />
left corner and 3" from the lower right edge. Repeat<br />
(4) times to make a total of 32 cut pieces. These cut<br />
pieces minimize waste for sections A5 and A6.<br />
A6<br />
3"<br />
3”<br />
Diagram 2 Diagram 3<br />
2. Starting with (1) White/Citron Screen A1 piece and<br />
rectangles<br />
(1) Citron Twisted A6 as Screen shown A2 piece, begin paper<br />
A6 Diagram 1<br />
Cut 8<br />
piecing Block #1. (See p. 8 for more information rectangles on<br />
3"<br />
A6 as shown<br />
paper piecing.) Continue working in number order,<br />
3”<br />
using Citron Twisted Screen A3 and A4 pieces and<br />
Diagram 4 Diagram 5<br />
White/Citron Screen A5, 3” A6 and A5 A7 pieces. Trim<br />
Cut 8 pieces<br />
Diagram 2 Diagram 3<br />
block to the 1/4" seam allowance as as indicated shown on the<br />
A5<br />
foundation. Make a total<br />
Diagram<br />
of (3)<br />
1<br />
#1 Blocks.<br />
8-1/2"<br />
8-1/2"<br />
Diagram 1<br />
Cut 8<br />
3. In the same way, use Dark Gray Triangle 3" Toss A2, A3,<br />
3"<br />
and A4 pieces, and White/Citron Screen A1, A5, A6<br />
and A7 pieces to make Block A6 #2. Make Cut a 8 total of (5)<br />
Diagram 2 Diagram rectangles 3<br />
#2 Blocks.<br />
4. In the same way, use Citron Beans Crosshatch A1<br />
pieces, Dark Gray Triangle Toss A2, A3, and A4<br />
pieces, and White/Citron Screen A5, A6 and A7<br />
pieces to make Block #3. Make a total of<br />
(4) #3 Blocks.<br />
3"<br />
Diagram 2 Diagram 3<br />
3"<br />
3"<br />
A53"<br />
Cut 8<br />
rectangles<br />
A5<br />
as shown<br />
Diagram 4 Diagram A6 5<br />
Cut 8 pieces<br />
Diagram 2<br />
Diagram 4<br />
A6 3” as shown<br />
Diagram 5<br />
8-1/2"<br />
8-1/2"<br />
3”<br />
Diagram 3<br />
Diagram 4 Diagram 5<br />
Diagram 4<br />
A6<br />
as shown<br />
Diagram 2 Diagram 3<br />
Diagram 4 Diagram 5<br />
7
Diagram 1<br />
A6<br />
A3<br />
A5<br />
A6<br />
A2<br />
A3<br />
A5<br />
A2<br />
A1<br />
A1<br />
A4<br />
A7<br />
A2<br />
A1<br />
A4<br />
A7<br />
A6<br />
A3<br />
A5<br />
A6<br />
A2<br />
A1<br />
A6<br />
A6<br />
A3<br />
A5<br />
A3<br />
A5<br />
A2<br />
A4<br />
A1<br />
A1<br />
A4<br />
A4<br />
A7<br />
A7<br />
A6<br />
A3<br />
A2<br />
A4<br />
A7<br />
A3<br />
A5<br />
A2<br />
A1<br />
A4<br />
A7<br />
A4<br />
A7<br />
A6<br />
A6<br />
A3<br />
A5<br />
A3<br />
A5<br />
A2<br />
A2<br />
A6<br />
A5<br />
A1<br />
A1<br />
A7<br />
A4<br />
A2<br />
A3<br />
A5<br />
A3<br />
A1<br />
A2<br />
A5<br />
A1<br />
A1<br />
A4<br />
A4<br />
A7<br />
A4<br />
A4<br />
A7<br />
A6<br />
A1<br />
A7<br />
A6<br />
A6<br />
A3<br />
A5<br />
A2<br />
A1<br />
A1<br />
A4<br />
A7<br />
A2<br />
A1<br />
A6<br />
A3<br />
A5<br />
A6<br />
A3<br />
A5<br />
A6<br />
A2<br />
A3<br />
A5<br />
A2<br />
A1<br />
A1<br />
A4<br />
A7<br />
A4<br />
A7<br />
A6<br />
A3<br />
A5<br />
A3<br />
A5<br />
A2<br />
A2<br />
A1<br />
A1<br />
A4<br />
A7<br />
A6<br />
A3<br />
A5<br />
A3<br />
A5<br />
A1<br />
A2<br />
A1<br />
A4<br />
A4<br />
A7<br />
A7<br />
A2<br />
A6<br />
A6<br />
A2<br />
A3<br />
A5<br />
A2<br />
A1<br />
A1<br />
A4<br />
A7<br />
A4<br />
A7<br />
A6<br />
A6<br />
A3<br />
A5<br />
A3<br />
A5<br />
A2<br />
A2<br />
A1<br />
A1<br />
A4<br />
A4<br />
A7<br />
A7<br />
A6<br />
A3<br />
A5<br />
A2<br />
A4<br />
A7<br />
A7<br />
A6<br />
A6<br />
A6<br />
A3<br />
A5<br />
A3<br />
A3<br />
A5<br />
A2<br />
A5<br />
A2<br />
A2<br />
A1<br />
A4<br />
A4<br />
A4<br />
A7<br />
A7<br />
A7<br />
A6<br />
A2<br />
A6<br />
A3<br />
A5<br />
A2<br />
A1<br />
A4<br />
A7<br />
A6<br />
A3<br />
A5<br />
A6<br />
A2<br />
A3<br />
A5<br />
A2<br />
A1<br />
A4<br />
A7<br />
A2<br />
A1<br />
A1<br />
A2<br />
A3<br />
A5<br />
A2<br />
A1<br />
A6<br />
A3<br />
A4<br />
A1<br />
A7<br />
A4<br />
A7<br />
A4<br />
A7<br />
A6<br />
A6<br />
A3<br />
A6<br />
A5<br />
A3<br />
A6<br />
A3<br />
A5<br />
A2<br />
A2<br />
A1<br />
A1<br />
A1<br />
A4<br />
A4<br />
A7<br />
A7<br />
A4<br />
A7<br />
A7<br />
A6<br />
A6<br />
A3<br />
A3<br />
A5<br />
A5<br />
A2<br />
A1<br />
A4<br />
A4<br />
A7<br />
A7<br />
3<br />
A5<br />
Diagram 2 Diagram 3<br />
3"<br />
5. In the same way, use Citron Beans Crosshatch A1<br />
A5<br />
pieces, Citron Twisted Screen A2, A3, and A4 pieces,<br />
and White/Citron Screen A5, A6 and A7 pieces to<br />
3"<br />
make Block #4. Make a total of (3) #4 Blocks.<br />
Diagram 4 Diagram 5<br />
A5<br />
3"<br />
Cut 8 pieces<br />
as shown<br />
Quilt Layout Diagram<br />
A6<br />
A6<br />
Cut 8 pieces<br />
as shown<br />
Diagram 5<br />
3"<br />
Assemble the Quilt<br />
Diagram 2 Diagram 3<br />
1. Lay out the (15) blocks into (5) rows of (3) blocks<br />
each, noting orientation of each block. Sew the blocks<br />
into rows and join the rows to complete the quilt top.<br />
2. Layer the backing right side down, batting and quilt<br />
top right side up. Baste to secure the layers and quilt<br />
as desired.<br />
Diagram 4 Diagram 5<br />
Diagram 1<br />
Diagram 1<br />
Diagram 2<br />
sidebar diagram<br />
3. Use the (4) 2-1/4" x 42" Citron Twisted Screen<br />
strips to bind the quilt.<br />
Quilt Layout Diagram<br />
Paper Piecing<br />
Primer<br />
Here’s a refresher (or quick crash<br />
course) on paper piecing.<br />
A couple quick notes first:<br />
• Position your fabrics right sides<br />
together on the BACK side of your<br />
foundation paper. You’ll be sewing<br />
on the printed lines on the paper,<br />
and sewing through the paper (on<br />
top) and the layers of fabric.<br />
• Shorten your stitch length. This<br />
makes it easier to remove the<br />
paper when you’re finished.<br />
• Always check to ensure that your<br />
cut fabric piece will completely<br />
cover the intended area.<br />
1. Position the A1 and A2 pieces<br />
right sides together on the wrong<br />
side of the foundation paper,<br />
positioning the matching<br />
Diagram 1<br />
Diagram 5<br />
raw edges<br />
1/4" past<br />
the printed line.<br />
With the paper<br />
side facing up,<br />
stitch on the<br />
Diagram 1<br />
printed line.<br />
2. Press the<br />
fabrics open.<br />
3. Fold the paper<br />
back on the<br />
stitched line<br />
(so you won’t<br />
be cutting it<br />
off) Diagram and 3 trim<br />
fabric 1/4"<br />
past the next<br />
stitching line.<br />
Unfold the<br />
paper so your<br />
entire<br />
foundation<br />
shows again.<br />
Diagram 5<br />
Diagram 6<br />
Diagram 1<br />
Diagram 2<br />
sidebar diagrams<br />
Diagram 3<br />
Diagram 1<br />
Diagram 3 Diagram 2 Diagram 4<br />
Diagram 2 1<br />
Diagram 2<br />
Diagram 3<br />
Diagram 4<br />
Diagram 5<br />
Diagram 3<br />
sidebar diagrams Diagram 2<br />
Diagram 5<br />
Diagram 3<br />
4. Position the A3<br />
piece right<br />
sides together<br />
on the A1/A2<br />
pieces, aligning<br />
raw edges.<br />
With the paper<br />
side facing up,<br />
stitch on the<br />
marked line.<br />
5. Press the<br />
fabrics open.<br />
6. In the same<br />
Diagram manner, 5 fold the<br />
Diagram 4<br />
paper back, trim<br />
Diagram 6<br />
Diagram7<br />
sidebar diagrams<br />
Diagram 3<br />
Diagram 6<br />
fabric Diagram to 1/4" 6 past<br />
the next stitching<br />
line, and then<br />
position the A4<br />
piece and stitch<br />
in place. Continue<br />
trimming fabric<br />
and adding pieces<br />
in numerical order.<br />
Diagram 4<br />
Diagram7<br />
Diagram 5 4<br />
Diagram 5<br />
Diagram 6<br />
Diagram7<br />
Diagram 6<br />
Diagram Diagram 4<br />
8
stock YOUR studio<br />
1<br />
2<br />
MUST-HAVE PRODUCTS, BOOKS AND MORE<br />
FOR THE MODERN QUILTER<br />
3<br />
4<br />
Fussy Cutters<br />
Club<br />
1. Love Quilts, Will Travel<br />
Southwest Modern by Kristi<br />
Schroeder features 18 projects<br />
inspired by the color and artistry<br />
of the southwestern United States.<br />
With gorgeous photos on location<br />
and pages chock full of travel tips,<br />
this book is as much a travel guide<br />
and as a source for gorgeous quilt<br />
patterns. Walk with Kristi through<br />
her design process and step by step<br />
sewing instructions. You’ll fall in love<br />
with the quilts and so much more!<br />
Luckyspool.com<br />
2. Thread Love<br />
If you’ve fallen in love with Amy Friend’s<br />
Improv collection, you’ll be happy to<br />
know that matching thread is available!<br />
The colors in the Aurifil Improv Thread<br />
Box blend beautifully—greys, peaches,<br />
golds, rose, and chartreuse! The box<br />
contains 12 50wt spools of 100%<br />
Aurifil Cotton. Perfect for piecing and<br />
quilting your future Improv project!<br />
Aurifil.com<br />
5<br />
Angie<br />
Wilson<br />
A Boot Camp for<br />
Mastering Fabric Play<br />
14 Projects<br />
3. She’s Got Precut Answers<br />
Precuts…they’re so addicting to buy,<br />
but then comes the hard part—you<br />
need to decide what to make with<br />
them! In her new book, Piece and<br />
Quilt with Precuts, Christa Watson<br />
offers easy and efficient tricks for<br />
piecing quilt tops with precuts and<br />
scrap fabrics. You’ll find 11 skillbuilding<br />
projects for fabric you already<br />
have. She also shares 18 machine<br />
quilting motifs for walking foot, free<br />
motion, and a combination of both<br />
techniques. Sew much inspiration in<br />
one book! (psst….watch for Christa’s<br />
new fabric collection with Contempo<br />
Studio later this fall!)<br />
Martingale-pub.com<br />
4. A Cut Above<br />
It’s not just the name that’s cool,<br />
though Rob Appell’s Man Sewing<br />
Shark Applicutter Rotary Cutter<br />
makes cutting applique pieces<br />
(especially the small ones!) easier.<br />
A precise 14mm blade cuts with<br />
accuracy, and a soft grip helps you<br />
control the blade with less effort.<br />
Safety first: the cutter also includes<br />
a safety fin for your finger and<br />
a brightly colored cover for safe<br />
storage! This cool tool is adaptable<br />
for both right and left-handed cutters<br />
Missouriquiltco.com<br />
5. Join the Club!<br />
The Fussy Cutters Club, that is. It’s<br />
the title of Angie Wilson’s new book,<br />
and an addicting way to play with fabric.<br />
Angie helps you to look at your fabric<br />
stash with fresh eyes and create a<br />
collage of your favorite parts. The book<br />
features 14 unique projects helping you<br />
to piece with purpose and showing how<br />
to fussy cut for color as well as design.<br />
If you’re tired of your stash, this book<br />
will help you see it in a new light!<br />
Ctpub.com<br />
9
MODERN<br />
with a twist<br />
Transforming traditional blocks<br />
Color Flow Puzzle<br />
Everyone<br />
loves a<br />
Nine-Patch!<br />
by Debby Kratovil<br />
Many traditional blocks can be traced to simple line drawings<br />
inside a specific size square. The Washington Puzzle is<br />
a Nine-Patch block with the lines drawn at a diagonal. This<br />
truly is a vintage block traditionally sewn with odd sized<br />
templates. I can imagine a quilter playing with paper and<br />
pencil and drawing the four lines in this block. Then, she<br />
cut it apart, added seams and sewed it back together. Funky<br />
templates for sure, but it creates a wonky, modern look!<br />
Old Design, New Method<br />
My technique, which I call Magic Stax, goes back about<br />
15 years when I, too, played with line drawings of traditional<br />
blocks. I drew this block on the paper side of freezer paper.<br />
Then, because the Washington Puzzle is comprised of nine<br />
unique patches/fabrics, I cut nine 10-1/2" squares of the<br />
luscious rainbow of colors in Caryl Bryer Faller-Gentry’s<br />
Color Flow fabric collection (love these prints!). I stacked<br />
them and ironed the freezer paper to the top. (This technique<br />
would work with any size square.) Because I was cutting<br />
through nine layers of fabric, I used a new rotary cutter blade<br />
and a larger cutter. Four cuts and you’re done cutting! Shuffle<br />
the patch piles as shown in the diagrams and you end up<br />
with nine layers of patches, every layer with nine different<br />
fabrics! Wonky-looking blocks, ready to sew.<br />
Color Flow Puzzle<br />
Finished Quilt Size: 39-1/2"<br />
A bright but more traditional<br />
Washington Puzzle quilt.<br />
Finished Block Size: 8-1/2"<br />
Note: To make the quilt shown, you will need (2) sets of (9) squares<br />
in order to get the needed (9) blocks with (5) tilting left and (4) tilting<br />
right. You’ll have pieces left to make an additional (9) blocks.<br />
Materials<br />
• 3/8 yard each of (9) Color Flow prints:<br />
Poppy (#1099-19), Fuchsia (#1099-28),<br />
Gold (#1099-33), Chartreuse (#1099-41),<br />
Green (#1099-44), Teal (#1099-54),<br />
Blue (#1099-55), Purple (#1099-66) and<br />
Flame (#1099-73)<br />
• 1/3 yard Color Flow Cloud (#1099-09)<br />
• 1/2 yard Color Flow Gray (#1099-13)<br />
• 1-1/4 yards backing fabric<br />
• 42" piece of batting<br />
• Freezer paper<br />
Cutting/Preparation<br />
From each 1/3 yard cut:<br />
(2) 10-1/2" squares<br />
From each of the Green, Purple, Gold and Fuchsia:<br />
(1) 5-1/2" x 15-1/4" piece<br />
From each of the Poppy, Blue, Flame, and Chartreuse:<br />
(1) 5-1/2" x 20-1/4" piece<br />
From the Cloud:<br />
(2) 1-1/2" x 30" strips<br />
(4) 1-1/2" x 28" strips<br />
(6) 1-1/2" x 9" pieces<br />
From the Gray:<br />
(5) 2-1/4" x 42" strips for binding<br />
Make the Blocks<br />
1. Cut a 10-1/2" square of freezer paper. Find and mark<br />
the mid-point of each edge and label A-D on the<br />
paper side of the square as shown. Draw a line from<br />
A to the bottom right corner. Draw a line from B to<br />
10
D<br />
B<br />
D<br />
B<br />
the bottom left corner. Draw a line from C to the top<br />
Diagram 1<br />
left corner. Draw a line from D to the top right corner.<br />
C<br />
the rows into the block. Trim to measure 9" square.<br />
C<br />
Diagram 4<br />
D<br />
A<br />
A<br />
Diagram 2<br />
Diagram 3<br />
D<br />
B D<br />
B<br />
C<br />
C<br />
Diagram 1<br />
Diagram 2<br />
Diagram 1<br />
Diagram 3<br />
2. Iron the marked square to right side of (1) 10-1/2"<br />
fabric square. Stack (8) different color squares<br />
3<br />
underneath, right sides D up. This will be 2 your B Dcutting<br />
9<br />
guide. Cut from A to the bottom right corner. 4Cut<br />
1<br />
from B to the bottom left corner. Cut from C to the<br />
Diagram 4<br />
8<br />
C<br />
top left corner, and cut from D<br />
C<br />
to the top right 5 corner.<br />
6<br />
Move stacks away from each other; 7you’ll have<br />
(9) piles of patches.<br />
Diagram 2<br />
A<br />
A<br />
Diagram 3<br />
B<br />
9<br />
8<br />
2<br />
1<br />
3<br />
Diagram 4<br />
5. Repeat to make (4) additional<br />
6<br />
left-tilting blocks.<br />
7<br />
Note: You have fabric cut to make (4) more.<br />
4<br />
5<br />
6. Mark a second freezer paper square as shown in the<br />
Mirror Image diagram below. Use this for the second<br />
stack of 9 squares and repeat steps 2-5, making (4) right<br />
tilting blocks. (You’ll have Diagram fabric 5 cut to make (5) more.)<br />
Diagram 4<br />
9<br />
Diagram 5<br />
8<br />
2<br />
7<br />
1<br />
3<br />
6<br />
4<br />
Assembly<br />
5<br />
Diagram 5<br />
1. Lay out the (9) block alternating with (6) 1-1/2" x 9"<br />
Cloud pieces into (3) rows of (3) blocks and (2) strips<br />
each. Sew the blocks and pieces into rows.<br />
D<br />
Diagram 2<br />
gram 4<br />
A<br />
Diagram 1<br />
Diagram 2<br />
A<br />
3. To rearrange the Diagram patches 4 and create the blocks, begin<br />
with the center stack (position #1). Move the top<br />
fabric to the B bottom D of the stack. B Move to the stack<br />
in position #2. Move the top (2) fabrics to the bottom<br />
of the stack. Move to position #3 and move the top<br />
C<br />
(3) C fabrics to the bottom of the stack. Continue,<br />
moving one more fabric piece in each stack. When you<br />
are finished, all the patches in a single layer will be a<br />
Diagram 3<br />
different fabric.<br />
9<br />
8<br />
2<br />
7<br />
1<br />
Diagram 3<br />
4. Sew the pieces together just like an ordinary<br />
Nine-Patch. Sew the top (3) pieces into a row. Press<br />
Diagram 5<br />
seams AWAY from the center. Sew the middle (3)<br />
patches and press TOWARD the center. Sew the<br />
bottom (3) patches and press AWAY from center. Join<br />
3<br />
6<br />
4<br />
5<br />
2. Sew the rows together alternating with<br />
(4) 1-1/2" x 28" Cloud strips.<br />
Diagram 5<br />
3. Sew the 1-1/2" x 30" Cloud strips to the sides.<br />
4. Sew the 5-1/2" x 15-1/4" Green and Purple pieces<br />
short ends together. Sew the 5-1/2" x 15-1/4" Gold<br />
and Fuchsia pieces short ends together. Sew the<br />
pieced strips to the sides of the quilt.<br />
5. Sew the 5-1/2" x 20-1/4" Poppy and Blue pieces short<br />
ends together. Sew the 5-1/2" x 20-1/4" Flame and<br />
Quilt Assembl Diagram<br />
Chartreuse pieces short<br />
ends together. Sew the<br />
pieced strips to the top<br />
and bottom of the quilt.<br />
6. Layer the backing,<br />
batting, and quilt top<br />
right side up. Baste<br />
the layers together<br />
and quilt as desired.<br />
Use the (5) 2-1/4" x 42"<br />
Gray strips to bind<br />
the quilt.<br />
Quilt Assembly Diagram<br />
11
let your<br />
Star Shine<br />
Piecing a framed<br />
border adds extra<br />
sparkle to this<br />
double star quilt.
intermediate<br />
Designed by: Sandra Walker; mmmquilts<br />
Finished Size: 36" square<br />
Fabric: Bree by Nancy Halvorsen and<br />
Colors for Quilters Solids for Benartex<br />
Make the Quilt<br />
1. Lay out (2) 3-1/2" navy dot and (2) 3-1/2" aqua dot<br />
squares as shown to make a four-patch. Sew the<br />
squares into rows and join the rows to make the<br />
center four-patch unit.<br />
Diag<br />
Materials<br />
• 1/2 yard Dot Circle Orange, includes binding<br />
(#2134-22)<br />
• 5/8 yard Multi Paisley Navy (#2132-11)<br />
• 1/2 yard Tiny Dot Aqua (#2137-24)<br />
• 1/2 yard Tiny Dot Blue (#2137-50)<br />
• 3/4 yard Colors for Quilters White Solid<br />
(#3000H-9)<br />
• 1-1/4 yards backing fabric<br />
• 42" square of batting<br />
Cutting<br />
From the Dot Circle Orange:<br />
(4) 4" squares<br />
(4) 2-1/4" x 42" strips for binding<br />
From the Multi Paisley Navy:<br />
(8) 9-1/2" squares<br />
From each of the Tiny Dot Aqua and Tiny Dot Blue:<br />
(2) 4" squares<br />
(2) 3-1/2" x 18-1/2" strips<br />
(1) 3-1/2" x 15-1/2" strip<br />
(1) 3-1/2" x 12-1/2" strip<br />
(1) 3-1/2" x 9-1/2" strip<br />
(3) 3-1/2" x 6-1/2" pieces<br />
(2) 3-1/2" squares<br />
From the White Solid:<br />
(4) 6-1/2" x 18-1/2" pieces<br />
(4) 6-1/2" squares<br />
(4) 4" Diagram squares 4<br />
(4) 3-1/2" squares<br />
Diagram 1<br />
2. Draw a diagonal line across the wrong side of (1)<br />
Diagram 4<br />
4" white square. Lay right sides together on (1) 4"<br />
orange square. Sew ¼” on either side of the drawn<br />
line, cut on the line and press open. Square to<br />
3-1/2". Make (8) half-square triangle (HST) units.<br />
Diagram 2<br />
3. Sew (2) HST units together as shown to make a star<br />
Diagram 5<br />
point pair. Make (4).<br />
Diagram 2 Diagram 3<br />
Diagram 4<br />
Diagram 5<br />
Diagram 2<br />
Diagram 3<br />
4. Sew star point pairs to opposite sides of the<br />
four-patch unit. Sew 3-1/2" white squares to both<br />
ends of the remaining star point pairs. Sew to the<br />
top and bottom of the four-patch to complete the<br />
block center.<br />
diagram 7<br />
diagram<br />
13
Diagram 4<br />
Diagram 5<br />
opposite end. Make a total of (4) flying geese units;<br />
(2) with navy dot strips and (2) with aqua dot strips.<br />
diagram 6<br />
diagram 6<br />
Diagram 4<br />
5. In the same way, make (4) 3-1/2" square HST units<br />
using 4" aqua dot and 4” blue dot squares.<br />
diagram 6<br />
6. Position the block center with the aqua dot<br />
squares in the upper left and lower right. Sew<br />
(1) 3-1/2" x 12-1/2" aqua dot strip to the top of the<br />
block center. Sew the (1) 3-1/2" x 12-1/2" blue dot<br />
strip to the bottom of the star.<br />
Diagram 2 Diagram 3<br />
7. Sew (1) aqua/blue dot HST to the end of<br />
(1) 3-1/2" x 15-1/2" blue dot strip as shown.<br />
Sew a second HST to the end of<br />
(1) 3-1/2" x 15-1/2" aqua dot diagram strip. Sew 7 to<br />
the top and bottom of the block center.<br />
Diagram 5<br />
quilt assembly diagram<br />
Diagram 5<br />
diagram 8<br />
8. Sew (1) 3-1/2" x 18-1/2" blue dot strip lengthwise<br />
diagram to (1) 6-1/2" 6 x 18-1/2" white strip. Make (2) strip<br />
sets. In the same way, make (2) aqua dot and<br />
white strip sets.<br />
Diagram 6<br />
diagram 7<br />
10. Sew (1) 3-1/2" x 6-1/2" blue dot piece to one side<br />
of (1) 6-1/2" white square. Sew (1) 3-1/2" x 9-1/2"<br />
blue dot piece to an adjoining side to make a single<br />
color corner unit. In the same way, make an aqua<br />
single color corner unit.<br />
diagram 7<br />
diagram 8<br />
ram 7<br />
14<br />
9. Draw a diagonal line on the wrong side of each<br />
9-1/2" navy paisley square. Noting orientation,<br />
position a marked square on one end of a blue dot/<br />
white strip set. Stitch on the drawn line, trim seam<br />
allowance to 1/4", and press open. Repeat on the<br />
Diagram 7<br />
diagram 8<br />
11. Sew (1) blue 3-1/2" x 6-1/2" piece to (1) 6-1/2"<br />
white square. Sew (1) aqua/blue HST unit to (1)
3-1/2" x 6-1/2" aqua dot piece. Make (2) double<br />
color corner units, noting the different orientation<br />
for each.<br />
diagram 8<br />
Assemble the Quilt<br />
1. Lay out the (4) corner units, (4) flying geese units,<br />
and block center into rows. Join the units into rows<br />
and sew the rows together to complete the quilt top.<br />
Press. The quilt top should measure 36-1/2" square.<br />
2. Layer the backing right side down, batting and quilt<br />
top right side up. Baste to secure the layers and<br />
quilt as desired.<br />
Diagram 8<br />
3. Use the (4) 2-1/4" x 42" orange strips to<br />
bind the quilt.<br />
quilt assembly diagram<br />
Quilt Assembly Diagram<br />
15
Zip It Up Trio<br />
Transform brightly colored prints and matching zippers<br />
into playful pouches in a variety of sizes.
easy<br />
Designed by:<br />
Lisa Swenson Ruble; Love to Color My World<br />
Finished Pouch Size: 11-1/2" x 9-1/2" (large);<br />
8" x 8-1/2" (medium); 7" x 4-1/4" (small)<br />
Fabric: All’s Wool that Ends Wool from Kanvas<br />
2. Position the (2) 9" flange pieces on opposite sides<br />
of the 5-1/4" x 9" sheep piece, matching raw edges.<br />
Baste in place.<br />
Zipper Tote Trio - Diagrams<br />
Diagram 1 Diagram 2<br />
1/2"<br />
detail<br />
Large Pouch<br />
Diagram 3<br />
Materials<br />
• 1/2 yard Woolly Bully Hydrangea (#8709-50)<br />
• 1 fat quarter Sheep Thrills Cream/Multi<br />
(#8705-07)<br />
• 1/2 yard On the Lamb Rust (#8710-88)<br />
• Fusible fleece<br />
• 14" or longer coordinating color zipper<br />
Diagram 5<br />
Cutting/Preparation<br />
From the Woolly Bully Hydrangea:<br />
(2) 5" x 9" pieces<br />
(2) 4" x 5" pieces<br />
(1) 11" x 14" piece (backing)<br />
From the Sheep Thrills Cream/Multi:<br />
Fussy cut (1) 5-1/4" x 9" piece (to center sheep)<br />
Fussy cut (1) 5-1/4" x 4" piece (to center sheep)<br />
From the On the Lamb Rust:<br />
(1) 12" x 10" piece (back lining)<br />
(1) 2-3/4" x 12-1/2" piece (front top lining)<br />
(1) 7-3/4" x 12-1/2" piece (front bottom lining)<br />
(1) 1" x 42" strip<br />
From the fusible web:<br />
(1) 14-1/4" x 9” piece<br />
(1) 14-1/4" x 4" piece<br />
(1) 11" x 14" piece<br />
press flanges away from center<br />
Diagram 4<br />
Diagram 2<br />
3. Position 5"<br />
Diagram<br />
x 9"<br />
1hydrangea squiggle pieces<br />
Diagram<br />
on<br />
2top<br />
of the flange pieces and stitch. Press 1/2" with flange<br />
pointed toward the hydrangea pieces to complete<br />
the bag bottom. Fuse the 14-1/4" x 9" fleece piece<br />
to the wrong side. Quilt as desired and trim to<br />
measure 12-1/2" x 7-3/4", making sure to center<br />
sheep from top to bottom.<br />
Diagram 3<br />
Diagram 6<br />
Diagram 1 Diagram 2<br />
Diagram 5<br />
1/2"<br />
Diagram 3<br />
Zipper Tote Trio - Diagrams<br />
Zipper Tote Trio - Diagrams<br />
Diagram 3<br />
Diagram 4<br />
Diagram 4<br />
press flanges away from center<br />
detail<br />
4. Repeat -1- steps 2-3 using the 4" x 5" hydrangea<br />
squiggle pieces, the 5-1/4" x 4" sheep print piece,<br />
and the 4" flange strips to make the bag top. Fuse<br />
the 14-1/4" x 4" fleece piece to the wrong side. Quilt<br />
as desired and trim to measure 2-3/4" x 12-1/2",<br />
press flanges away from center<br />
making sure to center sheep from top to bottom.<br />
-1-<br />
Diagram 4<br />
Diagram 6<br />
detail<br />
Making the Large Pouch<br />
1. Press the 1" x 42" rust swirl strip lengthwise<br />
wrong sides together to create a 1/2" wide flange.<br />
Diagram 5<br />
Cut (2) 9" pieces and (2) 4" pieces.<br />
Zipper Tote Trio - Diagrams<br />
Diagram 1 Diagram 2<br />
1/2"<br />
Diagram 1<br />
5. Fuse the 11" x 14" fleece piece to the wrong side<br />
of the 11" x 14" Diagram hydrangea 6 squiggle piece. Quilt<br />
as desired and trim to measure 12" x 10". Baste<br />
12" x 10" rust swirl lining right side up on fleece.<br />
6. Lay the front bag bottom right sides down on<br />
right side of one edge of the zipper tape and pin in<br />
place. Position the 12-1/2" x 7-3/4" rust swirl strip<br />
detail<br />
Diagram 3<br />
17<br />
press flanges away from center
Diagram Diagram 4 4<br />
Diagram Diagram 5 5<br />
on the back side of the zipper, sandwiching the<br />
zipper, and pin in place. Stitch using a zipper foot.<br />
Press open and topstitch 1/4" Diagram from 6 the zipper<br />
Diagram 5<br />
Diagram 6<br />
Diagram 6<br />
Diagram 7 Diagram 8<br />
detail<br />
Cutting/Preparation<br />
From the teal swirl:<br />
(1) 5" x 9" piece<br />
(1) 3" x 9" piece<br />
(1) 9" x 9-1/2" piece<br />
From the multicolor balls:<br />
(1) 8-1/2" x 9" piece (back lining)<br />
(1) 7" x 8-1/2" piece (front bottom lining)<br />
(1) 2-1/2" x 8-1/2" piece (front top lining)<br />
(1) 2-1/2" x 9" piece<br />
From the gold squiggle:<br />
(1) 1-1/2" x 9" piece<br />
From the fusible fleece:<br />
(1) 8" x 9" piece<br />
(1) 9" x 9-1/2" piece<br />
detail<br />
(1) 3" x 9" piece<br />
Zipper Tote Trio - Diagrams<br />
Diagram 7 Diagram 8<br />
Making the Medium Pouch<br />
1. Sew together the 5" x 9" teal swirl piece, 1-1/2" x 9"<br />
gold squiggle piece, and 2-1/2" x 9" multicolor ball<br />
piece to make the front bag bottom. Fuse to wrong<br />
side a 8" x 9" fleece piece. Quilt as desired and trim<br />
to measure 8-1/2"<br />
Diagram 9x 7".<br />
Diagram 10<br />
Diagram 7<br />
Diagram 9 Diagram 10<br />
9. With the zipper open halfway, layer the bag back<br />
on top of the bag front, with lining sides out. Pin in<br />
place and stitch around the outer edge using a 1/4"<br />
seam allowance. Clip the corners and trim zipper<br />
Diagram 8<br />
ends. Zigzag stitch or serge the raw edges.<br />
Zipper Tote Trio - Diagrams<br />
Medium Pouch<br />
Materials<br />
Diagram 11<br />
detail<br />
Diagram 10<br />
Diagram 8<br />
Diagram 12<br />
• 1 fat quarter each: On the Lamb Teal (#8710-84),<br />
Diagram 12<br />
Woolly Balls Cream/Multi (#8708-07),<br />
Woolly Bully Gold/Khaki (#8709-33)<br />
• Fusible fleece<br />
• 9" or longer coordinating color zipper<br />
Diagram 11<br />
Diagram 9<br />
2. Fuse the 3" x 9" fleece piece to the wrong side<br />
of the 3" x detail 9" teal swirl piece to make the front<br />
bag top. Quilt as desired and trim to measure<br />
2-1/2" x 8-1/2".<br />
Zipper Tote Trio - Diagrams<br />
Diagram 12<br />
7. Repeat step 6 with the front bag top, top lining, and<br />
the other side of the zipper.<br />
-1- -1-<br />
8. Open the zipper halfway<br />
Zipper<br />
and<br />
Tote<br />
stitch<br />
Trio<br />
across<br />
- Diagrams<br />
both ends<br />
of the zipper past the edge of the fabric.<br />
10. Turn the zipper pouch right side out.<br />
-2-<br />
3. Fuse the 9" x 9-1/2" fleece piece to the wrong side<br />
of the 9" x 9-1/2" teal swirl piece. Quilt as desired<br />
and trim to measure 8-1/2" x 9". Baste 8-1/2" x 9"<br />
multicolor dot lining right side up on fleece.<br />
-2-<br />
4. Lay the top of front bag bottom right sides down<br />
on right side of one edge of the zipper tape and pin<br />
in place. Position the 7" x 8-1/2" multicolor ball strip<br />
on the back side of the zipper, sandwiching the zipper,<br />
and pin in place. Stitch using a zipper foot. Press<br />
open and topstitch 1/4" from the zipper.<br />
Diagram 7 Diagram 8<br />
detail<br />
Diagram 9 Diagram 10<br />
Diagram 10<br />
18<br />
Diagram 11<br />
detail<br />
Diagram 12
Diagram 9 Diagram 10<br />
5. Repeat step 4 with the front bag top, top lining, and<br />
the other side of the zipper.<br />
Zipper Tote Trio - Diagrams<br />
6. Open the zipper halfway and stitch across both<br />
ends of the zipper past the edge of the fabric.<br />
Diagram 11<br />
detail<br />
Diagram 8<br />
Diagram 12<br />
Making the Small Pouch<br />
1. Fuse the fleece to the wrong side of the 9" x 10"<br />
stitch print piece. Quilt as desired and trim to<br />
measure 8" x 9".<br />
2. Lay 8" edge of quilted piece right side down on<br />
right side of one edge of the zipper tape and pin in<br />
place. Position the 8" x 9" multicolor balls piece right<br />
side down on<br />
Zipper<br />
the back<br />
Tote<br />
side<br />
Trio<br />
of the<br />
- Diagrams<br />
zipper, sandwiching<br />
the zipper, and pin in place. Stitch using a zipper foot.<br />
Press open and topstitch 1/4" from zipper.<br />
Diagram 13 Diagram 14<br />
9 Diagram 10<br />
Diagram 11<br />
Zipper Tote Trio - Diagrams<br />
7. With zipper open halfway, layer the bag back on top<br />
of the bag front, with lining sides out. Pin in place<br />
and stitch around the outer edge using a 1/4" seam<br />
allowance. Clip the corners and trim zipper ends.<br />
Zigzag stitch or serge the raw edges.<br />
Diagram 12<br />
Diagram 13<br />
Diagram 15 Diagram 16<br />
3. Fold the quilted piece right sides together so 8"<br />
edge is even with the far edge of zipper tape. Pin<br />
in place. Fold the multicolor balls piece right sides<br />
together so the 8" edge is even with the far edge<br />
of zipper tape and quilted piece. With a zipper foot,<br />
stitch all layers together.<br />
Zipper Tote Trio - Diagrams<br />
Diagram 13 Diagram 14<br />
Diagram 13 Diagram 14<br />
Diagram 15 Diagram 16<br />
Zipper Tote Trio -<br />
D<br />
Diagram 13 Diagram 14<br />
Diagram 17<br />
Diagram 15<br />
Diagram 15<br />
Small Pouch<br />
Materials<br />
• 1 fat quarter Big Stitch Cream/Multi (#8706-07)<br />
• 1 fat quarter Woolly Balls Black/Multi (#8708-99)<br />
• Fusible fleece<br />
• 9" or longer coordinating color zipper<br />
Diagram 15 Diagram 16<br />
-2-<br />
Diagram 12<br />
-2-<br />
8. Turn the zipper pouch right side out.<br />
4. Turn lining tube right side out so the multicolor<br />
balls print<br />
Diagram<br />
is on<br />
17the outside of the tube and the<br />
stitch print piece is on the inside of the tube. Open<br />
the zipper halfway. Stitch across both ends of the<br />
zipper past the edge of the fabric. Diagram 17<br />
-3-<br />
Diagram 16<br />
Diagram 17<br />
Cutting/Preparation<br />
From the big stitch print:<br />
(1) 9" x 10" piece<br />
From the multicolor balls:<br />
(1) 8" x 9" piece<br />
From the fusible fleece:<br />
(1) 9" x 10" piece<br />
Diagram 17<br />
-3-<br />
5. Fold the tube so the zipper is centered on one side.<br />
Flatten bag and stitch on both ends 1/4" from the<br />
seam allowance to make the bag. Clip the corners<br />
and trim zipper ends. Zigzag stitch or serge the<br />
raw edges.<br />
6. Turn the zipper pouch right side out.<br />
-3-<br />
-3-<br />
19
easy<br />
Fall<br />
FLEURISH<br />
A subtle stripe and simple<br />
geometric design combine to<br />
make a graphic statement.<br />
Designed by:<br />
Sarah Goer; Sarah Goer Quilts<br />
Finished Size: 30-1/2" x 10-1/2"<br />
Finished Count & Block Size: (5) 6" x 10"<br />
Fabric: Fleurish and Colors for Quilters Solids<br />
Make the Blocks<br />
Use an accurate 1/4" seam allowance on all seams.<br />
I prefer to reduce my stitch length and press seams<br />
open for seams to lay flat.<br />
1. Draw a diagonal line on the wrong side of (1) 3" Ivory<br />
square. Place square right sides together with<br />
(1) 3" Azure/Teal square. Sew 1/4" on each side<br />
of the marked line, cut on the line and press both<br />
units open. Trim each half-square triangle (HST) to<br />
measure 2-1/2" square. Repeat with the remaining<br />
3" Azure/Teal square, positioning the diagonal line in<br />
Figure 1<br />
the opposite direction as shown.<br />
Figure 1<br />
Materials<br />
• 7/8 yard Quilt Block Solids Ivory, includes<br />
binding and backing (#5398-1)<br />
• 1/4 yard Fleurish Azure/Teal (#5619-54)<br />
• 1/4 yard Fleurish Chestnut (#5619-77)<br />
• 1/4 yard Fleurish Wine (#5619-86)<br />
• 14" x 34" piece of batting<br />
Figure 1<br />
Diagram 1<br />
Figure 2<br />
2. Pairing HSTs so print fabric directionality matches, sew<br />
together (2) pairs of HSTs Figure to 2 make a (2) point unit.<br />
Figure 3<br />
Cutting/Preparation<br />
From the Quilt Block Solids Ivory:<br />
(3) 2-1/4" x 42" strips for binding<br />
(1) 14" x 34" piece for backing<br />
(5) 2-1/2" x 4-1/2" pieces<br />
(10) 3" squares<br />
From the Fleurish Azure/Teal:<br />
(2) 3" squares<br />
(1) 2-1/2" x 6-1/2" piece, cut so stripes run lengthwise<br />
(1) 4-1/2" x 6-1/2" piece, cut so stripes run lengthwise<br />
From each of the Fleurish Chestnut and Fleurish Wine:<br />
(4) 3" squares<br />
(2) 2-1/2" x 6-1/2" pieces, cut so stripes run lengthwise<br />
(2) 4-1/2" x 6-1/2" pieces, cut so stripes run lengthwise<br />
Diagram 2<br />
Figure 3<br />
Figure 2<br />
3. Sew point units to opposite sides of (1) ivory<br />
2-1/2" x 4-1/2" piece. Add (1) 2-1/2" x 6-1/2"<br />
Azure/Teal piece and (1) Figure 4-1/2" 4 x 6-1/2" Azure/Teal<br />
piece to complete a block.<br />
Figure 3<br />
Figure 4<br />
Quilt Assembly Diagram<br />
Diagram Figure 4 3<br />
Quilt Assembly Diagram<br />
21
Figure 3<br />
4. Repeat steps 1-3 to create four more blocks,<br />
two with Chestnut and two with Wine.<br />
Assemble the Quilt<br />
1. Layout the (5) blocks as shown. Sew the blocks into<br />
a row to complete the quilt top.<br />
Figure 4<br />
Quilt Assembly Diagram<br />
2. Layer the quilt backing right side down, batting and<br />
quilt top right side up. Baste to secure the layers<br />
and quilt as desired. Quilt shown features straight<br />
line echo quilting around the beads and free motion<br />
ribbons within each bead. Trim backing and batting<br />
even with quilt top<br />
3. Use the (3) 2-1/4" x 42" ivory strips to bind the quilt.<br />
Quilt Assembly Diagram<br />
1<br />
2Negative<br />
Super Size It…or…Turn It Inside Out!<br />
Make a larger version of the runner on p. 20<br />
(45-1/2" x 15-1/2") or reverse the colors.<br />
Make the Larger Runner<br />
From the Quilt Block Solids Ivory:<br />
(4) 2-1/4" x 42" strips for binding<br />
(5) 3-1/2" x 6-1/2" pieces<br />
(10) 4" squares<br />
From the Fleurish Azure/Teal:<br />
(2) 4" squares<br />
(1) 3-1/2" x 9-1/2" piece, cut so stripes run lengthwise<br />
(1) 6-1/2" x 9-1/2" piece, cut so stripes run lengthwise<br />
From each of the Fleurish Chestnut and Fleurish Wine:<br />
(4) 4" squares<br />
(2) 3-1/2" x 9-1/2" pieces, cut so stripes run lengthwise<br />
(2) 6-1/2" x 9-1/2" pieces, cut so stripes run lengthwise<br />
into Positive<br />
Sarah’s runner makes use<br />
of negative space—what<br />
would traditionally be the<br />
background (the solid<br />
cream) is instead used for<br />
the shapes. For a different<br />
look, you can swap the<br />
colors and let the “beads”<br />
pop with color instead.<br />
22
Sewcial Media<br />
Who do you follow? Between blogs, Instagram, Pinterest, Twitter, and more,<br />
there’s so much inspiration at our fingertips! We’ll introduce you to a few of our favorites.<br />
><br />
Auribuzz<br />
Aurifil’s blog, Auribuzz, is a<br />
treasure trove of eye candy,<br />
inspiration, and industry news.<br />
You’ll see their latest color<br />
collections—many coordinate<br />
with designers’ fabric lines.<br />
You’ll also find designer<br />
profiles, tutorials, and tips.<br />
FB: Quilt Design A Day<br />
This prolific group, known as<br />
QDAD, exists to encourage<br />
quilters to design a little bit<br />
(15-20 minutes) each day.<br />
Whether you join just to look<br />
or use the page as inspiration<br />
to grow your designing skills,<br />
you’ll find plenty of fun here!<br />
Shannon Fraser<br />
Designs<br />
Have you heard of the<br />
100 Day Project? It’s a<br />
free global art project that<br />
started last April. (check out<br />
#the100dayproject). Shannon<br />
just finished the finished quilt<br />
from her challenge. Browse her<br />
site to see more of her work!<br />
IG: Amanda Murphy<br />
Design<br />
We’ve mentioned Amanda on<br />
this page before, but if you’re<br />
not following her on IG, you’re<br />
missing out on some gorgeous<br />
eye candy! Amanda has two<br />
new collections coming out<br />
this fall—Meadow Dance and<br />
Winter Games.<br />
Pinterest:<br />
Modern Quilts<br />
Two familiar names in quilting<br />
are Alex Anderson and Ricky<br />
Tims. While their show and quilts<br />
cover a range of techniques<br />
and styles, we know you’ll like<br />
their Modern Quilts Pinterest<br />
board—a little wonky, a little<br />
improv, and a lot of design!<br />
The Midnight Quilt<br />
Show<br />
It’s entirely possible that<br />
The Midnight Quilt Show,<br />
featuring Angela Walters, was<br />
created with all of us night-owl<br />
quilters in mind. This YouTube<br />
series features a different<br />
quilt each week. Watch<br />
(and sew) in your pajamas!<br />
23
Project<br />
Gallery<br />
Perfect Harmony<br />
Fabric: Bree<br />
Designer: Heidi Pridemore<br />
Click here to download<br />
Inspiration from<br />
your screen to<br />
your sewing room!<br />
Paint Box<br />
Fabric: Shadow Blush<br />
Designer: Benartex Studio<br />
Click here to download<br />
You can never have too many<br />
quilts on your to-do list!<br />
Browse through these free<br />
quilt patterns, all available<br />
on our website. Print your<br />
Fly Away Home<br />
Fabric: Zentastic<br />
Designer: Benartex Studio<br />
Click here to download<br />
favorites, do a little fabric<br />
shopping, and start sewing!<br />
Bitmap Fleurish<br />
Fabric: Fleurish<br />
Designer: Benartex Studio<br />
Click here to download<br />
Meadow Paths<br />
Fabric: Meadow Dance<br />
Designer: Amanda Murphy<br />
Click here to download<br />
24
fabric<br />
gallery<br />
COLOR & WHIMSY<br />
ON PARADE<br />
We truly have a little something for everyone here! There’s the fun fabrics: yarn-themed<br />
novelty prints (love those swirl and squiggle coordinates!) and a mod baby line with cool<br />
geometric prints. The mini prints: sketched cross hatches, triangles, dots and whimsical<br />
paisleys. Rich color: textured prints in a rainbow of colors. And even a little outside-the-box<br />
Christmas! Whatever speaks “modern” to you, chances are you’ll find it here!<br />
Turn the page to check out our favorite new print collections on these gallery pages. Each<br />
page shows the full line of fabrics offered; use the provided links to visit our website and<br />
put a name and SKU to your favorites!<br />
ALL’S WOOL THAT<br />
ENDS WOOL<br />
IMPROV<br />
BREE<br />
COLOR FLOW<br />
KOALA BABY<br />
MERRY LITTLE<br />
CHRISTMAS<br />
25
ALL’S WOOL THAT ENDS WOOL<br />
by Kanvas Studio<br />
Even without the rows of fun multicolored sheep, this collection is stuffed with<br />
colors and patterns! Swirls? Check. Squiggles? Check. Dots and checks? Check.<br />
While these fabrics were originally designed with knitters in mind, fabric artists of<br />
all types (hello, modern quilters!) will have fun playing with these prints.<br />
26<br />
See a project using All’s Wool that Ends Wool on p. 16.
IMPROV<br />
by Amy Friend<br />
Modern fabrics designed by a modern quilter—that’s what makes Improv so<br />
appealing! Designer Amy Friend created a variety of geometric prints in a cool<br />
palette of citron, salmon and gray. Which mini print do you like best? Molehills,<br />
crosshatch beans, twisted screen, or triangle toss? They’ll all work beautifully in<br />
your next quilt.<br />
See a project using Improv on p. 6 and read more about Amy on p. 4.<br />
27
BREE<br />
by Nancy Halvorsen<br />
Nancy’s well-loved vibrant and cheery color palette goes modern with trendy paisleys,<br />
orange peel prints, and tiny dots. Pair these prints with a white or light solid to create<br />
a modern design using classic blocks. Nancy’s love of applique means this fabric line<br />
has a variety of shades of each color—ideal for gradation and shaded quilts.<br />
28<br />
See a project using Bree on p. 12.
COLOR FLOW<br />
by Caryl Bryer Fallert-Gentry<br />
Tonals with tons of texture...that’s what you’ll find in Caryl Bryer Fallert-Gentry’s<br />
new collection, Color Flow. Based on Caryl’s hand painted fabrics, the organic<br />
patterns are created by scrunching wet fabric so the color flows. Available in 20<br />
rich color combinations.<br />
See a project using Color Flow on p. 10.<br />
29
KOALA BABY<br />
by Kanvas Studio<br />
Adorable koala babies serve as the focal print in a collection of cool geometric<br />
coordinates. What we love almost as much as the prints—dashed rectangles and<br />
half-circles—is the color palette. Yes, you’ll find pink and blue, but with a twist. The<br />
blue is mixed with lime greens, periwinkles, and gray, and the pink is paired with<br />
citron, yellow, and taupe. Modern baby, modern palette.<br />
30
MERRY LITTLE CHRISTMAS<br />
by Holly Helgeson<br />
Christmas doesn’t have to be red and green. Go modern with lime, fuchsia, and teal<br />
in a contemporary Christmas collection. Triangle trees and mod reindeer mixed<br />
with snowflake-inspired prints, ornaments, and a ribbon and bow print. It’s holiday<br />
with attitude!<br />
31
Looking for More?<br />
Keeping in touch in a modern world<br />
Find all the<br />
issues here.<br />
You just finished reading the sixth issue of<br />
Modern by the Yard. We hope you enjoyed our e-zine<br />
and found plenty of inspiration for an upcoming project!<br />
You can bookmark the magazine to go back and view it<br />
online, or save it to your desktop to pull it up any time you<br />
like. We want the modern quilting movement to continue to<br />
grow, and we hope our e-zine inspires your next project or<br />
helps you to look at your fabric choices in a different light.<br />
Let’s be social...<br />
We hope you’ll stay in touch with us! We’re maintaining<br />
an email list of followers so that we can alert you each<br />
time a new issue comes out. If you didn’t receive<br />
an email with a link to this issue, please email us at<br />
modernbytheyard@gmail.com and ask to be added to<br />
our email mailing list. Then you’ll receive an email each time<br />
we produce a new issue. Let your friends know as well!<br />
We’re already busy working on Issue #7, but while you’re<br />
waiting for it, make sure you’re following us on our social<br />
media platforms so that you’re among the first to hear<br />
about our new fabric collections, projects, and giveaways.<br />
(Watch for Win-It Wednesdays on IG!)<br />
Follow us on:<br />
Submissions... Do you have an idea for an original modern quilt or small project design using Benartex fabric to be featured<br />
in Modern by the Yard? We’d love to hear about it! Contact us at modernbytheyard@gmail.com