Botvinnik Semi-Slav, The (Pedersen)
182 THE B01VINNIK SEMI-SLAV experience of this opening he knows the ins and outs, and he seems to prefer his dark-squared bishop in the centre rather than hiding it away on the kingside. However, the ... eS break is not that easy to carry out since with White moving his knight to e4, controlling the d6-square and placing the rook on the semi-open c-file, White can usually meet ... eS with dS. Therefore, to find suitable places for his pieces Black will have to engage in rather slow manoeuvring as illustrated with arrows in the diagram above. With the limited space available this almost seems to cause a traffic-jam, but it all fits nicely together with one piece freeing just the square needed for another all the time. Of course, Black must be careful not to doze off and allow White too much space. B Savchenko - Kuczynski Groningen 1992 Here are first a few examples where White in the first place seems to enjoy a nice controlled space advantage, but following Black's patient defensive manoeuvring, he is gradually pushed back. In the diagram above, White has grabbed as much space as he could, and soon might be threatening to start an attack. However, Black's position is rock-solid and he now seized the initiative with ... 19 ... f6 20 ltJc4?! 20 ltJf3 is probably better, but even so 20 ... i.g6 21 'li'f2 :ta8 maintains a flexible and very solid position. 20 ... i.g6 21 'ii'c3 i.h5 22 :te1:ta8 23ltJc5 :ta7 24 .:tf1 i.f7 25 .:tn b6 26 ltJe4 .:taa8 27 ltJcd2 :ac8 28 b4? A mistake but it is not easy to suggest a plan for White. On the other hand, Black's position seems much easier to handle, with ideas such as ...i.b8 and ... fS followed by ... cS on the agenda. 28 ... f5 29 ltJg3 i.d6! Black has a clear advantage. White's play in the above example was far from perfect, although very natural. It is the kind of position where Black can easily eject the white knights from their rather unstable outposts on eS and cS. A much better strategy for White, which was initially developed by Artur Yusupov, is to try to get in the advance e4-eS, and that means White has to refrain from playing ltJeS. However, White must be careful that he advances e4 in a position where Black is not able to reply with ... eS. Here is
THE MAIN LINE: 7 e3 !i:Jd7 8 i.d3 dxc4 183 how it can be done, and it is also a good example of what can happen to Black if he becomes too passive and plays without a clear plan: It has been difficult to predict any of Black's previous three moves, but they do not seem to do anything particularly useful for the defence. White broke through with ... 29 d5 'ii'd8 30 d6 ... and went on to win in another 10 moves. The set-up with a white pawn on eS occurs more frequently when Black has decided upon a kingside fianchetto. Then White also has a nice outpost for his knight on d6 but he must take care that his centre does not get undermined by ... cS. VVard - Ferguson Hastings 1995 16 ... ~d7 17lLlc5 This should be played only after Black has played ... ~d7, thus gaining a tempo by attacking the b-pawn. 17 ... :'a7 18 e4 ~e8 18 ... eS is now met strongly by 19 lLlxeS ~xeS 20 dxeS1WxeS 211Wb3. 19 e5lLlg6?! In Sakaev-Dreev, Brno 1992 an early peace agreement was signed after 19 ... b6 20 lLla4 :'aa8. 20 lLle4 is clearly more ambitious but Black replies 20 ... a4 with some counterplay. 20'WWe4! ~b6? This only wastes time. 20 ... b6 was still the move. 21lLla4 ~c7 22 h4 :'aa8 23 'ii'g4 b6 24 h5 lLlf8 25 lLlc3 ~h8 26 lLle4 i.b8 27 :'e1 :'a7 28 :'e3 :'c8 B Ivanchuk - Kramnik Novgorod 1996 White has supported the eS-pawn with a rook on el. Hence, it is not so easy for Black to undermine White's centre with ... cS since White has the strong reply dS. If Black could get in ... cS without White being able to reply dS White's centre would be close to
- Page 133 and 134: WHITE GAMBITS: 9 exf6!? 131 positio
- Page 135 and 136: WHITE GAMBITS: 9 exf6!? 133 White h
- Page 137 and 138: WHITE GAMBITS: 9 exf6!? 135 12 .. :
- Page 139 and 140: WHITE GAMBITS: 9 exf6!? 137 tZ:lc6
- Page 141 and 142: WHITE GAMBITS: 9 exf6!? 139 Such a
- Page 143 and 144: 11 7 a4 1 d4 d5 2 c4 c6 3 lLlf3 lLl
- Page 145 and 146: 7 a4 143 w After the forced 8 ... h
- Page 147 and 148: 7 a4 145 b) 10 exf6 gxh4 11 ~eS cS!
- Page 149 and 150: 7 a4 147 There seems to be no way t
- Page 151 and 152: 7 a4 149 on such a peculiar rook mo
- Page 153 and 154: 12 Early Deviations (6 e3 and 6 a4)
- Page 155 and 156: EARLY DEVIATIONS (6 e3 AND 6 a4) 15
- Page 157 and 158: EARLY DEVIATIONS (6 e3 AND 6 a4) 15
- Page 159 and 160: 14 The Anti-Moscow Variation: 6 Jth
- Page 161 and 162: THE ANTI-MoSCOW VARIATION: 6 .i.h4!
- Page 163 and 164: THE ANTI-MOSCOW VARIATION: 6 Ji.h4!
- Page 165 and 166: THE ANTI-MOSCOW VARIATION: 6 iLh4!?
- Page 167 and 168: THE ANTI-MoSCOW VARIATION: 6 ~h4!?
- Page 169 and 170: THE ANTI-MoSCOW VARIATION: 6 i&.h4!
- Page 171 and 172: THE ANTI-MoSCOW VARIATION: 6 ~h4!?
- Page 173 and 174: THE ANTI-MoSCOW VARIATION: 6 iLh4!?
- Page 175 and 176: THE ANTI-MoSCOW VARIATION: 6 iLh4!?
- Page 177 and 178: THE ANTI-MoSCOW VARIATION: 6 il..h4
- Page 179 and 180: THE ANTI-MoSCOW VARIATION: 6 ~h4!?
- Page 181 and 182: THE ANTI-MoSCOW VARIATION: 6 i4.h4!
- Page 183: 15 The Main Line: 7 e3 liJd7 8 Jtd3
- Page 187 and 188: THE MAIN LINE: 7 e3 liJd7 8 i.d3 dx
- Page 189 and 190: THE MAIN LINE: 7 e3 0.ti7 8 j,.d3 d
- Page 191 and 192: THE MAIN LINE: 7 e3 tiJd7 8 i.d3 dx
- Page 193 and 194: THE MAIN LINE: 7 e3 liJd7 8 ~d3 dxc
- Page 195 and 196: THE MAIN LINE: 7 e3 liJd7 8 ~d3 dxc
- Page 197 and 198: THE MAIN LINE: 7 e3 tDti7 8 .ii.d3
- Page 199 and 200: THE MAIN LINE: 7 e3 liJd7 8 i..d3 d
- Page 201 and 202: THE MAIN LINE: 7 e3 CUd7 8 i.d3 dxc
- Page 203 and 204: THE MAIN LINE: 7 e3 liJd7 8 i.d3 dx
- Page 205 and 206: 16 Black's 8th Move Alternatives 1
- Page 207 and 208: BLACK'S 8TH MOVE ALTERNATIVES 205 B
- Page 209 and 210: BLACK'S 8TH MOVE ALTERNATIVES 207 A
- Page 211 and 212: BLACK'S 8TH MOVE ALTERNATIVES 209 1
- Page 213 and 214: DEVIATIONS FROM THE MAIN LINE 211 A
- Page 215 and 216: DEVIATIONS FROM THE MAIN LINE 213 p
- Page 217 and 218: DEVIATIONS FROM THE MAIN LINE 215 B
- Page 219 and 220: DEVIATIONS FROM THE MAIN LINE 217 t
- Page 221 and 222: DEVIATIONS FROM THE MAIN LINE 219 a
- Page 223 and 224: 18 Odds and Ends A few things need
- Page 225 and 226: INDEX OF VARIATIONS 223 ttJxg5 hxg5
- Page 228: The Semi-Slav has been one of the m
182 THE B01VINNIK SEMI-SLAV<br />
experience of this opening he knows<br />
the ins and outs, and he seems to prefer<br />
his dark-squared bishop in the centre<br />
rather than hiding it away on the<br />
kingside. However, the ... eS break is<br />
not that easy to carry out since with<br />
White moving his knight to e4, controlling<br />
the d6-square and placing the<br />
rook on the semi-open c-file, White<br />
can usually meet ... eS with dS. <strong>The</strong>refore,<br />
to find suitable places for his<br />
pieces Black will have to engage in<br />
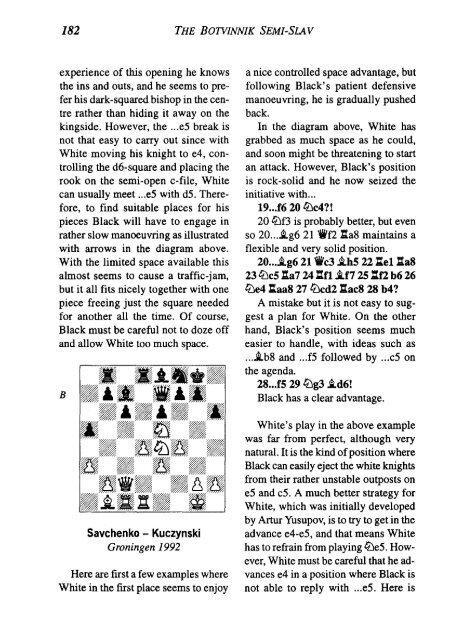
rather slow manoeuvring as illustrated<br />
with arrows in the diagram above.<br />
With the limited space available this<br />
almost seems to cause a traffic-jam,<br />
but it all fits nicely together with one<br />
piece freeing just the square needed<br />
for another all the time. Of course,<br />
Black must be careful not to doze off<br />
and allow White too much space.<br />
B<br />
Savchenko - Kuczynski<br />
Groningen 1992<br />
Here are first a few examples where<br />
White in the first place seems to enjoy<br />
a nice controlled space advantage, but<br />
following Black's patient defensive<br />
manoeuvring, he is gradually pushed<br />
back.<br />
In the diagram above, White has<br />
grabbed as much space as he could,<br />
and soon might be threatening to start<br />
an attack. However, Black's position<br />
is rock-solid and he now seized the<br />
initiative with ...<br />
19 ... f6 20 ltJc4?!<br />
20 ltJf3 is probably better, but even<br />
so 20 ... i.g6 21 'li'f2 :ta8 maintains a<br />
flexible and very solid position.<br />
20 ... i.g6 21 'ii'c3 i.h5 22 :te1:ta8<br />
23ltJc5 :ta7 24 .:tf1 i.f7 25 .:tn b6 26<br />
ltJe4 .:taa8 27 ltJcd2 :ac8 28 b4?<br />
A mistake but it is not easy to suggest<br />
a plan for White. On the other<br />
hand, Black's position seems much<br />
easier to handle, with ideas such as<br />
...i.b8 and ... fS followed by ... cS on<br />
the agenda.<br />
28 ... f5 29 ltJg3 i.d6!<br />
Black has a clear advantage.<br />
White's play in the above example<br />
was far from perfect, although very<br />
natural. It is the kind of position where<br />
Black can easily eject the white knights<br />
from their rather unstable outposts on<br />
eS and cS. A much better strategy for<br />
White, which was initially developed<br />
by Artur Yusupov, is to try to get in the<br />
advance e4-eS, and that means White<br />
has to refrain from playing ltJeS. However,<br />
White must be careful that he advances<br />
e4 in a position where Black is<br />
not able to reply with ... eS. Here is


