Create successful ePaper yourself
Turn your PDF publications into a flip-book with our unique Google optimized e-Paper software.
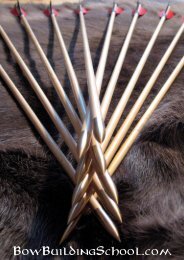
BowBuildingSchool.com
Imprint<br />
Publisher and owner:<br />
Matthias Wiltschko<br />
Gross Gundholz 25, 3920 Gross Gerungs, Austria<br />
www.BowBuildingSchool.com<br />
Publisher and media owner takes no legal responsibility or liability.<br />
All rights, copying, distribution and translation rights are with the<br />
owner and publisher.<br />
Text, photos, translation and layout: Matthias Wiltschko<br />
No legal responsibility or liability for injuries and damage to property<br />
of the customer/reader and third parties is taken over by the information<br />
provided and by the objects produced therefrom (eg bows, arrows,<br />
tools . . . ). Each customer/reader is responsible for his/her own<br />
safety and safety in dealing with his/her bows, arrows and tools. It is<br />
at the measure of the customer/reader to assess and avoid dangerous<br />
situations with bows, arrows and tools.
Out now in print<br />
Online Class 1<br />
346 pages - 438 color photos<br />
Worldwide Shipping<br />
$40.00 USD<br />
www.BowBuildingSchool.com
Druckversion<br />
Online Kurs 1<br />
342 seiten - 438 farbfotos<br />
Weltweiter versand<br />
Eur 36,-<br />
www.bogenbauschule.at
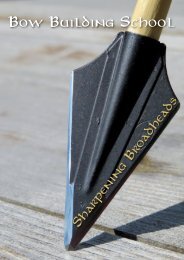
On the <strong>Sharpening</strong> Block<br />
The 90cm/35” long and 12cm/5” wide usable surface of the sharpening<br />
block allows very quick formation of a new bevel geometry. The biggest<br />
advantage of the sharpening block is the creation of a straight cutting<br />
edge across the whole tool. With small waterstones, this is not feasible.<br />
New draw knives or knives with severe damage can be processed<br />
within a few minutes to have a straight cutting edge again.
Although the bevel geometry on new draw knives is given, the cutting<br />
edge is severely jagged. The lower picture shows the rough grinding<br />
burr of a brand new knife: you cannot cut wood with such a blunt tool.
With both thumbs, the abrasive linen is stretched and positioned between<br />
the jaws. When clamping, the jaws should not be pressed against<br />
the abrasive linen so that it can slip into the gap.
Start sharpening the bevel with 180 grit paper. The movement begins<br />
on the left outer edge of the knife and in the middle of the sharpening<br />
block. It ends with the right edge in the middle of the grinding linen.
After sharpening the bevel, a burr forms on the cutting edge. The mirror<br />
is also ground on 180 grit. Here the angle must be kept as flat as possible<br />
(picture below). The photo perspective belies a very blunt angle.
Grinding with 180 grit. The lower the contact pressure when sharpening,<br />
the finer the burr. Now the bevel and mirror are sharpened with 400<br />
grit: the burr becomes smaller and the cutting edge sharper.
Here ends the work on<br />
the sharpening block. The<br />
slightly crowned bevel geometry<br />
is formed and the<br />
cutting edge is free of nicks<br />
and coarse sanding marks.
The sharp edges still need to be rounded. They create a risk of injury to<br />
the bowyer and the bow. Take 120 grit sandpaper on a small sanding<br />
block and round them generously. Do not forget to wear gloves!
Professionally rounded edge. Although the cutting edge visually makes<br />
a good impression, it still needs a fine touch.
With clamps the draw<br />
knife is fixed so that the<br />
cutting edge is freely<br />
accessible for further<br />
sharpening.
With a 1000 grit waterstone, held with both hands, bevel and mirror are<br />
ground. Put the stone in the water until it is completely soaked. Once it<br />
is too dry, submerge it again.
The cutting edge gets the finishing touches with the other side of the<br />
stone (6000 grit). Keep the slightly crowned shape of the bevel and<br />
make sure you keep the mirror angle as flat as possible.
On the Rotating Waterstone<br />
As with any new draw knife, the blunt cutting edge can be seen here.<br />
The light reflection indicates the dull drop of the cutting edge geometry.<br />
Old knife smiths say, “The white must go!“
I also work commercially on the small Tormek T4. With many knives<br />
and scissors a narrower stone is an advantage. The fan sucks off the<br />
vapors of the warming rubber drive wheel.
At an angle of about 45 degrees, I begin to work out the bevel on 220<br />
grit. If the knife was held perpendicular to the direction of sharpening, it<br />
could start to jump and this would produce an uneven cutting edge. At<br />
the cutting edge a uniform and continuous burr has to be formed.
The sharp edges of the blade are generously rounded on the outside<br />
of the coarse 220 grit stone.
After grinding the bevel, the burr will be bent to the opposite side (mirror).<br />
Now, the mirror will be ground on 1000 grit at the flattest possible<br />
sharpness angle. The overall tool angle remains at about 45 degrees.
True off the stone regularly to remove the chatter marks and to achieve<br />
a uniform grinding pattern. Only the cutting edge of the mirror has been<br />
sharpened and not the whole surface.
The fine burr is not ground away, but broken as close to the cutting<br />
edge as possible on a rotating leather disc. After several passes, the<br />
burr will be gone completely.
Top: Fresh out of the factory. Bottom: Finely sharpened draw knife.