

KNITmuch Issue 8
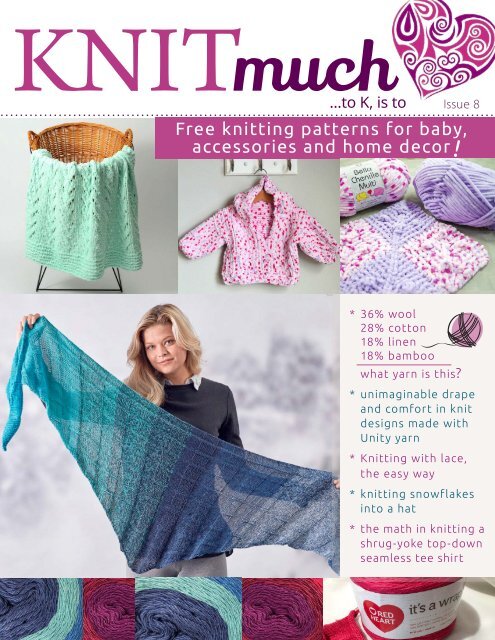
This issue of KNITmuch is irresistibly full of knitting projects for gifting and getting ready for the holidays. Within it, you'll find the cuddliest knitted patterns for baby, like onesies, blankets and accessories knit up using Bella Chenille Chunky. It will feel like a soft cocoon for baby. And from this chunky yarn, we explore knitting with lace weight yarn, here too, plenty of free knitting patterns. Charles Voth explains the benefits of knitting with lace weight yarn as it's often misunderstood. Don't miss the features highlighting Unity and Unity Beyond, two very luxurious yarns created using four natural fibers, find out which ones those are! Plenty of free pattern suggestions here as well. In all there are 17 patterns to consider and we close the issue with Charles Voth's tutorial on how to design your own knitted tee so it fits you to a tee, perfect every time! Awesome issue!
This issue of KNITmuch is irresistibly full of knitting projects for gifting and getting ready for the holidays. Within it, you'll find the cuddliest knitted patterns for baby, like onesies, blankets and accessories knit up using Bella Chenille Chunky. It will feel like a soft cocoon for baby. And from this chunky yarn, we explore knitting with lace weight yarn, here too, plenty of free knitting patterns. Charles Voth explains the benefits of knitting with lace weight yarn as it's often misunderstood. Don't miss the features highlighting Unity and Unity Beyond, two very luxurious yarns created using four natural fibers, find out which ones those are! Plenty of free pattern suggestions here as well. In all there are 17 patterns to consider and we close the issue with Charles Voth's tutorial on how to design your own knitted tee so it fits you to a tee, perfect every time! Awesome issue!

Create successful ePaper yourself
Turn your PDF publications into a flip-book with our unique Google optimized e-Paper software.
KNIT much.com<br />
much KNIT<br />
...to K, is to<br />
<strong>Issue</strong> 8<br />
Free knitting patterns for baby,<br />
accessories and home decor!<br />
* 36% wool<br />
28% cotton<br />
18% linen<br />
18% bamboo<br />
what yarn is this?<br />
* unimaginable drape<br />
and comfort in knit<br />
designs made with<br />
Unity yarn<br />
* Knitting with lace,<br />
the easy way<br />
* knitting snowflakes<br />
into a hat<br />
* the math in knitting a<br />
shrug-yoke top-down<br />
seamless tee shirt
KNIT much<br />
...to K, is to<br />
◦{<br />
daily blog<br />
◦{<br />
weekly giveaways<br />
◦{<br />
monthly newsletter<br />
◦{<br />
quarterly magazine<br />
◦{<br />
Facebook page<br />
◦{<br />
Pinterest page<br />
◦{<br />
ALL of the above!<br />
2 <strong>KNITmuch</strong> | issue 8<br />
.com<br />
ALL<br />
FREE!<br />
www.<strong>KNITmuch</strong>.com<br />
Visit and download our free ebook:<br />
Cynthia MacDougall's<br />
Knitting Essentials!<br />
EDITOR-IN-CHIEF, ART DIRECTOR<br />
Carla A. Canonico<br />
Carla@<strong>KNITmuch</strong>.com<br />
ADVERTISING SALES<br />
John De Fusco<br />
John@<strong>KNITmuch</strong>.com<br />
PUBLISHER<br />
A Needle Pulling Thread<br />
PHOTOGRAPHERS<br />
John De Fusco, Carla A. Canonico<br />
BLOGGERS/CONTRIBUTORS<br />
Cynthia MacDougall<br />
cgknitters.blogspot.com<br />
Michelle Nguyen<br />
www.stitchesbeslippin.com<br />
Charles Voth<br />
www.charlesvothdesigns.ca<br />
GRAPHIC DESIGN<br />
Carla A. Canonico<br />
Carla@<strong>KNITmuch</strong>.com<br />
Sondra Armas<br />
Sondra@<strong>KNITmuch</strong>.com<br />
SOCIAL MEDIA and WEB<br />
Sondra Armas<br />
Alejandro Araujo<br />
WEBSITE / BLOG : <strong>KNITmuch</strong>.com<br />
Like us on Facebook : <strong>KNITmuch</strong><br />
Follow us on Twitter : @<strong>KNITmuch</strong>mag<br />
WHERE TO GET YOUR COPY<br />
<strong>KNITmuch</strong> is a quarterly eMagazine published by A<br />
Needle Pulling Thread. It is available free for personal use<br />
online at <strong>KNITmuch</strong>.com.<br />
A limited number of printed copies of <strong>KNITmuch</strong> are<br />
available for purchase at select yarn shops and specialty<br />
stores. Ask for it at your local shop. <strong>KNITmuch</strong> is not<br />
available by subscription.<br />
YARN SHOPS<br />
If you are interested in carrying <strong>KNITmuch</strong> in your store,<br />
please email John@<strong>KNITmuch</strong>.com.<br />
EDITORIAL<br />
Bloggers, designers and other contributors who would<br />
like to be considered for future issues please email<br />
Carla@<strong>KNITmuch</strong>.com with a brief description of your<br />
work and your proposed project.<br />
©2019 <strong>KNITmuch</strong>. All rights reserved. <strong>Issue</strong> 8 ISSN 2368-5913.<br />
No part of this publication may be reproduced without<br />
written permission from the publisher.<br />
All designs, patterns, and information in this magazine are<br />
for private, non-commercial use only, and are copyrighted<br />
material owned by their respective creators or owners.<br />
www.TheNeedleworkPages.com<br />
the<br />
find a<br />
local shop!<br />
9 listings<br />
9 reviews<br />
9 events<br />
9 new products<br />
9 free patterns<br />
9 blogs<br />
& more!<br />
pages
<strong>KNITmuch</strong><br />
6<br />
7<br />
8<br />
9<br />
11<br />
12<br />
13<br />
15<br />
17<br />
19<br />
20<br />
21<br />
23<br />
24<br />
26<br />
27<br />
28<br />
30<br />
The essential yarn for knitting soft garments<br />
Center double decrease makes a good knitting mantra for Soft blanket<br />
The definition of using stitch definition when knitting<br />
Knitting snowflakes into a hat<br />
Bella Chenille, a soft and versatile polyester yarn<br />
How Bella Chenille enhances basic knit stitches differently than most yarns<br />
5 baby gifts to knit up in a few days with chunky Bella Chenille yarn<br />
Backwards purling to knit bobbles without all the bother<br />
Top-down baby sweater in Bella Chenille Multi and Solids<br />
It’s a Wrap by Red Heart<br />
Why you should knit with lace weight yarn<br />
Knitting with lace, the easy way<br />
It’s a Wrap yarn enhances simple knit and purl stitches<br />
It’s not a wrap until it’s been blocked<br />
Unraveling Unity and Unity Beyond: what makes this yarn unique?<br />
36% wool, 28% cotton, 18% linen & 18% bamboo, what yarn is this?<br />
Unimaginable drape and comfort in knit designs made with Unity yarn<br />
Knitting a shrug-yoke top-down seamless tee shirt<br />
contents<br />
<strong>KNITmuch</strong> | issue 8<br />
3
Download the NEW<br />
<strong>KNITmuch</strong> App!<br />
Includes the Premier issue and the latest<br />
issue FREE for a limited time only!
editor's letter<br />
By the time I was finished making up this<br />
issue, it dawned on me the variety of yarn<br />
weights in this issue. Ranging from lace<br />
weight to chunky chenille, I already have a<br />
list of projects to knit for each one.<br />
The one I<br />
found most<br />
irresistible is<br />
the chunky<br />
Bella Chenille,<br />
picturing it<br />
knit up in<br />
baby cocoons,<br />
sweaters,<br />
pajamas, hats<br />
and blankets.<br />
Talk about<br />
quick knits, I'll<br />
have a whole<br />
collection of<br />
baby garments<br />
for hospitals<br />
and charities.<br />
follow me<br />
On the other end of the<br />
scale, is the lace weight<br />
yarn. Many knitters shy<br />
away from knitting with<br />
lace weight, as there's<br />
this feeling of knitting a<br />
garment forever. But when<br />
I think about lace weight<br />
yarn, I think about a more<br />
flattering knit, can I say<br />
a slimming knit? I find I<br />
look better in lace weight<br />
projects, such as tops and<br />
cardis, where no extra<br />
bulk is added. As for the<br />
knitting part of it, who<br />
said knitting is a race? Although it can sometimes feel<br />
like a marathon. I'm in no rush to finish the project, just<br />
enjoying knitting.<br />
Charles Voth's feature, Knitting a shrug-yoke top-down<br />
seamless tee shirt, makes me happy knitting patterns are<br />
written out for me. This is a two-part lesson about all<br />
the 'math' you need to accomplish a design that suits<br />
your body type. I think it's quite an accomplishment to<br />
tackle designing your own tee, don't you think? It's like<br />
not just knitting anymore, it's creating a garment from<br />
scratch! Will you attempt this? With all those numbers<br />
involved, I'll need a full day to attempt it.<br />
Enjoy the issue!<br />
Cheerfully,<br />
Share the love of knitting. Own the obsession.<br />
<strong>KNITmuch</strong> | issue 7<br />
5
Soft Essentials in the colors<br />
Teal and Greyhound.<br />
One of the most ideal beginner<br />
projects I have found is a simple<br />
hat. Starting at the brim with<br />
a K2P2 rib and going up to the<br />
decreases. Soft Essentials complements<br />
that pattern well and<br />
it’s much shorter than a scarf.<br />
Red Heart Soft Essentials is one of your foundation<br />
yarns. It’s good for 90% of projects and comes in all<br />
your basic colors. Soft Essentials can be one of the<br />
building block yarns that make sure you can knit<br />
anything from your stash.<br />
The first thing I want to talk about is the weight of<br />
the yarn. It’s a bulky weight so anything you choose<br />
to knit in this fiber will knit up very fast. This is a<br />
major benefit when you just want to take out some<br />
yarn and get knitting.<br />
I also like this yarn for teaching others to knit. It’s a<br />
nice large yarn, but it doesn’t have too much texture.<br />
Soft Essentials slides along the needles well, so you<br />
don’t have to fight with your tension. I’m always on<br />
the look out for good yarn to teach people with. If you<br />
start a beginner off with a strange yarn that happens<br />
to be difficult to knit with, you’re not setting them up<br />
for success.<br />
Michelle Nguyen<br />
The essential<br />
yarn for knitting<br />
soft garments<br />
The fiber is 100% acrylic so that means easy care<br />
instructions. Machine wash and dry! As always, I would<br />
make a swatch and wash it to see how this fiber will<br />
react when you wash it. Acrylic usually relaxes, so you<br />
can afford to knit the fabric tightly and very stiff, then<br />
have the pleasure of watching it relax into the softest<br />
garment you’ll ever own. When you’re knitting this<br />
swatch with Soft Essentials and washing to see how<br />
the fiber will react, also take special care to note if the<br />
swatch grows at all. This is important information if<br />
you’re knitting anything that needs to be fitted.<br />
Now for the question I know you’ve all been asking in<br />
your head: is Soft Essentials really that soft? The short<br />
answer is yes, it is that soft. When you first touch it,<br />
the fiber is smooth and sleek. No halo or fuzziness to<br />
speak of, but the fiber itself is very springy and smooth.<br />
It’s soft in the way that water is considered soft; cool,<br />
smooth, and flowing.<br />
Photos by Michelle Nguyen<br />
6 <strong>KNITmuch</strong> | issue 8
Center double<br />
decrease makes a<br />
good knitting mantra<br />
for Soft blanket<br />
I picked up the Relaxing Ripple Throw pattern from<br />
the Red Heart website and immediately loved the<br />
look of it. The chevrons make for a crisp design<br />
and the transitions between colors smooth.<br />
Having talked about the general benefits of Soft<br />
Essentials yarn we’ll see how it really lets this<br />
pattern shine and I’m not just talking about the<br />
beautiful sheen of the yarn.<br />
First of all, the chevrons are lined up with either a<br />
center double decrease or a M1, K1, M1 pattern.<br />
This adds vertical lines throughout the blanket as<br />
well as the horizontal chevrons. The combination<br />
of those two just makes the OCD part of my brain<br />
light up. Perfectly straight vertical lines with the<br />
perfect horizontal chevrons is so aesthetically<br />
pleasing it makes my heart sing. I especially love<br />
how much the center double decrease stands<br />
up. The yarn weight gives the stitch a little extra<br />
oomph and extra definition.<br />
The Relaxing Ripple Throw pattern is very easy<br />
to memorize. When I started knitting it, I was a<br />
little concerned. I was just getting over the flu<br />
that had been going around and didn’t feel like I<br />
was on-the-ball enough to knit a pattern like this.<br />
Luckily for me, the pattern was much easier than<br />
it looked.<br />
There are only increases and decreases on one<br />
side and you purl all the way back. Just after I cast<br />
on, I was determined not to mess this pattern up<br />
so I started putting in a bunch of stitch markers.<br />
As I went through the pattern I ended up taking<br />
them out because they were more of a nuisance<br />
than just looking to see the stitches coming<br />
up in the row below. I was also counting every<br />
stitch instead of watching the row below. After<br />
The Relaxing Ripple Throw<br />
I stopped counting and took out all the stitch<br />
markers I was able to just knit. I did have to ‘tink’<br />
back a couple times because I went too far, but<br />
the time it took me to do that was much less than<br />
it would have been had I just kept going with my<br />
process.<br />
As we all know, I’m a huge fan of patterns that<br />
look like a lot of work while continuing to be very<br />
easy. The Relaxing Ripple Throw fits firmly into this<br />
category. The pattern is stunning and really set off by<br />
Soft Essentials yarn. There's a shiny sheen to the yarn<br />
that gives this throw an unreal perfect look that will<br />
make you want to touch it to see if it’s really there.<br />
This blanket looks really classy, without a whole lot of work. The best projects<br />
are always those that look complicated but are easy to memorize.<br />
<strong>KNITmuch</strong> | issue 8<br />
7
The definition of using stitch<br />
definition when knitting<br />
Looking at the stitch running down the middle of<br />
this swatch you can really see the definition of the<br />
stitches in this throw.<br />
Here is a side view of the raised stitch from the previous<br />
photo. You can see just how much it is raised.<br />
It is always advisable to knit a swatch first to see<br />
how the yarn is going to knit up.<br />
One of the aspects I really liked<br />
about the Relaxing Ripple Throw<br />
was the definition on the center<br />
double decrease. I wanted<br />
to delve into that a bit more<br />
because it’s an important topic<br />
for all knitters who knit patterns.<br />
The center double decrease is so<br />
well placed in this throw, it really<br />
makes you sit back and admire it.<br />
Using stitch definition can give<br />
garments a bit of a threedimensional<br />
look. Instead of<br />
using a knit stitch, you’re able to<br />
knit through the back loop and<br />
the stitch still looks like a knit<br />
stitch, but it sits up higher and is<br />
more defined than a regular knit<br />
stitch. I know I’ve talked about<br />
using plain yarns for intricate<br />
patterns, but if you’re absolutely<br />
set on having a busy yarn and<br />
a busy pattern, this will help.<br />
Especially when knitting a rib or a<br />
seed stitch.<br />
Let’s be clear that I’m not talking<br />
about twisted stitches, which<br />
make more of an X than a V<br />
when you’re knitting. Those<br />
stitches have their place, but they<br />
lay flat along your knitting. What<br />
I’m talking about is the center<br />
double decrease, any kind of<br />
nupp, or bubble stitch. Creating<br />
ridges and valleys in your<br />
garments to make the pattern<br />
you’re knitting really stand out.<br />
You can even see the stitch definition of the seed<br />
stitch along the edges<br />
As was the case with the Relaxing<br />
Ripple Throw pattern, you can<br />
also create a dip in your fabric<br />
on either side of a knit stitch<br />
to make that stitch stand out.<br />
When I was knitting the pattern,<br />
my M1’s were knit in the front<br />
and back. This causes the fabric<br />
of your knitting to create the<br />
slightest indent, which gives<br />
the illusion of the center stitch<br />
standing out more. In the<br />
Relaxing Ripple Throw pattern, it<br />
balanced out the center double<br />
decrease and created a line<br />
running parallel. The pattern<br />
would have looked a bit awkward<br />
if there was only one line running<br />
down through the bottom of the<br />
chevron Vs.<br />
This design aesthetic gives your<br />
knitting an elegant extra design<br />
aspect and helps take the look<br />
from homemade, to handmade.<br />
You can definitely find patterns<br />
that have already incorporated<br />
these techniques, but you can<br />
also start to play with them<br />
yourself! When you’re looking at<br />
a new pattern, find the stitches<br />
you think could be a little more<br />
defined and knit a swatch to<br />
sample what they would actually<br />
look like. It’s the best way to<br />
advance your knitting practice,<br />
just try it!<br />
8 <strong>KNITmuch</strong> | issue 8
Knitting snowflakes into a hat<br />
We talked about stitch definition,<br />
it’s only fitting then, to talk about<br />
color-work. The Snow Speckled Hat<br />
pattern by Red Heart is made to<br />
look like there are snowflakes on<br />
the hat, this is achieved by good<br />
selective color-work. With a brim<br />
of a different color and the top<br />
of the hat a solid color like a<br />
cloud, it’s sure to help stave off<br />
the snow coming this winter and<br />
make us really appreciate this<br />
summer-time heat.<br />
The Snow Speckled Hat pattern<br />
is pegged at an intermediate<br />
pattern, but I wouldn’t call it<br />
intermediate. If you’ve done<br />
any Fair Isle knitting before this<br />
is a great pattern to work on.<br />
It’s nice and easy. Don’t let the<br />
pattern rating scare you away if<br />
you haven’t done Fair Isle before<br />
but have knit in the round, this<br />
is a great place to start colorwork.<br />
I think knitting in the round<br />
is much easier than knitting<br />
back and forth, so I’m already<br />
predisposed to color-work hats<br />
and mittens.<br />
I knitted the Snow Speckled Hat<br />
in different colors so you could<br />
see what it looks like. I tried to<br />
invert the colors as much as I<br />
could, but I think it still looks like<br />
snow! The yarn called for in this<br />
pattern is Super Saver, but you<br />
can definitely knit this hat with<br />
Soft Essentials.<br />
The yarn weight is a little different,<br />
Soft Essentials is heavier than<br />
Super Saver, but this can be<br />
easily mitigated by going down a<br />
needle size. The recommended<br />
needle size for Soft Essentials is a<br />
10US [6mm] bringing the needle<br />
size down to an 8US [5mm]<br />
would make a world of difference.<br />
As I said in this week’s first article,<br />
it’s okay to knit this hat a little<br />
firm because the yarn relaxes<br />
so much when you block it. The<br />
garment might feel too firm<br />
when you first finish knitting it,<br />
but will be worth it in the end.<br />
When I was knitting the Snow<br />
Speckled hat pattern I thought<br />
the hat looked a little bit small<br />
and was worried about it actually<br />
fitting. I contemplated going<br />
down too many needle sizes,<br />
and have irrevocably messed up<br />
the pattern. Once I blocked it<br />
everything was fine though. The<br />
hat relaxed quite a bit and there<br />
were no issues with the hat fitting.<br />
In fact, I’d be worried about it<br />
being too large if I had knit it and<br />
it didn’t look small.<br />
The Snow Speckled Hat is the<br />
perfect easy color-work knit pattern,<br />
with a size that’s easily adjustable.<br />
I knit this hat at a tighter tension than I normally<br />
would have. The fabric is quite stiff, as you can<br />
see, it stands up on its own.<br />
The hat itself, in my color variation, post blocking.<br />
<strong>KNITmuch</strong> | issue 8<br />
9
10
Bella Chenille, a<br />
soft and versatile<br />
polyester yarn<br />
Bella Chenille Multi features a predominant color and two or three<br />
complementary colors in dots along the length of the yarn.<br />
Charles Voth<br />
I’d like to introduce you to Bella Chenille Multi, one of<br />
the softest baby yarns I’ve ever had on my needles.<br />
In this feature, I'll go over its assets, some free<br />
patterns, and then I’ll teach you a few techniques<br />
which take advantage of this yarn’s squishy goodness.<br />
Bella Chenille is a chunky weight fuzzy and lush<br />
chenille type yarn which when knit creates a velour<br />
or velveteen-like fabric because of the way the yarn<br />
is constructed. I had to struggle a bit to get this<br />
yarn to come apart enough to show the anatomy of<br />
how it’s built.<br />
There are two inner core threads and each consists<br />
of 2 plies with a tight twist. These inner core strands<br />
are twisted and as they are, the short fuzzy strands<br />
are caught in the twist and lay at a perpendicular<br />
angle to the inner threads. One would think that<br />
this would still make it easy for the short fuzzy fibers<br />
to come apart easily, but there is a heating process<br />
which sets the fibers in place and keeps the integrity<br />
of the yarn.<br />
Yes, if you were to pull aggressively at the little tufts<br />
of fuzz, they would slowly loosen up and come out,<br />
but many a baby and toddler have snuggled with<br />
knit items made of chenille and they don’t have<br />
the strength to loosen the fibers. There are many<br />
commonly used acrylic yarns with short fibers that<br />
are not chenille and knit into baby garments that<br />
have a higher chance of releasing short fibers into<br />
the fingers of little ones, so you need not worry<br />
about Bella Chenille not standing up to the strokes<br />
and squeezing of baby fingers.<br />
If you're a very tight knitter or tend to need to<br />
unknit your stitches a lot, you need to be aware<br />
that chenille yarns like this don’t fare well if you<br />
need to rip out your work repeatedly. The fuzz<br />
gets compacted when knit too tightly…which looks<br />
lovely in the finished fabric, but those compacted<br />
fibers do not spring back into place. If you have<br />
to reuse some frogged yarn, I would say that one<br />
re-use only is advisable, after a second or third<br />
ripping back and re knitting, the fabric starts to<br />
look a little shabby. Wet-blocking does help relax<br />
the compacted fibers a bit, but it’s not the same as<br />
knitting with the yarn once only.<br />
Anatomy of Bella Chenille, fuzzy strands are held in place by twisted plies of yarn.<br />
Photos by Charles Voth<br />
Columns of stockinette show that the placement of the dots is truly random<br />
and there won’t be any unwanted pooling.<br />
<strong>KNITmuch</strong> | issue 8<br />
11
Did you know that “chenille” is<br />
derived from the French word for<br />
caterpillar? Makes sense, doesn’t<br />
it? Fortunately, Bella Chenille is<br />
completely bug free! It’s dyed<br />
three different ways.<br />
There are Bella Chenille Multi<br />
that come in nine colorways<br />
(see right). There are also four<br />
colorways of Bella Chenille Dots<br />
which actually consist of evenly<br />
spaced segments of 3 or 4 colors.<br />
In my opinion the Multi should<br />
be called Dots and the Dots<br />
should be called Multi because<br />
of how they are dyed, but what’s<br />
done is done. Then there are 21<br />
solid colors, too.<br />
Colorway names (from left to right) Tidal Wave,<br />
Candy Store, Sweetness<br />
The above 3 colorways do not<br />
feature white prominently or at<br />
all while the remaining six consist<br />
of a white background with other<br />
sets of complimentary dots.<br />
Colorway names (from left to right): Peach Pie,<br />
Tropical Mix, and Sugar Spots<br />
Bella Chenille is made of a very<br />
soft polyester. This makes it<br />
washable and non-allergenic. It’s<br />
listed as a super-bulky (#6) yarn<br />
and knit with US10.5 [6.5mm]<br />
needles or even larger, but you<br />
can work it with size US10 [6mm]<br />
needles and achieve a bulky (#5)<br />
gauge as well.<br />
In each ball there are 131yds<br />
[120m] per 100g. You can<br />
machine wash it in warm water,<br />
but you’ll need to skip the dryer…<br />
too much heat mats the fibers,<br />
and you’ll lose the softness in the<br />
knit fabric.<br />
Colorway Names (from left to right): Denim<br />
Patch, Toy Cars, Grape Jam<br />
The colors of the dots coordinate very well with<br />
many of the solid colors of Bella Chenille.<br />
How<br />
Bella Chenille<br />
enhances<br />
basic knit<br />
stitches<br />
differently than<br />
most yarns<br />
12 <strong>KNITmuch</strong> | issue 8<br />
Let's try out some basic stitch<br />
patterns to see how different<br />
they look in this yarn.<br />
Bella Chenille has almost zero<br />
elasticity, so this means that<br />
you as the knitter will need to<br />
focus on as even of a tension<br />
on your yarn as possible so that<br />
the stitches are consistent. The<br />
fuzziness of the yarn makes it<br />
necessary to manually work any<br />
extra loose or extra tightness<br />
in an individual stitch into the<br />
neighboring stitches.<br />
This next tip is an important<br />
one to get gauge. After knitting<br />
several rows or rounds of<br />
stockinette stitches, grasp as<br />
much of the needle and live<br />
stitches on it with one hand and<br />
the bottom of the knit columns<br />
with the other hand and pull to<br />
stretch the stitches vertically as<br />
a group. Repeat this ‘pulling’ for<br />
the remaining stitches across<br />
the needle.<br />
Chenille in stockinette tends to<br />
create wide stitches with a deep<br />
channel in the middle of each<br />
stitch. By pulling it, the yarn goes<br />
into the strands that create the<br />
typical “V” appearance of a stitch<br />
rather than the horizontal strands<br />
that make the bumps on the<br />
purl side. If you don’t stretch the<br />
fabric vertically, these horizontal<br />
strands are visible through the<br />
stitches from the right side.
If you study the picture on the right you’ll notice<br />
deeper grooves between each column. These are<br />
actually the stacked center of the stitches. The<br />
vertical V strands like to snug up close to the<br />
neighboring V strands / stitches rather than with their<br />
own paired strands.<br />
When you want the purl side or the reverse<br />
stockinette stitch side of the fabric to be the public<br />
side, you’ll see that the typical “purl bumps” take on<br />
the look of plied yarn in horizontal ridges. The usual<br />
zigzag look of purl rows is hidden by the fuzz of the<br />
chenille. I really like this look, especially for side to<br />
side items.<br />
When Bella Chenille is knit into garter stitch rows, the<br />
ridges are more like squiggly horizontal bumps<br />
with a wider space in between them than in reverse<br />
stockinette, and look more like their namesake, the<br />
‘caterpillar’, I mentioned befoe. These mitered squares<br />
are part of a blanket pattern I’ll show you later.<br />
Lastly, when you knit 1×1 ribbing with Bella Chenille,<br />
you’ll achieve the more characteristic columns of Vs<br />
separated by bumps. In moss stitch, the horizontal<br />
and vertical ridges are broken up and the fabric loses<br />
the strong grain in either direction, making it look<br />
more homogeneous. I also think the squishy factor is<br />
heightened in the moss stitch fabric. This last photo<br />
on the right is taken from one of the free patterns I’ll<br />
feature next.<br />
Horizontal ridges are actually purl bumps which are “hidden” because of the<br />
fuzziness of the chenille.<br />
Bella Chenille in garter stitch rows, has a rippled horizontal ridge look to it,<br />
but a wider space between them than in reverse stockinette.<br />
5 baby gifts to<br />
knit up in a few days<br />
with chunky<br />
Bella Chenille yarn<br />
Let’s look at some free patterns that you can knit in<br />
a few days as baby gifts, or for your own baby, if<br />
you’re in the nesting stage!<br />
In the photo, you can see a beautiful pairing of<br />
a red solid and a multi with pinks and reds that<br />
are knit with a zigzag ripple stitch. Here’s the free<br />
pattern for this colorful baby blanket called Lil’<br />
Lightening Blanket.<br />
1×1 ribbing looks itself in Bella Chenille, and moss stitch is the best way to remove<br />
the very ridge-like appearance of the other basic stitches shown above.<br />
It’s easy to find a solid color of Bella Chenille that coordinates with one of the<br />
Multi, like the red in this ripple stitch blanket.<br />
<strong>KNITmuch</strong> | issue 8<br />
13
Lace stitches and motifs look great in solid colors<br />
of Bella Chenille.<br />
It’s also possible to knit lace motifs with Bella Chenille,<br />
and it looks best in solids so that the speckles don’t<br />
deter from the visual effects of the lace. The aqua<br />
one draped over this basket is ready to receive the<br />
little one home from the delivery room. This too is a<br />
free pattern called Soft Vines Blankie.<br />
Using moss stitch is a great way to evenly distribute<br />
bars and strands of Bella Chenille Multi so that the<br />
fabric has a denser squish factor. This baby beanie<br />
and pullover with raglan sleeves, and a raglan<br />
sleeve tab opening is a great free pattern to try as<br />
your first garment with chenille yarn. This one is<br />
called Snowbaby Set.<br />
I love how stockinette stitch on this onesie gives<br />
vertical stripes to a knit fabric that’s covered in dots<br />
without any tricky textured stitches. This pattern<br />
comes in four sizes from 6 months to 4 years and<br />
called It’s a Party! Onesie.<br />
The free pattern, Doodle Bug Hoodie, features easy to<br />
make drop-sleeve armholes, and a cute no-shaping<br />
neckline. The Bella Chenille Multi will really be<br />
suitable to give the little wearer a modern twist!<br />
I hope you try out some of these free knitting<br />
patterns for Bella Chenille.<br />
Easy to knit beanie and raglan sweater in the<br />
Denim colorway of Bella Chenille Multi<br />
How adorable is this onesie?<br />
14 <strong>KNITmuch</strong> | issue 8
Backwards purling to knit bobbles<br />
without all the bother<br />
Well-placed bobbles make this cute mitered square blanket fun for the baby to squeeze.<br />
I’ll share another blankie pattern I<br />
designed that has a few bobbles<br />
worked in.<br />
So many people don’t like<br />
bobbles because it’s tedious to<br />
turn the work back and forth to<br />
work the little extra short rows to<br />
build up the bobble. I’ve figured<br />
out a creative solution by using<br />
backwards purling. Read on to<br />
learn this technique.<br />
This blankie pattern features<br />
mitered squares. I chose this<br />
technique because I liked the<br />
different directions of the garter<br />
stitch ridges, particularly how<br />
they look when knit with Bella<br />
Chenille. There are 4 different<br />
ways to set-up a mitered square<br />
for an attach-as-you-knit type<br />
pattern. The set-ups all happen<br />
in the cast on or pick-up rows, so<br />
let’s look at how to do each setup<br />
row.<br />
First Block<br />
You only do this block once, right<br />
at the start. The best cast on for<br />
this non-elastic chenille is the<br />
cable cast-on, because it’s much<br />
stretchier than long-tail or similar<br />
cast-ons. Cast on 21 sts, and knit<br />
the first row. I’ll give you the rest<br />
of the pattern after we’ve read<br />
about all the other set-up rows.<br />
2nd Block<br />
Most right-hand knitters start<br />
with the block to the right of<br />
the First Block when it’s rotated<br />
into a diamond. Cable caston<br />
10 stitches. Then, with right<br />
side facing, pick up and knit<br />
into the middle right corner of<br />
the First Block rotated to be a<br />
diamond, pick up and knit 10<br />
stitches evenly along the block<br />
edge, usually into the garter<br />
stitch ridges, ensuring to have 2<br />
strands of yarn under the righthand<br />
needle when you insert it<br />
to pick up. Then, knit the first row.<br />
3rd Block<br />
With right side facing, pick up<br />
and knit 1 stitch in the top tip of<br />
the First Block, and then pick up<br />
and knit 10 stitches along the<br />
other edge, working into the<br />
ends of the garter stitch ridges as<br />
for the 2nd Block. Cable Cast on<br />
10 more stitches. Then knit the<br />
first row.<br />
Filler Blocks<br />
These are the blocks that are<br />
worked into the V-shaped gaps<br />
between the other 2 blocks.<br />
With right side facing, pick up<br />
and knit 1 stitch in the top tip<br />
of the right-most block in the<br />
next tier of blocks. Then pick up<br />
and knit 9 more stitches along<br />
the edge, using the ends of<br />
the garter stitch ridges. Then<br />
pick up and knit a stitch in the<br />
bottom of the V, and 10 stitches<br />
along the other side for a total<br />
of 21. Knit the first row.<br />
This solid purple diamond, or mitered square, is<br />
one of the Filler Blocks.<br />
Before you get started on<br />
your blanket, it's important to<br />
review how to work a double<br />
centered decrease and how to<br />
knit a bobble.<br />
<strong>KNITmuch</strong> | issue 8<br />
15
The decrease stitch required to<br />
maneuver these mitered squares<br />
is the centered double decrease<br />
(sl2tog, k1, psso). Insert the righthand<br />
needle into the front legs<br />
of the first 2 stitches as if to knit<br />
2 together, and slip them off the<br />
left needle. Knit the next stitch<br />
and pass both slipped stitches<br />
over the stitch just knit. Here’s a<br />
video demonstrating how to do<br />
this.<br />
We also need to know how to<br />
work a bobble stitch.<br />
Step 1: (K1, k1tbl, k1) all in the<br />
next stitch. Step 2: To make a<br />
bobble without too much bother,<br />
we need to learn how to purl<br />
in reverse. To do this, insert the<br />
left-hand needle from back to<br />
front up into the front leg of the<br />
first st on the right-hand needle.<br />
Wrap the yarn counter-clockwise<br />
around the left hand needle, and<br />
purl through that strand. Do this<br />
2 more times. Step 3: Slip first<br />
stitch of bobble from left hand<br />
needle, ssk in next 2 sts, pass<br />
slipped st over. The bobble is<br />
now done.<br />
In this video, I show you how to<br />
work the bobble in the middle<br />
of a centered double decrease,<br />
which is a little trickier than Step 1<br />
explained above, but Steps 2 and<br />
3 are the same and will appear in<br />
the video as well.<br />
other abbreviations<br />
k = knit<br />
p = purl<br />
sl = slip<br />
tog = together<br />
psso = pass slipped stitch(es) over<br />
st(s) = stitch(es)<br />
rep = repeat<br />
16 <strong>KNITmuch</strong> | issue 8<br />
Remainder of the Blocks<br />
Row 2: K10, p1, k10.<br />
Row 3: K9, sl2tog, k1, psso, k9.<br />
Row 4: Knit to center st, p1, knit<br />
rem stitches.<br />
Row 5: K8, sl2tog, k1, psso, k8.<br />
Row 6: Rep Row 4.<br />
Row 7: K3, make bobble in next<br />
st, k3, slip 2, work step one<br />
of bobble in next st, pass<br />
2 slipped stitches over the<br />
3 just made, work steps 2<br />
and 3 of bobble, k3, make<br />
bobble, k3.<br />
A non-bobble row 7 would be: K7,<br />
sl2tog, k1, psso, k7.<br />
Row 8: Rep Row 4.<br />
Row 9: K6, sl2tog, k1, psso, k6.<br />
Row 10: Rep Row 4.<br />
Row 11: K5, sl2tog, k1, psso, k5.<br />
Row 12: Rep Row 4.<br />
Row 13: K4, sl2tog, k1, psso, k5.<br />
Row 14: Rep Row 4.<br />
Row 15: K3, slip 2, work Step one<br />
of the bobble as follows:<br />
Slip 1 stitch, working into<br />
front legs of both of the<br />
next sts together, work<br />
(k1, k1 tbl, k1). Then work<br />
Steps 2 and 3 of bobble as<br />
explained above or shown<br />
in the video, k3.<br />
Alternative Row 15: K3, sl2tog, k1,<br />
psso, k3.<br />
Row 16: K3, p1, k3.<br />
Row 17: K2, sl2tog, k1, psso, k2.<br />
Row 18: K2, p1, k2.<br />
Row 19: K1, sl2tog, k1, psso, k1.<br />
Row 20: Insert right hand<br />
needle from back to front<br />
through back leg of 2nd<br />
stitch on left hand needle<br />
and immediately through<br />
back leg of first stitch on<br />
left hand needle as if to<br />
purl 2 together, but just<br />
slip them, purl 1, pass 2<br />
slipped stitches over the<br />
stitch just purled.<br />
Fasten off.<br />
If you don’t want the bobbles<br />
along the center line of the block,<br />
simply work a normal centered<br />
double decrease in those three<br />
stitches.<br />
Bobbles look like squishy rosettes and add<br />
attractive texture to the blanket.<br />
Making the blanket<br />
You can use as many colors as<br />
you like for a mitered square<br />
blanket. It’s a good way to use<br />
up odds and ends of yarn, but I<br />
thought one multi-colored Bella<br />
Chenille and one solid color<br />
would look the nicest.<br />
Begin First Block with a solid yarn.<br />
For the 2nd strip of diamonds,<br />
use a multi-colored yarn and<br />
work a 2nd block and a 3rd<br />
block.<br />
By the way, I weave in ends<br />
every 2 strips of diamonds, just<br />
so I don’t have that task to do at<br />
the end.<br />
For the 3rd strip of diamonds, use<br />
a solid yarn and work a 2nd Block,<br />
1 Filler Block, and one 3rd Block.<br />
For the 4th strip of diamonds,<br />
use a multi yarn and work a 2nd<br />
Block, 2 Filler Blocks, and end<br />
with a 3rd Block.<br />
Continue adding strips of<br />
diamonds until the length along<br />
the edge of the work is the<br />
desired width of your blanket.<br />
Then you need to choose<br />
between a rectangular version<br />
and a square version; regardless,<br />
keep alternating yarns each strip.
Rectangular Version<br />
For the next strip, do not work<br />
a 2nd Block. Begin with a Filler<br />
Block in the first gap and in each<br />
gap across, end with a 3rd Block.<br />
For the next strip, begin with a<br />
2nd Block, work a Filler Block in<br />
each gap across, but do not work<br />
a 3rd Block.<br />
Repeat the last 2 strips until your<br />
longer edge if the work is the<br />
desired length of the blanket. Then<br />
continue with the Square Version.<br />
Square Version<br />
For the next strip, do not work<br />
a 2nd Block, Begin with a Filler<br />
Block in the first gap and in each<br />
gap across.<br />
Repeat this strip until you work a<br />
sole diamond for the final strip.<br />
I hope you have fun knitting this<br />
mitered square blanket using<br />
the exciting color combinations<br />
you can make with Bella Chenille<br />
Multis and solids.<br />
The reverse side without the bobbles highlights<br />
the edges of each block where the stitches are<br />
picked up. A lovely braid-like border separates<br />
each block.<br />
It only took<br />
3/4 of each<br />
ball of Bella<br />
Chenille to<br />
make a size<br />
9 months<br />
baby sweater<br />
combining<br />
a solid<br />
blue and<br />
a speckled<br />
denim<br />
colorway.<br />
Top-down baby sweater in<br />
Bella Chenille Multi and Solids<br />
sizes<br />
6 mo 9 mo 1-2 yrs 3-4 yrs<br />
skeins of Bella Chenille<br />
1 in each color, solid: Indigo; multi:<br />
Denim Patch<br />
2 2 2 4<br />
finished chest circumference<br />
20½" 23" 25" 27½"<br />
It only takes 1<br />
skein in each<br />
color for the<br />
smallest 3<br />
sizes. You<br />
may even be<br />
able to get<br />
the largest<br />
size out of 2<br />
skeins, but<br />
only if you<br />
don’t want<br />
full length<br />
sleeves.<br />
needles and hook size<br />
US 10¾ [7mm] circular needle and<br />
G/6 [4mm] crochet hook<br />
other 2 stitch holders<br />
gauge<br />
11 sts and 14 rounds = 4″ in<br />
Stockinette Stitch<br />
abbreviations<br />
K = knit; P = purl; rem = remaining;<br />
st(s) = stitch(es); m1 = make 1;<br />
k2tog = knit 2 together; ssk = slip,<br />
slip, knit together through back<br />
loops; rep = repeat; WS = wrong<br />
side; LH = left hand<br />
<strong>KNITmuch</strong> | issue 8<br />
17
Change up the number of rounds per stripe and<br />
the frequency of changes for a custom look.<br />
instructions<br />
Yoke<br />
With solid yarn, cable cast on<br />
46 (50, 56, 60) sts and join in<br />
the round being careful not to<br />
twist. Place a marker to indicate<br />
beginning of round.<br />
Rnd 1: Knit.<br />
Rnd 2: Purl.<br />
Rnd 3: [K6, m1] 7 (8, 9, 9) times,<br />
knit to end of rnd–53 (58,<br />
65, 69) sts.<br />
Rnd 4: Knit.<br />
Rnd 5: [K7, m1] 7 (8, 9, 9) times,<br />
knit to end of rnd–60 (66,<br />
74, 78) sts.<br />
Rnd 6: Knit.<br />
Rnd 7: With speckled yarn, [k8 (8,<br />
12, 13), m1] 7 (8, 6, 6) times,<br />
knit to end of rnd–67 (74,<br />
80, 84) sts.<br />
Rnd 8: With solid yarn, knit.<br />
Rnd 9: [K9 (9, 13, 14), m1] 7 (8,<br />
6, 6) times, knit to end of<br />
rnd–74 (82, 86, 90) sts.<br />
Rnd 10: Knit.<br />
Rnd 11: Change to speckled<br />
yarn. [K10 (10, 14, 15), m1] 7<br />
(8, 6, 6) times, knit to end<br />
of rnd–81 (90, 92, 96) sts.<br />
Rnd 12: Knit.<br />
Rnd 13: [K10 (10, 15, 16), m1] 7 (8,<br />
6, 6) times, knit to end of<br />
rnd–88 (98, 98, 102) sts.<br />
Rnd 14: Knit.<br />
Sizes 1-2 years and 3-4 years only.<br />
18 <strong>KNITmuch</strong> | issue 8<br />
Rnd 15: [K – (–, 15, 14), m1] – (–,<br />
6, 7) times, knit to end of<br />
rnd–(104, 109) sts.<br />
Rnd 16: Knit.<br />
Rnd 17: [K – (–, 18, 17), m1] – (–,<br />
6, 7) times, knit to end of<br />
rnd–(110, 116) sts.<br />
All Sizes<br />
Knit until yoke measures approx..<br />
4″ (4.5, 4.75, 5.25)” from cast-on<br />
edge if necessary.<br />
Divide for Body and Sleeves<br />
Rnd 1: K26 (32, 34, 38), cable<br />
cast on 4 (5, 5, 6) sts, sl<br />
next 20 (22, 26, 26) sts<br />
onto a holder for sleeves,<br />
K26 (32, 34, 38), cable<br />
cast on 4 (5, 5, 6) sts, sl<br />
next 20 (22, 26, 26) sts<br />
onto a holder for other<br />
sleeve. Join to work in the<br />
round–56 (64, 68, 76) sts.<br />
Rnds 2-10: Knit.<br />
Rnds 11-13: With solid yarn, knit.<br />
Rnds 14-15: With speckled yarn,<br />
knit.<br />
Rnd 16: With solid yarn, knit.<br />
Continue to knit around until<br />
body from sleeve opening<br />
measures approx. 7″ (7.5, 8, 9)”.<br />
Last Rnd: Purl.<br />
Turn work so you are working<br />
across the WS of the rounds.<br />
Bind-off: *Purl 2 together, return<br />
st to LH needle; rep from *<br />
around.<br />
Fasten off and close the gap<br />
while weaving in ends.<br />
To weave in ends, you’ll want to<br />
use a small crochet hook instead<br />
of a darning needle, going under<br />
1 strand at a time on the WS of<br />
the work.<br />
Sleeves<br />
Rnd 1: Transfer sts from holder<br />
onto your needle. Join yarn<br />
and knit around, pick up<br />
and knit 6 stitches across<br />
the opposite side of the<br />
cable cast on under the<br />
armhole. Join to knit in the<br />
round–26 (28, 32, 32) sts.<br />
Rnd 2: Knit to last 7 sts, ssk, k4,<br />
k2tog, place market to<br />
indicate beginning of<br />
round–24 (26, 30, 30) sts.<br />
Rnd 3: Knit.<br />
Rnds 4-5: Knit.<br />
Rnd 6: K2tog, k16, ssk, knit rem<br />
sts–22 (24, 28, 28) sts.<br />
Rep last 3 rnds twice–18 (20, 24,<br />
24) sts.<br />
Rnds 13-15: Change to solid and<br />
rep Rnds 4-6.<br />
Rnd 18: Change to speckled<br />
and knit.<br />
Rnd 19: Change to solid and knit.<br />
Continue knitting in the round<br />
until sleeve from armhole<br />
measures 6.5″ (7.5, 8, 9.5)”.<br />
Last Rnd: Purl.<br />
Turn work so you are working<br />
across the WS of the rounds.<br />
Bind-off: *Purl 2 together, return<br />
st to LH needle; rep from *<br />
around.<br />
You can change the stripes to<br />
your taste, just balancing yarn<br />
amounts used so that you don’t<br />
have to start a new ball of either<br />
the solid or the speckled yarn.<br />
Fasten off and close the gap<br />
while weaving in ends.<br />
finishing<br />
Weave in all the other ends with<br />
the crochet hook as well.<br />
Charles Voth<br />
twitter.com/stitchstud<br />
charlesvothdesigns.ca
It’s a Wrap by Red Heart<br />
Michelle Nguyen<br />
It’s a Wrap yarn from Red Heart is<br />
a gradient yarn. The yarn shifts<br />
through several different shades,<br />
or colors, as you knit with it. It’s a<br />
harder color change rather than<br />
a true gradient, so the previous<br />
color suddenly stops and is taken<br />
over by a new color, giving the<br />
effect of chunks of color.<br />
Let’s start at the beginning and<br />
talk about the composition of<br />
the yarn. It’s half cotton and<br />
half acrylic, which is a new and<br />
interesting combination. The<br />
cotton will lend its antibacterial<br />
and heat releasing features, while<br />
acrylic will add its flexibility and<br />
durability. Cotton is never spun<br />
very tightly because it already<br />
has so little stretch, this makes for<br />
yarn that is splitty. It’s a Wrap is<br />
spun with an average tension so<br />
there’s a little bit of texture and<br />
it makes for a yarn that’s much<br />
easier to knit with.<br />
The washing instructions are to<br />
machine wash on gentle and<br />
lay flat to dry. Everyone knows<br />
that I love to machine wash my<br />
knitting, I simply don’t have the<br />
time to play with finnicky fabrics.<br />
Cotton and acrylic are normally<br />
okay to be thrown in the washer,<br />
so I'm glad that has carried over<br />
to It’s a Wrap.<br />
Choosing your pattern will be<br />
an important part of this knitting<br />
project. The way the colors block<br />
will be an integral feature of your<br />
garment. If you’re thinking about<br />
knitting a sweater, the sleeves<br />
would have a different pattern<br />
than the body. Unless you’re<br />
planning on cutting portions of<br />
the yarn out to make the sleeve<br />
stripes match. I’ll refer back to<br />
this article about knitting with<br />
color shifting yarn during the rest<br />
of the feature.<br />
It’s a Wrap is the ideal yarn for<br />
a shawl. Yes, I’m still on a shawl<br />
knitting binge, thank you for<br />
asking. The yarn is a very light<br />
weight, which doesn’t lend itself<br />
well to a blanket, but it goes<br />
along perfectly with a shawl, or a<br />
small lap blanket.<br />
Keep reading for a couple of ideal<br />
patterns and tips on knitting for<br />
light weight yarn. It’s a Wrap is a<br />
very versatile yarn and a great<br />
place to start if you’re looking to<br />
switching from a sock weight yarn<br />
down to something a little smaller.<br />
It’s a Wrap yarn from Red Heart!<br />
I love it when the washing instructions are<br />
carefully laid out.<br />
If you look underneath 50% cotton and 50%<br />
acrylic, you will notice that there’s 1100 yards of<br />
this yarn in one ball!<br />
Photos by Michelle Nguyen<br />
<strong>KNITmuch</strong> | issue 8<br />
19
Why you<br />
should knit<br />
with lace<br />
weight yarn<br />
Super fine weight yarn. See the swatch knit with It’s a Wrap yarn, lovely stitch definition.<br />
If you’re not used to knitting with<br />
lace, this might deter you, but<br />
it shouldn’t! It’s a Wrap comes in<br />
all sorts of fun colors, and colorblocks<br />
in a unique way. If that isn’t<br />
enough to convert you over to<br />
lace knitting, I’ll give you a couple<br />
good reasons to knit with lace.<br />
When I first started knitting, I<br />
walked into a yarn store to buy<br />
yarn for a sweater I was going<br />
to make. I asked the proprietress<br />
to show me the thickest yarn<br />
they had. I didn’t want this to<br />
take forever and I didn’t want to<br />
buy 87 balls of yarn for this one<br />
project. Thick yarn was the way to<br />
do that. I can remember this poor<br />
lady trying to convince me to use<br />
a different yarn, a thinner yarn, a<br />
medium or worsted, anything<br />
but the super chunky sale stuff I<br />
picked out. I’m probably one of<br />
those customers that haunts this<br />
poor lady’s dreams.<br />
I didn’t know any better, but<br />
using a large yarn adds mass<br />
to a sweater. There are patterns<br />
where that look is intended, but<br />
this was not one of them. It<br />
made the whole sweater look<br />
bulky and anyone who wore it<br />
looked bulky. Where there were<br />
two layers of yarn around the cuff<br />
and hem, the fabric was so thick<br />
it constantly flipped over. Without<br />
a doubt this was the ugliest,<br />
lumpiest, unformed, swelteringly<br />
hot, and unwearable sweater.<br />
The moral of this story is, thin<br />
yarn might take you a little longer<br />
to knit your project, but it’s worth<br />
the time in the end.<br />
Thinner yarn shows more stitch<br />
detail, if you’re looking at color<br />
work, it will be more precise. If<br />
you want to do fancy stitches,<br />
they will be easier to see.<br />
The other aspect I mentioned is<br />
thicker yarn adds mass. If your<br />
sweater is half an inch thick and<br />
you’re wearing it, that sweater<br />
is going to add the illusion of a<br />
half inch to everything is covers.<br />
I don’t know about you, but I’ve<br />
got problems enough. A sweater<br />
made from lace weight will<br />
be thinner and give you more<br />
control over your pattern.<br />
If you’re worried about being<br />
too cold (or too warm) look to<br />
fiber composition for that. If<br />
you’re knitting with cotton, it<br />
will keep you a little cooler. You<br />
want it even cooler than that?<br />
Use a pattern with an open<br />
weave stitch. If you’re looking for<br />
warmth, use those fluffy fibers<br />
with air space in them, such as<br />
wool, mink, angora.<br />
Now that you’ve decided you’ll<br />
give It’s a Wrap a try, pick your<br />
pattern carefully. Do something<br />
that will keep you engaged. I<br />
know that doing long stretches of<br />
stockinette stitch doesn’t bother<br />
me at all, but if I must focus on<br />
every stitch, I’m sure never to<br />
pick up that project. You might<br />
be the opposite! Know yourself<br />
and know what kind of knitting<br />
you enjoy. There’s no wrong<br />
answer so don’t choose a pattern<br />
because everyone else is doing it,<br />
chose it because it’s right for your<br />
knitting style.<br />
20 <strong>KNITmuch</strong> | issue 8
Knitting with lace, the easy way<br />
There are a few tips and tricks that will make your<br />
life a bit easier. It’s a Wrap is a great yarn to start with<br />
because it’s on the heavier side of lace, and it has a<br />
nice firm twist. If you get a yarn that’s a bit slippery<br />
or easily splits, it can be a very technical knit.<br />
The number one thing you can do to make your<br />
lace knitting easier is to swatch and make sure you<br />
are using the right needle size for your tension.<br />
With larger yarns it’s easy to not quite have the right<br />
needle size and the yarn makes up for the rest.<br />
With It’s a Wrap, if your needle size is off, your<br />
knitting will either be too tight, which is easier to fix,<br />
than too loose. If your needle size is too large, your<br />
knitting will be very relaxed.<br />
Just knitting a couple rows isn’t enough, you need<br />
to knit a proper swatch. The cast on, knitting, and<br />
bind off are all important and you need to see how<br />
your needle size compares. My knitting tension, for<br />
example, is looser so I usually have to go down a<br />
needle size or two. Normally I can get away with<br />
knitting larger yarns with the recommended needle<br />
size, but lace I need to be very conscious of how<br />
my fabric looks.<br />
Knitting It’s a Wrap with a larger needle size, will<br />
make it go faster, but make sure it’s really how you<br />
want your garment to look.<br />
In order to purely make your knitting go faster, you<br />
can double up the yarn. There are a few things<br />
you need to think about when you’re using this<br />
technique though. Gauge, knitting with two strands<br />
will change your gauge. Are you knitting something<br />
that requires your gauge to be spot on? When you<br />
knit your swatch, are your measurements far off?<br />
Can you adjust the pattern?<br />
Depending on what you’re knitting, some of these<br />
questions will not apply, but you need to consider<br />
them before you start.<br />
Another important thing you can do to make<br />
your lace knitting experience a pleasant one is to<br />
carefully consider your pattern. I know I mentioned<br />
it as well, but it will go a long way to making<br />
your experience better. Knitting a garment with<br />
techniques you enjoy will make it seem much faster.<br />
You’ll know if you like the pattern by reading<br />
it through before you even swatch. The whole<br />
pattern, from start to finish. By doing this you’ll<br />
catch anything in the pattern that doesn’t make<br />
sense, or any of those situations where the pattern<br />
says, “but before you do the previously outlined<br />
decreases do this” or “At the same time as the<br />
instructions, also do this other technique.” I’ve<br />
been caught by passages like those, and I’m sure<br />
I’m not the only one.<br />
Life lines are also a good idea. If you’re knitting<br />
a lace pattern that is in lace weight yarn, I would<br />
highly suggest putting in life lines. If you have to rip<br />
back to the start of your pattern repeat, it will be<br />
much easier to pick everything back up. Small yarn<br />
and yarn overs are never fun to pick up.<br />
Knitting with a lace weight yarn like It’s a Wrap is<br />
just like any other knitting technique, scary when<br />
you look at it from the outside, but never as bad as<br />
it seems. Just give it a try and with the helpful tips<br />
here, you’ll be knitting lace weight yarn in no time!<br />
Even if you’re<br />
downloading a free<br />
pattern from an<br />
amazing database of<br />
patterns, you should<br />
still be reading the<br />
whole thing over.<br />
<strong>KNITmuch</strong> | issue 8<br />
21
10 Night Aran Islands, Donegal & Causeway Coast (Ireland)<br />
Tour Dates:<br />
• 07 Sep 2019<br />
Please contact us<br />
for 2020 dates<br />
This amazing 10 night tour includes Studio Donegal, the stunning Slieve League Cliffs, &<br />
Glencolmcille Folk Village. Tour Northern Ireland’s Causeway Coast and visit the Giant’s<br />
Causeway, Dunluce Castle, Belfast City and Titanic Belfast. A highlight will be two nights<br />
on Inis Mór, one of the famous Aran Islands!<br />
Workshops with Edel McBride, Lisa Sisk from This is Knit and<br />
Una McDonagh on Inis Mór!<br />
Also Included:<br />
Hotels, Sightseeing<br />
Tours, Entrance<br />
Fees, Meals, Craft<br />
Demonstrations and<br />
Knitting Workshops!<br />
www.KnittingTours.com<br />
Toll Free: 1800 913 1135<br />
Info@knittingtours.com<br />
P.S Check out our website for more tours!<br />
KnittingTours.com is part of the Irish Tourism Group,<br />
Trusted tour operator, members of ACTA, ASTA & ETOA<br />
22 <strong>KNITmuch</strong> | issue 8
It’s a Wrap yarn enhances<br />
simple knit and purl stitches<br />
The Squared Off Shawl pattern<br />
When I was originally looking for a pattern to go<br />
over, I searched for patterns in the It’s a Wrap section<br />
and immediately found the Squared Off Shawl. Usually,<br />
I like to cross pollinate with yarns and patterns,<br />
pairing things up that you wouldn’t normally think<br />
to pair. I just loved this pattern so much, I had to<br />
do it. The fact that the product photo is done in my<br />
favorite colors is totally irrelevant.<br />
I know it’s marked as an intermediate pattern, but<br />
the steps are not difficult. Don’t let the rating of the<br />
pattern fool you, if you take your time and knit the<br />
pattern one row at a time, you’ll be fine. I, of course,<br />
didn’t take my own advice and read over the pattern<br />
first, so it took me a minute to get into the swing of<br />
things. Once I did though, the pattern just flowed.<br />
The pattern is quite easy and progresses very quickly.<br />
It was a combination of knits and purls to make the<br />
squares on the shawl. The texture of the pattern, in<br />
tandem with the color blocking of the yarn makes<br />
the pattern look more complicated than it is and<br />
we all know how much I love that effect.<br />
The pattern is a steady increase while maintaining<br />
that square pattern. That could be why it’s marked<br />
as intermediate. You have to be paying attention to<br />
creating the pattern and steadily increasing at the<br />
same time.<br />
In the first few rows, I will admit, it was a little<br />
confusing. Once you figure out the pattern it<br />
becomes second nature. The increase is always at<br />
the end of a row, if you’re worried about forgetting<br />
you can leave a stitch marker in there and always<br />
make the increase just before the stitch marker.<br />
Easy-peasy! With that reminder, you only have<br />
to worry about making the square pattern and<br />
changing to decreases at the right time.<br />
The Squared Off Shawl pattern is a really fun knit.<br />
You’ll have to pay attention to what you’re knitting,<br />
but it is easy to read your knitting and remember<br />
where you are. If you’re ever lost in the pattern<br />
when you try to pick it back up, you can look at the<br />
amount of stitches on your needle and know where<br />
you’re going from there.<br />
If you’re just getting into lace weight yarn, this is<br />
a good place to try it out. If you want to try lace<br />
knitting with lace weight yarn, I recommend to start<br />
with a heavier yarn weight first and learn to read<br />
lace knitting. A yarn like, With Love, or Super Saver<br />
would be ideal.<br />
It’s a Wrap really does this pattern justice and vice<br />
versa, which makes sense because they were written<br />
for one another. If you’re looking for a pattern to try<br />
out the It’s a Wrap yarn on, this is an excellent one<br />
to choose. There are also hundreds of free patterns<br />
on the Red Heart website if you’re looking for<br />
something a little different.<br />
<strong>KNITmuch</strong> | issue 8 23
My Squared Off<br />
Shawl before<br />
blocking.<br />
It’s not a wrap until it’s been<br />
Knitting with lace is interesting<br />
because it’s a type of knitting<br />
that must be blocked. Especially<br />
if worked in a lace pattern. The<br />
eyelets need to be opened up and<br />
the pattern aligned. If your knitting<br />
doesn’t look good while you’re<br />
knitting, don’t despair! It may just<br />
need a good, hard, blocking.<br />
blocked<br />
A lot of the different blocking<br />
techniques depend on<br />
your space, your time, what<br />
you’re trying to achieve with<br />
blocking. All these techniques<br />
are intertwined together and<br />
some are better than others for<br />
different situations.<br />
Steam blocking is something<br />
of which I’m a huge fan. I was<br />
curious to see how It’s a Wrap<br />
would block out because it’s<br />
lace knit up with a cotton<br />
acrylic blend. Acrylic will relax<br />
completely, but cotton doesn’t<br />
normally change too much<br />
when it’s blocked because, by<br />
nature, it’s a less flexible fiber.<br />
With steam blocking, the shawl<br />
laid flat and kept its stitch<br />
definition, and relaxed a bit, but<br />
not as much as a pure acrylic.<br />
This means when you block It’s<br />
a Wrap into a shape, it will keep<br />
that shape and you will need to<br />
re-block much less often. Cotton<br />
is a less malleable fiber that likes<br />
to stay in the shape it was knit<br />
into and this factors into what I<br />
said earlier about what you want<br />
the fiber to do. If you’ve knit<br />
something a little too short, you<br />
can block it longer. Usually you<br />
can get length or width from<br />
blocking a garment, but not<br />
both. With cotton, the garment<br />
will stay how you knit it.<br />
24 <strong>KNITmuch</strong> | issue 8<br />
Post steam blocking! It looks so much better!! You<br />
can now see the pattern and all the hard work<br />
from knitting and purling this lovely pattern.<br />
My swatch before blocking. You really cannot<br />
even tell what shape it is, it’s got an interesting<br />
ruffle effect happening.<br />
After wet blocking the swatch lays completely flat<br />
and you can clearly see it’s a square.<br />
You’ll be able to have those<br />
sharp shawl edges and open<br />
eyelets without compromising<br />
the structure of the shawl.<br />
With wet blocking it was a<br />
little easier to manipulate the<br />
dimensions of the garment. Wet<br />
blocking takes space, time, and<br />
you must be able to lay it in a<br />
place where it won’t be disturbed<br />
for a day or two. You completely<br />
submerge the garment then<br />
gently squeeze the water out.<br />
Pin it to the dimensions you<br />
want. While you can manipulate<br />
this fiber, it keeps its shape more<br />
than wool or acrylic, so double<br />
check your gauge before starting<br />
if you’re knitting a sweater or<br />
something that needs to be<br />
fitted. After wet blocking It’s a<br />
Wrap yarn, the swatch was more<br />
relaxed than steam blocking<br />
and still retained its ‘strength’. I<br />
felt like I could have tugged and<br />
pulled it in different directions<br />
and it would stretch, but not<br />
become disfigured.<br />
Overall, I was very impressed<br />
with the ability of It’s a Wrap<br />
to blend the stability of cotton<br />
with the softness and pliability<br />
of acrylic. All the while, keeping<br />
a machine washable yarn that<br />
makes a beautiful garment.<br />
Michelle Nguyen<br />
IG michelle_stitchplease
LM6463<br />
Great Squares<br />
Knit Blanket<br />
Anytime you sit down with yarn you are creating<br />
happiness. Make something for yourself, friends, family<br />
or a charity. Yarning = Happiness.<br />
For free pattern, please visit: redheart.com<br />
© 2018 Coats & Clark. All rights reserved. Coats & Clark is a registered trademark.<br />
25
Unraveling Unity<br />
and Unity Beyond:<br />
what makes this<br />
yarn unique? Charles Voth<br />
The subtle bouclé texture and the moderate thick and thin twist of Unity<br />
result in textured knits that have a lot of body and visual depth.<br />
Unity Beyond is the same yarn but has been<br />
painted in a series of multi-color hues.<br />
I’m excited to share my knitting<br />
experiences with Unity and Unity<br />
Beyond, an amazing blend of<br />
natural fibers by Fibra Natura.<br />
Unity by Fibra Natura comes<br />
in 10 solid colors. Its painted<br />
version, Unity Beyond, comes in 6<br />
complementary colorways. The<br />
palette is reminiscent of French<br />
Country decor with its muted,<br />
subtle colors that remind me of<br />
gardens and summer days.<br />
In the case of Unity, the fiber<br />
content and the architecture<br />
of the yarn give it its unique<br />
character and strengths. Let's<br />
look at the structure of the yarn<br />
and then at its fiber content and<br />
what that does for knit fabric.<br />
Unraveling Unity yarn led me to<br />
an interesting discovery. There’s<br />
an inner core of loosely spun<br />
fibers, but around this core, there<br />
is a tiny strand of what looks like<br />
bamboo (there’s a definite sheen)<br />
that is spun with a Z-twist (spun<br />
counter-clockwise) around the<br />
core. You can see the glimmer of<br />
the bamboo in each segment of<br />
the bouclé, but it just looks like a<br />
strand that is parallel to the other<br />
fibers, but with the Z-twist, it is<br />
actually stabilizing those loose<br />
core fibers. Then there is another<br />
equally thin ply that is spun with<br />
a S-twist around the core and the<br />
bamboo strand, basically crisscrossing<br />
the bamboo strand to<br />
hold the core in place. This is also<br />
very loosely twisted and looks<br />
like one of the core’s strands<br />
when you aren’t analyzing this<br />
up close. The final ply is about<br />
3 times as thick as these first 2<br />
thin plies and is tightly twisted<br />
with an S-twist, and then twisted<br />
around the core and the first 2<br />
thin plies also with an S-twist. I<br />
would hazard a guess that the<br />
loose, fluffy fibers and this thicker<br />
binding ply are all a blend of<br />
wool, cotton, and linen as they<br />
are soft, yet matte.<br />
Unity Beyond colors are added by<br />
one of two ways. In one process,<br />
the dyers pass the yarn through<br />
rollers where only the top rollers<br />
have the dye colors on them, and<br />
one half of the yarn is “painted”<br />
while the other side retains its<br />
natural white. In the other, the<br />
yarn goes under dye jets that<br />
spray only one half of the yarn.<br />
The effect in either case is similar<br />
to a marled yarn where one ply<br />
is a light color and the other is<br />
a contrasting color. The look<br />
of Unity Beyond when knit up<br />
reminds me of acid wash denim,<br />
only with in gradient stripes.<br />
It took a few minutes to fray the end of Unity yarn<br />
because of its sturdy architecture.<br />
26 <strong>KNITmuch</strong> | issue 8<br />
The painted effect of Unity Beyond creates gradual transitions<br />
between each color of this long-spaced self-striping yarn. The speckled<br />
appearance is reminiscent of Impressionist Art.<br />
Photos by Charles Voth
36% wool, 28% cotton, 18% linen & 18% bamboo,<br />
what yarn is this?<br />
I’ll explore the fiber<br />
characteristics of this yarn<br />
and I've inserted a video in<br />
this feature to show how the<br />
knit fabric behaves because<br />
of the qualities of each<br />
component fiber.<br />
Unity (and Unity Beyond) by<br />
Fibra Natura has four different<br />
fibers, one animal based,<br />
and 3 plant based. Each fiber<br />
brings its own characteristic<br />
to the yarn. The fiber content<br />
is 36% wool, 28% cotton, 18%<br />
linen and 18% bamboo.<br />
Bamboo fiber is actually a<br />
biodegradable rayon thread<br />
made from a pulp mash<br />
that is made with the pith<br />
from the inside of bamboo<br />
stalks. It’s shiny and extremely<br />
strong, however, it has little<br />
to no elasticity. In Unity, the<br />
bamboo provides sheen and<br />
also some of the strength in<br />
the binding plies.<br />
Linen comes from the flax<br />
plant. The strands of this long,<br />
grass-like plant are processed<br />
mechanically to remove the<br />
outer bark from the long<br />
inner strands of cellulose. The<br />
stalks go through a soaking,<br />
fermentation and drying<br />
process called retting which<br />
makes it easier to remove<br />
the outer bark. When linen<br />
is added to yarn it brings<br />
in three positives. It adds<br />
absorbency, which makes it<br />
cool to wear in hot, humid<br />
weather.<br />
The wool content of Unity and Unity Beyond helps with<br />
blocking. The finished piece can be stretched out to<br />
highlight lace or to modify row gauge and the wool content<br />
is sufficient to give the yarn “memory.”<br />
Reverse stockinette stitch shows of the reflective gleam of the<br />
bamboo content easily.<br />
Many of the Unity Beyond colorways have solid colors in Unity<br />
that complement them well. Here’s Adobe and Rose Villa (solids)<br />
to accompany Biscotti.<br />
It’s very strong and helps a<br />
garment keep its shape, and it<br />
provides an amazing amount<br />
of drape and lightness to knit<br />
fabrics. I’ll show you how the<br />
yarn drapes in this video.<br />
Cotton fiber adds coolness and<br />
softness to yarn. In Unity and<br />
Unity Beyond, cotton is the<br />
second highest fiber content. It<br />
lives up to its duties of keeping<br />
the yarn very comfortable to<br />
the touch and it helps keep<br />
the finished knits cool.<br />
There is proportionally more<br />
wool in Unity than any of<br />
the other fibers individually,<br />
but overall, wool makes up<br />
just over ⅓ of the yarn’s fiber<br />
content. What I found about<br />
the wool in this yarn is that it<br />
has no scratchiness at all, and<br />
it adds loft and drape. Wool<br />
is the only component of<br />
Unity and Unity Beyond that<br />
has elasticity. That’s important<br />
to a bouclé yarn so that you<br />
don’t get an extremely loose<br />
stitch or an extremely tight<br />
one that doesn’t relax during<br />
the blocking process. It also is<br />
key to helping the finished knit<br />
hold its shape after blocking.<br />
Now that we’ve looked at<br />
both the architecture and fiber<br />
content of Unity and Unity<br />
Beyond, we’ll review some<br />
designs that have been knit<br />
with these yarns.<br />
<strong>KNITmuch</strong> | issue 8<br />
27
Unimaginable drape and comfort in knit<br />
designs made with Unity yarn<br />
This 4-fiber yarn is excellent for spring,<br />
summer, and fall knits because of the<br />
balance it has between wool and plantbased<br />
fibers. I’d like to share some designs<br />
that have been knit with this yarn.<br />
A ripple or zigzag scarf is a really good<br />
project for a beginner knitter who wants<br />
to move past just the knit and purl stitches.<br />
This free design, the Coastline Scarf, uses<br />
only 2 skeins and there are yarn-overs for<br />
increasing and straightforward decreases<br />
to draw the columns of stitches into points.<br />
Use only one skein of the<br />
multicolored Unity Beyond, and<br />
one skein of the solid Unity to make<br />
this sophisticated ripple scarf.<br />
A scarf worked along<br />
the long edge truly<br />
feels like it takes less<br />
time to knit. With<br />
only 2 skeins in this<br />
design, you could<br />
knit several for the<br />
holidays.<br />
By adding a third skein, and one with a bit more contrast, you can<br />
knit this elegant triangular shawl.<br />
Even though this shawl could be knit with 3 skeins of Unity Beyond,<br />
I really like how the designer chose a darker solid blue called “Ink”<br />
to make eyelet rows that divide the wider bands of gradient stripes.<br />
This free design lives up to its name, the Flying V shawl.<br />
From all angles, the Flying V shawl is a graceful wrap, perfect for chilly spring or fall evenings.<br />
The aptly named “Flying V” shawl uses a starker contrasting solid<br />
Unity yarn to highlight the lace motif that break up the multicolored<br />
tones of Unity Beyond.<br />
28 <strong>KNITmuch</strong> | issue 8
In addition to these free designs in<br />
Unity and Unity Beyond, designers Amy<br />
Gunderson and Rachel Brockman have<br />
teamed together to write an e-booklet<br />
collection. You can obtain each design<br />
individually if you wish.<br />
The Tanami Tee has a solid front and a<br />
multicolored back with a lace motif on the<br />
back and the top yoke.<br />
This is another pattern that would be<br />
great for a beginner knitter to try. The<br />
construction of the Sonoran Tank isn’t<br />
standard and adds a bit of interest to<br />
the project, particularly at the beginning,<br />
when the bottom edging is worked in one<br />
long band. This pattern is part of a larger<br />
e-book collection, but can be purchased<br />
individually.<br />
The Kalahari Wrap is one of the most<br />
beautiful renditions of a blend of diamond<br />
and zigzag motifs that remind me of the<br />
signature Missoni fabrics in dresses and<br />
sweaters. I really love the versatility of a<br />
wide wrap like this. The best thing is, with<br />
the linen and bamboo content, this wrap<br />
is sure to drape with drama, or feel soft<br />
and silky if bundled up as a scarf.<br />
Designer Amy Gunderson truly interpreted<br />
the drape of this linen blend, Unity Beyond,<br />
in this design called Mojave Poncho. For<br />
the knitter who gets bored of stockinette<br />
stitch, this design has a solution as there is<br />
a lovely textured stitch that’s easy to knit,<br />
and it repeats often.<br />
A couple of months ago, I went into some<br />
depth on using Ravelry.com to find<br />
patterns that enhance the yarn of your<br />
choice. I delved into the collection and<br />
found this lovely version of Pfeilraupe.<br />
Edmoejewel gave me permission to share<br />
her photo of the end result. Again, this<br />
pattern is a perfect interpretation of how<br />
Unity and Unity Beyond look good when<br />
drape is what you want.<br />
I hope you’ve enjoyed my foraging into<br />
patterns that look great knit with Unity and<br />
Unity Beyond. Next, I’ll share my recipe for<br />
knitting an over-the-head yoke and topdown<br />
tee-shirt.<br />
Pairing a solid blue with a Unity Beyond colorway in a lace motif, this Tee<br />
uses 4 skeins for the smallest size and 6 to 8 skeins for the plus sizes.<br />
The Sonoran tank top starts with a lacy motif worked around the bottom<br />
edge. Then the stitches are picked up and the body is knit from the bottom up.<br />
The Kalahari Wrap uses 8 skeins, 4 of a solid Unity color and 2 each of a<br />
Unity Beyond gradient self-striping version of this drapey yarn.<br />
The Mojave Poncho is another design that celebrates the drape and<br />
texture of Unity and Unity Beyond.<br />
<strong>KNITmuch</strong> | issue 8<br />
29
Knitting a shrug-yoke top-down<br />
seamless tee shirt – part 1<br />
Maybe you’ve never heard of a shrugyoke<br />
sweater construction. I’m not sure I’ve<br />
heard the name before, but I haven’t seen<br />
this type of design before either, so to me<br />
this is something new.<br />
We’ve been looking at Unity and Unity<br />
Beyond yarn, and I’ve used this lovely multicolored<br />
and multi-fiber yarn to design<br />
a summer tee for my wife. I’m sharing a<br />
recipe for making your own version of this<br />
to adapt to your measurements, but if you<br />
want to follow a fully written multi-size<br />
pattern, refer back to last couple of pages,<br />
where I shared quite a few designs worked<br />
in Unity and Unity Beyond.<br />
To knit this tee, you’ll need some<br />
intermediate knitting skills – working a<br />
provisional cast-on, short-rows, increasing<br />
and decreasing. You’ll also need to be<br />
comfortable with knitting a gauge swatch,<br />
and keeping track of several different stitch<br />
counts and row counts, as different shapings<br />
happen at the same time.<br />
There are a few key measurements that<br />
you’ll need to take for this:<br />
• Your full bust<br />
• The cross-back width (which is from<br />
shoulder bone to shoulder bone). You<br />
can measure this easily by wearing your<br />
favorite T-shirt and measuring from one<br />
shoulder-sleeve seam to the opposite one<br />
across the top of your back. There should<br />
be no slack in the measuring tape.<br />
• The upper arm circumference at the<br />
widest spot<br />
• The circumference of the hips at the point<br />
where you want the bottom hem of the<br />
Tee to land<br />
• The desired length of the sleeve taken<br />
from the top of the shoulder<br />
You’ll need between 5 and 8 skeins of Unity<br />
or Unity Beyond depending on whether<br />
you’re making a size X-small/Small up to a<br />
3x/4x Tee. I used size US 6 [4mm] needles for<br />
the body and size US 5 [3.75mm] needles for<br />
the ribbing edges.<br />
Cast on 26 to 30 stitches with US 6 [4mm]<br />
needles and knit a swatch as follows:<br />
Rows 1-6: Knit.<br />
Row 7: Knit.<br />
Row 8: K3, purl to last 3 sts, k3.<br />
Rows 9 – 42: Repeat Rows 7 & 8.<br />
Rows 43 – 48: Knit.<br />
Bind off.<br />
30 <strong>KNITmuch</strong> | issue 8
The shrug yoke<br />
starts at the front<br />
bust line and is<br />
worked up and<br />
over the head<br />
and shoulders.<br />
Thoroughly soak your swatch in warm water.<br />
Remove as much excess moisture as you<br />
can, then pull the swatch vertically and let<br />
its natural elasticity return it to its natural<br />
shape. Lay the swatch flat, pin it out (without<br />
stretching it width-wise), and allow it to dry.<br />
Then measure your gauge. I got 21 sts and<br />
33 rows per 4″ [10cm].<br />
If you’ve ever knit, worn, or seen a shrug,<br />
you know that basically it’s two sleeves<br />
with a rectangular or oval ‘back’ piece that<br />
connects the two sleeves. We’re doing<br />
something similar, but in this design, we’ll<br />
also knit a front.<br />
The shrug yoke starts at the full bust line.<br />
You knit the front and the fronts of the<br />
sleeves first, then shape the underarm and<br />
front bodice by working short rows for<br />
the sleeves. At the neck, separate balls are<br />
required to knit both sides at the same time.<br />
At the end of the neck shaping, you’ll be partway down<br />
the back bodice. The back underarm shaping is worked<br />
differently than the front. It has a lace motif at the<br />
shoulder to mimic a shoulder seam (and provide a bit<br />
of ventilation). At the end of a few more short rows and<br />
a few rows to complete the back bodice, you’ll arrive<br />
back at the bust-line, where the stitches on your needle<br />
will join the ones from your provisional cast on and be<br />
finished off by being worked in the round.<br />
The body is worked with gradual increases to achieve<br />
the hip circumference.<br />
Eyelets define the faux sleeve seam at the back of this bodice.<br />
<strong>KNITmuch</strong> | issue 8<br />
31
The<br />
Math<br />
Here are a few calculations you need to complete to<br />
begin your design.<br />
A. Number of bust stitches required<br />
Bust measurement × stitch gauge ÷ 4” = Bust Stitches.<br />
Round this down to an even number if necessary and<br />
divide by 2.<br />
Example 44″ bust × 21 sts ÷ 4 = 230 ÷ 2 = 115.<br />
If your result is an odd number then subtract 1. Since<br />
our result is 115, I’ll reduce it to 114.<br />
You could also simply divide your sts per 4″ by 4 to get<br />
the number of stitches per inch, which may help you<br />
figure out the numbers more easily.<br />
B. Number of bodice stitches required<br />
Cross-back measurement × stitch gauge ÷ 4” = Bodice<br />
Stitches. Round this down to an even number.<br />
Example 16.75″ across back × 21 sts ÷ 4 = 230 = 88 stitches.<br />
C. Amount to decrease during sleeve/bodice<br />
shaping<br />
A. (Bust Stitches) – B. (Bodice Stitches) = Sleeve/Bodice<br />
Decreases.<br />
Example 114 – 88 = 26 stitches<br />
To finish off the neck opening,<br />
I used [k2, p1, k1, p1] ribbing.<br />
It’s a little different, and it gives<br />
a nice effect.<br />
32 <strong>KNITmuch</strong> | issue 8
I used my examples to make this Unity Beyond<br />
Summer Top knit to fit a 44'' bust. By using<br />
custom measurements for shoulders and<br />
sleeves. I achieved a great fit!<br />
The decreases happen at each underarm and at<br />
the stitches ⅓ and ⅔ of the way across the front<br />
body stitches approximately.<br />
D. Number of rows for armholes<br />
Upper arm circumference measurement plus 4″ for<br />
ease (you don’t want your sleeves to choke your<br />
upper arms and this leaves a little room to breathe)<br />
× row gauge (from swatch) ÷ 4″ = Total Armhole<br />
Rows. Round up to an even number, if necessary,<br />
then divide by 2 to get the number of Front<br />
Armhole Rows (which is also the number of Back<br />
Armhole Rows).<br />
Example (12.75 + 4) × 33 ÷ 4 = 138 ÷ 2 = 69<br />
If the result is an odd number round up to the next<br />
even number. I will round up to 70 rows.<br />
Example 70 rows for front half of shrug yoke<br />
E. Number of rows for sleeves<br />
Sleeve Rows = 85% of Total Armhole Rows,<br />
rounded up to an even number.<br />
Example 70 × 0.85 = 59.5 rows<br />
I will rounded up to 60 rows for my sleeves.<br />
F. Number of rows for neck opening<br />
Rows for Front Neck Opening = 50% of Front<br />
Armhole Rows (result of D) rounded to an even<br />
number.<br />
Example 70 × 0.50 = 36 rows<br />
For a more revealing neck opening use 60% and for<br />
a more conservative neck opening use 40%.<br />
G. Number of stitches for neck opening<br />
Neck Opening at Widest Point = 42% of Bodice<br />
Stitches (B) rounded to the nearest even number.<br />
Example 88 × 0.42 = 36.96 stitches<br />
The nearest even number is 36.<br />
H. Shoulder Width<br />
B. (Bodice Stitches) – G. (Neck Opening) ÷ 2 =<br />
Shoulder Width<br />
Example (88 – 36) ÷ 2 = 26 stitches<br />
J. Sleeve Stitches<br />
Desired sleeve length (in inches) × stitch gauge ÷<br />
4, rounded to the nearest even number = Sleeve<br />
Stitches.<br />
Example 5.5 inches × 21 ÷ 4 = 28.87 stitches<br />
The nearest even number is 28.<br />
K. Short row turns<br />
D. (Front or Back Armhole Rows) – E. (Sleeve Rows) =<br />
Short Row Turns<br />
Example 70 – 60 = 10 short row turns<br />
Half of the short row turns are used in each sleeve,<br />
halfway across the number of sleeve stitches.<br />
So after you’ve done a little math, and taken<br />
detailed notes, you’ll be ready to use the recipe for<br />
this sweater that I’ll share with you next.<br />
If you’re a visual person, it will help you to draw a<br />
schematic on paper, and insert the information you<br />
have worked out. Here are some of the results of today’s<br />
examples, put onto a sketch.<br />
<strong>KNITmuch</strong> | issue 8<br />
33
Knitting a shrug-yoke top-down<br />
seamless tee shirt – part 2<br />
This schematic<br />
shows where key<br />
shaping needs<br />
to be worked<br />
to fit your body<br />
perfectly.<br />
Using the numbers that you calculated, you can knit<br />
a custom fitted summer top. The schematic shows<br />
the placement of shaping details that will make this<br />
tee fit perfectly.<br />
The placement of the symbols shows approximately<br />
where the shaping will be worked – the actual<br />
number of symbols is just representative. Where<br />
I have shown 4 increases, you might have as few<br />
as 3 or as many as 8. It will completely depend on<br />
your calculations.<br />
Let’s get started<br />
Now we can cast on. We’re using a provisional cast<br />
on, so you’ll need some scrap cotton or acrylic yarn<br />
that is the same weight or slightly finer than your<br />
Unity Beyond. You can use a crochet cast on or any<br />
other type of provisional cast on.<br />
Cast on the whole amount of stitches for the front<br />
and both sleeves(the results of A and J × 2). In my<br />
case that’s 114 + (26 × 2) = 166 stitches. Place stitch<br />
markers where your “fake seam” will go – on my<br />
sweater, it is after the first 26 stitches and before<br />
the last 26 stitches. This helps keep track of the<br />
“boundaries” for the sleeves and body.<br />
As I started working in stockinette stitch for 2 rows,<br />
I also added more stitch markers. I needed to<br />
work both the bottom yoke shaping for the bust<br />
and the short-row shaping for the sleeves. To do<br />
this yourself, you’ll need your number L. I needed<br />
to decrease 26 stitches at the lower bust, but the<br />
design looks best if you decrease both at the<br />
underarm and then at the places where a princess<br />
seam would land, which is about the ⅓ and ⅔ spot<br />
across the width of the body stitches. So I took 114<br />
and divided it by 3, which is 38 sts. So I added stitch<br />
markers with 38 stitches between the sleeve seam<br />
stitch markers.<br />
For the short row calculations, I use the value of<br />
K. Work short rows halfway across the number of<br />
sleeve stitches, placing a stitch marker at that point<br />
to remind you to do the turns. In my case, I need<br />
to work 5 pairs of short rows. I begin them halfway<br />
across the 26 sleeve stitches, placing a stitch marker<br />
at the 13th stitch point. I now have 6 stitch markers<br />
on my needles. To sum up, my needle now shows:<br />
13 sts, sm, 13 sts, sm, 38 sts, sm, 38 sts, sm, 38 sts,<br />
sm, 13 sts, sm, 13 sts.<br />
34 <strong>KNITmuch</strong> | issue 8
The circled areas<br />
indicate where<br />
shaping occurs on the<br />
shrug yoke.<br />
Your numbers will be different, as they will be based<br />
on your measurements.<br />
After your stitch markers have been placed into the<br />
knitting in the first two rows of stockinette stitch,<br />
you can begin shaping. I’ve written out what I did in<br />
these instructions. You can copy my instructions and<br />
paste them into a document then substitute your<br />
numbers as necessary.<br />
Row 1: Knit to second marker, sm, ssk, knit to next<br />
marker sm, ssk, [knit to 2 sts before next<br />
maker, k2tog] twice, knit remaining stitches.<br />
Row 2: Purl across.<br />
This makes 4 decreases. I need 26, so I’ll repeat<br />
these 2 rows 5 more times to reach a total of 24<br />
decreases, then on the next decrease row, I will only<br />
make decreases at the sleeve seams.<br />
At the SAME time, I need to work short-row turns.<br />
I use the German short row, but you can use any<br />
technique you like.<br />
Right side: Knit across working the decreases as<br />
established above to the 6th stitch marker, leaving<br />
the marker on the left needle, turn work (which<br />
means the marker is now on the right needle).<br />
Wrong side: Slip the first stitch purlwise, bring yarn<br />
over the top of the right-hand needle to the back<br />
of the work, and up between the needles to the<br />
front of the work, and tug hard (but not so hard as<br />
to break the yarn) to create a “hitch stitch” on the<br />
right-hand needle (this hitch stitch will look like a<br />
messy 4 strand stitch), purl across to the last stitch<br />
marker, leaving the marker on the left needle, turn<br />
work.<br />
Right side: Slip the first stitch purlwise, bring yarn<br />
over the top of the right-hand needle to the back<br />
of the work, knit the next stitch and tug to tighten<br />
both the stitch just knit and the hitch stitch behind<br />
it. Knit across, working the decreases as established,<br />
to the next hitch stitch, knit into the hitch stitch so<br />
there are 2 strands on either side of the right-hand<br />
needle when you insert the tip into the stitch, then<br />
knit remaining stitches.<br />
Wrong side: Purl across to the first marker, remove<br />
marker, purl 3, place marker back, purl to 2 stitches<br />
before the other hitch stitch, place a marker, purl<br />
2, purl the hitch st with 2 strands on either side of<br />
the right-hand needle when you insert the tip to<br />
purl, remove the previously placed marker, purl the<br />
remaining stitches.<br />
These 4 steps create the pair of short row turns. This<br />
will add 2 rows to the inside of the body, but not at<br />
the edge of the sleeves. As you work, you can see<br />
that the location of the row turns change by a few<br />
stitches. This is important to keep the sleeves from<br />
forming visible pleats.<br />
In my case, as I was decreasing, I also worked 4<br />
more pairs of short row turns. Then, I worked even<br />
in stockinette stitch on my 88 (for front) plus 2 x<br />
26 (total 140 sts) until it was time to bind off for<br />
the front neckline, which in my case was after row<br />
34. For your row count take your result of D and<br />
subtract F. For me it was 70 – 36.<br />
<strong>KNITmuch</strong> | issue 8<br />
35
The shrug yoke after<br />
all shaping is done,<br />
and with sleeve<br />
seams completed,<br />
and all body stitches<br />
on a circular needle.<br />
Using your calculation for neckline width, G,<br />
you can figure out how many stitches will be<br />
bound off. You’ll need to leave some stitches<br />
for the diagonal corners of the neckline. I<br />
decreased 4 stitches on each side, so with my<br />
value of G being 36, minus 4 at each side, I<br />
had an initial bind off of 28 stitches. With 140<br />
total, I simply subtracted 28 from 140 and<br />
divided the result by 2.<br />
(140 – 28) ÷ 2 = 56.<br />
For the beginning of the neck opening, I knit<br />
across 56 stitches, bound off 38, and knit the<br />
remaining 56. Then, I purled across the first half,<br />
joined another ball of yarn and purled across the<br />
second half. To help keep my striping “in sync,” I<br />
joined the new yarn in at the same place in the<br />
color sequence so that both halves of the front<br />
would match.<br />
For the next 8 rows, I decreased 1 stitch at each<br />
edge of the neck opening on the knit rows. That<br />
left me with 52 stitches on either side of the neck<br />
opening. Your mileage will vary!<br />
The next shaping required are the increases for<br />
the sleeve cap which are worked on the sleeve<br />
side of the seam stitch markers. I increased 2<br />
stitches on each side every 4th row beginning<br />
about 10 rows before the end of the front. You<br />
may want to increase 3 or 4 stitches on each side,<br />
so just begin early enough.<br />
At this point, you’re ready to work the back of<br />
the yoke.<br />
To knit the back, I didn’t reverse the shaping<br />
from the front exactly. I started by immediately<br />
increasing 1 stitch at each edge of the neckline<br />
4 times and decreasing on the outside of the<br />
sleeve seam stitch markers. This gives the back of<br />
the neck a gentle scoop that allows room for the<br />
ribbing to come up the back of the neck later.<br />
Once those decreases were done, I cast on 28<br />
stitches for the center of the back neck and<br />
began working work all the way across again.<br />
Because we don’t need the extra shaping in the<br />
back, I left out the princess seam stitch markers.<br />
When my stitch count equaled 140, I had this on<br />
my needle:<br />
13 sts, sm, 13 sts, sm, 88 stitches, sm, 13 sts, sm,<br />
13 sts.<br />
Then I started the eyelet lace, which incorporates<br />
the shaping to bring my stitch count back up to<br />
the number needed to match the cast on.<br />
Row 1: Knit to 2nd marker, slip marker, k1, yo, ssk,<br />
yo, ssk, knit to 5 sts before next marker,<br />
k2tog, yo, k2tog, yo, k1, slip marker, knit<br />
across.<br />
Row 2: Purl.<br />
Row 3: Knit to 2nd marker, slip marker, k1, yo,<br />
ssk, yo, knit to 3 sts before next marker, yo,<br />
k2tog, ko, k1, slip marker, knit across.<br />
Row 4: Purl.<br />
36 <strong>KNITmuch</strong> | issue 8
This photo of the back<br />
yoke of the<br />
Unity Beyond Tee shows<br />
the lace eyelets next to<br />
the armhole shaping.<br />
This increases 2 stitches every 4 rows and adds<br />
the decorative eyelets.<br />
At the same time, I worked 5 pairs of short-row<br />
turns as above.<br />
When the stitch count was back to 166, I<br />
continued working rows 1 and 2 until the back<br />
was the same length as the front.<br />
The yoke and sleeves are now complete. At this<br />
point, you can unpick the provisional cast on and<br />
graft the sleeve stitches to each other or put the<br />
sleeve stitches onto a different needle for the<br />
front and back stitches, then work a 3-needle<br />
bind off for the under-sleeve seams.<br />
The remaining body stitches will all be placed<br />
on a circular needle and you can continue<br />
working in the round.<br />
I decided to continue the eyelet lace in the<br />
locations as established. I also decided to flare<br />
out the body, by incorporating increases every<br />
4th row until I reached the desired number of<br />
stitches for the hip circumference. This gives<br />
a gradual A-line silhouette to the top which<br />
pleases her. You can work the body in solid<br />
stockinette stitch with no shaping if you prefer.<br />
It’s up to you how you “cook” up a summer tee<br />
with this recipe.<br />
As you can see, I still need to add some ribbing<br />
to the neckline and cuffs and the bottom of the<br />
tee. You can also see that my wife will end up<br />
with a lovely top!<br />
I got great mileage out of the Unity Beyond yarn.<br />
My version only used 4 skeins, and it’s a size XL.<br />
In the photo below, you can see a fifth skein, plus<br />
a skein of Unity in Adobe red, but there’s enough<br />
left in the ball without the band to finish the<br />
sweater. I’m sure you’ll be pleased with whatever<br />
you choose to knit with Unity yarn. My wife is<br />
thrilled with the feel, fit, and drape of her new<br />
Tee!<br />
The gentle shading of Unity Beyond creates horizontal stripes that are softer<br />
and more flattering to the figure than sharp color changes.<br />
Charles Voth<br />
twitter.com/stitchstud<br />
charlesvothdesigns.ca<br />
<strong>KNITmuch</strong> | issue 8<br />
37
BUSINESS DIRECTORY To list your business in this space please call 1.866.969.2678.<br />
Brenda Franklin Designs<br />
7570 Mapleton SR 18 RR 1, Alma, ON N0B 1A0<br />
519.638.9958 bfdesigns.on.ca<br />
help@bfdesigns.on.ca<br />
More than 500 charts available for counted<br />
needlework, latch hook rugs, beadwork, beaded<br />
knits and knitting patterns. Mail/fax order or ask<br />
for our products at your local shop. Contact us for<br />
custom designs or needle felted sculpture.<br />
Brampton Sew & Serge<br />
289 Rutherford Rd S, Unit 7, Brampton, ON L6W 3R9<br />
905.874.1564 sewnserge.com<br />
monique@bramptonsewnserge.com<br />
Welcome to Your One Stop Sewing Centre! We are<br />
authorized dealers of Baby Lock, Husqvarna Viking,<br />
and Singer sewing machines and sergers. We also<br />
offer a full schedule of sewing classes for everyone.<br />
Bytowne Threads - Ottawa, ON<br />
1.888.831.4095 bytownethreads.com<br />
mlj@bytownethreads.com<br />
Featuring Aurifil thread from Italy. Long staple<br />
Egyptian cotton threads - 270 colours in 12, 28, 40<br />
and 50 wt; 88 colours in 80 wt. Polyester Aurilux -<br />
240 high sheen colours. Wool threads - 192 colours.<br />
Many kits available. Check our website!<br />
Canadian National Fabric - Melancthon, ON<br />
https://canadiannationalfabric.com/<br />
info@canadiannationalfabric.com<br />
We are an online fabric shoppe offering a wide<br />
variety of fabrics, patterns, books and notions for all<br />
your sewing needs. Flat rate Canada wide shipping<br />
of $5 with FREE SHIPPING for orders over $75. Shop<br />
in person available by appointment!<br />
Country Concessions<br />
1 Dufferin St, Cookstown, ON L0L 1L0<br />
705.458.4546 or toll-free 1.888.834.4407<br />
countryconcessions.com<br />
info@countryconcessions.com<br />
Visit our lovely and unique quilt shop in the quaint<br />
village of Cookstown. We have over 7000 bolts of<br />
cotton fabrics plus a wide selection of patterns, books<br />
& notions. You will be so glad you came for a visit.<br />
Gitta's<br />
271 Lakeshore Rd E, Mississauga, ON L5G 1G8<br />
905.274.7198 gittas.com<br />
questions@gittas.com<br />
Gitta's, named after owner Gitta Al-Basi, nestled in<br />
the east village of Port Credit, is the place where<br />
stitchers meet with their stitching friends, shop for<br />
stitching supplies and see the new stitching designs<br />
from Europe and the United States.<br />
Hardanger House, designs by Betty Stokoe<br />
PO Box 1223, Stettler, AB T0C 2L0<br />
403.742.2749 bettystokoe@gmail.com<br />
tnplisting.com/hardanger-house.html<br />
Hardanger embroidery charts and kits. Designs<br />
feature contemporary adaptations of this traditional<br />
cutwork embroidery from Norway. Shop online<br />
at etsy.com/shop/HardangerHouse. Some digital<br />
downloads available.<br />
Haus of Stitches<br />
626 Main Street, Humboldt, SK S0K 2A0<br />
306.682.0772 or toll-free 1.800.344.6024<br />
hausofstitches.ca<br />
Our one of a kind store offers everything you need<br />
for sewing, quilting, knitting, rug hooking and<br />
needlework. Authorized dealers for Janome and Elna.<br />
Heartfelt Fibre Arts<br />
42 Industrial St, Toronto, ON M4G 1Y9<br />
647.920.3616 heartfeltfibrearts.com<br />
info@hearftfeltfibrearts.com<br />
Canadian Fibre Arts supply store specializing in<br />
high-quality, unique fibre and tools for all of your<br />
knitting, felting, rug hooking and stitching needs.<br />
38 <strong>KNITmuch</strong> | issue 8<br />
Impressions Embroidery & Engraving<br />
#8-449 Mayor Magrath Dr S, Lethbridge, AB T1J 3L8<br />
403.942.3934 impressionslethbridge.ca<br />
impressions22@shaw.ca<br />
Our shop does embroidery and laser engraving.<br />
Laser engraving is a beautiful process for fabric,<br />
as nothing cuts cleaner and more precisely than a<br />
laser. We now carry a nice array of fabric as well to<br />
compliment the abilities of the laser.<br />
Kelly's Creative Sewing<br />
804 Main St, Dartmouth, NS B2W 3V1<br />
902.435.7380 kellyscreativesewing.ca<br />
kellyscreativesewing@gmail.com<br />
We offer sales and on-site service of high-end<br />
domestic embroidery, sewing machines and sergers,<br />
as well as a variety of educational programs.<br />
Needles & Knits<br />
15040 Yonge St, Aurora, ON L4G 1M4<br />
905.713.2066 needlesandknits.com<br />
Fabulous selection of yarns. Extremely<br />
knowledgable and expert help. Cozy and friendly<br />
atmosphere. Classes. Guild night every first Tuesday<br />
of the month. Tea with Tove, the owner, every<br />
Thursday from 6-8pm.<br />
Needleworker's Delight / Silkweaver Fabrics<br />
Plaza K 181 Route 1 South, Metuchen, NJ 08840<br />
732-388-4545 needleworkersdelight.com<br />
info@needleworkersdelight.com<br />
Standard & specialty Zweigart Fabrics & canvas,<br />
hand-dyed fabrics, floss, fibers, towels, tableware,<br />
leaflets/designs, painted canvases, notions, tools,<br />
baby items, home decor, and so much more!<br />
Pine Ridge Knit & Sew<br />
17477 Hwy 2 PO Box 68, Trenton, ON K8V 5R1<br />
613.392.1422 pineridgeknitsew.com<br />
yvette@pineridgeknitsew.com<br />
We have knitting machines by Artisan and Silver<br />
Reed, embroidery machines by Husqvarna/Viking<br />
& White. Sewing notions and supplies, books and<br />
software. Hands-on lessons and classes. Wide variety<br />
of yarns, threads, dress and pant zippers.<br />
Ruby Pearl Quilts<br />
500 King St W, Suite 8, Oshawa, ON L1J 2K9<br />
905.436.3535 rubypearlquilts.com<br />
joy@rubypearlquilts.com<br />
We are your full service source of professional quilting<br />
equipment, products, & courses. Led by 44 years of<br />
sewing experience & more than 20 years of quilting<br />
experience, we have the experience necessary to help<br />
you push your hobby to the next level!<br />
Serenity Knits<br />
525 Brooker Ridge #102, Newmarket, ON L3X 2M2<br />
905.710.3283 serenityknits.ca<br />
info@serenityknits.ca<br />
We offer a wide selection of high quality yarns as well<br />
as needles, hooks, patterns and notions. We also offer<br />
a large variety of classes from beginner to the more<br />
advanced.<br />
Sew Fancy Inc.<br />
Guelph, ON<br />
519.824.4127 sewfancy.com<br />
sales@sewfancy.com<br />
Your Premier Canadian Source for Specialty Sewing<br />
Supplies including Smocking, Heirloom Sewing,<br />
Goldwork, Silk Ribbon Embroidery, Needle Tatting,<br />
Swarovski Crystals, Sashiko, Quilting and more. Visit<br />
the website for the latest in sewing supplies.<br />
Sew Inspired<br />
375 Daniel St S, Arnprior, ON K7S 3K6<br />
613.623.0500 sewinspired.ca<br />
info@sewinspired.ca<br />
Your Ottawa Valley PFAFF® Authorized Dealer. We<br />
have a large supply of quilting & sewing supplies,<br />
knitting supplies, as well as in stock PFAFF® sewing<br />
machines. We also have a listing of sewing and<br />
quilting classes.<br />
Sew With Vision<br />
480 Parkland Dr, Halifax, NS B3S 1P9<br />
902.479.2227 sewwithvision.net<br />
Authorized PFAFF, HUSQVARNA VIKING, and SINGER<br />
dealer and service provider offering an extensive<br />
line of sewing, embroidery and serger machines, as<br />
well as long-arm quilting systems.<br />
That Sewing Place<br />
16610 Bayview Ave #10, Newmarket, ON L3X 1X3<br />
905.715.7725 thatsewingplace.ca<br />
jaret&liana@thatsewingplace.ca<br />
Introducing That Sewing Place as your sewing<br />
source and Authorized Dealers for Bernina and<br />
Brother machines. Jaret & Liana focus on placing<br />
your sewing needs first, providing outstanding<br />
support, service, and training.<br />
The Quilt Store / Evelyn's Sewing Centre<br />
17817 Leslie St, Unit 40, Newmarket, ON L3Y 8C6<br />
905.853.7001 or toll-free 1.888.853.7001<br />
The Quilt Store West<br />
695 Plains Rd E, Unit 6, Burlington, ON L7T 2E8<br />
905.631.0894 or toll-free 1.877.367.7070<br />
thequiltstore.ca<br />
Now with 2 locations to serve you, we are your Quilt<br />
Store Destination! The staff here at The Quilt Store<br />
is always on hand to provide Quilt Wisdom, Quilt<br />
Inspiration and most of all we pride ourselves as the<br />
place to make... All Your Quilt Dreams Come True!<br />
The Stitcher's Muse<br />
99 Commercial Street, Nanaimo, BC V9R 5G3<br />
250.591.6873 thestitchersmuse.com<br />
info@thestitchersmuse.com<br />
A divine little shop with supplies for all your hand<br />
stitching needs! Friendly, knowledgeable, helpful<br />
staff. Cross stitch, canvaswork, needlepoint,<br />
embroidery, counted thread, lace making and<br />
more. Books, patterns, fabric, threads, tools.<br />
The Yarn Guy<br />
15 Gower St, Toronto, ON M4B 1E3<br />
416.752.1828 or toll-free 1.800.836.6536<br />
theyarnguy.com info@sewknit.ca<br />
See us on Facebook, follow us on Twitter!<br />
Knitting machines, sewing machines, repairs, parts<br />
for Passap, Studio, Singer, Silver Reed, Superba,<br />
White. Sewing notions and supplies, books, ball<br />
yarns, coned yarns, TAMM yarns, Paton's yarns,<br />
Bernat yarns, Phentex yarns, Bernat kits & crafts.<br />
Ultimate Sewing Centre<br />
191 Bloor St East, Oshawa, ON L1H 3M3<br />
905.436.9193 ultimatesewing.com<br />
ultimatesewing@bellnet.ca<br />
For all your sewing needs be sure to call Durham’s<br />
largest one stop shop: Janome and Elna Sewing<br />
Machines, Sergers, & Embroidery machines,<br />
over 3000 bolts of first quality cottons, Floriani<br />
Embroidery supplies, the latest notions, books, &<br />
patterns, year round classes, and so much more!<br />
Upper Canada Quiltworks<br />
PO Box 64, Brockville, ON K6V 5T7<br />
613.345.3956 Fax: 613.342.3327<br />
uppercanadaquiltworks.com<br />
Visit us online for a wide selection quilt patterns<br />
and books. Techniques include felted wool, fusible<br />
appliqué, punchneedle, rag quilting and printing<br />
photos on fabric.
don't miss these<br />
projects & tutorials online!<br />
KNIT much.com<br />
...to K, is to<br />
Colorful<br />
Chic Sheep<br />
pure wool,<br />
pure knitting fun<br />
READ NOW<br />
READ NOW<br />
Butterfly Baby<br />
Blanket knit in<br />
Super Saver Ombre<br />
and<br />
there's<br />
so<br />
much<br />
more!<br />
READ NOW<br />
Knitting<br />
with<br />
Alaska yarn,<br />
soft & airy<br />
<strong>KNITmuch</strong> | issue 8<br />
39
KNIT much .com<br />
...to K, is to<br />
Standard abbreviations & terms<br />
Standards & Guidelines For Crochet and Knitting • YarnStandards.com<br />
alt = alternate<br />
approx = approximately<br />
beg = begin(ning)<br />
BO= bind off<br />
Standards & Guidelines For Crochet and Knitting • YarnStandards.com CC = contrast colour<br />
Standards & Guidelines For Crochet and Knitting • YarnStandards.com<br />
ch = chain<br />
cm = centimetre(s)<br />
cn = cable needle<br />
Standard Yarn Weight System<br />
co = cast on<br />
cont = continue, continuing<br />
dc = double crochet<br />
Standard Yarn Weight System<br />
Yarn Weight<br />
Symbol &<br />
Category<br />
Names<br />
Yarn Weight<br />
Type of<br />
Symbol & Yarns in<br />
Category Category<br />
Names<br />
Categories of yarn, gauge ranges, and recommended needle and hook sizes<br />
Standard Yarn Weight System<br />
Fingering,<br />
10 count<br />
crochet thread<br />
Knit Gauge<br />
Type of Range* in Fingering, Sock,<br />
Yarns in<br />
33–40**<br />
Stockinette 10 count Fingering,<br />
sts<br />
Category Stitch to crochet thread Baby<br />
4 inches<br />
Knit Gauge<br />
Range* in Recommended<br />
33–40** 27–32<br />
Stockinette Needle in 1.5–2.25<br />
Stitch to Metric Size<br />
sts<br />
mm<br />
sts<br />
4 inches Range<br />
Sock,<br />
Fingering,<br />
Baby<br />
27–32<br />
sts<br />
2.25–3.25<br />
mm<br />
dec = decrease(s), decreasing<br />
Categories of yarn, gauge ranges, and recommended needle and hook sizes<br />
dpn = double-pointed needle(s)<br />
foll = following<br />
Yarn Weight<br />
g = gram(s)<br />
Symbol & DK,<br />
Worsted, Chunky,<br />
hdc = half double crochet<br />
Sport, Category<br />
Bulky,<br />
Jumbo,<br />
Light<br />
Afghan,<br />
Craft,<br />
inc = increase(s), increasing<br />
Names Baby<br />
Roving Roving<br />
in(s) = inch(es)<br />
Worsted<br />
Aran<br />
Rug<br />
k = knit<br />
kf&b or kfb = knit into front and back of st (increase)<br />
Categories of yarn, gauge ranges, and recommended needle and hook sizes<br />
Type of<br />
Fingering, Sock,<br />
DK,<br />
Yarns in DK, 10 count Worsted, Fingering, Chunky,<br />
Sport,<br />
Sport,<br />
6 sts<br />
23–26 21–24 16–20 12–15 BabyBulky,<br />
Light<br />
7–11 Jumbo,<br />
Category Light crochet thread Afghan, Baby Craft,<br />
Baby<br />
Worsted and<br />
sts<br />
sts<br />
sts<br />
sts Roving sts Roving<br />
Worsted<br />
Aran<br />
Rug<br />
fewer<br />
Knit Gauge<br />
Range* in<br />
33–40** 27–32<br />
23–26<br />
Stockinette<br />
21–24<br />
3.25–3.75 Stitch to 3.75–4.5sts<br />
16–20<br />
4.5–5.5sts<br />
12–15<br />
sts<br />
4 mm<br />
sts<br />
inches mm<br />
sts<br />
mm<br />
sts<br />
23–26 21–24<br />
6 sts<br />
16–20<br />
12.75 mm<br />
5.5–8 sts 7–11<br />
8–12.75 sts<br />
and<br />
sts<br />
and<br />
mm<br />
sts<br />
mm fewer<br />
larger<br />
Chunky,<br />
ktbl = knit Bulky, through the back Jumbo, loop<br />
Craft, k2tog = knit Roving 2 sts tog (right-leaning Roving decrease)<br />
Rugk3tog = knit 3 sts together (double right-leaning<br />
decrease)<br />
m = marker<br />
m = meter(s)<br />
6 sts<br />
12–15 m1 = Make 7–11 1 stitch: pick up the horizontal strand<br />
and<br />
sts between sts2 stitches from front to back and knit it<br />
tbl (lifted increase) fewer<br />
MC = main colour<br />
mm = millimetre(s)<br />
oz = ounce(s)<br />
Recommended<br />
Recommended Recommended<br />
17<br />
p = purl<br />
12.75 mm<br />
Needle in 1.5–2.25 2.25–3.25 3.25–3.75 3.75–4.5<br />
Needle U.S. 000 to 1 1 to 3 3 to 5 5 to 7 7 to 9 9 to 11 11 to 17 12.75 mm<br />
4.5–5.5 5.5–8 8–12.75<br />
p2tog = purl 2 sts tog (decrease)<br />
Needle in 1.5–2.25 2.25–3.25 3.25–3.75Metric Size 3.75–4.5 mm4.5–5.5<br />
mm 5.5–8 mm8–12.75<br />
and<br />
and<br />
mm<br />
Size Range<br />
and<br />
mm<br />
mmpatt = pattern mm<br />
Metric Size<br />
mm<br />
mm<br />
mm<br />
larger<br />
Range mm<br />
mm<br />
mm<br />
mm<br />
larger<br />
larger<br />
pfb = purl into front and back of stitch (increase)<br />
Range<br />
Crochet<br />
pm = place marker<br />
Recommended<br />
psso = pass slipped stitch over 17<br />
Gauge*Ranges 32–42<br />
6 sts<br />
Recommended<br />
21–32 16–20<br />
RS = right side<br />
in Single<br />
double<br />
Needle U.S. 12–17 000 to 1 11–141 to 3 8–11 3 to 5 7–9 5 to 7 17<br />
and<br />
7 to 9 9 to 11 11 to 17<br />
and<br />
Needle U.S. 000 to 1 1 to 3 sts 3 to 5 sts<br />
sts<br />
sts<br />
sts<br />
sts<br />
rem = remain(ing)<br />
Crochet to crochets**<br />
Size Range 5 to 7 7 to 9 9 to 11 11 to 17<br />
and<br />
fewer<br />
larger<br />
rep = repeat<br />
Size Range<br />
larger<br />
4 inch<br />
rev = reverse<br />
Crochet<br />
rnd = round<br />
Crochet<br />
Steel***<br />
Gauge*Ranges 32–42<br />
sc = single crochet 6 sts<br />
Gauge*Ranges Recommended 32–42<br />
21–32 16–20 12–17 15 mm<br />
1.6–1.4 mm 2.25–3.25 3.5–4.5 in Single 4.5–5.5 double<br />
6.5–9<br />
9–15 6 sts<br />
11–14<br />
8–11<br />
7–9<br />
sl = slip<br />
Hook in Metric<br />
21–32 16–20 12–17 11–14 5.5–6.5mmsts<br />
8–11 sts 7–9<br />
and<br />
in Single<br />
double<br />
sts and sts<br />
sts skp = slip one stsst, knit next st, pass slipped st over knit<br />
Regular hook mm<br />
Crochet mm to mm crochets**<br />
mm<br />
mm and<br />
fewer<br />
Size Range<br />
sts<br />
sts<br />
sts<br />
sts<br />
sts<br />
sts<br />
Crochet to crochets**<br />
larger<br />
st (dec)<br />
2.25 mm<br />
4 inch<br />
fewer<br />
ssk = slip, slip, knit: slip 2 sts knitwise, 1 at a time, insert<br />
4 inch<br />
left-hand needle into front of both sts and knit<br />
Recommended<br />
them tog (left-leaning 15 mm decrease)<br />
Steel***<br />
1.6–1.4 mm<br />
Steel*** Steel***<br />
Recommended<br />
2.25–3.25 3.5–4.5 4.5–5.5<br />
Recommended 6, 7, 8<br />
Hook in Metric<br />
I–9<br />
15 mm<br />
1.6–1.4 mm 2.25–3.25 3.5–4.5 4.5–5.5 Regular hook mm 6.5–9<br />
Q<br />
K–10<br />
Hook U.S. Size Regular B–1 to E–4 E–4 to 7 7 to I–9<br />
to<br />
1 ⁄2 mm 9–15<br />
5.5–6.5mm<br />
Hook in Metric<br />
Size Range<br />
5.5–6.5mm<br />
M-13 mm<br />
and<br />
Regular hook mm<br />
mm<br />
mm 2.25 mm<br />
mm<br />
and<br />
Size Range<br />
to M-13 mm to Q<br />
Range<br />
hook<br />
K–10 1 ⁄2<br />
larger<br />
2.25 mm<br />
larger<br />
B–1<br />
Steel***<br />
Steel***<br />
Recommended 6, 7, 8<br />
I–9<br />
* GUIDELINES ONLY: The above reflect the most commonly used gauges and needle or hook sizes for specific yarn categories.<br />
Recommended 6, 7, 8<br />
Hook U.S. Size RegularI–9<br />
B–1 to E–4 E–4 to 7 7 to I–9 Q<br />
** Lace weight yarns are usually knitted or crocheted on larger needles and hooks to create K–10<br />
to<br />
lacy, openwork patterns. Accordingly, a<br />
Hook U.S. Size Regular B–1 to E–4 E–4 to 7<br />
gauge range is difficult to determine. Always follow Range 7 to I–9<br />
the gauge stated hook to<br />
1 ⁄2 M-13<br />
and<br />
in your pattern.<br />
K–10 1 ⁄2<br />
to M-13<br />
to Q<br />
Range<br />
hook<br />
B–1K–10 1 ⁄2<br />
larger<br />
*** Steel crochet hooks are sized differently from regular hooks--the higher the number, the smaller the hook, which is the reverse<br />
of regular B–1 hook sizing.<br />
6.5–9 sssk = slip next 9–15three stitches individually, knitwise.<br />
and<br />
mm Insert tip mmof left needle from front to back into<br />
the fronts of these three largerstitches and knit them<br />
together (double left-leaning decrease)<br />
st(s) = stitch(es)<br />
St st = stocking stitch<br />
tbl = through back loop<br />
K–10 tog 1 ⁄2 = together M-13<br />
to M-13<br />
tr = treble crochet<br />
to Q<br />
WS = wrong side<br />
yo = yarn over<br />
This Standards & Guidelines booklet and downloadable * GUIDELINES symbol artwork ONLY: The are above available reflect at: YarnStandards.com<br />
the most commonly used gauges and needle or hook sizes for specific yarn categories.<br />
Worsted,<br />
Afghan,<br />
Aran<br />
Q<br />
and<br />
larger


