Pro Photo West Magazine Spring 2019
Spring Edition of Pro Photo West Magazine - West Coast School, Are Your Ready?
Spring Edition of Pro Photo West Magazine - West Coast School, Are Your Ready?

Create successful ePaper yourself
Turn your PDF publications into a flip-book with our unique Google optimized e-Paper software.
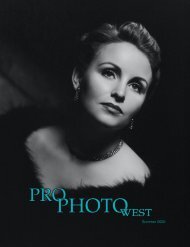
<strong>Photo</strong> by Randy Van Duinen<br />
<strong>Spring</strong> <strong>2019</strong>
INSIDE THIS ISSUE<br />
6Editor’s PPA Director Message<br />
Meet Your Executive Team<br />
President’s<br />
8 10 11Gadget Girl<br />
Message<br />
16<br />
Simply Complex Black and White<br />
25<br />
Your 8x10’s Are How Much?<br />
<strong>Pro</strong>fessional <strong>Photo</strong>graphers of California
SPRING <strong>2019</strong><br />
22<br />
Meet your Affiliates<br />
30<br />
Face Mask Histogram<br />
34 WCS Schedule<br />
39<br />
WCS Instructors<br />
28<br />
<strong>Photo</strong>-Biz 101<br />
32<br />
Are You Ready for <strong>West</strong> Coast School <strong>2019</strong><br />
www.prophotoca.com <strong>Spring</strong> <strong>2019</strong>
CONGRATULATIONS<br />
Pete Rezac<br />
On this amazing accomplishment!<br />
Our very own PPC President Pete Rezac is<br />
also one of the newest Directors of<br />
<strong>Pro</strong>fessional <strong>Photo</strong>graphers of America!<br />
6
A Huge Thank You to Our Sponsors!<br />
Your Support is Greatly Appreciated!<br />
<strong>Spring</strong> <strong>2019</strong><br />
7
<strong>2019</strong> OFFICERS<br />
PRESIDENT<br />
Pete Rezac, M.<strong>Photo</strong>g.Cr, CPP,<br />
M-PPC, S-PPC<br />
president@ppconline.com<br />
FIRST VICE PRESIDENT<br />
Jim Trapp, M.<strong>Photo</strong>g.Cr, CPP<br />
S-PPC<br />
firstvp@ppconline.com<br />
SECOND VICE PRESIDENT<br />
Diane Costello, M.<strong>Photo</strong>g.Cr, CPP<br />
M-PPC, S-PPC<br />
<strong>Pro</strong>fessional <strong>Photo</strong>graphers of California, Inc. is a non-profit, 501(c)6<br />
trade association of professional photographers, employees, suppliers<br />
and others allied to the profession. <strong>Pro</strong>fessional <strong>Photo</strong>graphers of<br />
California offers a variety of opportunities and benefits to its Members and<br />
is one of the largest state affiliates of <strong>Pro</strong>fessional <strong>Photo</strong>graphers of<br />
America. <strong>Pro</strong> <strong>Photo</strong> <strong>West</strong> is the official publication of <strong>Pro</strong>fessional<br />
<strong>Photo</strong>graphers of California and is published quarterly for the purpose of<br />
keeping Members informed of photographic information, news and<br />
activities of the state. Subscription is included with Member dues.<br />
Articles, with or without photographs, are welcome for review for inclusion<br />
in this publication; however the Editor reserves the right to edit and use<br />
articles on a space-available basis. Materials will not be returned unless a<br />
postage paid envelope is provided. Letters and contributions must include<br />
name, email and phone number. Send all communication, articles or<br />
advertising to the Editor. Articles appearing in <strong>Pro</strong> <strong>Photo</strong> <strong>West</strong> reflect the<br />
opinions of the writer. They do not necessarily represent those of the<br />
Editor or <strong>Pro</strong>fessional <strong>Photo</strong>graphers of California. Permission to reprint<br />
contents of this magazine is granted to similar photographic publications,<br />
provided the author, <strong>Pro</strong>fessional <strong>Photo</strong>graphers of California and <strong>Pro</strong><br />
<strong>Photo</strong> <strong>West</strong> are credited as the source.<br />
secondvp@ppconline.com<br />
SECRETARY<br />
Tim Meyer, MFA, MA, M.<strong>Photo</strong>g.Cr,<br />
F-PPC, S-PPC<br />
secretary@ppconline.com<br />
TREASURER<br />
Robin Swanson, M.<strong>Photo</strong>g.Cr, CPP,<br />
F-PPC, S-PPC, CPA, CGMA<br />
treasurer@ppconline.com<br />
CHAIRMAN OF THE BOARD<br />
Marcy Dugan, M.<strong>Photo</strong>g.Cr, CPP, M-<br />
PPC, F-PPC, S-PPC<br />
cob@ppconline.com<br />
STAFF<br />
EXECUTIVE<br />
ADMINISTRATOR<br />
Mel Carll, S-PPC<br />
exec_admin@ppconline.com<br />
DIRECTOR,<br />
WEST COAST SCHOOL<br />
David LaNeve, CPP<br />
director@westcoastschool.com<br />
8<br />
<strong>Pro</strong>fessional <strong>Photo</strong>graphers of California
www.prophotoca.com <strong>Spring</strong> <strong>2019</strong> 9
President’s Message<br />
We have made it through our first quarter of <strong>2019</strong> with a lot of positive steps forward.<br />
You know there has to be an easier and more personable and less boring way to communicate with<br />
all of you!!!<br />
Hey! Click this link and let’s cancel boring!!<br />
https://youtu.be/CXSvjhQKGbc<br />
10
Gadget Girl<br />
by Robin Hilton Swanson<br />
In this issue I am reviewing the new MagMod MagBox.<br />
There are so many things I love about this product that I’m not sure where to start. Let me begin by<br />
saying that I have tried pretty much every portable speedlite softbox out there. The main problems<br />
that I encountered with virtually all of them were that they were too complicated to assemble and just<br />
not enough light power (only 1 flash). MagBox addressed both these issues. I did an engagement<br />
shoot the day after I received my MagBox and thought to myself “this will be a great opportunity to<br />
test it out”. Now, I normally would not advocate trying out a new piece of equipment on a client;<br />
however, I did have a Plan B just in case it didn’t work out. I’m happy to say that I was very<br />
impressed with both the quantity of light (2 flashes) and the quality of light. I was also very happy with<br />
what I call the “ease of deployment”; it set up very fast and was up and working with no problems.<br />
<strong>Spring</strong> <strong>2019</strong><br />
11
Here is a sample of what the image looks like with just natural light. It’s very flat and boring.<br />
Then we set up the MagBox. Although there are several accessories that you can purchase with the<br />
system, there are 5 components you must have:<br />
1. MagBox 24 Octa<br />
2. MagRing<br />
3. MagShoe<br />
4. MagBox Fabric Diffuser<br />
5. Maggrip (If you currently use MagMod products, you already have the MagGrip)<br />
12
Gadget Girl<br />
I am using 2 Canon Speedlites and a Canon<br />
controller. Of course you don’t need to use this<br />
same setup. The MagGrip will fit on any speedlite<br />
and you can use whatever remote controller you<br />
normally use (i.e. pocket wizard, etc.) The<br />
MagBox can be used on a light stand or (my<br />
favorite) just have your assistant hold it.<br />
Here is the result using the MagBox. Nice soft light<br />
and a photo that pops.<br />
You can click here to see a short video of me setting up the MagBox. https://youtu.be/PJ0LShojvUw .<br />
Keep in mind it was just the second time I had set it up and you can see how quick and easy it is.<br />
This is a quality product and a lot of thought was put into its design. If you are looking for a portable<br />
softbox to use with your speedlites, I urge you to go to https://magnetmod.com and check out the<br />
MagBox system.<br />
<strong>Spring</strong> <strong>2019</strong><br />
13
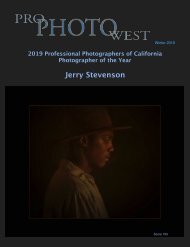
Simply Complex Black and White<br />
Pete Rezac<br />
M.<strong>Photo</strong>g.Cr, CPP, M-PPC, S-PPC<br />
There are many genres of the art, science, and craft<br />
of photography, but the genre that I love most is the<br />
black and white studio portrait. I’ve found that I’ve<br />
always been drawn to classic studio portraiture, and<br />
specifically those created in black and white. I’m<br />
also of the mindset that we as photographic artists<br />
like to produce what we enjoy looking at and for me I<br />
love to look at black and white portraiture.<br />
There is just something that speaks to me about the<br />
simplicity of using tones of gray to convey a story,<br />
feeling, and interest in my black and white work.<br />
That simplicity actually has more of a complex<br />
process to it than one might expect and in ways that<br />
are dfferent than one might think, as it’s not about<br />
post production. Rather, there is a fair amount of<br />
pre production and consultation work that aids in the<br />
successful completion of my visions for the portraits<br />
that I create.<br />
Most people know my work for the “Dirty” kids or what<br />
I refer to as my “Sand Lot Sessions”. My Sand Lot<br />
work is what really proved to me that I could make a<br />
go of moving my primary focus to black and white<br />
work. They proved to me that there can still be an<br />
honesty and craftsmanship to a photograph without<br />
having to rely on the computer and post production to<br />
make my vision. I’m not really all that skilled at<br />
photoshop. I have grand visions and appreciation for<br />
the artists that make computer work look like they are<br />
conducting a symphony. I don’t have that skill set but I know what authenticity looks like before I press the<br />
shutter release. I know how to make a child’s face look dirty. I know that a cowgirl with her saddle or<br />
authentically worn hat looks right at exposure because that’s how it looks. So what my Sand Lot sessions<br />
taught me was the key of authenticity, which is what I strive for in all my work, be it a business portrait or a<br />
dirty baseball kid, paying attention to the details that are authentic are small differences that make a huge<br />
difference!<br />
<strong>Spring</strong> <strong>2019</strong><br />
17
The other factor that plays into how I like my work<br />
to present itself is to use light that my friend Tim<br />
Meyer says has “Character and Personality”. The<br />
first time I heard Tim use those words to describe<br />
light changed a lot for me on how I look at lighting.<br />
I want light that has direction, that brings out<br />
texture, has “character and personality”. Early in<br />
my career I would subscribe to the one light,<br />
because there is only one sun school of thought,<br />
and there is nothing wrong with that. However,<br />
what I learned is that adding lights to specific parts<br />
of the scene start to add separation and depth to<br />
subject and photograph. I have learned that the<br />
quality of light doesn’t always have to be soft, that<br />
hard light can be equally beautiful specifically with<br />
black and white portraiture. Mixing hard and soft<br />
sources, having control over edge separations,<br />
controlled ratios, and lighting the background all<br />
contribute to the “personality and character” of the<br />
light, and if done properly can give the illusion that<br />
all were done with one light!<br />
Lastly, is proper exposure of the lighting. The<br />
handheld light meter is the most important tool<br />
other than my vision that I have in my tool box. I<br />
use it for precision measurement and establishment<br />
of ratios.<br />
I may want the face to be 2 stops brighter than the<br />
hands. Maybe I want it 3 stops brighter or 1 stop<br />
brighter. It all depends on my vision. I may want<br />
the background to render the actual tone it is, or<br />
render darker or lighter. I may want to have an<br />
edge light highlight within a highlight. All of those<br />
subtleties are achieved by using a hand held meter.<br />
I’ve also found it’s far easier for me to get those<br />
dialed in prior to making the exposure, rather than<br />
trying to add them in post production. Having an<br />
image show up on the camera screen exactly how<br />
you see it in your head is a rush, and seems to<br />
build immediate credibility with clients. Of course,<br />
you have to also understand that I’ve migrated back<br />
to film for most of my client work and the only way<br />
to confirm lighting is to do a “digital Polaroid”, also<br />
known as a Nikon D750 shot prior to going to film to<br />
confirm light is landing where I want. It really looks<br />
fantastic on the black and white negative and print!<br />
I have the D750 set up to show a toned black and<br />
white image so we see exactly what we are going<br />
to get on the negative!<br />
18<br />
<strong>Pro</strong>fessional <strong>Photo</strong>graphers of California
I hope this gives you a quick glimpse into how I arrive at my black and white portraiture. They may have a<br />
simple appearance, but now you know a bit about the pre-production work and thought process that goes<br />
into what I do! Cheers!<br />
www.prophotoca.com <strong>Spring</strong> <strong>2019</strong> 19
A F F I L I A T E S H I G H L I G H T S<br />
AVPP - All Valley <strong>Pro</strong>fessional <strong>Photo</strong>graphers<br />
Arthur Argote<br />
President<br />
allvalleypp.com<br />
Walter Wright<br />
Vice President<br />
CIPPA - Channel Islands <strong>Pro</strong>fessional <strong>Photo</strong>graphers<br />
Larry Skibiski<br />
President<br />
www.cippa.org<br />
Vice President<br />
GCPPA - Gold Coast <strong>Pro</strong>fessional <strong>Photo</strong>graphers<br />
Sandra Cortez<br />
President<br />
goldcoastppa.info<br />
Michael Collins<br />
Vice President<br />
IEPPV - Inland Empire <strong>Pro</strong>fessional <strong>Photo</strong>graphers<br />
Nick Seth-Smith<br />
President<br />
ieppv.com<br />
David Schulman<br />
Vice President<br />
PPLAC - <strong>Pro</strong>fessional <strong>Photo</strong>graphers of Los Angeles County<br />
John Grusd<br />
President<br />
pplac.org<br />
Eleanor Gray<br />
Vice President<br />
22
PPOC - <strong>Pro</strong>fessional <strong>Photo</strong>graphers of Orange County<br />
Duane Murphy<br />
President<br />
ppoc.org<br />
Trudy Brown<br />
Vice President<br />
PPSDC - <strong>Pro</strong>fessional <strong>Photo</strong>graphers of San Diego County<br />
Janet Bark<br />
President<br />
ppsdc.com<br />
Monica Royal<br />
Vice President<br />
PPSV - <strong>Pro</strong>fessional <strong>Photo</strong>graphers of Sacramento Valley<br />
Kimberly Olker<br />
President<br />
ppsv.org<br />
Suzanne Hambleton<br />
Vice President<br />
HPP - Hispanic <strong>Pro</strong>fessional <strong>Photo</strong>graphers<br />
Rutilo Corona<br />
President<br />
Nicolas Curtis<br />
Secretary<br />
https://www.facebook.com/groups/1621796218145137<br />
PPSCV - <strong>Pro</strong>fessional <strong>Photo</strong>graphers of Santa Clara Valley<br />
Roberto Gonzalez<br />
President<br />
Jim Skintauy<br />
Vice President<br />
https://www.ppscv.net<br />
<strong>Spring</strong> <strong>2019</strong><br />
23
24
Your<br />
8x10’s<br />
Are<br />
How<br />
Much?<br />
Arica Dorff, Cr.<strong>Photo</strong>g.<br />
<strong>Spring</strong> <strong>2019</strong><br />
25
“How much are your 8x10’s?”<br />
It’s the question that so many photographers dread hearing from potential clients. Well, instead of<br />
viewing the question as a negative, how about looking at it as a positive. Think of it as a way to educate<br />
a potential client on the services and products that you offer. Plus, let’s cut these potential clients a little<br />
slack - they aren’t asking “How much are your 8x10’s?” because they really care exactly what the price<br />
of your 8x10s are. They’re asking because they don’t know what else to ask. Potential clients are not<br />
going to call and say, “Can you please sell me on your portrait experience?”.<br />
In order for you to answer the “How much are your 8x10’s” question with any hope of having that person<br />
become a client, that person has to understand the value of what they are paying for. After all, in the<br />
absence of value, price is always an issue. Imagine that you were recently hired by a bakery shop and<br />
today is your first day. The phone rings and the bakery shop owner looks at you and says, “Can you<br />
answer that?”. Ahh! Immediate panic sets in! You don’t know anything about the bakery’s products or<br />
pricing. It’s only your first day! You answer the phone and the person on the other line says, “How much<br />
do your wedding cakes cost?”. You look over and the bakery shop employees are all helping other<br />
customers so you can’t hand the phone to them. Quick! Your customer is waiting for an answer! You<br />
could sheepishly admit, “Today is my first day and I haven’t learned that yet.”. Instead you utter the<br />
words, “Who is getting married?”. The customer responds, “I am”. And you say, “Congratulations!”. The<br />
bride wants nothing more than to chat about her big day so you start information gathering. “How many<br />
people are going to be at the wedding?” “What are the wedding colors going to be?” After she answers,<br />
you enthusiastically agree with her choice, “Oh I love those colors! What a beautiful combination!”<br />
“Where is the wedding taking place?” You chime in about the wedding you attended last month at the<br />
same location and how beautiful the venue was. Before you know it, you’ve been on the phone for 10<br />
minutes and this bride has already decided that she’s getting her wedding cake through your shop even<br />
though you haven’t given her any pricing yet. The bride had called two other bakeries before calling you<br />
and she asked them, “How much do your wedding cakes cost?” and the answers went something like,<br />
“Our wedding cakes range from $200-$1,200.”. “Oh okay, thanks” and she hangs up. Again, clients don’t<br />
know what else to ask, so they ask about pricing. It’s our job as photographers to explain our portrait<br />
experience and the value of what they’re getting. So, that’s the simple secret to answering the “How<br />
much are your 8x10’s” question - you answer the question with a question. I would start by saying “I’d be<br />
happy to explain our pricing to you! We offer a variety of portrait sessions and packages, so let me get<br />
some information from you so I can steer you in the right direction.”<br />
Here are some information gathering questions and conversation starters: “How did you hear about us?”<br />
“Do you need the portraits by a certain date?” “Who’s going to be in the portraits?” “When’s the last time<br />
you had a professional family portrait done?” “Have you thought about where you want to display your<br />
portraits in your home?” Since I’m a pet photographer, I’d ask, “What kind of pets do you have?” and<br />
“Are your pets on a grooming schedule?”. Clients have to Know, Like and Trust you in order to feel<br />
comfortable working with you and, ultimately, become lifetime clients. This is an opportunity to start<br />
building that relationship. In doing so, your ideal clientele will think ‘This is the photographer I want to<br />
work with’ before they even hear your pricing. Now I know what some of you are thinking - what about<br />
26
people who don’t want to hear all the fluff or answer the questions and just keep saying, “I really just want<br />
to know how much your 8x10s are?”. Well for starters, they are probably not your ideal client if they aren’t<br />
interested in you getting to know them and understanding their needs. And, secondly, if someone insisted<br />
on knowing the price before I was done information gathering, I would reemphasize, “I just want to have a<br />
better understanding of what you’re looking for because we offer a variety of portrait sessions and each<br />
session has a different Creation Fee. After the Creation Fee, our 8x10s can be purchased a la carte or you<br />
get a discount if you’re purchasing multiple 8x10’s.”. So I’m not stalling on giving them an answer simply to<br />
buy time in hopes that I’ll win them over, I’m truly trying to get a better understanding of what their needs<br />
are. Do they just need a few good images? Maybe a Mini Session would work best for them. Are they<br />
interested in me capturing candid lifestyle images? Maybe my ‘Day In The Life’ session would be a good<br />
fit. Are they planning on doing outfit changes? Do they prefer studio or outdoors? I have to know all of this<br />
before I can accurately quote them a price for their portrait experience.<br />
Whether you do a Planning Session in-person or over the phone, once you’ve done your information<br />
gathering, explained how your portrait experience works, NOW tell the client the price of your Creation<br />
Fee and what’s included. NOW explain your portrait pricing and all of the different products that you offer.<br />
NOW there’s value in the price that you’re quoting them. So the next time the phone rings or you do an inperson<br />
consultation, remember the bakery example. Be an information gatherer. Be a good listener. Ask<br />
these new potential clients to show you images of their family (as a pet photographer this is vital so I can<br />
give my clients ‘what to wear’ suggestions based on their pets’ coloring). Suggest a background color or<br />
location idea. Clients want your expertise - it’s part of what they are paying you for. Now go out there and<br />
confidently tackle the “How much are your 8x10’s” question by turning it into a relationship-building<br />
conversation. It’s no longer a dreaded question and your answer is no longer just a price.<br />
Arica Dorff, Cr.<strong>Photo</strong>g.<br />
www.aricadorff.com<br />
<strong>Spring</strong> <strong>2019</strong><br />
27
Robin Swanson, CPA, CGMA<br />
QUICKBOOKS…IS IT FOR YOU?<br />
Well, another tax season has come and gone and now is the time that many people are thinking next<br />
year they will be more prepared. As a CPA and a <strong>Pro</strong>fessional <strong>Photo</strong>grapher, I am often asked if<br />
QuickBooks can be used to account for the finances of <strong>Pro</strong>fessional <strong>Photo</strong>graphers. As a <strong>Pro</strong>fessional<br />
<strong>Photo</strong>grapher who uses QuickBooks, I can tell you that the answer is yes! Now, I’ll be the first to tell<br />
you that QuickBooks doesn’t do “everything”. There are some excellent studio management programs<br />
that “do it all” and are made specifically for professional photographers; however, some are very<br />
expensive and others do a great job of studio management but only a fair job of accounting for your<br />
finances. If you have a large photography studio, then I suggest you look into one of these specialized<br />
programs…but do your homework and make sure it does everything you want/need it to do. If,<br />
however, you are a small studio or an independent photographer working out of your home, I suggest<br />
you give QuickBooks a try.<br />
There are several different options to consider:<br />
QuickBooks Desktop<br />
• <strong>Pro</strong> <strong>2019</strong><br />
• QuickBooks Mac Desktop <strong>2019</strong><br />
• Premier <strong>2019</strong><br />
• Enterprise<br />
Click here to compare Desktop versions: https://quickbooks.intuit.com/desktop/<br />
QuickBooks Online<br />
• Simple Start<br />
• Essentials<br />
• Plus<br />
• Advanced<br />
Click here to compare on-line versions: https://quickbooks.intuit.com/pricing/<br />
It boggles the mind the myriad of choices and options. That being said, most small photography<br />
businesses can be well managed with either <strong>Pro</strong> <strong>2019</strong> or Mac Desktop <strong>2019</strong> in the Desktop versions<br />
OR the QuickBooks Online Plus subscription. Consider whether you want access to QuickBooks from<br />
different locations or if you want easy access for your accountant – then the online option might be<br />
right for you. However, if you have spotty internet service, or you don’t really need access to your<br />
books away from your home or studio – the desktop version might be a better choice. There are<br />
many other things to consider so I urge you to click on the links above and compare. Intuit (the<br />
makers of QuickBooks) have been slowly pushing towards getting people to use the On-Line Version.<br />
This link compares the on-line subscriptions to the desktop version https://quickbooks.intuit.com/<br />
move-to-online/#compare.<br />
Once you have made your choice, now you’re ready for business! You can easily create estimates and
invoices; print checks, pay bills, & track expenses; keep track of customers and vendors; create<br />
customizable reports like <strong>Pro</strong>fit & Loss Statements and sales reports; export data to Excel<br />
spreadsheets; download credit card and bank transactions; and just about anything else you can think<br />
of!<br />
There are a few features that I believe are worth delving into a little deeper:<br />
Class Tracking: One of my favorite features (that I think is very under-used) is the “Class Tracking”<br />
feature. You can assign each transaction (income and expenses) to a class. Classes can be anything<br />
you want to track more closely. The classes I use are my profit centers, i.e. Wedding, Event, Portrait,<br />
Pets, etc. By assigning classes to transactions, you can run profit and loss reports on each class,<br />
thereby finding out which activities are money makers and which are losers.<br />
Customizable Forms: Image is everything! If you hand a customer an invoice scribbled on a generic<br />
“Office Depot” invoice, you’re not going to present a very professional image. All of the forms you<br />
generate in QuickBooks can be customized with your Logo and business information (very<br />
professional!).<br />
Check Printing: I really hate to do double work. By purchasing QuickBooks compatible checks I only<br />
have to enter the transaction once and then hit the print button. Yahoo! Virtually all check printing<br />
companies sell QuickBooks compatible checks (you can also order them directly from Intuit)<br />
Sales-Tax: If you read my article about Sales Tax, you know the importance of charging (and paying)<br />
sales tax. Once you set up sales tax codes in QuickBooks, the program automatically calculates sales<br />
tax on invoices and generates a sales-tax report to help you complete your sales tax return when it is<br />
due. It truly simplifies the process and takes the mystery out of sales tax.<br />
Your Accountant Will Love You: When tax-time rolls around (and it always does) all you have to do<br />
is print two reports (<strong>Pro</strong>fit & Loss and Balance Sheet) and give them to your accountant. No more<br />
shoe boxes full of receipts (although you still need to keep receipts) to rummage through looking for<br />
every deduction. It’s already accounted for in QuickBooks.<br />
One more item that I would like to touch on is the ever-elusive “Chart of Accounts” (COA). For those of<br />
you that don’t know what a COA is, it is a listing of all the accounts that you will use to track your<br />
finances (i.e. Assets, Liabilities, Income, Expenses and Owner’s Equity). Starting with a meaningful<br />
chart of accounts is a must if you are going to reap the full benefits of any financial software. For<br />
example, it’s a good idea for aphotographer who does his/her own printing to have a “Printing<br />
Supplies” account; conversely, it wouldn’t make any sense at all for a photographer who does not<br />
have any employees to have an “Employee Benefit” expense account. A couple of ways to start<br />
creating your Chart of Accounts is to 1) Check with your accountant (if you have one); 2) Look at last<br />
year’s tax return (if you filed one) to see what income and expenses were reported (some items are<br />
required to be reported separately on your tax return. Finally, don’t stress over it. With QuickBooks,<br />
you can easily add or subtract accounts to your Chart of Accounts as you need to.<br />
I could go on and on about all the great features that are available in QuickBooks; however, there are<br />
just too many to mention here. Do your homework and dive into the wonderful world of bookkeeping.<br />
So, what are you waiting for? It’s time to put the “<strong>Pro</strong>fessional” back in <strong>Pro</strong>fessional <strong>Photo</strong>grapher and<br />
start taking care of the business side of your <strong>Photo</strong>graphy business.
Face Mask Histograms<br />
Tim Meyer, MFA, MA, M.<strong>Photo</strong>g.Cr, CPP,<br />
M-PPC, S-PPC<br />
Determining exposure in today's digital world is easier than ever. Determining correct exposure is<br />
somewhat more elusive.<br />
The definition of "correct" exposure is going to vary depending on multiple factors. A landscape artist,<br />
commercial photographer and a portrait photographer may all have different ideas about what a<br />
correctly exposed file might look like. Each could/should be correct for their specific application.<br />
Portrait photographers tend to be interested in correct exposure for the face. This too can vary<br />
somewhat depending on if it is a scenic view or how important the environment is in the image. For the<br />
sake of simplicity, however, I would like to describe a technique that works very well for traditional<br />
portraiture.<br />
This technique is called "Face Mask Histogram." This is by far the most consistent means I know to<br />
achieve repeatable results in portrait exposures. It is what I have used for years and it has remained a<br />
valuable technique.<br />
The Face Mask Histogram technique is built around the use of histograms to determine exposure. The<br />
histogram is a graphic representation of the tonal range in a photograph. The histogram depicts the<br />
range of tones in an image from the darkest on the left of the graph (0 in digital terms) to the lightest on<br />
the right side (255 in digital terms). You can find histograms in the menus of most modern digital<br />
cameras and in today's popular Lightroom, Bridge and <strong>Photo</strong>shop applications.<br />
Figure 1<br />
In "Figure 1" you will see how a histogram is found in Adobe's Lightroom application. The histogram<br />
here indicates that there are very few areas of the image that are dark (note the left side of the<br />
histogram) and many areas that are light (note the right hand side of the histogram). There are also<br />
areas in the image that are over exposed. When parts of the histogram push up against the right or left<br />
side of the histogram, it indicates clipping or under or overexposure. In this case on the right or<br />
highlight side indicates overexposure<br />
30
Traditionally a "correct" histogram or normally exposed file has no clipping. It is very important at this<br />
point to understand that histograms indicate the tonal values for the complete image. This particular<br />
image has a very broad range of tonality beyond what can normally be captured digitally. So knowing<br />
that there are some areas in this image that are too bright for the camera to handle, how can I<br />
determine correct exposure for this scene?<br />
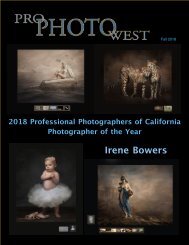
Figure 2 Figure 3<br />
In Figures 2 and 3 I have moved the histogram onto the image for ease of reading. Again in Figure 1<br />
you can see the histogram for the complete scene. So how can I see a histogram for only the face?<br />
By using the cropping tool (this works for Lightroom, <strong>Photo</strong>shop and Bridge's Camera Raw programs),<br />
crop only to the area of the face that you are interested in. The histogram will indicate the tonal ranges<br />
in the area that you have selected. (Note Figure 3.)<br />
The histogram in Figure 3 indicates that the face has a near perfect exposure. There is no clipping in<br />
either the shadow or the highlights and tonal distribution look exactly like what I have come to expect<br />
from properly exposed faces. This translates into excellent results when receiving prints from my lab.<br />
Please note that in this case there is a very bright edge light on the child's face coming from the sun. I<br />
purposely did not include that in my crop. I wanted to know the values on the child's face and knew that<br />
the very bright edge light would impact the Face Mask Histogram.<br />
This technique works equally well in the studio. Just remember to crop to the "mask" of the face.<br />
Obviously most portrait photographers do not shoot tethered to computers and therefore cannot use the<br />
Face Mask Histogram technique out in the field or in studio. I use the technique upon returning to the<br />
studio as a means of double checking my in studio or on location exposure technique. I also use it<br />
when producing digital files for ordering. I will check the Face Mask Histogram of all my files to make<br />
sure that they will print the way that I expect.<br />
Hopefully you find the Face Mask Histogram technique as useful as I have.<br />
Tim Meyer <strong>Photo</strong>grapher, educator and author, Tim Meyer is passionate about the field of<br />
photography. With over 30 years as a professional photographer, he brings experience and sustained<br />
energy to his work. Mixing our rich artistic heritage with today’s modern styles, his images enlighten<br />
and inspire.<br />
<strong>Spring</strong> <strong>2019</strong> 31
ARE YOU READY?<br />
To Have fun? Learn? Laugh? Eat?<br />
Play? Shoot?<br />
Class of 2018<br />
You Could<br />
Be Here!!!<br />
32
<strong>Spring</strong> <strong>2019</strong><br />
33
<strong>2019</strong> <strong>West</strong> Coast<br />
Sunday, June 9<br />
2:00 pm – Registration & Dorm Check in – Maher Hall Lobby<br />
4:00 pm – Orientation – Solomon Lecture Hall (Maher Hall)<br />
5:30 pm - Class <strong>Photo</strong> in front of Serra Hall. Please wear your WCS shirt<br />
for the photo!<br />
6:00 pm – Dinner – Pavilion Dining Hall<br />
7:00 pm - Social at Alcala Apts.<br />
Monday, June 10<br />
8:30 am – Class starts<br />
12:00 noon – Lunch – Pavilion Dining Hall<br />
1:30 pm – Class<br />
5:00 pm – Dinner – Pavilion Dining Hall<br />
6:30-9:00 pm – Super Shoot! Meet in front of Maher Hall<br />
Tuesday, June 11<br />
8:30 am – Class starts<br />
12:00 noon – Lunch – Pavilion Dining Hall<br />
12:30 – 1:00 Class Open House<br />
1:30 pm – Class<br />
5:00 pm – Dinner – Pavilion Dining Hall<br />
6:30-9:00 pm – Vendor Night / Swap Meet, Speaker – Hahn Center<br />
34
School Schedule<br />
Wednesday, June 12<br />
8:30 am – Class starts<br />
12:00 noon – Lunch – Pavilion Dining Hall<br />
1:30 pm – Class<br />
5:00 pm – Dinner – Pavilion Dining Hall<br />
6:30 pm – Field Trip with class<br />
Thursday, June 13<br />
8:30 am – Class starts<br />
12:00 noon – Lunch – Pavilion Dining Hall<br />
1:30 pm – Class<br />
5:00 pm – Dinner with your class<br />
7:00 pm – WCS Social & Auction at Alcala Apts.<br />
Friday, June 14<br />
7:00 am - 8:30 am – Check out of dorm, Maher Hall<br />
10:00 am – 2:00 pm – Class<br />
11:00 am – 1:00pm – CPP Test (register at ppa.com)<br />
For a quick list on a few things recommended to bring, turn the page…<br />
<strong>Spring</strong> <strong>2019</strong> 35
36
<strong>Spring</strong> <strong>2019</strong> 37
<strong>Pro</strong>fessional <strong>Photo</strong>graphers of California proudly present the<br />
<strong>West</strong> Coast School of <strong>Photo</strong>graphy<br />
Instructor Line-up for <strong>2019</strong>.<br />
http://www.westcoastschool.com/<br />
<strong>West</strong> Coast School is a <strong>Pro</strong>fessional <strong>Photo</strong>graphers of America (PPA) Affiliate School founded in<br />
1956 and is considered to be one of the top five photographic institutions in the country! <strong>West</strong><br />
Coast School is a non-profit organization operated by the <strong>Pro</strong>fessional <strong>Photo</strong>graphers of California<br />
and offers an amazing week of hands-on <strong>Pro</strong>fessional Imaging Creativity, <strong>Photo</strong>graphy, Business<br />
Developement and FUN!<br />
Instructors are internationally recognized and share the same goal of helping you with the growth<br />
of your photography business. Each year, nationally acclaimed working professionals celebrate<br />
the craft of photography by sharing their knowledge and expertise with their students. Hands-on<br />
participation is emphasized as students learn the latest techniques from a successful professional.<br />
<strong>West</strong> Coast School offers an outstanding lineup of instructors and a full schedule of special events.<br />
Our commitment has been to teach attendees practical, real-world skill that can be used to build a<br />
satisfying and prosperous career in professional photography.<br />
For more information about <strong>West</strong> Coast School<br />
http://www.westcoastschool.com/about-wcs/<br />
Are You ready to register?<br />
Registration Closes<br />
REGISTER NOW! May 3<br />
38
TIM MEYER<br />
FUNDAMENTALS OF LIGHTING AND POSING<br />
Tim will show you how to work in studio and<br />
outdoors with basic to creative lighting<br />
equipment and natural light. This class<br />
provides the opportunity for learning the<br />
posing and lighting techniques that are the<br />
backbone of a successful professional portrait<br />
or wedding studio.<br />
http://www.westcoastschool.com/staff-item/<br />
fundamentals-of-lighting-and-posing/<br />
TONY CORBELL<br />
BETWEEN LIGHT & SHADOW<br />
Understanding and controlling light quality<br />
is at the core of all of Tony’s workshops and<br />
presentations. Attendees will learn how to<br />
see a unique perspective and not be afraid<br />
to push the limits of their experience and<br />
talents.<br />
http://www.westcoastschool.com/staff-item/tonycorbell-between-light-and-shadow/<br />
<strong>Spring</strong> <strong>2019</strong> 39
SANDRA PEARCE<br />
ADVANCED PAINTING WITH PHOTOSHOP<br />
Sandra Pearce is one of the most sought after<br />
digital artists in the photographic industry today.<br />
With so many teachers in the photography world,<br />
we all need a good reason to take a class that will<br />
help our business grow and prosper.<br />
Pre-requisite: Must have taken Sandra’s<br />
beginning class.<br />
http://www.westcoastschool.com/staff-item/peterezac-black-and-white-film-exposure-to-print/<br />
http://www.westcoastschool.com/staff-item/sandrapearce/<br />
PETE REZAC<br />
BLACK AND WHITE FILM - EXPOSURE TO PRINT<br />
Pete still chooses to work with medium and<br />
large format cameras and film in creating his<br />
fine art portraiture because of the tactile process<br />
it provides him in creating his work, along with<br />
the rich tones and high fidelity of the<br />
photographs that come from these tools.<br />
Seeking an authentic look to his children’s<br />
character portraits, Pete was inspired to create<br />
timeless portraits showing children at their best.<br />
40
BRY COX<br />
THE BUSINESS OF PHOTOGRAPHY<br />
With more competition, it’s more crucial than ever<br />
to have a high-end style that blends emotion,<br />
creativity, pro techniques, and business savvy.<br />
Having an eye-grabbing portfolio, killer marketing<br />
images, and shooting stronger images presented<br />
in the right way means making more money and<br />
attracting better clients. Whether you photograph<br />
families, children, weddings, or high school<br />
seniors, come learn to create more powerful<br />
images with more variety, while actually shooting<br />
fewer images, and also be ninja-fast in<br />
your workflow.<br />
http://www.westcoastschool.com/staff-item/brycox-the-business-of-photography/<br />
RANDY VAN DUINEN<br />
ARCHITECTURE AND LANDSCAPE<br />
This is a unique two-part class where you<br />
will learn Architectural and Landscape<br />
<strong>Photo</strong>graphy and how to put both together to<br />
create stunning images.<br />
http://www.westcoastschool.com/staff-item/<br />
randy-van-duien-landscape-andarchitecture/<br />
<strong>Spring</strong> <strong>2019</strong><br />
41