Create successful ePaper yourself
Turn your PDF publications into a flip-book with our unique Google optimized e-Paper software.
<strong>Mygo</strong> <strong>Max</strong><br />
User Instructions<br />
Mode d’emploi<br />
Benutzerhandbuch<br />
Håndboken<br />
Manuale
The <strong>Mygo</strong> <strong>Max</strong> has been designed to<br />
offer a high level of postural positioning<br />
while enabling function and mobility.<br />
This manual shows how you can<br />
quickly, easily and safely make use of<br />
all of the functions. The instructions on<br />
safety and maintenance will ensure that<br />
you will enjoy the use of the product for<br />
a long time.<br />
Contents<br />
01 Intended Use<br />
02 Declaration of Conformity<br />
03 Terms of Warranty<br />
04 Product History Record<br />
05 Product Training<br />
06 Safety Information<br />
07 How to Unpack and Assemble<br />
08 Fitting the Covers<br />
09 Clinical Setup for Postural Management<br />
10 Frequent Adjustments for Daily Use<br />
11 Cleaning and Care Information<br />
12 Daily Product Inspections<br />
13 Annual Product Inspections<br />
14 Reissuing Leckey Products<br />
15 Product Servicing<br />
16 Technical Information<br />
17 Accessories
6 Safety Information<br />
1. Intended Use<br />
The <strong>Mygo</strong> <strong>Max</strong> is an activity chair which<br />
has been designed for children and young<br />
adults with disabilities for use at home or<br />
in the school environment. It is suitable<br />
for clients aged 12 -18 years. The seating<br />
system has a maximum user weight of<br />
85kg. The seating system is modular<br />
and can be used with a choice of indoor<br />
or outdoor chassis. The Hi-low chassis<br />
has been designed for use indoors but<br />
can also be used outdoors on a level<br />
surface. The Hi-low chassis should never<br />
be exposed to the elements as this may<br />
corrode the metal components.<br />
2. Declaration of Conformity<br />
James Leckey Design Ltd as manufacturer<br />
with sole responsibility declares that the<br />
<strong>Mygo</strong> <strong>Max</strong> conforms to the requirements<br />
of the 93/42/EEC Guidelines, Medical<br />
Device Regulations 2002 and EN12182<br />
Technical aids for disabled persons and<br />
test methods.<br />
3. Terms of Warranty<br />
The warranty applies only when the<br />
product is used according to the<br />
specified conditions and for the intended<br />
purposes, following all manufacturers’<br />
recommendations (also see general terms<br />
of sales, delivery and payment). A two<br />
year warranty is provided on all Leckey<br />
manufactured products and components.<br />
4. Product History Record<br />
Your Leckey product is classified as<br />
a Class 1 Medical device and as such<br />
should only be prescribed, set up<br />
or reissued for use by a technically<br />
competent person who has been trained<br />
in the use of this product. Leckey<br />
recommend that a written record is<br />
maintained to provide details of all<br />
setups, reissue inspections and annual<br />
inspections of this product.<br />
5. Product Training Record<br />
(Parents, Teachers & Carers)<br />
Your Leckey product is a prescribed Class<br />
1 Medical Device and as such Leckey<br />
recommend that parents, teachers and<br />
carers using the equipment should be<br />
made aware of the following sections<br />
of this user manual by a technically<br />
competent person:<br />
Section 6<br />
Safety Information<br />
Section 11<br />
Frequent Adjustments for Daily use<br />
Section 12<br />
Cleaning and Care<br />
Section 13<br />
Daily Product Inspection<br />
Leckey recommend that a written record<br />
is maintained of all those who have been<br />
trained in the correct use of this product.<br />
6.1 Always read instructions fully before<br />
use.<br />
6.2 To improve safety we recommend<br />
that users should not be left unattended<br />
at any time whilst using Leckey<br />
equipment.<br />
6.3 Only use Leckey approved<br />
components with your product. Never<br />
modify the product in any way. Failure<br />
to follow instructions may put the user<br />
or carer at risk and will invalidate the<br />
warranty on the product.<br />
6.4 If in any doubt to the continued safe<br />
use of your Leckey product or if any<br />
parts should fail, please cease using<br />
the product and contact our customer<br />
services department or your local<br />
dealer as soon as possible.<br />
6.5 Carry out all positional adjustments<br />
and ensure that they are securely<br />
fastened before you put the user into<br />
the product. Some adjustments may<br />
require the use of a tool which is<br />
provided with each product. Keep all<br />
tools out of reach of children.<br />
6.6 When putting the user into a seating<br />
system, both for positional and safety<br />
reasons, always secure the Leeway<br />
Pelvic Cradle first.<br />
6.7 When the product is stationary<br />
ensure that all castors are locked and<br />
facing away from the base, as this<br />
will improve product stability. This is<br />
especially important when the tilt in<br />
space or back recline facility is in use.<br />
6.8 When the seat is in use on a Hi-low<br />
chassis please ensure that the height<br />
adjustment pedal and tilt in space lever<br />
are locked off and cannot be adjusted<br />
accidentally by other children.<br />
6.9 When the Leckey seating systems<br />
are used on the Hi-low chassis we do not<br />
recommend that users are moved over<br />
uneven surfaces when in the equipment.<br />
All due care and attention should be<br />
taken if transporting in and out of the<br />
seat.<br />
6.10 Never leave the product on a<br />
sloping surface, greater than 5 degrees.<br />
Always remember to lock all the castors.<br />
6.11 Only use the push handle to steer<br />
and move the seat from one area to<br />
another. Never use the tray for this<br />
purpose.<br />
6.12 The product contains components<br />
which could present a choking hazard<br />
to small children. Always check that<br />
locking knobs and bolts within the<br />
child’s reach are tightened and secure<br />
at all times.<br />
6.13 Leckey products comply with fire<br />
saftey regulations in accordance with<br />
EN12182. However the product contains<br />
plastic components and therefore should<br />
be kept away from all direct sources of<br />
heat including naked flames, cigarettes<br />
and gas heaters.<br />
6.14 Do not place objects hotter than<br />
40 o C on the tray.t is in use on a Hi-low<br />
chassis please ensure that the height<br />
adjustment pedal and tilt in space lever<br />
are locked off and cannot be adjusted<br />
accidentally by other children.
6.13 Leckey Produkte erfüllen die Feuer-<br />
Sicherheits- Vorschriften im Einklang mit<br />
EN12182. Allerdings beinhaltet das<br />
Produkt Kunststoffteile und muss daher<br />
von allen direkten Hitzequellen wie<br />
offenem Feuer, Zigaretten, elektrischen<br />
und Gasöfen ferngehalten werden.<br />
6.14 Legen Sie niemals Objekte mit<br />
einer Temperatur über 40°C auf den<br />
Tisch. Wenn der Tisch auf einem Hi-Low<br />
Fahrgestell eingesetzt wird, stellen<br />
Sie bitte sicher, dass die Hebel für die<br />
Höhenverstellung und Neigungsstellung<br />
verriegelt sind und nicht versehentlich<br />
von anderen Kindern verstellt werden<br />
können.<br />
6.18 Überprüfen Sie vor dem Benutzen<br />
des Sitzsystems stets, ob der<br />
Verbindungshandgriff am Sitz vollständig<br />
mit dem Fahrgestell verbunden ist. Wenn<br />
der Handgriff nicht richtig eingerastet<br />
ist, könnte sich die Sitzeinheit lösen<br />
und den Benutzer oder die Pflegeperson<br />
schwer verletzen.<br />
Das Auspacken<br />
und Zusammenbauen<br />
des<br />
Sitzsystems<br />
6.15 Reinigen Sie das Produkt<br />
regelmäßig. Benutzen Sie dazu keine<br />
Scheuermittel. Führen Sie regelmäßig<br />
Instandhaltungsprüfungen durch, um<br />
sicherzugehen, dass sich Ihr Produkt in<br />
gutem Zustand befindet.<br />
6.16 Das Produkt wurde zur Benutzung<br />
in Innenräumen entworfen. Bei<br />
Nichtbenutzung sollte es an einem<br />
trockenen Ort aufbewahrt werden,<br />
der keinen extremen Temperaturen<br />
ausgesetzt ist. Der Spanne für die<br />
Betriebstemperatur liegt zwischen +5°<br />
und +40° Celsius.<br />
6.17 Überprüfen Sie stets, ob die<br />
Handknöpfe aus Kunststoff an der<br />
Schiebestange sicher angezogen sind,<br />
bevor Sie die Sitzeinheit fortbewegen.<br />
7
7.1 Das Einstellen<br />
der Fußstützen<br />
7.2 Das Anbringen des<br />
Sitzsystems am Hi-Low<br />
Fahrgestell<br />
Überprüfen Sie die Teile<br />
Herzlichen Glückwunsch zum Kauf Ihres<br />
<strong>Mygo</strong> <strong>Max</strong> Sitzsystems. Alle Teile befinden<br />
sich in Plastiktüten, die jeweils deutlich<br />
etikettiert sind. Nehmen Sie diese vorsichtig<br />
aus den Kartons und überprüfen Sie alle<br />
Teile, die Sie bestellt haben.<br />
Bewahren Sie Plastiktüten außerhalb der<br />
Reichweite von Kindern auf.<br />
Einige Teile des Zubehörs müssen<br />
zusammengebaut werden, bevor Sie den<br />
Sitz auf der von Ihnen gekauften Basis<br />
befestigen.<br />
Das Multiwerkzeug<br />
Für eine Anzahl von Einstellungen wird das<br />
Multiwerkzeug benötigt, das mit jedem<br />
Sitz mitgeliefert wird und sich in der<br />
Rückentasche des Sitzes befindet.<br />
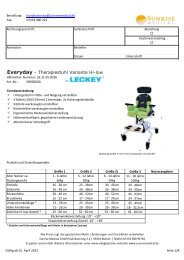
Öffnen Sie den Winkel der Beinstützen,<br />
indem Sie die Drehknöpfe (A) wie gezeigt<br />
abschrauben und stellen Sie ihn auf<br />
die weiteste Position ein. Lösen Sie die<br />
Zylinderschrauben (B) und schieben Sie<br />
die Unterschenkelstützen hinein. Bringen<br />
Sie sie in die gewünschte Position, wobei<br />
die Fußstützen nach vorne zeigen, und<br />
ziehen Sie die Zylinderschrauben mit dem<br />
Multiwerkzeug wieder an.<br />
Vergewissern Sie sich stets, dass die<br />
Fußstütze fest angebracht ist.<br />
Stellen Sie die Höhe des Fahrgestells auf die<br />
maximale Position ein, um das Risiko der<br />
Rückenbelastung zu verringern, wenn Sie die<br />
Sitzeinheit anbringen. Beziehen Sie sich auf<br />
Abschnitt 11, um die Höheneinstellung des<br />
Fahrgestells vorzunehmen, das Sie gekauft<br />
haben. Öffnen Sie zuerst den Sicherheitsstift<br />
vorne am Sitz. Dazu ziehen Sie den Stift<br />
heraus und drehen ihn um 90° Grad. Heben<br />
Sie den Sitz vorsichtig an und setzen Sie<br />
ihn auf das Fahrgestell. Am hinteren unteren<br />
Ende des Sitzes finden Sie den dafür<br />
vorgesehenen Kanal.<br />
Setzen Sie diesen sicher über das Rohr in<br />
Richtung Rückseite des Fahrgestells.<br />
Ziehen Sie den Handgriff an der Vorderseite<br />
der Sitzeinheit nach oben und drehen Sie<br />
anschließend den Sitz nach vorne und nach<br />
unten. Sobald die Vorderseite des Sitzes<br />
vollständig gesenkt ist, lassen Sie den<br />
Handgriff los und schieben ihn nach vorne,<br />
um sicherzustellen, dass er vollständig im<br />
vorderen Rohr eingerastet ist.<br />
A<br />
B
7.3 Das Anbringen des<br />
Schiebehandgriffs<br />
7.4 Das Anbringen<br />
der Kopfstütze<br />
7.5 Das Anbringen<br />
der Thoraxpelotten<br />
Drehen Sie den Sicherheitsstift, sodass er<br />
vor dem Handgriff einrastet. Wenn er am<br />
Handgriff anstößt, ist der Sitz nicht richtig<br />
angebracht. Entfernen Sie ihn und nehmen<br />
Sie die oben genannten Schritte erneut vor.<br />
Überprüfen Sie immer den Handgriff<br />
und den Sicherheitsstift, bevor Sie das<br />
Kind in das Sitzsystem setzen. Wenn der<br />
Handgriff nicht richtig einrastet, kann<br />
die Sitzeinheit sich lockern und dem<br />
Kind oder der Pflegeperson schwere<br />
Verletzungen zufügen.<br />
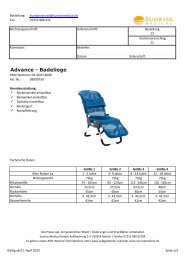
Der Schiebehandgriff wird an der Sitzbasis<br />
angebracht, indem Sie die beiden niedriger<br />
sitzenden Stämme in die dafür vorgesehenen<br />
Rohre schieben, wie gezeigt. Sichern Sie den<br />
Handgriff an Ort und Stelle, indem Sie die<br />
Feststellknöpfe (a) befestigen.<br />
Ein regelmäßiges Überprüfen auf die<br />
Festigkeit der Knöpfe ist unerlässlich, vor<br />
allem, wenn Sie die Produkteinheit über<br />
Korridore bewegen, die möglicherweise<br />
uneben oder schräg sind.<br />
Die Kopfstütze bringen Sie an, indem Sie den<br />
Stamm in die Aufnahmehalterung schieben,<br />
in der gewünschten Position einstellen und<br />
anhand des Handhebels (a) befestigen.<br />
Während Sie die Komponenten<br />
zusammenhalten, entfernen Sie Schraube<br />
und Unterlegescheibe. Passen Sie die<br />
Winkeleinstellungsformteile aus Kunststoff<br />
und die seitliche Halterung an den Schlitz<br />
in der Rückenlehne an und setzen Sie die<br />
Unterlegscheibe und die Kunststoffschraube<br />
erneut ein.<br />
A
7.6 Das Anbringen des<br />
Leeway Beckengurts<br />
7.7 Das Anbringen der<br />
Fußschalen<br />
7.8 Das Anbringen der<br />
Armlehnen<br />
7.9 Das Anbringen des<br />
Tisches<br />
Schließen Sie die vordere Schnalle und<br />
die seitlichen Klettverschlüsse des Leeway<br />
Beckengurts. Befestigen Sie die vier seitlich<br />
lösbaren Schnallen (a), zwei befinden sich<br />
hinten an der Sitzbasis und zwei an der<br />
Seite.<br />
Sollten Fußschalen erforderlich sein,<br />
können sie mit einer einzigen Schraube<br />
an den Fußplatten befestigt werden. Zur<br />
Positionierung der Fußschalen lösen<br />
Sie einfach den Drehknopf (a) unter der<br />
Fußplatte, wählen die gewünschte Position<br />
aus und drehen ihn erneut fest.<br />
Schieben Sie die Armlehnen in die Halterung.<br />
Stellen Sie sie in der gewünschten Höhe ein<br />
und befestigen Sie den Drehknopf wieder.<br />
Der Tisch wird am Sitz angebracht, indem<br />
Sie die Tisch-Rohre durch die Mitte der<br />
Armlehne schieben. Sobald der Tisch in<br />
Position ist, ziehen Sie den Drehknopf (a)<br />
fest an.<br />
A<br />
A<br />
A
7.10 Das Anbringen<br />
der Hüftpelotten<br />
7.11 Das Anbringen<br />
der Fußgurte<br />
7.12 Das Anbringen der<br />
Protraktionspolster<br />
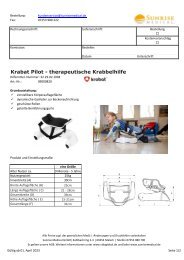
Um die Hüftpelotten an der Sakralstütze<br />
anzubringen, lösen Sie die Schraube (a) und<br />
schieben die Stange der Hüftpelotte in das<br />
Loch, das sich an der Seite der Sakralstütze<br />
befindet. Ziehen Sie die Schraube<br />
anschließend fest.<br />
Fädeln Sie das Gurtband durch den Schlitz in<br />
der Fußschale ein. Ziehen Sie das Gurtband<br />
zurück hoch und durch die Unterseite der<br />
Stegschnalle. Anschließend ziehen Sie<br />
das Gurtband durch die obere Seite der<br />
Stegschnalle. Damit das Gurtband schließlich<br />
an Ort und Stelle befestigt werden kann,<br />
muss es erneut durch die Unterseite der<br />
Stegschnalle gezogen werden. Kürzen Sie<br />
den Gurt auf die gewünschte Länge.<br />
Um die Protraktionspolster anzubringen,<br />
entfernen Sie die Schraube (a) aus der<br />
Metallhalterung an der Seite. Platzieren Sie<br />
das Protraktionspolster auf die Halterung<br />
und verwenden Sie dafür die neuen längeren<br />
beigefügten Schrauben. Ziehen Sie sie mit<br />
dem Inbusschlüssel fest. Am Sitz gemäß<br />
Abschnitt 7.5 anbringen.<br />
1<br />
3<br />
A<br />
A<br />
2<br />
4
Das<br />
Anbringen<br />
der<br />
Polsterteile<br />
8.1 Die<br />
Oberschenkelkissen<br />
Schieben Sie ein Oberschenkelkissen auf<br />
jede der Oberschenkelstützen und befestigen<br />
Sie sie, indem Sie die Druckknöpfe auf jeder<br />
Seite herunterdrücken.<br />
8.2 Das Sitzkissen<br />
Das Sitzkissen wird befestigt, indem man<br />
es an Ort und Stelle legt und mit den<br />
beiden Druckknopflaschen (a) hinten an der<br />
Sitzbasis befestigt. Zur weiteren Sicherung<br />
haken Sie die Elastikschlaufen an den Haken<br />
(b) unter der Sitzbasis ein.<br />
Vergewissern Sie sich stets, dass das<br />
Sitzkissen sicher befestigt ist, bevor Sie<br />
das Kind in den Sitz platzieren.<br />
8<br />
B<br />
A
8.3 Das Rückenkissen 8.4 Der Leeway<br />
Beckengurt<br />
8.5 Das Sakralkissen 8.6 Die Hüftpelotten<br />
Zuallererst lösen Sie die Schulterpelotten<br />
mit dem mitgelieferten Inbusschlüssel.<br />
Schieben Sie das Kissen über die Seitenteile<br />
und befestigen Sie es mit den beiden<br />
Druckknöpfen. Schieben Sie die Laschen<br />
über das obere Ende der Rückenlehne und<br />
unter das untere Ende der Rückenlehne.<br />
Befestigen Sie sie mit den Druckknöpfen.<br />
Befestigen Sie den Leeway Beckengurt und<br />
platzieren Sie ihn auf das Sitzkissen. Drücken<br />
Sie den Klettverschluss auf das Sitzkissen<br />
und bringen Sie zur Befestigung vier Gurte<br />
(a) an. Es gibt zwei Haltenocken hinter dem<br />
Sitz und eine auf jeder Seite.<br />
Montieren Sie das Sakralkissen über das<br />
Gerüst und befestigen Sie es hinten mit den<br />
Druckknöpfen. Die Standard Sakralstütze<br />
sollte mit den beiden Doppelklappen am<br />
oberen Ende befestigt werden.<br />
Schieben Sie die Kissenbezüge über die<br />
Hüftpelotte, mit dem offenen Reißverschluss<br />
außen. Schließen Sie den Reißverschluss und<br />
befestigen Sie den Klettbandverschluss.
8.7 Der Rumpfgurt 8.8 Die Thoraxpelotten<br />
8.9 Der Brustgurt 8.10 Das<br />
Kopfstützenkissen<br />
Schieben Sie jeden der vier Gurte (b) durch<br />
jede Haltenockenhalterung und befestigen<br />
Sie sie, indem Sie die Haltenocken nach<br />
unten drücken. Anschließend befestigen<br />
Sie die Schultergurte (c) in den beiden<br />
Haltenocken am oberen Ende und den<br />
beiden an der Seite.<br />
Schieben Sie die Kissenbezüge über<br />
die Thoraxpelotte, mit dem offenen<br />
Reißverschluss außen. Führen Sie die<br />
Schnalle aus Kunststoff durch den Schlitz im<br />
Bezug, schließen Sie den Reißverschluss und<br />
befestigen sie die Klettverschlusslasche.<br />
Der Brustgurt wird befestigt, indem der<br />
männliche Teil der Schnalle (a) in den<br />
weiblichen Teil (b) auf beiden Seiten der<br />
Brustpelotten hineingesteckt wird.<br />
Platzieren Sie das Kissen auf die Kopfstütze.<br />
Lassen Sie den Zentralverschluss und die<br />
beiden seitlichen Verschlüsse an der Stelle<br />
einrasten. Bringen Sie die untere Lasche<br />
unter die Kopfstütze und befestigen Sie den<br />
Klettverschluss.<br />
B<br />
A<br />
B<br />
C
8.11 Der gepolsterte<br />
Tischeinsatz<br />
Schieben Sie den Tisch in den gepolsterten<br />
Tischeinsatz und befestigen Sie die sechs<br />
Druckknöpfe. Zwei unten, zwei oben und<br />
zwei seitlich.<br />
Klinische<br />
Einstellung<br />
für die<br />
Positionierung<br />
9
9.1 Der Leeway<br />
Beckengurt<br />
9.2 Die Hüftpelotte<br />
Der Leeway Beckengurt sollte flach und<br />
geöffnet sein, wenn der Benutzer in den<br />
<strong>Mygo</strong> <strong>Max</strong> platziert wird. Alle vier seitlichen<br />
Gurte sollten dann bereits am Sitz befestigt<br />
sein. Zuerst befestigen Sie die Schnalle (a)<br />
vorne am Leeway Beckengurt. Anschließend<br />
befestigen Sie den Klettverschluss (b) an<br />
den Seiten, um den Leeway Beckengurt an<br />
den Benutzer anzupassen. Dann stellen Sie<br />
die vorderen und hinteren Riemen (c) und (d)<br />
ein, um die Beckenposition des Benutzers zu<br />
sichern.<br />
Die Hüftpelotten können hinsichtlich<br />
Breite und Winkel verstellt werden, um<br />
den Anforderungen des Benutzers zu<br />
entsprechen. Lösen Sie die Schrauben (a)<br />
hinten an der Sakralstütze. Verschieben Sie<br />
die Hüftpelotten in die gewünschte Position.<br />
Die Hüftpelotten sollten idealerweise stets<br />
gedreht werden, sodass sie oben auf dem<br />
Sitzkissen liegen, auch wenn die Rückenoder<br />
Sakralstütze angewinkelt ist. Sobald<br />
die Hüftpelotten platziert sind, ziehen Sie<br />
die Schrauben wieder fest an. Die Pelotten<br />
können ebenfalls abgewinkelt werden, um<br />
einer Abduktion, Adduktion oder einem<br />
Windschlagdeformität entgegenzuwirken. Um<br />
eine Winkelverstellung bei den Hüftpelotten<br />
vorzunehmen lösen Sie die Schraube (b)<br />
am Scharnier der Hüftpelotte. Stellen Sie<br />
den gewünschten Winkel ein und ziehen<br />
Sie die Schraube erneut fest an. Die Polster<br />
können ebenfalls in der Tiefe und gering<br />
in der Drehung verstellt werden, indem die<br />
Schrauben (c) an dem Polster gelöst werden,<br />
das Polster in die gewünschte Position<br />
geschoben wird und die Schrauben wieder<br />
fest angezogen werden.<br />
A<br />
B<br />
C<br />
B<br />
C<br />
A<br />
D
9.3 Die Höhe der<br />
Rückenlehne<br />
9.4 Der Rückenwinkel 9.5 Das Einstellen der 9.6 Das Einstellen der<br />
Oberschenkelstützen Oberschenkelführungen<br />
Um die Gesamthöhe der Rückenlehne<br />
einzustellen, lösen Sie die beiden Schrauben<br />
in der Mitte der Rückenlehne, stellen Sie in<br />
der gewünschten Position ein und ziehen sie<br />
erneut fest. Die Höhe kann fein eingestellt<br />
werden, wenn der Benutzer sich im Sitz<br />
befindet.<br />
Achten Sie beim Einstellen auf die<br />
minimale Position darauf, dass Ihre<br />
Finger nicht zwischen den beweglichen<br />
und feststehenden Teilen eingeklemmt<br />
werden.<br />
Um den Winkel zu ändern, lösen Sie<br />
die Schrauben am unteren Ende der<br />
Rückenlehnstange, bringen den Winkel in<br />
die gewünschte Position und ziehen die<br />
Schrauben erneut fest an.<br />
Der Winkel der Rückenlehne kann verstellt<br />
werden, während sich der Benutzer in dem<br />
Sitz befindet. Die Rückenlehnstange besitzt<br />
einen sinnvollen Winkelindikator, der auf die<br />
bevorzugte Position oder den Rückenwinkel<br />
für die verschiedenen Aktivitäten hinweisen<br />
soll.<br />
Halten Sie die Rückenlehnstange mit<br />
einer Hand, während Sie den Winkel der<br />
Rückenlehne verstellen.<br />
Bei der Auslieferung sind die<br />
Oberschenkelstützen auf der minimalen Position<br />
eingestellt. Stellen Sie die Tiefe ein, bevor Sie<br />
das Kind in den Sitz setzen. Verfeinerungen an<br />
den Einstellungen können später vorgenommen<br />
werden, werden aber durch das Gewicht des<br />
Benutzers eingeschränkt. Um die richtige<br />
Position zu erreichen, messen Sie die Länge<br />
von der Lendenwirbelsäule des Kindes bis zu<br />
seinen Kniekehlen. Stellen Sie die Stützen in der<br />
gewünschten Position ein, indem Sie die beiden<br />
Drehknöpfe unter der Sitzbasis benutzen. Zum<br />
Einstellen lösen Sie die Drehknöpfe, schieben<br />
die Stützen in die gewünschte Position und<br />
drehen die Knöpfe wieder fest. Die Stützen<br />
müssen zu diesem Zeitpunkt gerade nach<br />
vorne zeigen, es sei denn man muss einer<br />
starken Windschlagdeformität, einer Adduktion<br />
oder Abduktion entgegenwirken. In diesem<br />
Fall muss der Winkel mit Hilfe der Drehknöpfe<br />
dementsprechend eingestellt werden.<br />
Um die Breite der Oberschenkelführungen<br />
einzustellen, lösen Sie die Schrauben<br />
(a) und positionieren die Führungen in<br />
der gewünschten Position. Es gibt zwei<br />
Schrauben pro Oberschenkelführung.<br />
A
9.7 Die<br />
Höheneinstellung der<br />
Fußstützen<br />
9.8 Die Wadenstütze 9.9 Die<br />
9.10 Die Fußschalen<br />
Winkeleinstellung der<br />
Fußstützen<br />
Um die richtige Höhe der Fußstützen<br />
einzustellen lösen Sie die Schraube (a),<br />
stellen die gewünschte Höhe ein und ziehen<br />
die Schraube erneut fest an. Die Fußstütze<br />
verfügt über einen sinnvollen Höhenindikator,<br />
der die bevorzugte Position anzeigt.<br />
Um den Winkel der Wadenstütze einzustellen<br />
lösen Sie die Schraube (b) oben an der<br />
Wadenstütze, bewegen die Wadenstütze<br />
vor oder zurück bis zur gewünschten<br />
Winkelposition und ziehen die Schraube<br />
erneut fest an.<br />
Zum Verstellen des Winkels, um einer<br />
Plantarflexion oder Dorsalflexion<br />
entgegenzuwirken, lösen Sie einfach die<br />
Schraube (a) oder ziehen sie fest, um den<br />
gewünschten Winkel auszuwählen.<br />
Die Fußstützen können einfach hochgeklappt<br />
werden, um den Transfer zu erleichtern.<br />
Um die Fußschalen zu positionieren, lösen<br />
Sie einfach den Drehknopf (a) unter der<br />
Fußplatte, wählen die gewünschte Position<br />
aus und befestigen den Drehknopf erneut.<br />
Um die Füße des Benutzers Sie in den<br />
Fußschalen zu positionieren, befestigen Sie<br />
den mitgelieferten Klettverschluss für die<br />
Knöchel und Fußhalteriemen.<br />
B<br />
A<br />
A<br />
A
9.11 Das Einstellen<br />
der Sakralpelotte<br />
9.12 Die Seitenpelotten<br />
Die Standard Sakralpelotte<br />
Um die Höhe, Tiefe oder den Winkel der<br />
Standard Sakralpelotte einzustellen, lösen<br />
Sie die beiden Schrauben (a) auf jeder Seite<br />
der Halterung, bringen Sie in die gewünschte<br />
Position und ziehen sie wieder fest an.<br />
Sakralpelotte mit Kugelgelenk<br />
Um die Höhe oder Tiefe der Sakralpelotte<br />
mit Kugelgelenk einzustellen, lösen Sie jede<br />
Schraube (a) auf jeder Seite der Halterung,<br />
bringen die Pelotte in die gewünschte<br />
Position und ziehen die Schrauben erneut<br />
fest. Zur Verstellung des Winkels lösen<br />
Sie beide Schrauben (b) am Kugelgelenk.<br />
Positionieren Sie die Pelotte im gewünschten<br />
Winkel und ziehen Sie die Schrauben erneut<br />
fest an.<br />
Die Standard Seitenpelotten<br />
Lösen Sie die Schrauben (a) um Breite, Höhe<br />
und Winkel der Seitenpelotten einzustellen<br />
und ziehen Sie sie erneut fest an, wenn die<br />
gewünschte Position erreicht wurde.<br />
Die hochklappbaren Seitenpelotten<br />
Breite, Höhe und Winkel werden wie oben<br />
eingestellt. Die Seitenpelotten können<br />
hochgeklappt werden, indem der Stift (b)<br />
herausgezogen wird.<br />
Die komplexen Seitenpelotten<br />
Die komplexen Seitenpelotten können in<br />
einer beliebigen Kombination verwendet<br />
werden, um den Anforderungen des<br />
Benutzers zu entsprechen. Um die Höhe,<br />
Breite und den Winkel der Pelotten zu<br />
verstellen, lösen Sie die Schraube (a)<br />
und ziehen Sie nach der gewünschten<br />
Positionierung wieder fest an. Die<br />
komplexen Pelotten können ebenfalls so<br />
abgewinkelt werden, dass das Polster die<br />
Gestalt des Benutzers konturieren kann.<br />
Zum Einstellen lösen Sie die Schraube (a)<br />
in der Mitte des Polsters, positionieren<br />
das Polster im gewünschten Winkel und<br />
ziehen die Schraube erneut fest. Die<br />
Seitenpelotten können hochgeklappt<br />
werden, indem der Stift herausgezogen wird,<br />
siehe hochklappbare Seitenpelotten. Die<br />
Seitenpelotten verfügen über einen sinnvollen<br />
Höhenindikator.<br />
A<br />
A<br />
A<br />
A<br />
B<br />
B
9.13 Der Brustgurt 9.14 Der Rumpfgurt<br />
9.15 Die<br />
Schulterpelotte<br />
9.16 Die Kopfstütze<br />
Um die Breite des Brustgurts zu ändern,<br />
heben Sie die vordere Abdeckung<br />
hoch, stellen die Klettverschlüsse in der<br />
gewünschten Breite ein und setzen die<br />
Abdeckung wieder drauf.<br />
Der Rumpfgurt ist offen, wird aber mit einem<br />
Klip (a) befestigt. Wenn das Kind wieder in<br />
das Sitzsystem gesetzt wird, führen Sie den<br />
Rumpfgurt vorne um das Kind herum und<br />
befestigen ihn, indem Sie die Klips in die<br />
Schnallen auf der anderen Seite einrasten<br />
lassen (b). Alle Verbindungsriemen sind<br />
einstellbar, indem Sie den Haltenocken lösen,<br />
sie in der gewünschten Länge einstellen und<br />
den Haltenocken wieder befestigen.<br />
Um den Winkel der Schulterpelotte<br />
einzustellen, lösen Sie die Schraube,<br />
bringen die Pelotten in die gewünschte<br />
Winkelposition und ziehen die Schrauben<br />
erneut fest an.<br />
Um Höhe, Tiefe und Winkel der konturierten<br />
Kopfstütze einzustellen, lösen Sie die<br />
Drehknöpfe (A) und ziehen sie wieder<br />
an, wenn die gewünschten Einstellungen<br />
vorgenommen wurden. Entfernen Sie die<br />
Kopfstütze nicht, während sich der Benutzer<br />
im Sitz befindet.<br />
Verwenden Sie die Kopfstütze niemals dazu,<br />
den Kopf des Benutzers zu positionieren.<br />
Achten Sie stets darauf, dass Sie Ihre Finger<br />
beim Einstellen der Höhe der Kopfstütze<br />
nicht einklemmen.<br />
A<br />
B<br />
A
9.17 Das Einstellen der<br />
Armlehne<br />
Um die Höhe der Armlehne einzustellen,<br />
lösen Sie bitte den Handknopf (b), stellen die<br />
gewünschte Höhe ein und ziehen ihn wieder<br />
an. Um den Winkel einzustellen, drehen Sie<br />
den Ratschengriff (a) bis die gewünschte<br />
Position eingestellt wurde.<br />
Achten Sie bitte stets darauf, dass Ihre<br />
Finger beim Einstellen der Höhe nicht im<br />
Schlitz eingeklemmt werden.<br />
9.18 Das Einstellen des<br />
Tisches<br />
Höhe und Winkel des Tisches werden durch<br />
das Verstellen der Armlehnen wie oben<br />
beschrieben eingestellt. Um den Tisch zu<br />
entfernen oder seine Tiefe einzustellen, lösen<br />
Sie die Drehknöpfe (a) unter der Armlehne,<br />
stellen die gewünschte Position ein und<br />
ziehen sie dann wieder fest an.<br />
Achten Sie stets darauf, dass die Hände<br />
oder Arme des Kindes beim Einschieben<br />
des Tisches nicht eingeklemmt werden.<br />
Legen Sie niemals heiße Gegenstände mit<br />
einer Temperatur von über 40° Grad auf<br />
den Tisch.<br />
Häufige<br />
Anpassung für<br />
den täglichen<br />
Gebrauch<br />
(Therapeuten/<br />
Betreuer/Eltern)<br />
B<br />
A<br />
Bitte beachten Sie dass der Tisch<br />
ausschließlich für den Benutzer vorhanden<br />
ist.<br />
Lehnen Sie sich niemals darauf und legen<br />
Sie keine schweren Gegenstände auf den<br />
Tisch, die mehr als 8kg (17,6lbs) wiegen.<br />
A<br />
Eltern und Pflegepersonal müssen<br />
von einer technisch und klinisch<br />
kompetenten Person, die für die<br />
Benutzung des Produkts ausgebildet<br />
wurde, in den häufig vorgenommenen<br />
Anpassungen unterwiesen und auf die<br />
Sicherheits-Überprüfungen in<br />
Abschnitt 6 aufmerksam gemacht<br />
werden. Leckey<br />
10<br />
empfiehlt, ein<br />
schriftliches Protokoll von allen Eltern<br />
und dem Pflegepersonal festzuhalten,<br />
die in der Benutzung dieses Produkts<br />
unterwiesen wurden.
10.1 Der Transfer Ihres<br />
Kindes in den Sitz hinein<br />
und wieder heraus<br />
10.2 Das Einstellen des<br />
Leeway Beckengurts<br />
10.3 Das Fahrgestell<br />
Bevor Sie das Kind in den Sitz transferieren,<br />
führen Sie die tägliche Überprüfung des<br />
Produkts aus, wie in Abschnitt 13 dieses<br />
Benutzerhandbuchs beschrieben. Stellen<br />
Sie den Sitz auf einer bequemen Höhe ein,<br />
um den Transfer zu erleichtern. Stellen<br />
Sie alle Lenkrollen fest und achten Sie<br />
darauf, dass sie alle nach außen gerichtet<br />
sind, um die Stabilität des Produkts zu<br />
maximieren. Vergewissern Sie sich, dass die<br />
Sicherheitsschnalle am Brustgurt gelöst ist<br />
und nicht im Weg ist, um den Transfer zu<br />
erleichtern.<br />
Wenn der Sitz über hochklappbare<br />
Thoraxpelotten verfügt, räumen Sie sie weg,<br />
indem Sie den Drehknopf (a) verwenden.<br />
Lösen Sie den Leeway Beckengurt in der<br />
Mitte und den seitlichen Klettverschluss des<br />
Leeway Beckengurts und lassen Sie zu, dass<br />
das Gurtzeug sich öffnet, um den Transfer<br />
zu erleichtern. Schließlich öffnen Sie die<br />
Riemen, wenn die Fußschalen angebracht<br />
sind. Sie können nun das Kind in den Sitz<br />
transferieren oder hineinheben. Der Leeway<br />
Beckengurt wird mit der mittleren Schnalle<br />
und dem seitlichen Klettverschluss befestigt.<br />
Die korrekte Positionierung und Spannung<br />
des Leeway Beckengurts ist der Schlüssel<br />
zum Haltungsmanagement eines Kindes,<br />
da er dessen Bequemlichkeit und die<br />
Fähigkeit, Aktivitäten durchzuführen,<br />
beeinflusst. Bitte beraten Sie sich mit Ihrem<br />
Therapeuten, um sicherzustellen, dass der<br />
Leeway Beckengurt korrekt angelegt wird<br />
und die Gurte entsprechend gespannt sind.<br />
Um den Leeway Beckengurt zu spannen<br />
verwenden Sie die 4 Seitengurte (c) und die<br />
Klettverschlusslaschen (d). Wenn Sie den Sitz<br />
draußen verwenden und Ihr Kind ein Mantel<br />
trägt, legen Sie den Leeway Beckengurt<br />
unter dem Mantel an.<br />
Der <strong>Mygo</strong> <strong>Max</strong> wurde für verschiedene<br />
Fahrgestelle entwickelt. Dieses<br />
Benutzerhandbuch zeigt die richtige und<br />
sichere Verwendung des Sitzsystems mit<br />
dem Leckey Hi-Low Fahrgestell. Für alle<br />
anderen Fahrgestelle oder Untergestelle<br />
beziehen Sie sich bitte auf das Handbuch<br />
des Herstellers.<br />
Um das Hi-Low Fahrgestell für das<br />
Sitzsystem vorzubereiten empfehlen wir,<br />
dass Sie das Fahrgestell in eine bequeme<br />
Arbeitshöhe bringen. Das tun Sie, indem Sie<br />
das Fußpedal hinten am Fahrgestell oder den<br />
Up-Knopf auf dem Handapparat betätigen,<br />
falls Sie ein elektrisches Fahrgestell<br />
benutzen.<br />
Befestigen Sie stets den Leeway<br />
Beckengurt zuerst, bevor Sie andere<br />
Schnallen oder Gurte befestigen. Passen<br />
Sie den Gurt an das Kind an, damit es<br />
nicht aus dem Sitz herausrutschen oder<br />
kriechen kann.<br />
C<br />
C<br />
D
10.4 Die elektrische<br />
Höhenverstellung<br />
10.5 Das Aufladen des<br />
Akkus<br />
10.6 Die<br />
Höhenverstellung am<br />
Hi-Low Fahrgestell<br />
Das angetriebene Fahrgestell kann<br />
leicht mithilfe des Drucktasters auf dem<br />
Handapparat eingestellt werden. Die Höhe<br />
des Sitzes kann eingestellt werden, während<br />
sich der Benutzer im Sitz befindet. Wenn<br />
einer der Drucktaster auf dem Handapparat<br />
gedrückt wird, bewegt sich der Sitz nach<br />
oben oder unten in die jeweilige Richtung,<br />
bis der Taster losgelassen wird oder der<br />
Aktuator seinen Endanschlag erreicht hat.<br />
Das System wird durch das Einsetzen des<br />
Akkus in die kreisförmige Halterung, die<br />
sich am Ende des Steuerkastens befindet,<br />
gestartet. Befreien Sie die Magnetpole von<br />
jeglichem Schmutz und Metallspänen, bevor<br />
Sie den Akku einsetzen. Der Akku haftet von<br />
selbst magnetisch in der korrekten Position<br />
und es ertönt ein langes Bestätigungssignal.<br />
Der Steuerkasten überprüft den Ladezustand<br />
alle 24 Sekunden und wenn der Akku einen<br />
niedrigen Grenzwert erreicht hat, sendet der<br />
Steuerkasten alle 24 Sekunden ein doppeltes<br />
Warnsignal aus, um darauf hinzuweisen, dass<br />
der Akku wieder aufgeladen werden muss.<br />
Das wird im „C3-Ladegerät” durchgeführt.<br />
Das vollständige Wiederaufladen dauert 5-8<br />
Stunden, abhängig vom Ladezustand. Um<br />
den Akku zu entfernen, drehen Sie ihn um<br />
90 Grad (rechts oder links), um ihn aus den<br />
Magneten zu lösen. Der Akku (Typ NiMH)<br />
kann in jedem beliebigen Ladezustand<br />
geladen werden, ohne dass sich die<br />
Lebensdauer oder die Leistung des Akkus<br />
verringert. Wenn Sie das „C3-Ladegerät“ mit<br />
dem Stromnetz (100 – 240 V AC) verbinden,<br />
blinkt die rote Diode ununterbrochen auf und<br />
ein einziges Aufblinken in der grünen Diode<br />
erscheint, bevor sie sich wieder abschaltet.<br />
Beim Einsetzen des Akkus in das Ladegerät<br />
beginnt die grüne Diode während des<br />
Ladevorgangs im Abstand von 1 Sek. zu<br />
blinken. Sobald der Ladevorgang beendet<br />
ist, hört die grüne Diode auf zu blinken<br />
und bleibt durchgehend angeschaltet. Der<br />
Akkus ist nun vollständig geladen, kann<br />
entfernt werden und ist in der C3-Steuerung<br />
einsatzbereit. Wiederholtes Anfahren<br />
mit hoher Geschwindigkeit und starker<br />
Belastung kann ein Überhitzen im Akku<br />
hervorrufen - eine Sicherheitsverriegelung<br />
mit Temperatursensor unterbricht die<br />
Stromzufuhr. Sobald der Akku auf die<br />
akzeptierte Betriebstemperatur abgekühlt ist,<br />
schaltet sich die Stromzufuhr automatisch<br />
an.<br />
Um ein lange Lebensdauer bei Akkus des<br />
Typs NiMH sicherzustellen, wird empfohlen,<br />
den Akku mindestens alle 3 Monate<br />
aufzuladen.<br />
Signaltö ne :<br />
Langer Ton: Einschalten (Akku eingesetzt)<br />
Zwei kurze Töne: Alle 24 Sekunden (wenn<br />
das System nicht in Benutzung ist): = zeigt<br />
einen niedrigen Ladezustand an, bitte<br />
aufladen.<br />
Zwei kurze Töne: Beim Starten des<br />
Aktuators = Niederspannung, bitte den Akku<br />
demnächst austauschen, oder aufladen – der<br />
Akku gibt immer noch Strom ab, jedoch nur<br />
für einen begrenzten Zeitraum.<br />
Langer Ton: Beim Betreiben des Aktuators<br />
= Akku ist niedriger als 17.6 Volt (nur wenn<br />
außer Betrieb/in Bewegung wird er danach<br />
akzeptiert) Ununterbrochene kurze Töne:<br />
(Die Temperatur im Steuerkasten ist zu hoch,<br />
bitte eine Pause einlegen).<br />
Diese Einstellung können Sie vornehmen,<br />
während sich das Kind im Sitz befindet.<br />
Um die Höhe des Hi-Low Fahrgestells<br />
einzustellen,<br />
betätigen Sie das Fußpedal am hinteren<br />
Ende des Fahrgestells oder drücken den<br />
Up-Knopf auf dem Handapparat, falls Sie die<br />
elektrische Option haben, während Sie<br />
gleichzeitig den Schiebegriff festhalten.<br />
Sobald Sie den Fuß vom Pedal oder den<br />
Daumen vom Handapparat nehmen, stellt<br />
sich der Sitz in der gewählten Höhe ein.<br />
Aus Sicherheitsgründen kann das Pedal zur<br />
Höheneinstellung festgestellt werden, indem<br />
Sie den Zugstift (C) auf der rechten Seite<br />
des Pedals einsetzen. Um das Pedal wieder<br />
freizustellen, ziehen Sie den Stift wieder<br />
heraus und drehen ihn um 90° Grad. Das<br />
Pedal kann jetzt wieder betätigt werden.<br />
Der Sicherheitsstift (C) muss sich immer in<br />
der gesicherten Position befinden, wenn Sie<br />
keine Anpassungen vornehmen. Stecken Sie<br />
den Sicherheitsstift stets ein, wenn Sie keine
10.7 Die<br />
Neigungseinstellung<br />
10.8 Die Fußschalen<br />
Einstellungen am Fahrgestell vornehmen.<br />
Dadurch wird ein versehentliches<br />
Betätigen des Pedals verhindert.<br />
Achten Sie stets darauf, dass Ihre<br />
Finger beim Einstellen der Höhe nicht<br />
eingeklemmt werden.<br />
Die Neigungseinstellung kann vorgenommen<br />
werden, während sich der Benutzer im Sitz<br />
befindet. Bevor Sie den Neigungswinkel des<br />
Sitzes einstellen, vergewissern Sie sich stets,<br />
dass der Beckengurt sicher angebracht ist.<br />
Dadurch wird verhindert, dass der Benutzer<br />
im Sitz nach vorne rutscht.<br />
Um den Neigungswinkel einzustellen, ziehen<br />
Sie den Hebel am Schiebegriff. Sobald Sie<br />
den gewünschten Winkel gewählt haben,<br />
stellt sich der Sitz automatisch in dieser<br />
Position ein, sobald Sie den Hebel loslassen.<br />
Bitte verwenden Sie die Handgriffe, wenn<br />
Sie die Neigungseinstellung vornehmen.<br />
Beraten Sie sich stets mit Ihrem<br />
Therapeuten, ob die Neigungseinstellung<br />
keine Obstruktionen verursachen kann<br />
Falls das Kind eine Brustkorbunterstützung<br />
als Teil seines Programms zur<br />
Haltungsunterstützung benötigt, kann der<br />
Sitz mit harten Seitenpelotten oder einer<br />
Kombination aus Seitenpelotten, Brust- und<br />
Rumpfgurt ausgestattet werden. Diese<br />
müssen möglicherweise täglich angepasst<br />
werden, um sich der unterschiedlichen<br />
Kleidung anzupassen.<br />
Beraten Sie sich stets mit Ihrem<br />
Therapeuten, um die optimale<br />
Positionierung und Spannung der Gurte<br />
und Stützfunktionen bei Ihrem Kind<br />
einzustellen.<br />
Um die Weite des Brustgurts zu verändern,<br />
heben Sie die vordere Abdeckung an und<br />
stellen die Bänder mit den Klettverschlüssen<br />
auf die gewünschte Weite ein. Wenn die<br />
korrekte Weite erreicht wurde, legen Sie die<br />
Abdeckung wieder darüber.<br />
Das Einstellen des Gurtzeugs<br />
Beziehen Sie sich bitte auf Abschnitt 9.14 für<br />
die spezifischen Anweisungen, die die<br />
Anpassung des Rumpfgurtes betreffen.<br />
Vergewissern Sie sich stets, dass<br />
die Kunststoffschnallen vollständig<br />
eingerastet<br />
sind, wenn Sie den Brustgurt verwenden.<br />
Überprüfen Sie, ob der Gurt und die<br />
Seitenpelotten sicher befestigt sind, um zu<br />
gewährleisten, dass das Kind sicher sitzt<br />
und im Sitz nicht nach vorne rutschen<br />
kann. Das kann zur Beeinträchtigung<br />
seiner Atmung führen.<br />
A<br />
A
10.9 Die Fußschalen<br />
10.10 Das Einstellen<br />
des Tisches<br />
10.11 Das Einstellen<br />
der Armlehne<br />
Um die Füße des Benutzers in den<br />
Fußschalen zu positionieren, befestigen Sie<br />
die mitgelieferten Klettbänder, sodass der<br />
Fuß in Position gehalten wird. Die Bänder<br />
müssen über den Fußrücken und über die<br />
Zehen gelegt werden.<br />
Falls das Kind Sandalen oder leichtes<br />
Schuhwerk trägt, überprüfen Sie die<br />
Bänder, um sicherzustellen, dass das<br />
Gurtband die Haut nicht reizt.<br />
Der Therapietisch kann für verschiedene<br />
Funktionen eingesetzt werden. Seine Position<br />
kann fein eingestellt werden, um sich dem<br />
Benutzer und der Aktivität anzupassen,<br />
ganz gleich, ob es dabei um Spaß, Bildung<br />
oder Füttern geht. Der Tisch wird am Sitz<br />
angebracht, indem Sie die Rohre durch die<br />
Mitte einer jeden Armlehne schieben. Sobald<br />
sich der Tisch in der richtigen Position befindet,<br />
muss der Drehknopf (a) fest angezogen<br />
werden. Passen Sie die Armlehnen an, um die<br />
Höhe und den Winkel des Tisches einzustellen.<br />
Bitte beachten Sie, dass der Tisch<br />
ausschließlich für die Benutzung des<br />
Benutzers gedacht ist. Lehnen Sie sich<br />
nicht darauf und legen Sie keine schweren<br />
Gegenstände mit einem Gewicht von mehr<br />
als 8kg (17,6lb) auf den Tisch.<br />
Um die Höhe der Armlehne einzustellen,<br />
lösen Sie den Handknopf (b), stellen die<br />
gewünschte Höhe ein und drehen den Knopf<br />
wieder fest. Zum Einstellen des Winkels,<br />
drehen Sie den Handknopf (b) solange, bis<br />
die gewünschte Position erreicht wurde.<br />
Wenn die Armlehne vollständig entfernt<br />
werden muss, etwa beim seitlichen Transfer<br />
oder beim Unterstützen, ein Kind in den Sitz<br />
hinein- oder herauszuheben, lösen Sie den<br />
Handgriff (c) und entfernen den Knopf.<br />
Achten Sie stets darauf, dass Ihre Finger<br />
nicht im Schlitz eingeklemmt werden, wenn<br />
Sie die Höhe einstellen.<br />
Achten Sie stets darauf, dass die Hände<br />
und Arme des Kindes beim Einschieben des<br />
Tisches nicht eingeklemmt werden.<br />
Benutzen Sie den Tisch niemals zum<br />
Lenken oder Schieben des Stuhls.<br />
Legen Sie niemals heiße Gegenstände mit<br />
einer Temperatur von über 40 Grad Celsius<br />
auf den Tisch. Bitte beachten Sie, dass der<br />
Tisch ausschließlich für die Benutzung des<br />
Benutzers gedacht ist. Lehnen Sie sich<br />
nicht darauf und legen Sie keine schweren<br />
Gegenstände mit einem Gewicht von mehr<br />
als 8kg (17,6lb) auf den Tisch.<br />
C<br />
A<br />
A<br />
B
11 Reinigung und Pflege<br />
12 Die tägliche<br />
Überprüfung des Produkts<br />
Instandhaltung<br />
Zur Reinigung empfehlen wir das Verwenden<br />
von warmem Wasser und eines nicht<br />
scheuernden Reinigungsmittels. Benutzen<br />
Sie niemals organische Lösungsmittel oder<br />
trockene Reinigungsmittel.<br />
Polster und Stoffe<br />
Polster und Stoffe<br />
1. Die Polster und Stoffe können entfernt,<br />
maschinell bei 40 Grad gewaschen und im<br />
Trockner bei niedriger Temperatur getrocknet<br />
werden.<br />
Entfernen Sie bitte den Schaumstoff<br />
bevor Sie die folgenden Bezüge<br />
waschen:<br />
Kopfstütze<br />
Schulterstütze<br />
Rückenlehnenpolster<br />
Sitzpolster<br />
Die restlichen weichen Polster<br />
können nach Entfernen der Bolzen<br />
und Verschlüssen ganz in die<br />
Waschmaschine gelegt werden.<br />
2. Die Polster und Stoffe können an Ort<br />
und Stelle von Hand gereinigt werden. Zur<br />
Reinigung empfehlen wir nur lauwarmes<br />
Wasser und ein nicht scheuerndes<br />
Reinigungsmittel.<br />
3. Flecken müssen so schnell wie möglich<br />
mit einem aufnahmefähigen Tuch, Handtuch<br />
oder Schwamm entfernt werden. Eine übliche<br />
Seife und warmes Wasser ist bei einer<br />
gewöhnlichen Verschmutzung und leichten<br />
Flecken wirksam. Achten Sie darauf, den<br />
Stoff nicht zu nass zu machen, da dies zu<br />
einer Vergrößerung des Fleckens führt.<br />
4. Antiseptische Reinigungsmittel können für<br />
hartnäckigere Flecken benutzt werden. Diese<br />
benötigen unter Umständen ein sicheres<br />
Lösungsmittel wie Isopropylalkohol oder<br />
Mineralspiritus. Eine halbe Tasse Bleichmittel<br />
auf 5 Liter Wasser kann ebenfalls als<br />
Desinfektionsmittel benutzt werden.<br />
5. Die Becken- und Rumpfgurte sind in<br />
der Waschmaschine bei 40°C waschbar.<br />
Vergewissern Sie sich, dass alle Schrauben<br />
und Knöpfe vorher entfernt wurden, da diese<br />
Ihre Waschmaschine beschädigen können.<br />
Bewahren Sie diese an einem sicheren Ort,<br />
außerhalb der Reichweite von Kindern auf.<br />
6. Vergewissern Sie sich, dass das Produkt<br />
trocken ist, bevor es wieder benutzt wird.<br />
Teile aus Metall und Plastik<br />
1. Seife und Wasser oder ein antibakterielles<br />
Spray können zur täglichen Reinigung<br />
verwendet werden.<br />
2. Für eine tiefergehende Reinigung kann<br />
ein Dampfstrahler mit niedrigem Druck<br />
verwendet werden.<br />
3. Benutzen Sie keine Lösungsmittel, um<br />
Teile aus Metall oder Plastik zu reinigen.<br />
4. Vergewissern Sie sich, dass das Produkt<br />
trocken ist, bevor es wieder benutzt wird.<br />
(Therapeuten, Eltern & Pflegepersonal)<br />
Wir empfehlen tägliche visuelle<br />
Überprüfungen des Geräts durch den<br />
Therapeuten, das Pflegepersonal oder die<br />
Eltern, um sicherzustellen, dass das Produkt<br />
für den sicheren Gebrauch geeignet ist. Wir<br />
empfehlen die im Folgenden genannten<br />
täglichen Inspektionen.<br />
1. Überprüfen Sie, ob keine<br />
Seitwärtsbewegung oder ein Wackeln in<br />
den beweglichen Teilen stattfindet. Stellen<br />
Sie sicher, dass alle Einstellknöpfe und –<br />
schrauben sich an Ort und Stelle befinden<br />
und gesichert sind.<br />
2. Überprüfen Sie alle Polster und<br />
Klettverschlüsse auf Anzeichen von<br />
Verschleiß.<br />
3. Überprüfen Sie, ob sich alle Rollen frei<br />
bewegen und sicher feststellen lassen.<br />
4. Vergewissern Sie sich, dass der Handgriff<br />
an der Verbindungsstelle mit dem Sitz<br />
vollständig eingesetzt ist und dass sich der<br />
Sitz sicher auf dem Fahrgestell befindet.<br />
5. Vergewissern Sie sich, dass der Leeway<br />
Beckengurt vollständig um den Benutzer<br />
herum gesichert ist und dieser im Sitz nicht<br />
nach vorne rutschen kann.<br />
6. Vergewissern Sie sich, dass die Fußplatte<br />
angebracht und gesichert ist.<br />
Falls Sie irgendwelche Zweifel an<br />
der sicheren Benutzung Ihres Leckey<br />
Produkts haben oder falls irgendwelche<br />
Teile ausfallen, stellen Sie bitte die<br />
Benutzung ein und nehmen Sie<br />
schnellstmöglich Kontakt mit unserem<br />
Kundendienst oder Ihrem ortsansässigen<br />
Händler auf.
13 Die jährliche Überprüfung<br />
des Produkts<br />
14 Wiedereinsatz von<br />
Leckey Produkten<br />
(Therapeut, Techniker, Leckey<br />
Produktberater, Händler)<br />
Leckey empfiehlt, dass alle Produkte<br />
mindestens einmal im Jahr und vor jeder<br />
erneuten Herausgabe inspiziert werden.<br />
Diese Überprüfung muss von einer technisch<br />
kompetenten Person durchgeführt werden,<br />
die in der Benutzung des Produkts geschult<br />
ist, und muss zumindest die folgenden<br />
Prüfungen beinhalten.<br />
1. Überprüfen Sie, ob keine<br />
Seitwärtsbewegung oder ein Wackeln in<br />
den beweglichen Teilen stattfindet. Stellen<br />
Sie sicher, dass alle Einstellknöpfe und –<br />
schrauben sich an Ort und Stelle befinden<br />
und gesichert sind.<br />
2. Überprüfen Sie, ob alle Ratschengriffe,<br />
Knöpfe, Muttern, Schrauben und<br />
Kunststoffschnallen an ihrem Platz sind und<br />
ersetzen Sie alle fehlenden Teile. Achten Sie<br />
besonders auf die folgenden Teile:<br />
> Verschlussschrauben an der Kopfstütze.<br />
> Schrauben zur Höhen- und<br />
Winkeleinstellung der Rückenlehne.<br />
> Schrauben für die Tiefeneinstellung.<br />
> Befestigungsschrauben am Leeway<br />
Beckengurt/an der Hüftführung.<br />
> Höhen- und Winkeleinstellung<br />
der Fußstütze.<br />
3. Überprüfen Sie, ob der Mechanismus zur<br />
Höhenverstellung des Fahrgestells richtig<br />
funktioniert. Falls das Fahrgestell mit einem<br />
Fußpedal betrieben wird, vergewissern<br />
Sie sich, dass sich die Höhe nicht<br />
verändert, wenn das Pedal losgelassen<br />
wird. Überprüfen Sie außerdem, ob<br />
der Sicherheitsstift richtig passt, um<br />
versehentliche Neueinstellungen der<br />
Fahrgestell-Höhe zu verhindern.<br />
4. Stellen Sie den Sitz auf den<br />
<strong>Max</strong>imalbereich der Neigungsfunktion ein<br />
und vergewissern Sie sich, dass der<br />
Sicherheitshebel den Sitz sicher in jeder<br />
Stellung der Neigungsfunktion sichert.<br />
5. Überprüfen Sie, ob keine<br />
Verschleißerscheinungen an den Metallteilen<br />
der Verbindungsstelle zwischen Sitz und dem<br />
Fahrgestell auftreten.<br />
6. Heben Sie die Basis an und überprüfen<br />
Sie jede Rolle einzeln. Vergewissern Sie<br />
sich, dass sich die Rollen frei bewegen<br />
und entfernen Sie allen Schmutz von den<br />
Gummirädern. Überprüfen Sie, ob die<br />
Bremsen alle Räder sicher anhalten.<br />
7. Überprüfen Sie visuell die Struktur des<br />
Produkts, wobei Sie Ihre Aufmerksamkeit<br />
auf die Schweißpunkte am Rahmen richten.<br />
Stellen Sie sicher, dass keine Anzeichen von<br />
Materialermüdung oder Brüchigkeit an den<br />
Schweißstellen vorliegen.<br />
8. Leckey empfiehlt, dass Sie ein<br />
schriftliches Protokoll über alle jährlichen<br />
Produktinspektionen führen.<br />
Falls Sie irgendwelche Zweifel zum<br />
sicheren Betrieb Ihres Leckey Produkts<br />
haben oder falls irgendwelche<br />
Teile versagen, stellen Sie bitte<br />
die Benutzung ein und nehmen<br />
Sie schnellstmöglich Kontakt mit<br />
unserem Kundendienst oder Ihrem<br />
ortsansässigen Händler auf.<br />
Die meisten Leckey Produkte werden<br />
eingeschätzt und auf die Bedürfnisse des<br />
individuellen Benutzers angepasst. Bevor<br />
ein Produkt erneut herausgegeben wird,<br />
empfehlen wir, dass der Therapeut, der<br />
das Produkt verschrieben hat, einen<br />
Kompatibilitätstest des Produkts für den<br />
neuen Benutzer durchführt und sicherstellt,<br />
dass das erneut herausgegebene Produkt<br />
keinen Veränderungen oder besonderen<br />
Anbringungen unterliegt.<br />
Eine detaillierte technische Inspektion muss<br />
vor der erneuten Herausgabe durchgeführt<br />
werden. Sie muss von einer technisch<br />
kompetenten Person, die in der Benutzung<br />
und Wartung des Produkts unterwiesen<br />
wurde, durchgeführt werden. Beziehen Sie<br />
sich bitte auf Abschnitt 11 für die nötigen,<br />
auszuführenden Prüfungen. Vergewissern<br />
Sie sich, dass das Produkt im Einklang mit<br />
Abschnitt 12 dieses Handbuchs gründlich<br />
gereinigt wurde. Stellen Sie sicher, dass<br />
eine Kopie des Benutzerhandbuchs mit<br />
dem Produkt mitgeliefert wird. Eine Kopie<br />
kann von unserer Website www.leckey.com<br />
heruntergeladen werden.<br />
Leckey empfiehlt, dass Sie ein schriftliches<br />
Protokoll aller jährlich durchgeführten<br />
Wartungen führen, während der erneuten<br />
Herausgabe des Produkts.<br />
Falls Sie irgendwelche Zweifel<br />
an der sicheren Benutzung Ihres<br />
Leckey Produkts haben oder falls<br />
irgendwelche Teile versagen, stellen<br />
Sie bitte die Benutzung ein und<br />
nehmen Sie schnellstmöglich mit<br />
unserem Kundendienst oder Ihrem<br />
ortsansässigen Händler Kontakt auf.
15 Technische<br />
Informationen<br />
<strong>Mygo</strong> Sitzmaße<br />
Kodierungen des Produkts und Zubehörs<br />
161-600 <strong>Mygo</strong> <strong>Max</strong> Sitzssystem<br />
161-900-02 Sitzkissenpackung - Orange<br />
161-900-03 Sitzkissenpackung - Blau<br />
161-900-04 Sitzkissenverpackung - Pink<br />
161-900-15 Sitzkissenpackung - Grau<br />
Fahrgestell<br />
161-693 Hydraulische Hi-Low Basis<br />
161-679 Elektrische Hi-Low Basis<br />
Zubehör<br />
161-688 Armlehnen<br />
152-3600 Fußschalen<br />
161-610 Unterschenkelstützen<br />
161-689 Hochklappbare Seitenpelotten<br />
161-690 Komplexe Seitenpelotten<br />
161-691 Protraktionspolster<br />
161-692 Winkelverstellbares Sakralkissen<br />
161-608 Große Beinschilde<br />
161-967 Gepolsterter Tischbezug<br />
161-961 Sitzkissen aus Memory-Schaum<br />
161-695 Tisch<br />
147-2600 Leeway Beckengurt Größe 2<br />
147-2610 Leeway Beckengurt Größe 3<br />
155-LEC-002 Montageset für Rumpfgurt<br />
155-N001-L Großer Rumpfgurt<br />
161-696 Seitenpolster<br />
Verwendete Materialien<br />
Schalengestell: Pulverbeschichtetes und verchromtes Stahl, eloxiertes Aluminium<br />
Sitz und Rücken: Polypropylen, verchromter Stahl, Schaumstoff Dichte 50<br />
Anbauteile (Pelotten ect.): Polypropylen mit verzinkten oder verchromten Stahl;<br />
Schaumstoff Dichte 50<br />
Bezüge: 100% schwerentflammbares Polyester<br />
Verzinkte Schrauben<br />
Größe Größe 3<br />
Alter 12 - 18<br />
<strong>Max</strong>. Benutzergewicht 85<br />
Sitztiefe<br />
Sitzbreite<br />
Brustbreite<br />
Rückenhöhe<br />
Abstand Sitz bis Fußschale<br />
Plantarflexion / Dorsiflexion 10° bis 10°<br />
Min 410mm / 16.4 zoll<br />
<strong>Max</strong> 560mm / 22.4 zoll<br />
Min 345mm / 13.8 zoll<br />
<strong>Max</strong> 500mm / 120 zoll<br />
Min 170mm / 6.7 zoll<br />
<strong>Max</strong> 270mm / 10.6 zoll<br />
Min 330mm / 13.2 zoll<br />
<strong>Max</strong> 510mm / 20.4 zoll<br />
Min 330mm / 13.2 zoll<br />
<strong>Max</strong> 510mm / 20.4 zoll<br />
Rückenwinkel +10° bis -25°<br />
Windsweeping bis zu 20°<br />
Wadenwinkel -15° bis +30°<br />
Neigungsstellung +10° bis -25°<br />
Armlehne<br />
Min 360mm / 14.2 zoll<br />
<strong>Max</strong> 700mm / 27.5 zoll
Aktuator-Spezifizierung -500055+493312-<br />
020000<br />
Eingestuft IP66<br />
Arbeitszyklus <strong>Max</strong>. 10% oder 2 Min.<br />
kontinuierlicher Benutzung, gefolgt von<br />
18 Min. unbenutzt<br />
Betriebstemperatur -5°C bis +70°C,<br />
Lagerungstemperatur -40°C bis +70°C.<br />
Druck/Zug <strong>Max</strong>. 4500N<br />
Selbstsperre bei 4500N Druck/Zug Typische<br />
Geschwindigkeit bei voller Ladung 6,0 mm/<br />
Sek. <strong>Max</strong>. Amp. bei Ladung von 4500N<br />
betragent 8 Amp.<br />
Eingangsspannungsschwankungen 24 V +-<br />
10%<br />
Batteriekasten – C3BAT Eingestuft IP51<br />
Typ: NiMH<br />
Spannungsversorgung: 24 V DC<br />
<strong>Max</strong>imum kontinuierlicher Strom: 7A (Kurzzeit-<br />
Spitzenstrom 10-20 A)<br />
Kapazität: 1400 mAh<br />
Warnanzeige bei niedriger Kapazität: Signalton<br />
Handapparat – C3REMOX einschl. Folie<br />
Eingestuft IP51<br />
Steuerung der Umgebungstemp. +5° bis +40°C<br />
Ladegerät – C3CHAR<br />
Spannungsversorgung: 110-240 V AC<br />
Ladevorgang: 5-8 Stunden<br />
Netzstecker: Europäischer/UK/US Typ<br />
Batteriewechsel: Einfacher Drehverschluss<br />
Ladesignal: Blinkendes grünes Licht<br />
Signal bei voller Leistung: Grünes Dauerlicht<br />
Die Produkte sollten in unbeheizten<br />
Speicheranlagen aufbewahrt werden, mit<br />
einer Luftfeuchtigkeit zwischen 0 und 100%,<br />
nicht kondensierend. Nicht kondensierend<br />
bedeutet, dass man ein Produkt nicht aus einem<br />
eiskalten Lager in einen Raum stellt, in dem eine<br />
Temperatur von 20°C beträgt. Falls dies getan<br />
wird, tritt Feuchtigkeit auf den Produkten auf.<br />
<strong>Mygo</strong> <strong>Max</strong> er utviklet for å gi optimal<br />
posisjonering og samtidig gi barnet<br />
mulighet til å bevege seg rundt og<br />
fungere i hverdagen. Denne håndboken<br />
viser deg hvordan du på en rask, enkel<br />
og sikker måte kan benytte deg av alle<br />
funksjonene. Instruksjonene vedrørende<br />
sikkerhet og vedlikehold sikrer at du får<br />
fullt utbytte av produktet i lang tid.<br />
Innhold<br />
01 Bruksområde<br />
02 Samsvarserklæring<br />
03 Garantivilkår<br />
04 Produkthistorie<br />
05 Produktopplæring<br />
06 Sikkerhetsinformasjon<br />
07 Pakke ut og montere produktet<br />
08 Montere polstringen<br />
09 Klinisk tilpasning for posisjonering<br />
10 Vanlige justeringer ved daglig bruk<br />
11 Rengjøring og vedlikehold<br />
12 Daglig inspeksjon av produktet<br />
13 Årlig inspeksjon av produktet<br />
14 Gjenbruk av Leckey-produkter<br />
15 Service<br />
16 Teknisk informasjon<br />
17 Tilbehør
6 Sikkerhetsinformasjon<br />
1. Bruksområde<br />
<strong>Mygo</strong> <strong>Max</strong> er en aktivitetsstol som er<br />
utviklet for barn og unge voksne med<br />
funksjonshemminger, for bruk i hjemmet<br />
eller på skolen. Den er egnet for personer<br />
i alderen 12–18 år. Personen som bruker<br />
sittesystemet, må ikke veie mer enn 85<br />
kg. Sittesystemet er modulbasert og kan<br />
brukes med understell for innendørs eller<br />
utendørs bruk. Hi-Low-understellet er<br />
utviklet for innendørs bruk, men kan også<br />
brukes utendørs på flatt underlag. Hi-Lowunderstellet<br />
må aldri utsettes for vær og<br />
vind, ettersom dette kan føre til korrosjon<br />
på metallkomponentene.<br />
2. Samsvarserklæring<br />
Som produsent med eneansvar<br />
erklærer James Leckey Design Ltd at<br />
<strong>Mygo</strong> <strong>Max</strong> samsvarer med kravene i<br />
retningslinjene i 93/42/EØF, Medical<br />
Device Regulations 2002 og EN12182-<br />
standarden om tekniske hjelpemidler for<br />
funksjonshemmede og prøvingsmetoder.<br />
3. Garantivilkår<br />
Garantien er kun gyldig når produktet<br />
brukes i henhold til spesifiserte forhold<br />
og bruksområder, og i henhold til<br />
produsentens anbefalinger (se også de<br />
generelle vilkårene for salg, levering og<br />
betaling). Alle produkter og komponenter<br />
produsert av Leckey har to års garanti.<br />
4. Produkthistorie<br />
Dette Leckey-produktet er klassifisert som<br />
medisinsk utstyr av klasse 1 og skal derfor<br />
kun foreskrives, tilpasses og overføres<br />
til en ny bruker av en teknisk kompetent<br />
person som har fått opplæring i bruk av<br />
dette produktet. Leckey anbefaler at det<br />
føres en skriftlig logg for dette produktet,<br />
med informasjon om alle tilpasninger,<br />
årlige inspeksjoner og inspeksjoner i<br />
forbindelse med overføring til ny bruker.<br />
5. Produktopplæring (foreldre,<br />
lærere og omsorgspersoner)<br />
Dette Leckey-produktet er klassifisert som<br />
medisinsk utstyr av klasse 1, og Leckey<br />
anbefaler derfor at foreldre, lærere og<br />
omsorgspersoner som benytter utstyret,<br />
blir gjort oppmerksom på følgende avsnitt<br />
i denne brukerhåndboken av en teknisk<br />
kompetent person:<br />
Avsnitt 6<br />
Sikkerhetsinformasjon<br />
Avsnitt 11<br />
Vanlige justeringer ved daglig bruk<br />
Avsnitt 12<br />
Rengjøring og vedlikehold<br />
Avsnitt 13<br />
Daglig inspeksjon av produktet<br />
Leckey anbefaler at det føres en skriftlig<br />
logg over alle som har fått opplæring i<br />
riktig bruk av dette produktet.<br />
6.1 Sørg alltid for å lese alle<br />
instruksjonene før bruk.<br />
6.2 Med tanke på sikkerheten bør<br />
brukeren aldri forlates uten tilsyn ved<br />
bruk av Leckey-produktet.<br />
6.3 Bruk kun Leckey-godkjente<br />
komponenter med produktet. Produktet<br />
må aldri modifiseres på noen måte. Hvis<br />
instruksjonene ikke følges, kan brukeren<br />
eller omsorgspersonen bli utsatt for<br />
risiko, og produktets garanti blir gjort<br />
ugyldig.<br />
6.4 Hvis det er noen som helst tvil om<br />
at produktet er trygt å bruke, eller hvis<br />
en eller flere deler svikter, skal all bruk<br />
av produktet opphøre. Ta kontakt med<br />
kundeserviceavdelingen vår eller den<br />
lokale forhandleren så snart som mulig.<br />
6.5 Foreta alle justeringer og forsikre<br />
deg om at alt er godt festet før du<br />
plasserer brukeren i produktet.<br />
Noen justeringer må gjøres med et<br />
verktøy, og dette leveres sammen med<br />
produktet. Hold alt verktøy utenfor barns<br />
rekkevidde.<br />
6.6 Når brukeren plasseres i et<br />
sittesystem, må du alltid feste<br />
bekkenselen først, både med tanke på<br />
posisjoneringen og sikkerheten.<br />
6.7 Når produktet står stille, må<br />
du sørge for at alle hjulene er låst<br />
og vender bort fra basen, for at<br />
stabiliteten skal blir best mulig. Dette<br />
er spesielt viktig når tiltfunksjonen eller<br />
ryggreguleringen brukes.<br />
6.8 Når setet er i bruk på et Hi-Lowunderstell,<br />
må du sørge for at<br />
høydejusteringspedalen og tiltspaken er<br />
låst og ikke kan justeres ved et uhell av<br />
andre barn.<br />
6.9 Når Leckey-sittesystemet brukes på<br />
et Hi-Low-understell, anbefaler vi ikke<br />
at brukeren forflyttes på ujevnt underlag<br />
mens vedkommende sitter i setet.<br />
Ta alle nødvendige forholdsregler når<br />
brukeren forflyttes inn i og ut av setet.<br />
6.10 Forlat aldri produktet på et underlag<br />
som heller mer enn 5 grader.<br />
Husk alltid å låse alle hjulene.<br />
6.11 Bruk kun kjørehåndtaket til å styre<br />
og flytte setet fra ett område til et annet.<br />
Bruk aldri bordet til dette formålet.<br />
6.12 Produktet inneholder komponenter<br />
som kan utgjøre en kvelningsfare for små<br />
barn. Sørg for at knotter og skruer som<br />
befinner seg innenfor barns rekkevidde,<br />
alltid er strammet godt til.<br />
6.13 Leckey-produktene samsvarer<br />
med brannsikkerhetsbestemmelsene i<br />
EN12182. Produktet inneholder imidlertid<br />
plastkomponenter, og det bør derfor<br />
holdes unna direkte varmekilder som<br />
åpne flammer, sigaretter og gassovner.<br />
6.14 Plasser ikke gjenstander som er<br />
varmere enn 40 °C, på bordet. Når bordet<br />
er i bruk på et Hi-Low-understell, må du<br />
sørge for at høydejusteringspedalen og<br />
tiltspaken er låst og ikke kan justeres ved<br />
et uhell av andre barn.
6.15 Clean the product regularly. Do<br />
not use abrasive cleaners. Carry out<br />
maintenence checks on a regular<br />
basis to ensure your product is in good<br />
working condition.<br />
6.16 The product is designed for<br />
indoor use and when not in use should<br />
be stored in a dry place that is not<br />
subjected to extremes of temperature.<br />
The safe operating temperature range<br />
of the product is +5 to +40 deg Celsius.<br />
6.17 Always check the plastic hand<br />
knobs on the push handle are tightened<br />
securely before you move the seat unit.<br />
How to<br />
unpack and<br />
assemble<br />
the seating<br />
system<br />
6.18 Before using the seating system<br />
always check that the interface handle<br />
on the seat unit is fully engaged<br />
with the chassis. If the handle is not<br />
engaged properly the seat unit may<br />
come loose and could cause serious<br />
injury to the child or carer.<br />
7
7.1 Setting the<br />
footrests<br />
7.2 Attaching the<br />
seating system to the<br />
Hi-low chassis<br />
Check parts<br />
Congratulations on purchasing your<br />
<strong>Mygo</strong> <strong>Max</strong> System. All of the parts will be<br />
contained in polythene bags with each one<br />
clearly labelled. Carefully remove them from<br />
the boxes and check all the parts you have<br />
ordered.<br />
Keep polythene bags away from<br />
children.<br />
Some of the accessories will need to be<br />
assembled before you attach the seat to the<br />
base you have purchased.<br />
Multi-tool<br />
A number of adjustments will require the use<br />
of the multi-tool, which is supplied with each<br />
seat and can be found in the back pocket of<br />
the seat.<br />
Open up the angle of the leg supports by<br />
unscrewing the knobs (A), shown, and set to<br />
the maximum width. Open the socket caps<br />
(B) and slide in the calf supports. Set to the<br />
desired position, with the footplates facing<br />
forward and retighten the socket cap bolts<br />
with the multi-tool.<br />
Always make sure the foot plate is<br />
attached firmly.<br />
Adjust the height of the chassis to its<br />
maximum to reduce risk of back strain while<br />
attaching the seat unit. Refer to Section 11<br />
on how to adjust the height of the chassis<br />
you have purchased.<br />
First release the safety locking pin at the<br />
front of the seat. To do this pull the pin out<br />
and rotate through 90 degrees. Carefully lift<br />
the seat and place it into the chassis. At the<br />
rear of the underside of the seat you will see<br />
a receiving channel. Place this securely over<br />
the tube towards the back of the chassis.<br />
Pull the handle at the front of the seat unit up<br />
and then pivot the seat forward and down.<br />
A<br />
B
7.3 Attaching the<br />
push handle<br />
7.4 Attaching the<br />
headrest<br />
7.5 Attaching the<br />
lateral supports<br />
Once the front of the seat is lowered fully,<br />
release the handle and push it forward to<br />
ensure it has fully engaged on the front tube.<br />
Rotate the safety locking pin so it engages in<br />
front of the handle. If it hits the handle then<br />
the seat is not inserted properly. Remove<br />
and repeat process outlined above.<br />
Always check the handle and locking<br />
pin are fully engaged before you place<br />
the child in the seating system. If the<br />
handle is not engaged properly the seat<br />
unit can come loose and could cause<br />
serious injury to the child or carer.<br />
The push handle is attached to the seatbase<br />
by inserting the two lower stems into the<br />
receiving tubes as shown. Secure the handle<br />
in place by tightening the locking knobs (a).<br />
Check these regularly to make sure the<br />
knobs are tight, particularly if you are<br />
moving the product unit along corridors<br />
that may have uneven or sloping<br />
surfaces.<br />
To attach the head support slide the stem<br />
into the receiving bracket. Set to the desired<br />
position and secure using the hand lever (a).<br />
While holding the components together,<br />
remove the screw and washer. Align the<br />
plastic angle adjuster mouldings and lateral<br />
bracket with the slot in the backrest and refit<br />
the washer and plastic screw.<br />
A
7.6 Attaching the<br />
Leeway Pelvic Cradle<br />
7.7 Attaching the sandals 7.8 Attaching the<br />
armrests<br />
7.9 Attaching the Tray<br />
Fasten the front buckle and side.Velcro tabs<br />
of the Leeway Pelvic Cradle. Attach the four<br />
side release buckles (a), two at the back of<br />
the seatbase and two at the side.<br />
If sandals are required they can be attached<br />
to the footplates with a single fixing bolt.<br />
To position the sandals simply loosen the<br />
knob (a) under the footplate, select the<br />
position you require and re-fasten the knob.<br />
Slide the armrest into the receiving bracket.<br />
Adjust to the required height and retighten<br />
the knob.<br />
The tray is attached to the seat by inserting<br />
the tray tubes through the centre of each<br />
armrest. Once the tray is located in the<br />
position the knob (a) should be tightened<br />
securely.<br />
A<br />
A<br />
A
7.10 Attaching the<br />
Hip Laterals<br />
7.11 Attaching the<br />
ankle huggers<br />
7.12 Attaching the<br />
protraction pads<br />
To attach the hip laterals to the sacral<br />
support, loosen screw (a) and insert the bar<br />
of the hip lateral into the hole on the side<br />
of the sacral support. Tighten the screw to<br />
secure.<br />
Slide the webbing through the slot in the<br />
sandal. Loop the webbing back up and<br />
through the bottom of the triglide. Then pass<br />
the webbing through the top of the triglide.<br />
Finally to lock the webbing in place, pass it<br />
through the bottom of the triglide again.<br />
Trim strap to required length.<br />
To attach the protraction pads, remove<br />
screw (a) from metal bracket on the standard<br />
lateral. Place the protraction pad on top of<br />
the bracket and replace with the new longer<br />
screws which are included. Retighten using<br />
the allen key. Attach to the seat as per 7.5.<br />
1<br />
3<br />
A<br />
A<br />
2<br />
4
Fitting<br />
the<br />
cushions<br />
8.1 Femoral cushions 8.2 Seat base cushion<br />
Slide a femoral cushion onto each of the<br />
femoral supports and secure them by<br />
pressing down on the poppers on either side.<br />
The seat base cushion can be attached by<br />
simply setting it in place and securing the<br />
two popper tabs (a) at the back of the seat<br />
base. To secure further hook the elastic tabs<br />
to the hooks (b) underneath the seat base.<br />
Always check the seat base cushion is<br />
secure before placing the child in the seat.<br />
A<br />
8<br />
B
8.3 Backrest Cushion 8.4 Leeway Pelvic Cradle<br />
8.5 Sacral Cushion 8.6 Hip Laterals<br />
First of all loosen the shoulder support<br />
laterals with the allen key provided. Slide the<br />
cushion over the laterals and secure using<br />
the two snap fasteners. Slide the flaps over<br />
the top of the backrest and underneath the<br />
bottom of the backrest and secure with the<br />
snap fasteners.<br />
Fasten the Leeway Pelvic Cradle and place<br />
on the seat base cushion. Press Velcro onto<br />
the seat base cushion and attach four straps<br />
(a) to secure. There are two camlocks at the<br />
back of the seat and one on either side.<br />
Fit the sacral cushion over the hardware and<br />
fasten at the back with the snap fasteners.<br />
The standard sacral support should be<br />
attached with the double flaps at the top.<br />
Slide the cushion covers over the hip lateral<br />
with the open zip on the outside. Close the<br />
zip and secure the Velcro flap.
8.7 Trunk Harness 8.8 Lateral Supports<br />
8.9 Chest Harness 8.10 Headrest cushion<br />
Slide each of the four straps (b) through<br />
each of the camlock brackets and secure<br />
by pushing down on the camlocks. Then<br />
connect the shoulder straps (c) into the two<br />
camlocks at the top and two at the side.<br />
Slide the cushion covers over the lateral<br />
support with the open zip on the outside.<br />
Feed the plastic buckle through the slot<br />
in the cover, close the zip and secure the<br />
Velcro flap.<br />
The chest harness can be attached by<br />
clipping the male buckle (a) into the female<br />
buckle (b) at either side of the lateral<br />
supports.<br />
Place the cushion onto the head support.<br />
Snap the central fastener and two side<br />
fasteners in place. Bring the lower flap under<br />
the head support and attach the Velcro.<br />
B<br />
A<br />
B<br />
C
8.11 Padded Tray Insert<br />
Slide the tray into the padded tray insert and<br />
secure the six snap fasteners. Two at the<br />
top, two at the bottom and two at the sides.<br />
Clinical<br />
Setup for<br />
Postural<br />
Management<br />
9
9.1 Leeway Pelvic Cradle<br />
9.2 Hip Lateral<br />
The Leeway Pelvic Cradle should be flat<br />
and open when the user is placed into the<br />
<strong>Mygo</strong> <strong>Max</strong>. All four side and starps should be<br />
already attached to the seat. First fasten the<br />
buckle (a) at the front of the Leeway Pelvic<br />
Cradle. Then fasten the Velcro (b) at the<br />
sides to fit the Leeway Pelvic Cradle to the<br />
user. Then adjust the front and rear straps<br />
(c) and (d) to secure to position the user’s<br />
pelvis.<br />
The hip laterals can be width and angle<br />
adjusted to suit the user’s requirements.<br />
Loosen the screws (a) at the back of the<br />
sacral support. Move the hip laterals to<br />
required position. Ideally the hip laterals<br />
should always be rotated so they rest on<br />
top of the seat cushion even if the backrest<br />
or sacral support is angled. Once the hip<br />
laterals are in position, retighten the screws<br />
securely. The laterals can also be angled<br />
to help support, abduction adduction or<br />
windsweeping.<br />
To adjust the angle of the hip laterals loosen<br />
the screw (b) on the hinge of the hip lateral.<br />
Adjust to the required angle and retighten<br />
the screw. The pads can also be adjusted<br />
in depth and a small degree of rotation by<br />
loosening the screws (c) on the pad, sliding<br />
it to the required position and retighten the<br />
screws.<br />
A<br />
B<br />
C<br />
B<br />
C<br />
A<br />
D
9.3 Backrest Height 9.4 Backrest Angle 9.5 Adjusting the upper 9.6 Adjusting the<br />
leg supports<br />
femoral guides<br />
To adjust the overall height of the backrest<br />
loosen the two screws in the middle of the<br />
backrest, adjust to the required position and<br />
retighten securely. The height can be fine<br />
tuned with the user in the seat.<br />
Use caution when adjusting to minimum<br />
setting as fingers could become trapped<br />
between moving and static parts.<br />
To change the angle loosen the screw at the<br />
bottom of the backrest spine, adjust to the<br />
required position and retighten the screw<br />
securely.<br />
The backrest angle can be adjusted with the<br />
user in the seat. The backrest spine has a<br />
useful angle indicator designed to indicate<br />
the preferred position or back angle for<br />
different activities.<br />
Hold the backrest spine with one hand<br />
while you adjust the back angle.<br />
The upper leg supports will be set at the<br />
minimum position on arrival. Set the depth<br />
before placing the child in the seat. Fine<br />
adjustment is possible afterwards but is<br />
restricted by the user’s weight. To achieve<br />
the correct position measure the length from<br />
the child’s lower back to the back of their<br />
knee.<br />
Adjust the supports to the desired position<br />
using the two knobs underneath the seat<br />
base. To adjust, loosen the knobs, slide to<br />
the desired position and retighten. Keep the<br />
supports pointing straight forward at this<br />
time unless wind sweeping or adduction,<br />
abduction must be accommodated, in which<br />
case set the angle accordingly using the<br />
knobs again.<br />
To adjust the width of the femoral guides.<br />
Loosen the screws (a) and position as<br />
required. Retighten the screws. There are<br />
two screws per femoral guide.<br />
A
9.7 Footsupport Height 9.8 Calf Support 9.9 Foot Support Angle 9.10 Sandals<br />
To raise or lower the height of the<br />
footsupport, loosen screw (a) adjust to the<br />
required position and retighten the screw<br />
securely. The foot support has a useful<br />
height indicator designed to indicate the<br />
preferred position,<br />
To adjust the calf support angle, loosen the<br />
screw (b) at the top of the calf support, move<br />
front or back to the required angle, then<br />
retighten the screw.<br />
To set the angle to accommodate<br />
plantarflexion or dorsiflexion, simply loosen<br />
or tighten the screw (a) to select the angle<br />
you require.<br />
The foot supports can simply flip up to aid<br />
transfer.<br />
To position the sandals simply loosen the<br />
knob (a) under the footplate, select the<br />
position you require and re-fasten the knob.<br />
To position the user’s feet in the sandals<br />
secure the Velcro ankle and toe straps<br />
provided.<br />
B<br />
A<br />
A<br />
A
9.11 Adjusting the<br />
Sacral Support<br />
9.12 Lateral Supports<br />
Standard Sacral Support<br />
To adjust the height, depth or angle of the<br />
standard sacral support, loosen the two<br />
screws (a) on either side of the bracket,<br />
move to the required position and retighten<br />
the screws.<br />
Ball & Socket Sacral Support<br />
To adjust the height or depth of the ball &<br />
socket sacral support, loosen each screw<br />
(a) on either side of the bracket, move to the<br />
required position and retighten the screws.<br />
To adjust the angle, loosen both the screws<br />
(b) on the ball and socket joint. Position the<br />
support at the required angle and retighten<br />
the screws.<br />
Standard laterals<br />
Loosen the bolts (a) to adjust the width,<br />
height and angle of the lateral supports<br />
and retighten when you have achieved the<br />
desired position.<br />
Flipaway laterals<br />
Adjust width, height and angle as above. The<br />
laterals can be flipaway by pulling pin (b).<br />
Complex laterals<br />
The complex laterals can be used in<br />
whatever combination is most suited to the<br />
user’s requirements. To adjust the height<br />
width and angle of these laterals, loosen bolt<br />
(a) and retighten when you have achieved the<br />
desired position.<br />
The complex laterals can also be angled to<br />
allow the pad to contour to the user’s shape.<br />
To adjust loosen the bolt (a) at the centre<br />
of the pad, angle the pad to the required<br />
position and retighten the bolt. The laterals<br />
can be flipaway by pulling pin as per the<br />
flipaway laterals. The lateral supports have<br />
a useful height indicator.<br />
A<br />
A<br />
A<br />
A<br />
B<br />
B
9.13 Chest Harness 9.14 Trunk Harness<br />
9.15 Shoulder Support 9.16 Head support<br />
To change the width of the chest harness, lift<br />
the front cover, adjust the Velcro straps to<br />
the desired width and replace the cover.<br />
The trunk harness will be open but remain<br />
attached by the clip (a). When placing the<br />
child in the seating system bring the trunk<br />
harness across the front and attach by<br />
connecting the clip into the buckles on the<br />
other side (b). All of the connecting straps<br />
are adjustable by releasing the camlock,<br />
adjusting to the desired position and then<br />
securing the camlock.<br />
To adjust the angle of the shoulder support<br />
laterals, loosen screw, move laterals to<br />
required angle and retighten.<br />
To adjust the height, depth and angle of the<br />
contoured headrest, loosen the hand knobs<br />
(A) and when set to the desired position<br />
retighten the knobs. Do not remove the<br />
headrest while the user is in the seat.<br />
Never use the headrest to force the position<br />
of the user’s head. Always use caution to<br />
ensure fingers do not become trapped when<br />
adjusting the headrest<br />
A<br />
B<br />
A
9.17 Armrest adjustment 9.18 Tray Adjustment<br />
To adjust the height of the armrest loosen<br />
the hand knob (b), set to the desired height<br />
and retighten. To adjust the angle, rotate<br />
ratchet handle (a) until the desired position<br />
has been achieved.<br />
Always use caution as fingers could become<br />
trapped in the slot when adjusting the height.<br />
The height and angle of the tray are set by<br />
adjusting the armrests as detailed above. To<br />
remove or adjust the depth of the tray loosen<br />
the knobs (a) under the armrest, set to the<br />
desired position and re-tighten securely.<br />
Always use caution to ensure the child’s<br />
hands or arms do not become trapped<br />
when inserting the tray.<br />
Never use the tray to steer or push the<br />
chair.<br />
Do not place objects, hotter than 40<br />
degrees Celsius on the tray.<br />
Frequent<br />
adjustment<br />
for daily use<br />
(therapists/<br />
carers/parents)<br />
Please note that the tray is for the use of<br />
the user only. Do not lean or place objects<br />
on the tray, greater than 8kgs (17.6lbs).<br />
B<br />
A<br />
A<br />
Parents and carers should be<br />
shown how to make frequent<br />
adjustments and be made aware<br />
of the safety checks in Section<br />
6 by a technically and clinically<br />
competent person who has been<br />
trained in the use of the product.<br />
Leckey recommend that a written<br />
record is maintained<br />
10<br />
of all parent<br />
and carers who have been trained<br />
in the use of this product.
10.1 Transferring your<br />
child into and out of the<br />
seat<br />
10.2 Adjusting the<br />
Leeway Pelvic Cradle<br />
10.3 Chassis<br />
Before transferring the child into the seat<br />
carry out the daily product inspection as<br />
outlined in section 13 of this user manual.<br />
Adjust the seat to a comfortable height<br />
to facilitate transfer. Lock all the castors,<br />
ensuring that they are facing outwards<br />
to maximise product stability. Make sure<br />
the safety buckle on the chest harness is<br />
released and is out of the way to facilitate<br />
transfer.<br />
If the seat has flip-away thoracic laterals,<br />
first move these out of the way using knob<br />
a. Unclip the Leeway Pelvic Cradle in the<br />
middle, undo the side velcro of the Leeway<br />
Pelvic Cradle and allow the harness to open<br />
out to facilitate transfer. Lastly if sandals are<br />
fitted open the straps. You are now ready to<br />
transfer or hoist the child into the seat. The<br />
Leeway Pelvic Cradle is fastened using the<br />
middle buckle, and side velcro.<br />
The correct positioning and tensioning<br />
of the Leeway Pelvic Cradle is key to a<br />
child’s postural management, affecting their<br />
comfort and ability to carry out activities.<br />
Please consult with your therapist to ensure<br />
the Leeway Pelvic Cradle is positioned<br />
correctly and that the straps are tensioned<br />
appropriately.<br />
To tension the Leeway Pelvic Cradle use the<br />
4 side straps (c) and the velcro tabs (d).<br />
If using the seat outdoors and your child is<br />
wearing a coat, position the Leeway Pelvic<br />
Cradle under the coat.<br />
The <strong>Mygo</strong> <strong>Max</strong> is designed to fit onto a<br />
range of chassis. This user manual shows<br />
the correct and safe use of the seating<br />
system with the Leckey Hi-low chassis. For<br />
all other chassis or bases please refer to the<br />
manufacturer’s handbook.<br />
To prepare the Hi-low chassis for the seating<br />
system we recommend that you raise the<br />
chassis to a comfortable working height<br />
by pressing the foot lever at the rear of the<br />
chassis or by pressing the up button on the<br />
handset of the powered option.<br />
Always secure the Leeway Pelvic Cradle<br />
first before fastening other buckles or<br />
harnesses. Adjust the harness so the child<br />
cannot slide or creep forward in the seat.<br />
C<br />
C<br />
D
10.4 Powered height<br />
adjustment<br />
10.5 Charging the<br />
battery<br />
10.6 Height Adjustment<br />
– Hi-low Chassis<br />
The powered chassis can be easily adjusted<br />
with the push button control handset. The<br />
seat can be height adjusted with the client<br />
in the chair. When one of the buttons on<br />
the handset is pressed, then the seat will<br />
move up or down in that direction until the<br />
button is released again, or if the actuator<br />
has reached the end of its stroke.The system<br />
is started by inserting the battery into the<br />
circular holder in the end of the control<br />
box. Clean the magnetic poles for all dirt<br />
or metal chips before inserting. The battery<br />
will magnetically hold itself in place with the<br />
correct position , and a confirming long beep<br />
is heard.<br />
The control box checks the battery level<br />
every 24 seconds, and when the battery<br />
reaches a low limit, then the control box will<br />
give a double-beep every 24 seconds to<br />
indicate that the battery needs recharging.<br />
This is done in the ”C3-charger”, full<br />
re-charging takes 5-8 hours, depending<br />
on state of charge. To remove the battery,<br />
turn it 90 degrees (right- or left) to release it<br />
from the magnets . The battery (NiMH-type)<br />
can be recharged from any state of charge<br />
without reducing battery life or batterycapacity.<br />
When connecting the ”C3-charger” to the<br />
mains (100 – 240 V AC), the red diode lights<br />
up continuously and a single flash in the<br />
green diode appear before it turns off again.<br />
When inserting the battery into the charger,<br />
the green diode starts flashing with an<br />
interval of 1/sec during the charging process.<br />
When charging is finishing, the green diode<br />
stops flashing and turns on continuously, the<br />
battery is fully charged, can be removed and<br />
is ready for use in the C3 controller.<br />
Repeated runs at a high rate with heavy<br />
loads, may create overheating inside the<br />
battery – a safety interlock-temperature<br />
sensor will disconnect the power. When<br />
the battery has cooled down to accepted<br />
working temperature the power switch on<br />
automatically.<br />
To secure long lifetime of NiMH batteries, it<br />
is recommended to recharge the battery at<br />
least every 3 months.<br />
Beep signals:<br />
Long beep: Power on (battery inserted)<br />
Two short beeps: Every 24 seconds (when<br />
the system is not in use): = indicating low<br />
battery level, please recharge.<br />
Two short beeps: When starting the actuator<br />
= low voltage, please change battery soon,<br />
or recharge—the battery will still give power,<br />
but only limited time.<br />
Long beep: When running the actuator =<br />
battery lower than 17,6Volt (only down/in<br />
movement will be accepted thereafter)<br />
Continuous short beeps: (Temperature inside<br />
control box too high, please take a break)<br />
You can carry out this adjustment with the<br />
child in the chair. To adjust the height of the<br />
Hi-low chassis press the foot lever at the rear<br />
of the chassis or press the up button on the<br />
handset of the powered option whilst holding<br />
the push handle. Once you remove your<br />
foot from the pedal or your thumb from the<br />
handset the seat will be fixed at the chosen<br />
height.<br />
For safety the height adjustment pedal on<br />
the chassis can be locked by engaging the<br />
pull pin (C) on the right hand side of the<br />
pedal. To unlock pull the pin out and rotate<br />
90 degrees, the pedal can then be operated.<br />
The locking pin (C) should be kept in the<br />
locked position when you are not adjusting<br />
the chassis.
10.7 Tilt in space<br />
10.8 Chest and Trunk<br />
Harness Adjustment<br />
Always keep the locking pin engaged<br />
when you are not adjusting the chassis.<br />
This will prevent the foot pedal being<br />
operated accidentally.<br />
Always use caution as hands could<br />
become trapped when height adjusting<br />
the base.<br />
The tilt in space can be angled while the<br />
user is in the seat. Before you adjust the tilt<br />
in space angle of the seat always ensure the<br />
pelvic harness is secured preventing the user<br />
from sliding forward in the seat.<br />
To adjust the tilt angle pull the lever on<br />
the push handle. Once you have selected<br />
the angle you require, by simply removing<br />
your hand from the handle, the chair will be<br />
locked in position.<br />
Please use handle bars when operating tilt<br />
in space.<br />
Always check with your therapist that<br />
the use of tilt in space will not cause any<br />
obstructions<br />
If the child requires chest support as part<br />
of their postural support programme the<br />
seat will be fitted with rigid laterals or a<br />
combination of laterals, chest harness<br />
and trunk harness. These may need to be<br />
adjusted on a daily basis to accommodate<br />
differences in clothing.<br />
Always check with your therapist as to the<br />
optimum positioning and tensioning of the<br />
straps and support items for the child.<br />
To change the width of the chest harness, lift<br />
the front cover, adjust the Velcro straps and<br />
set to the desired width. When the correct<br />
width has been achieved replace the cover.<br />
Please refer to section 9.14 for specific<br />
guidance on adjusting the trunk harness.<br />
Always make sure the plastic buckles<br />
are fully engaged when using the chest<br />
harness.<br />
Check the harness and laterals are secure<br />
to ensure the child is safe and cannot<br />
slide forward in the seat as this may<br />
restrict their breathing.<br />
A<br />
A
10.9 Sandals<br />
10.10 Tray Adjustment<br />
10.11 Armrest<br />
adjustment<br />
To position the user’s feet in the sandals<br />
secure the Velcro straps provided so the foot<br />
is held in place. The straps should be placed<br />
over the bridge of the foot and over the toes.<br />
If the child is wearing sandals or light<br />
footwear check the straps to make sure<br />
the webbing does not irritate the skin.<br />
The activity tray can be used for a range of<br />
functions and its position can be fine tuned<br />
to suit the user and the activity whether it<br />
is for fun, education or feeding. The tray is<br />
attached to the seat by inserting the tray<br />
tubes through the centre of each armrest.<br />
Once the tray is located in the position the<br />
knob (a) should be tightened securely.<br />
Adjust the armrests to set the height and<br />
angle of the tray.<br />
To adjust the height of the armrest loosen<br />
the hand knob (b) set to the desired height<br />
and retighten. To adjust the angle rotate<br />
hand knob (a) until the desired position has<br />
been achieved.<br />
To remove the armrest completely for side<br />
transfer or assist in getting the child into or<br />
out of the seat loosen hand knob (c), and<br />
remove knob.<br />
Always use caution as fingers could<br />
become trapped in the slot when adjusting<br />
the height.<br />
Always use caution to ensure the child’s<br />
hands or arms do not become trapped<br />
when inserting the tray.<br />
Never use the tray to steer or push the<br />
chair.<br />
Do not place hot objects, greater than 40<br />
degrees Celsius on the tray.<br />
Please note that the tray is for the use of<br />
the user only. Do not lean or place heavy<br />
objects on the tray, not greater than 8kgs<br />
(17.6lbs).<br />
C<br />
A<br />
A<br />
B
11 Cleaning & Care<br />
12 Daily Product<br />
Inspection<br />
How to Maintain<br />
When cleaning we recommend that you use<br />
only warm water and a non-abrasive<br />
detergent. Never use organic solvents or dry<br />
cleaning fluids.<br />
Upholstery and fabrics<br />
1. The cushion covers can be removed,<br />
machine washed at 40ºC and tumble dried at<br />
a low temperature.<br />
All other soft upholstery can be placed into<br />
the washing machine intact, after removing<br />
bolts and fastenings.<br />
2. The upholstery and fabrics can also be<br />
cleaned by hand whilst in place. When<br />
cleaning we recommend that you use only<br />
warm water and a non-abrasive detergent.<br />
3. Staining should be removed as quickly<br />
as possible with absorbent cloth, towels or<br />
a sponge. Routine soap and warm water<br />
sponging is effective for ordinary soiling<br />
and minor spills. Be careful not to over wet<br />
the fabric as this will cause the stainingto<br />
spread.<br />
4. Antiseptic cleaning agents can be used<br />
on more stubborn stains. These may require<br />
a safe solvent such as Isopropyl Alcohol or<br />
Mineral Spirit. A half cup of household bleach<br />
to 5 litres of water can also be used as a<br />
useful disinfectant.<br />
5. The Leeway Pelvic Cradle and trunk<br />
harnesses can be machine washed at 40<br />
Deg C. Make sure all bolts and fasteners are<br />
removed first as they may cause damage to<br />
your washing machine. Store these in a safe<br />
place and out of reach from children.<br />
6. Always ensure the product is dry before<br />
use.<br />
Metal and plastic components<br />
1. Soap and water or antibacterial spray can<br />
be used for daily cleaning.<br />
2. For deep cleaning a low pressure steam<br />
cleaner can be used.<br />
3. Do not use solvents to clean plastic or<br />
metal components.<br />
4. Make sure the product is dry before use.<br />
(Therapists, parents & carers)<br />
We recommend that daily visual checks of<br />
the equipment are carried out by therapists,<br />
carers or parents to ensure the product is<br />
safe for use. The recommended daily checks<br />
are detailed below.<br />
1. Check that there is no lateral movement or<br />
wobble in any of the moving parts. Ensure<br />
all adjustment knobs and bolts are in place<br />
and secure.<br />
2. Check all upholstery and Velcro for signs<br />
of wear and tear.<br />
3. Check all castors are moving freely and<br />
lock securely.<br />
4. Ensure the handle and locking pin on the<br />
seat interface plate is fully engaged and<br />
the seat unit is securely fixed onto the<br />
chassis.<br />
5. Ensure the Leeway Pelvic Cradle is fully<br />
secured around the user and they cannot<br />
slide or creep forward in the seat.<br />
6. Ensure the footplate is attached securely.<br />
If in any doubt to the continued safe<br />
use of your Leckey product or if any<br />
parts should fail, please cease using<br />
the product and contact our customer<br />
service department or your local dealer<br />
as soon as possible.
13 Annual Product<br />
Inspection<br />
14 Re-issuing Leckey<br />
Products<br />
(Therapist, Technician, Leckey Product<br />
Advisor, Dealer)<br />
Leckey recommend that each product should<br />
be subject to a detailed inspection at least<br />
once a year and every time the product is<br />
reissued for use. This inspection should<br />
be carried out by a technically competent<br />
person who has been trained in the use of<br />
the product and should include the following<br />
checks as a minimum requirement.<br />
1.Check that there is no lateral movement or<br />
wobble in any of the moving parts. Ensure all<br />
adjustment knobs and bolts are in place and<br />
secure.<br />
2.Check all ratchet handles, knobs, nuts,<br />
bolts and plastic buckles are in place,<br />
replacing any missing items. Paying<br />
particular attention to the following items;<br />
> Headsupport locking bolts.<br />
> Backrest height and angle adjustments<br />
bolts.<br />
> Seat depth adjustment bolts.<br />
> Leeway Pelvic Cradle / hip guide<br />
attachment bolts.<br />
> Footrest height and angle adjustment.<br />
3.Check the chassis height adjustment<br />
mechanism is working properly. If the<br />
chassis is foot pedal operated ensure the<br />
seat height doesn’t change when the pedal<br />
is released. Also, check that the locking<br />
pin engages securely to prevent accidental<br />
height adjustment of the chassis.<br />
4.Adjust the seat to its maximum range of<br />
tilt in space and ensure that the locking lever<br />
locks the seat out securely at varying point in<br />
this range.<br />
5.Check that where the seat and chassis join<br />
there is no visible wear and tear on the metal<br />
components.<br />
6. Lift the base to check each castor<br />
individually. Make sure they are moving freely<br />
and remove any dirt from the rubber wheels.<br />
Check that the brakes lock the wheels<br />
securely<br />
7.Visually check the structure of the product<br />
paying attention to weld points on the frame<br />
ensuring there are no signs of fatigue or<br />
cracking around the welds.<br />
8.Leckey recommend that a written record is<br />
maintained of all annual product inspections.<br />
If in any doubt to the continued safe<br />
use of your Leckey product or if any<br />
parts should fail, please cease using<br />
the product and contact our customer<br />
service department or your local dealer<br />
as soon as possible.<br />
Most Leckey products are assessed and<br />
ordered to meet the needs of an individual<br />
user. Before reissuing a product we<br />
recommend that the therapist prescribing<br />
the product has carried out an equipment<br />
compatibility check for the new user and has<br />
ensured that the product being re-issued<br />
contains no modifications or special<br />
attachments.<br />
A detailed technical inspection should be<br />
carried out on the product prior to re-issuing.<br />
This should be carried out by a technically<br />
competent person who has been trained in<br />
the use and inspection of the product. Please<br />
refer to section 11 for the required checks to<br />
be carried out.<br />
Ensure the product has been cleaned<br />
thoroughly in accordance with section 12 of<br />
this manual.<br />
Ensure a copy of the user manual is supplied<br />
with the product. A copy can be downloaded<br />
from our website www.leckey.com<br />
Leckey recommend that a written record is<br />
maintained of all product inspections carried<br />
out during the reissue of the product.<br />
If in any doubt to the continued safe<br />
use of your Leckey product or if any<br />
parts should fail, please cease using<br />
the product and contact our customer<br />
service department or your local dealer<br />
as soon as possible.
15 Technical Information<br />
<strong>Mygo</strong> seat dimensions<br />
Product and Accessory Codes<br />
161-600 <strong>Mygo</strong> <strong>Max</strong> Seat Shell<br />
161-900-02 Seat Cushion Pack - Orange<br />
161-900-03 Seat Cushion Pack - Blue<br />
161-900-04 Seat Cushion Pack - Pink<br />
161-900-15 Seat Cushion Pack - Grey<br />
Chassis<br />
161-693 Hydraulic Hi-Low Base<br />
161-679 Powered Hi-Low base<br />
Accessories<br />
161-688 Armrests<br />
152-3600 Sandals<br />
161-610 Lower Leg Supports<br />
161-689 Flipaway lateral supports<br />
161-690 Complex lateral supports<br />
161-691 Protraction pads with lateral supports<br />
161-692 Angle adjustable sacral pad<br />
161-608 Large femorals<br />
161-967 Padded tray cover<br />
161-961 Memory foam cushion pack<br />
161-695 Tray<br />
147-2600 Leeway Pelvic Cradle Size 2<br />
147-2610 Leeway Pelvic Cradle Size 3<br />
155-LEC-002 Fitting kit for Harness<br />
155-N001-L Large Trunk Harness<br />
161-696 Side Pads<br />
Size Size 3<br />
Age 12 - 18<br />
<strong>Max</strong> User Weight 85<br />
Seat Depth<br />
Seat Width<br />
Chest Width<br />
Back Height<br />
Seat to Sandal<br />
Plantarflexion / Dorsiflexion 10° to 10°<br />
Back Angle +10° to -25°<br />
Windsweeping up to 20°<br />
Min 410mm / 16.4 inches<br />
<strong>Max</strong> 560mm / 22.4 inches<br />
Min 345mm / 13.8 inches<br />
<strong>Max</strong> 500mm / 120 inches<br />
Min 170mm / 6.7 inches<br />
<strong>Max</strong> 270mm / 10.6 inches<br />
Min 330mm / 13.2 inches<br />
<strong>Max</strong> 510mm / 20.4 inches<br />
Min 330mm / 13.2 inches<br />
<strong>Max</strong> 510mm / 20.4 inches<br />
Calf Angle -15° to +30°<br />
Tilt in Space +10° to -25°<br />
Armrest<br />
Min 360mm / 14.2 inches<br />
<strong>Max</strong> 700mm / 27.5 inches
Actuator specification- 500055+493312-<br />
020000<br />
Rated IP66<br />
Duty Cycle <strong>Max</strong> 10% or 2 min continuous<br />
use followed by 18 min not in use.<br />
Operation temperature -5degC to +70degC,<br />
storage temperature -40degC to +70degC.<br />
Push/pull <strong>Max</strong> 4500N<br />
Self Lock at 4500N Push/Pull Typical speed<br />
with full load 6,0mm/sec <strong>Max</strong> amps at load<br />
of 4500N is 8 amps<br />
Power input voltage 24v +- 10%<br />
Battery Box – C3BAT Rated IP51<br />
Type: NiMH<br />
Power supply: 24V DC<br />
<strong>Max</strong>imum continuous current: 7A (short time<br />
peak current 10-20A)<br />
Capacity: 1400mAh<br />
Low-capacity warning: Sound signal<br />
Handset – C3REMOX incl. foil Rated IP51<br />
Control Ambient temp +5deg to +40deg C<br />
Battery Charger – C3CHAR<br />
Power supply: 110-240V AC<br />
Charging time: 5-8 hours<br />
Mains connector: European/UK/US type<br />
Battery change: Easy revolving fastening<br />
Charging signal: Green light flashing<br />
Full capacity signal: Continous green light<br />
Products may be stored in non-heated<br />
storage facilities with humidity between<br />
0 and 100%, none condensing. None<br />
condensing means that one should not take<br />
a product from an ice cold warehouse into a<br />
room with a temperature of 20deg C;<br />
if this is done then moistness will appear on<br />
the products.<br />
Il <strong>Mygo</strong> <strong>Max</strong> è stato progettato per<br />
offrire un eccellente livello di postura<br />
oltre a garantire funzionalità e mobilità.<br />
Il presente manuale spiega come<br />
utilizzare tutte le funzioni in modo<br />
semplice, sicuro e veloce. Le istruzioni<br />
sulla sicurezza e sulla manutenzione<br />
garantiranno un uso del prodotto<br />
protratto nel tempo.<br />
Indice<br />
01 Destinazione d’uso<br />
02 Dichiarazione di Conformità<br />
03 Termini di Garanzia<br />
04 Documentazione sulla storia del prodotto<br />
05 Formazione sull’uso del prodotto<br />
06 Informazioni sulla sicurezza<br />
07 Come rimuovere dall’imballaggio ed assemblare il sistema di postura<br />
08 Inserire i rivestimenti<br />
09 Configurazione clinica per la gestione della postura<br />
10 Regolazioni frequenti per l’uso quotidiano<br />
11 Informazioni sulla pulizia e sulla manutenzione<br />
12 Controlli quotidiani del prodotto<br />
13 Controlli annuali del prodotto<br />
14 Riassegnazione dei prodotti Leckey<br />
15 Assistenza prodotto<br />
16 Informazioni tecniche<br />
17 Accessori
6 Informazioni sulla sicurezza<br />
1. Destinazione d’uso<br />
<strong>Mygo</strong> <strong>Max</strong> è un sistema di seduta attivo<br />
progettato per essere utilizzate da bambini<br />
e giovani adulti diversamente abili a casa<br />
o a scuola. Può essere utilizzato da<br />
bambini e ragazzi di età compresa tra i<br />
12 e i 18 anni e può sostenere un peso<br />
massimo di 85 kg. Il sistema di postura<br />
è modulare e può essere utilizzato con<br />
La base Hi-low. Questa base è stata<br />
progettata per l’uso in interni ma può<br />
essere utilizzata anche all’esterno su<br />
una superficie piana. La base Hi-low<br />
non dovrebbe mai essere esposta alle<br />
intemperie dal momento che i componenti<br />
in metallo si potrebbero corrodere.<br />
2. Dichiarazione di Conformità<br />
Il produttore, James Leckey Design Ltd,<br />
dichiara, sotto la propria responsabilità,<br />
che <strong>Mygo</strong> <strong>Max</strong> è conforme ai<br />
requisiti della direttiva 93/42/CEE, del<br />
Regolamento sui Dispositivi Medici del<br />
2002 e della norma EN 12182 — Ausili<br />
tecnici per persone disabili e metodi di<br />
prova.<br />
3. Termini di Garanzia<br />
La garanzia si applica solo se il<br />
prodotto viene utilizzato in conformità<br />
con le condizioni specificate e la sua<br />
destinazione d’uso, rispettando tutte le<br />
raccomandazioni del produttore (si vedano<br />
anche le condizioni generali di vendita,<br />
consegna e pagamento). Tutti i prodotti<br />
e i componenti Leckey sono garantiti due<br />
anni.<br />
4. Documentazione sulla storia del<br />
prodotto<br />
Il prodotto Leckey è un dispositivo<br />
medico di Classe 1 e, in quanto tale,<br />
dovrebbe essere prescritto, configurato<br />
o riassegnato da personale tecnico<br />
competente, che è stato formato sull’uso<br />
di questo prodotto. Leckey consiglia di<br />
conservare una documentazione scritta<br />
che fornisca le informazioni relative a<br />
tutte le impostazioni, i controlli relativi alla<br />
riassegnazione del prodotto e i controlli<br />
annuali.<br />
5. Documentazione relativa alla<br />
formazione sull’uso del prodotto<br />
(genitori, insegnanti e assistenti)<br />
Il prodotto Leckey è un dispositivo medico<br />
di Classe 1 e, in quanto tale, Leckey<br />
raccomanda che genitori, insegnanti e<br />
assistenti che fanno uso di questo ausilio<br />
vengano messi a conoscenza delle<br />
seguenti sezioni del presente manuale da<br />
personale tecnico competente:<br />
Sezione 6<br />
Informazioni sulla sicurezza<br />
Sezione 11<br />
Regolazioni frequenti per l’uso quotidiano<br />
Sezione 12<br />
Pulizia e sulla manutenzione<br />
Sezione 13<br />
Controllo quotidiano del prodotto<br />
Leckey consiglia di conservare un dossier<br />
scritto riguardante tutti coloro che sono<br />
stati formati all’uso corretto del prodotto.<br />
6.1 Prima dell’uso leggere sempre con<br />
attenzione le istruzioni.<br />
6.2 Per una maggiore sicurezza, si<br />
raccomanda di non lasciare mai senza<br />
sorveglianza l’utilizzatore.<br />
6.3 Utilizzare per il prodotto solamente<br />
parti approvate da Leckey. Non<br />
apportare in nessun caso e in nessun<br />
modo modifiche al prodotto. La<br />
mancata osservanza delle istruzioni<br />
potrebbe mettere in pericolo l’utente o<br />
l’assistente e annullare la garanzia sul<br />
prodotto.<br />
6.4 In caso di dubbi relativi sulla<br />
persistenza dell’uso sicuro del<br />
prodotto Leckey o nel caso in cui<br />
alcune parti dovessero danneggiarsi,<br />
si prega di interrompere l’uso del<br />
prodotto e contattare il nostro servizio<br />
clienti o il rivenditore locale il prima<br />
possibile.<br />
6.5 Regolare il prodotto in tutte le<br />
posizioni e assicurarsi che siano tutte<br />
ben salde prima di far sedere l’utente.<br />
Per alcune regolazioni potrebbe<br />
essere necessario utilizzare uno<br />
strumento che viene fornito con ogni<br />
prodotto. Tenere tutti gli strumenti<br />
fuori dalla portata dei bambini.<br />
6.6 Quando si fa sedere un utente<br />
su un sistema di postura, per ragioni<br />
di sicurezza e di postura, allacciare<br />
sempre prima la Cinghia Pelvica<br />
Leeway.<br />
6.7 Quando il prodotto è fermo,<br />
assicurarsi che tutte le rotelle siano<br />
bloccate e rivolte in direzione opposta<br />
alla base: questo aumenterà la<br />
stabilità del prodotto. Ciò è importante<br />
soprattutto quando si utilizzano le<br />
funzioni basculante e reclinabile.<br />
6.8 Quando si utilizza il sistema di<br />
postura con la base Hi-low, assicurarsi<br />
che la leva per la regolazione dell’altezza<br />
e del basculamento siano bloccate e non<br />
possano essere azionate fortuitamente<br />
da altri bambini.<br />
6.9 Quando si utilizza il sistema di<br />
postura Leckey con la base Hi-low, si<br />
raccomanda di non spostare gli utenti<br />
su superfici irregolari. Devono essere<br />
prese tutte le dovute precauzioni per<br />
i trasferimenti da e per il sistema di<br />
postura.<br />
6.10 Non lasciare mai il prodotto su<br />
superfici con pendenze maggiori di 5<br />
gradi. Ricordarsi sempre di bloccare<br />
tutte le rotelle.<br />
6.11 Utilizzare il maniglione di spinta<br />
solo per guidare e spostare il sistema<br />
di postura da una zona all’altra. Non<br />
utilizzare mai il tavolino a questo scopo.<br />
6.12 Il prodotto contiene componenti<br />
che potrebbero costituire un rischio<br />
di soffocamento per bambini piccoli.<br />
Controllare sempre che le manopole e<br />
i bulloni di bloccaggio raggiungibili dal<br />
bambino siano ben serrati e saldi.<br />
6.13 I prodotti Leckey sono conformi alle<br />
norme antincendio EN 12182. Tuttavia, il<br />
prodotto contiene componenti in plastica<br />
e, quindi, dovrebbe essere tenuto<br />
lontano da tutte le fonti dirette di calore<br />
come fiamme libere, sigarette, radiatori<br />
elettrici e a gas.
Leckey<br />
19 Ballinderry Road<br />
Lisburn<br />
BT28 2SA<br />
Northern Ireland<br />
United Kingdom<br />
T: 028 9260 0750<br />
F: 028 9260 0799<br />
E: info@leckey.com<br />
W: www.leckey.com<br />
Stephen<br />
24 hour postural<br />
care for babies,<br />
kids & adults.<br />
Sleeping, Sitting,<br />
Standing, Walking,<br />
Moving, Bathing,<br />
Toileting.<br />
LS314-01