Create successful ePaper yourself
Turn your PDF publications into a flip-book with our unique Google optimized e-Paper software.
BowBuildingSchool.com
Imprint<br />
Publisher and owner:<br />
Matthias Wiltschko<br />
Gross Gundholz 25, 3920 Gross Gerungs, Austria<br />
www.BowBuildingSchool.com<br />
Publisher and media owner takes no legal responsibility or liability.<br />
All rights, copying, distribution and translation rights are with the<br />
owner and publisher.<br />
Text, photos, translation and layout: Matthias Wiltschko<br />
No legal responsibility or liability for injuries and damage to property<br />
of the customer/reader and third parties is taken over by the information<br />
provided and by the objects produced therefrom (eg bows,<br />
arrows . . . ). Each customer/reader is responsible for his/her own<br />
safety and safety in dealing with his/her own manufactured bows and<br />
arrows. It is at the measure of the customer/reader to judge the wood<br />
used by him/her on its resistance to breakage.
Out now in print<br />
Online Class 1<br />
346 pages - 438 color photos<br />
Worldwide Shipping<br />
$40.00 USD<br />
www.BowBuildingSchool.com
Druckversion<br />
Online Kurs 1<br />
342 seiten - 438 farbfotos<br />
Weltweiter versand<br />
Eur 36,-<br />
www.bogenbauschule.at
The Arrow Shaft<br />
It makes no difference how efficient your bow is, with bad arrows you will<br />
never be able to consistently shoot well.<br />
The most important variable of a good arrow is the shaft. No matter which<br />
wood you prefer, Port Orford Cedar, Spruce, Northern Pine or Hemlock, the<br />
arrow shafts of one set must have the same properties. That is, the bending<br />
stiffness (spine) and the weight should be as close as possible to each<br />
other in an arrow set.<br />
How do you achieve this? The fastest, best and easiest version: Buy the<br />
shafts spined and weight balanced. Some traders offer their shafts +-1<br />
pound spine and +-0.5 grams shaft weight, which is really accurate. However<br />
I was also able to achieve very good shooting results with +-2.5 pounds<br />
spine and +-1 gram shaft weight.<br />
Although these high-quality shafts sometimes cost twice or three times as<br />
much as the cheap standard shafts, you will not regret the purchase. You<br />
will have fewer misses, fewer arrows break and after a short time, the investment<br />
pays off.<br />
But the most important thing to remember is that in a bad shot with perfectly<br />
matched arrows, you can be sure that YOU have made a mistake.<br />
There are no more excuses like: “The bow does not suit me“ or “I use the<br />
cheap arrows.“<br />
If you are not sure which spine value fits your bow, which can be very different<br />
for selfbows, do the following: Your bow has a draw weight of 40# at<br />
your draw length. Buy twelve weight balanced shafts in the spine value 40#<br />
+-2.5#. Even if the arrows hit a little further to the left or right, your brain is<br />
already figuring out how to change shooting technique to make sure the<br />
arrows land in the center of the target. It makes no sense to make different<br />
arrow sets that only differ by 1# spine. There are many other factors that<br />
affect the flight characteristics and the spine of an arrow. More about this in<br />
the next article, “Shooting Selfbows“.<br />
But before we go straight to making arrows, a few words about storage and<br />
the different wood species.
Storage<br />
If you buy many arrow shafts to put them in stock, tie them tightly in the<br />
middle and at the ends with strong yarn. Store them lying horizontally<br />
in a room where air humidity does not fluctuate. Very important, label<br />
your shafts with wood type, spine value and weight. In no case should<br />
you fix the shafts with rubber bands; these dissolve, then stick to the<br />
wood and you have additional sanding work.
Arrow wood<br />
I had labeled this arrow package with Spruce, but it is clearly Pine.<br />
Only in the Pine species are the light resin vessels in the latewood so<br />
large that they are visible to the naked eye. Below you see two Pine<br />
shafts: on the left sapwood, on the right the darker heartwood. No matter<br />
if sapwood or heartwood, they will fly the same.
Left picture<br />
The left shafts are made of Northern Pine and the right ones are from<br />
Port Orford Cedar. You can clearly see the dark, dense and firm latewood<br />
rings of the Pine shafts.<br />
The Cedar shafts on the right side have a very homogenous structure<br />
and the latewood rings can only be recognized as a wafer-thin layer.<br />
With Port Orford Cedar I always had many broken arrows, so I soon<br />
switched to Northern Pine. It is a bit heavier but more robust.<br />
Wood and Machining Defects<br />
Shafts where the growth rings separate from each other should be<br />
sorted out immediately. This is very rare in the solid latewood of Northern<br />
Pine. With Port Orford Cedar I have not seen this wood defect at
In the case of significant fiber deviations, it can happen that fiber tears<br />
are produced when the shafts are being turned. If these are close to<br />
the end of the shaft, you can still use this end for the arrowhead. Often,<br />
the imperfections also fall away when shortening the arrows.
In the softer Port Orford Cedar, fibrous shaft surfaces sometimes occur.<br />
The greater the fiber deviation from the longitudinal axis of the<br />
shaft, the greater the surface fuzziness. The flames of the growth rings<br />
below indicate a significant fiber deviation.
If the growth rings form an island in the shaft, this also indicates a<br />
fiber deviation. If the rings are particularly narrow, these drawings occur<br />
more frequently and already indicate small and insignificant fiber<br />
deviations. The islands are only dangerous in the case of wide annual<br />
rings and possible ring delamination (see below).
This is what perfect arrow shafts look like. The latewood rings show<br />
you that the grain follows the exact longitudinal axis of the arrow shafts.<br />
THE sign of maximum durability.
Lay the shaft between your thumb and forefinger, aim over its entire<br />
length, roll the shaft with the other hand and see if the front shaft part<br />
is straight or bent. The straight shaft end will receive the nock and the<br />
field point will later be mounted on the crooked end.
Mark the front end with color, so that there will be no confusion. If you<br />
notice a slight curve in the shaft, you can now straighten it by bending<br />
the shaft in the opposite direction. If it breaks now, it should never have<br />
become an arrow anyway.
With 400 grit sandpaper, all protruding wood fibers are removed and<br />
the shaft is perfectly smoothed. With one hand you hold the sandpaper,<br />
but the sanding movement is done with the shaft.
Take a fine cloth and remove the adhering sanding dust. Thereafter, the<br />
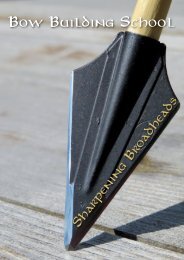
rear ends of the shafts are sharpened for gluing the plastic nocks. Attention!<br />
The sharpener has two sides: one for the nock and the sharper<br />
angle for the arrowhead.
If it is imperative that you want to make arrows from shafts of this poor<br />
quality, make sure that the ring flames are pointing forward to the arrow<br />
head. If the arrow breaks in the shot, the sharp fragments fly upwards<br />
and not down into the bow hand.
If the fiber deviations are so strong, this end should become the arrow<br />
head. A broken arrow so far behind can be dangerous for the shooter.<br />
Check your arrows regularly for damages before shooting them.
With alcohol-based wood stain, the entire shaft is colored several times.<br />
Work outside or provide good ventilation in the workshop. I never use<br />
water-based wood stain. Water is a no-go on arrows and bows.
Here are some great adhesives. The Fastset Gel is excellent, and the<br />
small tube is perfect for private use, and so is the Loctite Super Glue. I<br />
had the Bohning Fletch Tite and Saunders NPV Glue in stock for a long<br />
time and even after 10 years, they perform as promised.
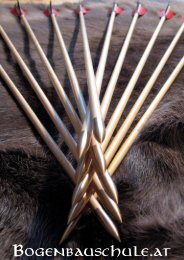
Arrow for a right-handed person. The flag of the nock points to the left.<br />
For a left-handed shooter, the flag points to the right. The growth-ringflames<br />
on the upper side of the shaft always point forwards in both<br />
variants. I like to use these speed nocks. Even without looking it can be<br />
determined by the flag, where the index/cock feather is.
STOP! Here the nock has the wrong position on the shaft! When the<br />
arrow is nocked on the string, the growth-ring-flames would lie on the<br />
side. These are clamp nocks that should hold the arrow on the string.
Of course, you can also saw or file the nocks directly into the wood.<br />
First, I saw a slot with the band saw and then work out the notch width<br />
with sandpaper. In the next step, the surface of the shaft is sealed several<br />
times.
For finishing bows and arrows, I prefer to use Danish Oil. It is easy to<br />
apply, dries relatively quickly and provides a nice surface.
Even if Danish Oil does not self-ignite, I seal all oil-soaked rags in a jar.<br />
After repeated oiling I let the shafts dry for a few days in the house. I<br />
use the Cartel Fletching Jig; it fulfills the task with flying colors.
Sunshine and wind help with fast drying the finish.
The more often the fletching clip is used, the more glue accumulates<br />
on it. To remove the adhesive residue, I sand it off on 120 grit sandpaper.<br />
Try to hold the clamp at a 90 degree angle.
First, the cock feather is glued on. The flag of the nock points exactly<br />
to the guide of the clip. For optical reasons, I always choose the index<br />
feather in the color of the nock.
I place the back end of the feather on the second marker line (6mm or<br />
3/8 inches from the end of the clip). Swipe your fingernail over the quill<br />
and press it firmly against the clip.
I always use a lot of glue. There would be nothing more annoying for<br />
me than a feather coming off the shaft. First put the clip on the bevel<br />
and then tilt it onto the magnets.
Slide the clip to the lower stop and then press the quill onto the shaft.<br />
Too much glue? Here I used some old and very viscous Super Glue<br />
Gel. Not a good idea. I will continue with a new tube of Fastset Gel.
The old Super Glue is squeezed out only on one side . . . A sign that the<br />
quill is not properly resting on the shaft.
Safety tip: If you work inside, a small USB fan can blow away the toxic<br />
fumes. In addition, open a window.
Here you can see that the cock feather only touches the shaft with the<br />
outside (left). The gap on the right is filled up with glue.
Adjust the fletching jig carefully and check the position of the quill on<br />
the shaft several times. Mark the correct setting with color.
In the upper picture there is still a small gap between quill and shaft.<br />
Below you can see that the fletching device is perfectly set for the 5/16<br />
shafts. If you later use 11/32 shafts, the jig must be readjusted.
The quill rests on the arrow shaft over its entire length exactly in the<br />
middle. To achieve this, the clip must be adjusted slightly inclined. In<br />
the rear view, the front of the feather lies farther right than the rear end.<br />
This only applies to feathers from the right wing. For left wing feathers,<br />
the front has to be further to the left than the rear end is. In this position<br />
the feather retains its natural curvature, the arrow flies stabler and the<br />
shooting pattern is more consistent.
Here you can see the natural feather curvature. The white lead feather<br />
below was glued completely straight on to the shaft and the quill touches<br />
the wood only on the outside (left). The natural curvature is missing.<br />
If one feather sits differently, the arrow will spin irregularly.
Homemade arrow holder made of maple. Here I let the glue harden.<br />
Now the sharp points of the quills are secured and they should not hurt<br />
your bow hand.
For the winding I take a two piece cubit long crochet yarn in the color of<br />
the nock and cock feather. Simply wrap over the beginning piece.
Make sure that the beginning of the thread does not overlap the quill to<br />
form an elevation. Slightly push the windings together so that they do<br />
not form ugly gaps.
A drop of waterproof wood glue secures the end of the winding. The<br />
glue immediately fixes the yarn.
If the yarn is fixed, another layer of glue is applied immediately to allow<br />
the thread to soak it up. Take care at the bottom for a smooth transition<br />
to the shaft.
I apply up to three layers of glue on the winding. If these are dry, the<br />
field points are mounted.
If the point is difficult to screw on, I heat it very briefly over a flame to<br />
allow the metal to expand. I screw the warm point onto the shaft and as<br />
soon as it is cold, it holds tight.
Years ago, I found one of my arrows in the compost pile. It had been<br />
there for a long time. The stain was pale, the wood was soft, the fletches<br />
had been loose almost on their entire length and started to decompose.<br />
Only the wood-glue-soaked winding was completely intact and<br />
still held the quills in the front.