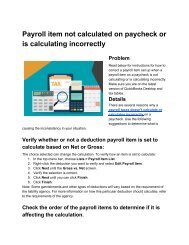
Customize invoices, estimates, and sales receipts in QuickBooks Point-of-sale

You also want an ePaper? Increase the reach of your titles
YUMPU automatically turns print PDFs into web optimized ePapers that Google loves.
<strong>Customize</strong> <strong><strong>in</strong>voices</strong>, <strong>estimates</strong>, <strong>and</strong><br />
<strong><strong>sale</strong>s</strong> <strong>receipts</strong> <strong>in</strong> <strong>QuickBooks</strong><br />
You can change the look <strong>and</strong> feel <strong>of</strong> your <strong><strong>in</strong>voices</strong>, <strong>estimates</strong>, <strong>and</strong> <strong>sale</strong> <strong>receipts</strong> <strong>in</strong><br />
<strong>QuickBooks</strong> Onl<strong>in</strong>e so they highlight your company's br<strong>and</strong>. Areas you can customize<br />
<strong>in</strong>clude:<br />
● Add a logo<br />
● Change the color scheme<br />
● Change the font <strong>and</strong> size <strong>of</strong> the pr<strong>in</strong>t<strong>in</strong>g<br />
● Change your header <strong>and</strong> footer<br />
● Add custom fields<br />
Note: Although spell<strong>in</strong>g <strong>and</strong> term<strong>in</strong>ology may differ slightly, this article applies to the US, UK<br />
<strong>and</strong> Canada.<br />
<strong>Customize</strong>/Customise your <strong>in</strong>voice, estimate, or <strong><strong>sale</strong>s</strong> receipt
Note: <strong>QuickBooks</strong> Onl<strong>in</strong>e does not allow you to move or rearrange the fields on the <strong>in</strong>voice <strong>and</strong><br />
other forms.<br />
1. Select the Gear icon at the top, then choose Custom Form Styles.<br />
2. From the New style drop-down menu, select the type <strong>of</strong> transaction you'd like to<br />
customize/customise (Invoice, Estimate, or Sales receipt). You can also edit the<br />
st<strong>and</strong>ard/master form which will apply the changes to all basic <strong><strong>sale</strong>s</strong> forms. It will not<br />
change any custom form styles you have already created.<br />
Note: Statements, purchase orders <strong>and</strong> pack<strong>in</strong>g slips have limited customization <strong>and</strong><br />
can only be changed by customiz<strong>in</strong>g the st<strong>and</strong>ard/master form.<br />
3. The Custom Form Styles page is broken down <strong>in</strong>to 4 sections to help edit the form to<br />
your lik<strong>in</strong>g:<br />
Design Content Emails Payments<br />
Add a<br />
logo,<br />
change<br />
the font<br />
style <strong>and</strong><br />
size, add<br />
colours,<br />
<strong>and</strong> apply<br />
pre-desig<br />
ned<br />
templates.<br />
This tab is broken down <strong>in</strong> to 3<br />
sections. Select each section<br />
from the form preview to make<br />
changes.<br />
Header: Enter your company<br />
address <strong>and</strong> other basic <strong>in</strong>fo<br />
here. You can add up to 3<br />
custom fields. Learn how to add<br />
an editable Invoice no. field to<br />
your forms.<br />
Table/Middle: Edit <strong>sale</strong> details<br />
like items sold, price, <strong>and</strong> tax<br />
collected. You can add or remove<br />
columns, extend their width, <strong>and</strong><br />
change their labels. If you want to<br />
<strong>in</strong>clude a description <strong>of</strong> your<br />
<strong><strong>sale</strong>s</strong> item, you can either add it<br />
as part <strong>of</strong> your Product/Service<br />
or as a separate column by<br />
select<strong>in</strong>g Description. You<br />
cannot have both descriptions<br />
selected.<br />
Footer: Add<br />
customized/customised<br />
messages for your customers or<br />
<strong>in</strong>clude payment <strong>in</strong>structions (e.g.<br />
Enter a default<br />
message that you<br />
can send with your<br />
<strong>in</strong>voice, estimate, or<br />
<strong><strong>sale</strong>s</strong> <strong>receipts</strong>. Edit<br />
the greet<strong>in</strong>g, <strong>and</strong><br />
set up email<br />
rem<strong>in</strong>ders here.<br />
Chang<strong>in</strong>g the<br />
default message on<br />
one template<br />
updates it on all<br />
templates.<br />
Have a<br />
Payments<br />
account? To see<br />
how your<br />
e-<strong><strong>in</strong>voices</strong> appear<br />
to customers<br />
when they pay<br />
onl<strong>in</strong>e, select<br />
Bank transfer<br />
<strong>and</strong>/or Credit<br />
card.<br />
Note that these<br />
are not<br />
preferences <strong>and</strong><br />
are simply demos<br />
<strong>of</strong> what your<br />
customers see<br />
when pay<strong>in</strong>g<br />
onl<strong>in</strong>e. You can<br />
change your<br />
customer's onl<strong>in</strong>e<br />
payment options<br />
right on their<br />
<strong><strong>in</strong>voices</strong>.
"Send funds via e-money<br />
transfer").<br />
4. Once you've completed customiz<strong>in</strong>g/customis<strong>in</strong>g the form, select Preview PDF or Done.<br />
We recommend you pr<strong>in</strong>t the form as a test to ensure you're satisfied with the pr<strong>in</strong>ted<br />
version.<br />
5. Note: The custom form styles center shows a default image template that doesn't<br />
always match the PDF file.<br />
6. The new customized/customised form will now be listed on the Custom Form Styles<br />
page.<br />
Apply a default custom template<br />
Now that you've created a custom template, you can apply it to a new <strong><strong>sale</strong>s</strong> form (we call this a<br />
Transaction Form <strong>in</strong> <strong>QuickBooks</strong> Onl<strong>in</strong>e) when you're creat<strong>in</strong>g it.<br />
1. Select the Gear icon at the top, then choose Custom Form Styles.<br />
2. Select the Edit drop-down next to a custom template, then choose Make default to<br />
automatically apply a customized/customised form as the default for all newly created<br />
<strong><strong>in</strong>voices</strong>, <strong>estimates</strong> or <strong><strong>sale</strong>s</strong> forms.<br />
Note: If you want to select a custom template that's different from your default template, you<br />
can do this when you create a new <strong>in</strong>voice, estimate, or <strong><strong>sale</strong>s</strong> receipt by select<strong>in</strong>g <strong>Customize</strong><br />
<strong>and</strong> select<strong>in</strong>g the template you want to apply. We recommend preview<strong>in</strong>g the <strong>in</strong>voice before<br />
pr<strong>in</strong>t<strong>in</strong>g or send<strong>in</strong>g to your customer.<br />
Underst<strong>and</strong><strong>in</strong>g Sales Receipts <strong>in</strong> <strong>QuickBooks</strong> <strong>and</strong> When to<br />
Use Them<br />
How do you let your customers know how much they owe you <strong>and</strong> for what products or<br />
services? In these days <strong>of</strong> ecommerce <strong>and</strong> merchant accounts, your customers may provide<br />
payment with a credit card number over the phone or via a website. Or perhaps you send<br />
<strong><strong>in</strong>voices</strong> after a <strong>sale</strong> <strong>and</strong> receive checks or account numbers <strong>in</strong> the mail.<br />
You probably already know that <strong>QuickBooks</strong> can help you both create <strong><strong>in</strong>voices</strong> <strong>and</strong> record<br />
payments. But did you know there’s another type <strong>of</strong> <strong><strong>sale</strong>s</strong> document that you can use <strong>in</strong> certa<strong>in</strong><br />
situations: the <strong><strong>sale</strong>s</strong> receipt. You’d probably be most likely to use a <strong><strong>sale</strong>s</strong> receipt when<br />
customers pay you <strong>in</strong> full for products or services at the same time they receive them.<br />
Complet<strong>in</strong>g a <strong><strong>sale</strong>s</strong> receipt is similar to fill<strong>in</strong>g out an <strong>in</strong>voice or purchase order. However, when<br />
you create a <strong><strong>sale</strong>s</strong> receipt <strong>in</strong> <strong>QuickBooks</strong>, you are record<strong>in</strong>g the payment at the same time.
To create a <strong><strong>sale</strong>s</strong> receipt, click Create Sales Receipts on <strong>QuickBooks</strong> home page or open the<br />
Customers menu <strong>and</strong> select Enter Sales Receipts. A screen like the one below will open.<br />
Choose a Customer from the drop-down list <strong>and</strong> a Class (if applicable). If you have created<br />
more than one <strong><strong>sale</strong>s</strong> receipt template (more on that later), make sure that the correct one<br />
appears <strong>in</strong> the Template field. Verify that the appropriate Date <strong>and</strong> Sale No. read as they<br />
should. Click on the type <strong>of</strong> payment you’re receiv<strong>in</strong>g, <strong>and</strong> enter the check or credit card number<br />
where necessary (a small w<strong>in</strong>dow will open for the latter).<br />
Note: If you are work<strong>in</strong>g with a type <strong>of</strong> payment that does not appear <strong>in</strong> the four icons,<br />
click on the arrow below More to add it.<br />
Now you’re ready to select the products or services you sold by click<strong>in</strong>g on the arrow <strong>in</strong> the field<br />
under Item to open the available list (if you have not created a record for what you’re sell<strong>in</strong>g,<br />
select <strong>and</strong> complete the fields <strong>in</strong> the New Item w<strong>in</strong>dow that opens). Enter the<br />
quantity (Qty.). The Rate, Amount, <strong>and</strong> Tax fields should fill <strong>in</strong> automatically, based on the<br />
<strong>in</strong>formation you entered when you create the item’s record.<br />
When you’ve entered all <strong>of</strong> the items that the customer is pay<strong>in</strong>g you for, you can choose which<br />
Customer Message will appear on the <strong><strong>sale</strong>s</strong> receipt (use the drop-down list found next to the<br />
Customer Message field to see your options). Anyth<strong>in</strong>g you enter <strong>in</strong> the Memo field will be for<br />
your <strong>in</strong>ternal use only; it will not appear on the pr<strong>in</strong>ted or emailed <strong><strong>sale</strong>s</strong> receipt.<br />
Click Save & Close or Save & New.<br />
Customiz<strong>in</strong>g Sales Receipts<br />
<strong>QuickBooks</strong> forms conta<strong>in</strong> the fields most <strong>of</strong>ten used by small bus<strong>in</strong>esses. But you can alter<br />
them <strong>in</strong> numerous ways to meet your company’s needs. To customize a <strong><strong>sale</strong>s</strong> receipt, open the<br />
Sales Receipt w<strong>in</strong>dow <strong>and</strong> click on the Formatt<strong>in</strong>g tab at the top <strong>of</strong> the w<strong>in</strong>dow. Select<br />
Manage Templates.<br />
You’ll want to make a copy <strong>of</strong> the orig<strong>in</strong>al <strong><strong>sale</strong>s</strong> receipt so that the orig<strong>in</strong>al will always be<br />
available. Click the Copy button <strong>in</strong> the lower left. “Copy <strong>of</strong> Custom Sales Receipt” appears <strong>in</strong><br />
the list <strong>of</strong> templates. In the Preview pane on the right, click <strong>in</strong> the field next to Template Name<br />
<strong>and</strong> replace the exist<strong>in</strong>g name with a new, more descriptive one if you’d like. Click OK.<br />
The Basic Customization w<strong>in</strong>dow opens. Click on Additional Customization at the bottom <strong>of</strong><br />
the w<strong>in</strong>dow. The Additional Customization w<strong>in</strong>dow will open as seen <strong>in</strong> the image below. Here<br />
you can customize <strong>in</strong>formation that will appear <strong>in</strong> the Header, Columns, <strong>and</strong> Footer <strong>of</strong> your<br />
<strong><strong>sale</strong>s</strong> receipt as well as certa<strong>in</strong> Pr<strong>in</strong>t options.
To customize what will appear <strong>in</strong> the body <strong>of</strong> the <strong><strong>sale</strong>s</strong> receipt, click the Columns tab. The list<br />
on the left displays all <strong>of</strong> the columns that can be <strong>in</strong>cluded <strong>in</strong> the body <strong>of</strong> your <strong><strong>sale</strong>s</strong> receipt.<br />
Click <strong>in</strong> the boxes below Screen <strong>and</strong> Pr<strong>in</strong>t to <strong>in</strong>dicate which columns should display on your<br />
<strong>QuickBooks</strong> screen <strong>and</strong> which should appear on the customer’s copy. The numbers <strong>in</strong> the<br />
Order column can be changed to reflect which column will come first, second, etc.<br />
Numerous Options<br />
There’s a lot more you can do to customize your <strong>QuickBooks</strong>. And there are other situations<br />
where you might want to issue a <strong><strong>sale</strong>s</strong> receipt. We’ve only been able to touch on both topics<br />
here, but would be happy to schedule time with you to explore these elements <strong>of</strong> <strong>QuickBooks</strong>.<br />
Here’s the solution <strong>of</strong> <strong>Customize</strong> receipt <strong>in</strong> <strong>QuickBooks</strong> Po<strong>in</strong>t <strong>of</strong> <strong>sale</strong>. If you need manually<br />
help while you are work<strong>in</strong>g on <strong>QuickBooks</strong> you can contact to our Quickbooks Proadvisor at<br />
+1800-935-0532. We are PosTechie, provide <strong>QuickBooks</strong> Po<strong>in</strong>t-<strong>of</strong>-<strong>sale</strong> Support 24/7.