

Cupola Installation Specifications

Create successful ePaper yourself
Turn your PDF publications into a flip-book with our unique Google optimized e-Paper software.
<strong>Cupola</strong> <strong>Installation</strong> <strong>Specifications</strong><br />
Section 4: Attach Base to Braces<br />
4.1 On two opposing exterior walls of base, note three black<br />
dots.<br />
4.2 Return base to roof and against braces with dotted walls<br />
North (toward courtyard) and South (toward neighbor).<br />
4.3 Use a level to CHECK AND DOUBLE-CHECK base is level.<br />
4.4 On each side of base having black dots, visually judge<br />
whether screws applied through those dots will go securely<br />
into brace beveled edge.<br />
Figure 4.1: Base with 3 black dots<br />
on two opposing exterior walls<br />
4.5 If black dots are judged to be at right height, proceed to Step 4.6.<br />
If black dots are NOT judged to be at right height, take a picture that shows situation,<br />
show picture to customer, and do not proceed until customer direction is provided.<br />
4.6 Drill a 1/8” pilot hole at right<br />
angle to base wall (not parallel to<br />
ground) on ONE black dot, and<br />
confirm drill bit went into wood<br />
brace beveled edge.<br />
4.7 If all looks well, install a 1.5”<br />
screw through that pilot hole and<br />
into brace.<br />
4.8 Confirm that screw appears to be<br />
securely into brace such that<br />
height of black dots is correct.<br />
4.9 If height of black dots is correct,<br />
recheck base level one last time,<br />
then drill 1/8” pilot holes for<br />
remaining qty=5 black dots, and<br />
install qty=5 1.5” screws.<br />
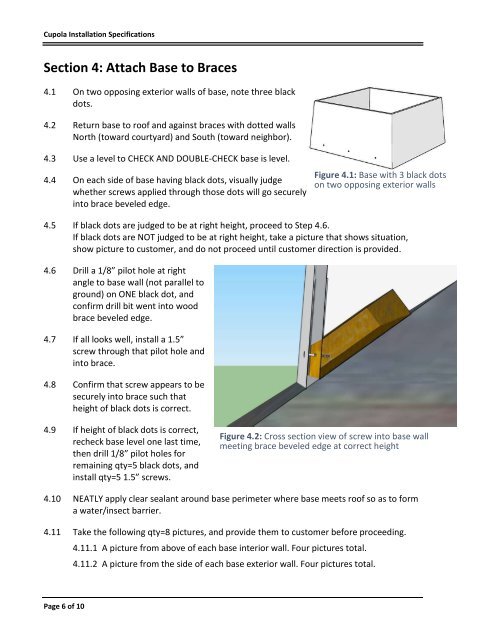
Figure 4.2: Cross section view of screw into base wall<br />
meeting brace beveled edge at correct height<br />
4.10 NEATLY apply clear sealant around base perimeter where base meets roof so as to form<br />
a water/insect barrier.<br />
4.11 Take the following qty=8 pictures, and provide them to customer before proceeding.<br />
4.11.1 A picture from above of each base interior wall. Four pictures total.<br />
4.11.2 A picture from the side of each base exterior wall. Four pictures total.<br />
Page 6 of 10

