Beginner's - ArtTrader Magazine
Beginner's - ArtTrader Magazine
Beginner's - ArtTrader Magazine

Create successful ePaper yourself
Turn your PDF publications into a flip-book with our unique Google optimized e-Paper software.
Art TRADER<br />
m a g a z i n e<br />
Technique 5: Book Pages<br />
Materials<br />
• cardstock<br />
• old book page or newspaper<br />
• acrylic or watercolor paints<br />
-46-<br />
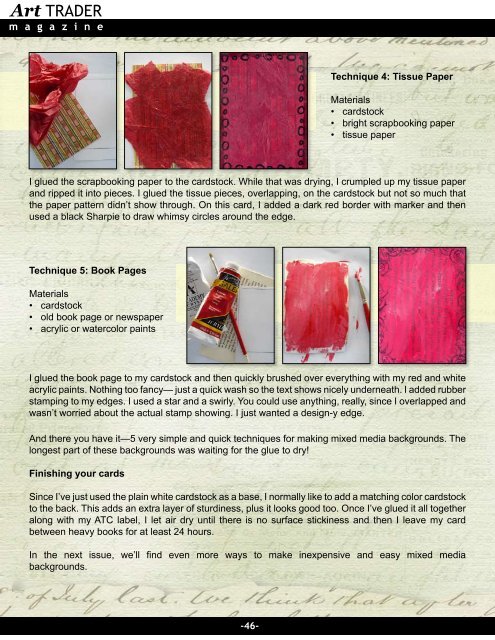
Technique 4: Tissue Paper<br />
Materials<br />
• cardstock<br />
• bright scrapbooking paper<br />
• tissue paper<br />
I glued the scrapbooking paper to the cardstock. While that was drying, I crumpled up my tissue paper<br />
and ripped it into pieces. I glued the tissue pieces, overlapping, on the cardstock but not so much that<br />
the paper pattern didn’t show through. On this card, I added a dark red border with marker and then<br />
used a black Sharpie to draw whimsy circles around the edge.<br />
I glued the book page to my cardstock and then quickly brushed over everything with my red and white<br />
acrylic paints. Nothing too fancy— just a quick wash so the text shows nicely underneath. I added rubber<br />
stamping to my edges. I used a star and a swirly. You could use anything, really, since I overlapped and<br />
wasn’t worried about the actual stamp showing. I just wanted a design-y edge.<br />
And there you have it—5 very simple and quick techniques for making mixed media backgrounds. The<br />
longest part of these backgrounds was waiting for the glue to dry!<br />
Finishing your cards<br />
Since I’ve just used the plain white cardstock as a base, I normally like to add a matching color cardstock<br />
to the back. This adds an extra layer of sturdiness, plus it looks good too. Once I’ve glued it all together<br />
along with my ATC label, I let air dry until there is no surface stickiness and then I leave my card<br />
between heavy books for at least 24 hours.<br />
In the next issue, we’ll find even more ways to make inexpensive and easy mixed media<br />
backgrounds.