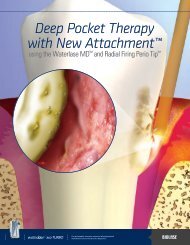
Deep Pocket Therapy with New Attachment - Biolase
Deep Pocket Therapy with New Attachment - Biolase
Deep Pocket Therapy with New Attachment - Biolase

Create successful ePaper yourself
Turn your PDF publications into a flip-book with our unique Google optimized e-Paper software.
Warnings & Precautions:<br />
Procedure<br />
Step 2 Tip Power Pulse Rate Air Water Mode<br />
Troughing & Inner<br />
Epithelium Removal<br />
CONTENTS:<br />
RFPT5-14 tip<br />
After routine periodontal evaluation through radiographic and<br />
clinical examination and assessment of probing depth, gingival<br />
recession, clinical attachment level, hyperplasia, bleeding on<br />
probing, plaque, suppuration, bone loss, furcation and mobility,<br />
proceed <strong>with</strong> the following steps:<br />
RFPT5-14 1.5W 30Hz 11% 20% H<br />
Select settings as provided in the table above, using an MD Gold Handpiece<br />
Apply anesthetic to the treatment site as needed.<br />
Topical anesthetic is usually adequate.<br />
Place tip in contact <strong>with</strong> the gingival crest, parallel to the long axis of the tooth (Fig 1). Activate<br />
laser and start moving along the gingival margin to prepare a trough all the way to the crest of the<br />
bone. This trough will allow for increased visibility and access and to initiate removal of diseased<br />
epithelium lining. The radial and forward cutting action of this tip allows for effective separation<br />
and simultaneous removal of the inflamed and diseased epithelium lining. The narrow tip glides<br />
easily to allow minimally invasive treatment of the entire epithelium lining all the way to the bottom<br />
of the pocket.<br />
Alternatively, a bottom-up technique can be used in which the laser is fired only when moving the<br />
tip coronally. The protocol is optimized for safety and efficacy using either one of the techniques.<br />
<strong>Deep</strong> <strong>Pocket</strong> <strong>Therapy</strong> <strong>with</strong> <strong>New</strong> <strong>Attachment</strong><br />
Waterlase MD Er, Cr: YSGG assisted <strong>New</strong> <strong>Attachment</strong> Procedure<br />
The Waterlase MD Er,Cr:YSGG system has numerous applications for cutting, removing, shaping and<br />
contouring hard and soft tissues, including periodontal therapy. These clinical indications also include<br />
Er,Cr:YSGG assisted <strong>New</strong> <strong>Attachment</strong> Procedure. This procedure promotes cementum-mediated<br />
periodontal ligament new attachment to the root surface in the absence of long junctional epithelium.<br />
Following is a basic reference guide to procedural steps, laser settings and technique for using the<br />
Waterlase MD, Er,Cr:YSGG laser to treat periodontal pockets. The objective for this procedure is to<br />
remove diseased, infected, inflamed and necrosed soft tissue and calculus <strong>with</strong>in the periodontal<br />
pocket to improve clinical indices including gingival index, gingival bleeding index, probing depth,<br />
attachment loss and tooth mobility.<br />
Eyewear: Doctor, patient, assistant and all others inside the operatory must wear appropriate laser protective eyewear for the<br />
2.78 μm wavelength (OD 4). Use caution when using the tip inside the periodontal pocket. Excessive force could break the tip<br />
and inconvenience your patient. Laser protective magnification loupes are recommended for this procedure.<br />
Do not direct air or spray toward tissue that may entrap air or water. Exercise caution when working inside the pocket <strong>with</strong>out continuous<br />
water flow. Hard tissue structures that come in immediate contact <strong>with</strong> the laser energy in the absence of water could be damaged.<br />
Make sure to maintain a consistent water flow during the entire treatment, especially in the deeper areas of the pocket.<br />
STEP 2 Troughing and Inner Epithelium Lining Removal<br />
Settings<br />
STEP 3 Calculus Removal<br />
Settings<br />
Step 3 Tip Power Pulse Rate Air Water Mode<br />
Calculus Removal RFPT5-14 1.5W 30Hz 11% 20% H<br />
Root Surface<br />
Smoothening<br />
RFPT5-14 1.5W 50Hz 11% 20% H<br />
A hand or ultrasonic scaler may be used prior to the laser.<br />
RFPT Kit No. 7200828 (2-pack) and 7200109 (10-pack)<br />
To reorder and for information call <strong>Biolase</strong> at (800) 321-6717<br />
STEP 1 Anesthesia<br />
Use Calculus Removal settings provided above. Calculus removal is performed <strong>with</strong> the fiber tip<br />
at 10-15 degrees angle against the surface moving up and down in one pass followed by a<br />
side-by-side pass. With loupes, check after first passes for remaining calculus and repeat until<br />
the root sufrace is completely clean.<br />
Use the Root Surface Smoothening settings to refine the root surface.<br />
Figure 1<br />
Figure 2<br />
5201222 Rev. E (12/10) P. 1
STEP 4 Outer Epithelium Lining Removal<br />
Figure 3<br />
Settings<br />
Step 4 Tip Power Pulse Rate Air Water Mode<br />
Outer Epithelium<br />
Removal<br />
STEP 5 Pressure Clot<br />
Insert a curette into the pocket to push the gingiva away and visualize the root surface. The surface should be clean and free of<br />
any calculus deposits. Applying external pressure should produce a thin layer blood clot inside the pocket. Hold and press a wet<br />
gauze in place over the outer area of the pocket for approximately 3 minutes to achieve this effect. Seal the clot <strong>with</strong>in the sulcus<br />
by applying a barrier such as surgical glue (cyanoacrylate) along the gingival margin using a pipette. This seal is necessary to<br />
provide a barrier from external debris that might interfere <strong>with</strong> proper initiation of healing of the treated pocket. The first probing<br />
should be performed 3 months after the treatment.<br />
Post-operative Patient Instructions<br />
Do not to use a toothbrush for the first 24 hours after the procedure. Rinse <strong>with</strong> Peridex or other chlorhexidine solution two<br />
times per day for 2 weeks post-treatment. After 24 hours, start brushing again using a soft-bristle toothbrush and toothpaste,<br />
floss daily, and use an over-the-counter mouthwash rinse after the 2-week Peridex regimen. Schedule follow-up visits, including<br />
the first probing at 3 months. Some offices bring the patient back on a routine basis for coronal polishing and post-operative<br />
evaluation prior to the 3-month follow-up.<br />
Single Use Non-Sterile Tips Included<br />
1. Use only as specified in this guide.<br />
2. Tip may break if excessive force is applied.<br />
3. Dispose of tip in sharps container after single use.<br />
Specifications RFPT5-14<br />
Tip Diameter 580µm<br />
Tip Length 14mm<br />
Max Power of<br />
Operation<br />
Calibration<br />
Factor<br />
Disclaimer: Only licensed professionals who have successfully completed training should use this instrument. Always start treatment at the lowest power setting and increase as<br />
required. Closely observe the clinical effects and use your judgment to make appropriate adjustments to compensate for varying tissue compositions, density and thickness. Use<br />
your clinical judgment to decide the clinical protocol and whether any additional laser or conventional instrumentation is required. It is important to note that sound principles of<br />
periodontal treatment have not been affected by using this technique. Protocols that constitute correct periodontal treatment remain <strong>with</strong>in the scope of the operator’s clinical<br />
judgment and experience.<br />
U.S. Patent Numbers: 4,940,411; 5,116,227; 5,151,029; 5,232,367; 5,257,935; 5,267,856; 5,324,200; 5,342,198; 7,421,186. Other U.S. and Int’l Patents Granted and Pending<br />
biolase.com<br />
NASDAQ: BLTI<br />
RFPT5-14 1.5W 30Hz 11% 20% H<br />
0482<br />
USA<br />
2<br />
<strong>Biolase</strong> Technology, Inc.<br />
4 Cromwell<br />
Irvine, CA 92618<br />
949.361.1200<br />
NON<br />
STERILE !<br />
Remove the outer epithelium using the same tip. Use<br />
laser settings provided for Outer Epithelium Removal.<br />
Position the tip parallel to and approximately 1 mm away<br />
from the outer gingiva (Fig 3). Angle the end of the tip<br />
slightly toward the surface. Activate the laser and move<br />
the tip over a 5 mm area from the gingival margin apically.<br />
The tissue surface is altered only enough to disrupt the<br />
epithelium layer, <strong>with</strong>out significant tissue removal.<br />
4.0W<br />
0.80<br />
Europe<br />
MT Promedt Consulting GmbH<br />
Altenhofstrasse 80<br />
D-66386 St. Ingbert<br />
Germany<br />
+49 6894 581020<br />
www.mt-procons.com<br />
P. 2