


You also want an ePaper? Increase the reach of your titles
YUMPU automatically turns print PDFs into web optimized ePapers that Google loves.
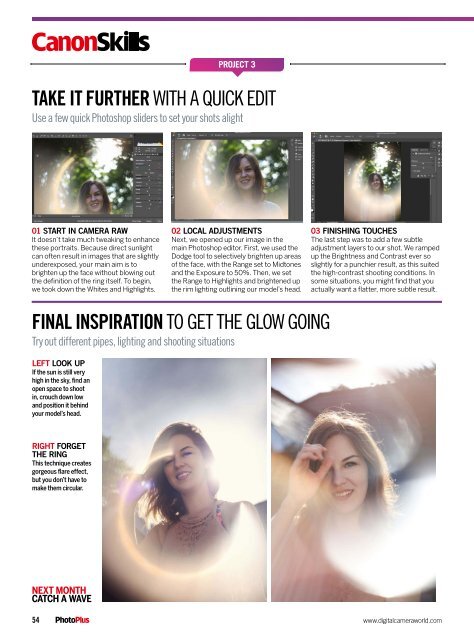
Project 3<br />
Take it further with a QUick edit<br />
Use a few quick Photoshop sliders to set your shots alight<br />
01 start in camera raw<br />
It doesn’t take much tweaking to enhance<br />
these portraits. Because direct sunlight<br />
can often result in images that are slightly<br />
underexposed, your main aim is to<br />
brighten up the face without blowing out<br />
the definition of the ring itself. To begin,<br />
we took down the Whites and Highlights.<br />
02 Local adjuStmentS<br />
Next, we opened up our image in the<br />
main Photoshop editor. First, we used the<br />
Dodge tool to selectively brighten up areas<br />
of the face, with the Range set to Midtones<br />
and the Exposure to 50%. Then, we set<br />
the Range to Highlights and brightened up<br />
the rim lighting outlining our model’s head.<br />
03 Finishing touches<br />
The last step was to add a few subtle<br />
adjustment layers to our shot. We ramped<br />
up the Brightness and Contrast ever so<br />
slightly for a punchier result, as this suited<br />
the high-contrast shooting conditions. In<br />
some situations, you might find that you<br />
actually want a flatter, more subtle result.<br />
Final inspiration TO Get the glow GOING<br />
Try out different pipes, lighting and shooting situations<br />
left look up<br />
If the sun is still very<br />
high in the sky, find an<br />
open space to shoot<br />
in, crouch down low<br />
and position it behind<br />
your model’s head.<br />
right forget<br />
the ring<br />
This technique creates<br />
gorgeous flare effect,<br />
but you don’t have to<br />
make them circular.<br />
Next month<br />
catch a wave<br />
54<br />
www.digitalcameraworld.com


