- Page 1 and 2:
TEAM LinG
- Page 4:
Blues Guitar FOR DUMmIES‰ by Jon
- Page 8:
About the Author Jon Chappell is a
- Page 12:
Contents at a Glance Introduction .
- Page 16:
Table of Contents Introduction.....
- Page 20:
Table of Contents ix Playing E-base
- Page 24:
Table of Contents xi Five Positions
- Page 28:
Table of Contents xiii 21st-Century
- Page 32:
Table of Contents xv Muddy Waters (
- Page 36:
Introduction As B.B. King might say
- Page 40:
Introduction 3 Right hand and left
- Page 44:
Introduction 5 discover the acousti
- Page 48:
Part I You Got a Right to Play the
- Page 52:
Chapter 1 Every Day I Have the Blue
- Page 56:
Chapter 1: Every Day I Have the Blu
- Page 60:
Chapter 1: Every Day I Have the Blu
- Page 64:
Chapter 1: Every Day I Have the Blu
- Page 68:
Chapter 1: Every Day I Have the Blu
- Page 72:
Chapter 1: Every Day I Have the Blu
- Page 76:
Chapter 1: Every Day I Have the Blu
- Page 80:
Chapter 2 Blues Meets Guitar: A Mat
- Page 84:
Chapter 2: Blues Meets Guitar: A Ma
- Page 88:
Chapter 2: Blues Meets Guitar: A Ma
- Page 92:
Chapter 2: Blues Meets Guitar: A Ma
- Page 96:
Chapter 2: Blues Meets Guitar: A Ma
- Page 100:
Chapter 2: Blues Meets Guitar: A Ma
- Page 104:
Chapter 2: Blues Meets Guitar: A Ma
- Page 108: Chapter 2: Blues Meets Guitar: A Ma
- Page 112: Chapter 3 Grab Hold, Tune Up, Play
- Page 116: Chapter 3: Grab Hold, Tune Up, Play
- Page 120: Chapter 3: Grab Hold, Tune Up, Play
- Page 124: Chapter 3: Grab Hold, Tune Up, Play
- Page 128: Chapter 3: Grab Hold, Tune Up, Play
- Page 132: Chapter 3: Grab Hold, Tune Up, Play
- Page 136: Chapter 3: Grab Hold, Tune Up, Play
- Page 140: Chapter 3: Grab Hold, Tune Up, Play
- Page 144: Part II Setting Up to Play the Blue
- Page 148: Chapter 4 Getting a Grip on Left-Ha
- Page 152: Chapter 4: Getting a Grip on Left-H
- Page 156: Chapter 4: Getting a Grip on Left-H
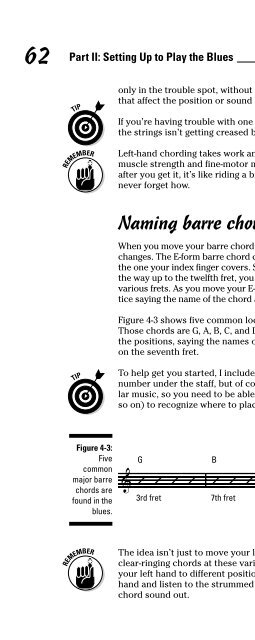
- Page 162: 64 Part II: Setting Up to Play the
- Page 166: 66 Part II: Setting Up to Play the
- Page 170: 68 Part II: Setting Up to Play the
- Page 174: 70 Part II: Setting Up to Play the
- Page 178: 72 Part II: Setting Up to Play the
- Page 182: 74 Part II: Setting Up to Play the
- Page 186: Figure 5-4 is a simple pick-strum p
- Page 190: The 12/8 groove The 12/8 groove is
- Page 194: 80 Part II: Setting Up to Play the
- Page 198: 82 Part II: Setting Up to Play the
- Page 202: Track 11 E7 A7 T A B P.M. P.M. P.M.
- Page 206: 86 Part II: Setting Up to Play the
- Page 210:
Shuffle (qr=qce) E7 A/E N.C. E7 A/E
- Page 214:
90 Part II: Setting Up to Play the
- Page 218:
92 Part II: Setting Up to Play the
- Page 222:
The two-beat feel The two-beat feel
- Page 226:
(continued) A7 5fr. A 7 4fr. E7 5fr
- Page 230:
98 Part II: Setting Up to Play the
- Page 234:
100 Part II: Setting Up to Play the
- Page 238:
102 Part II: Setting Up to Play the
- Page 242:
Track 20 N. C. 1324 6fr. A9 1324 4f
- Page 246:
The 8-bar blues The 8-bar blues is
- Page 250:
108 Part II: Setting Up to Play the
- Page 254:
Track 24 (qr=qce) G G6 G G6 C C6 C
- Page 258:
Track 25 Shuffle (qr=qce) A5 A6 A5
- Page 262:
114 Part II: Setting Up to Play the
- Page 266:
Figure 6-15: A two-bar turnaround w
- Page 270:
118 Part II: Setting Up to Play the
- Page 274:
120 Part II: Setting Up to Play the
- Page 278:
122 Part II: Setting Up to Play the
- Page 282:
Track 32, 0:00 Figure 7-4: An eight
- Page 286:
The 5-6 riff is a blues-rhythm hall
- Page 290:
Track 34 Shuffle (qr=qce) A 3 T A B
- Page 294:
Intro, turnaround, and ending riffs
- Page 298:
If the double strikes in the bass g
- Page 302:
Track 37, 0:33 Figure 7-19: A low-n
- Page 306:
136 Part II: Setting Up to Play the
- Page 310:
In this part . . . This part dives
- Page 314:
140 Part III: Beyond the Basics: Pl
- Page 318:
Figure 8-2 features two notes — t
- Page 322:
144 Part III: Beyond the Basics: Pl
- Page 326:
146 Part III: Beyond the Basics: Pl
- Page 330:
Track 45 Shuffle (qr=qce) E7 A7 E7
- Page 334:
Track 46 E7 A7 E7 T A B 0 0 0 0 3 2
- Page 338:
Track 47 Shuffle Figure 8-10: The m
- Page 342:
154 Part III: Beyond the Basics: Pl
- Page 346:
156 Part III: Beyond the Basics: Pl
- Page 350:
158 Part III: Beyond the Basics: Pl
- Page 354:
After you practice Figure 9-3 a bit
- Page 358:
8fr. Track 50, 0:12 Figure 9-6: A l
- Page 362:
phrase. Slides are covered in more
- Page 366:
166 Part III: Beyond the Basics: Pl
- Page 370:
168 Part III: Beyond the Basics: Pl
- Page 374:
170 Part III: Beyond the Basics: Pl
- Page 378:
172 Part III: Beyond the Basics: Pl
- Page 382:
Super blues star Buddy Guy is a mas
- Page 386:
176 Part III: Beyond the Basics: Pl
- Page 390:
178 Part III: Beyond the Basics: Pl
- Page 394:
Track 58, 0:00 Figure 10-6: Three t
- Page 398:
Track 59, 0:14 Figure 10-9: Pull-of
- Page 402:
184 Part III: Beyond the Basics: Pl
- Page 406:
Releasing right on time Letting go
- Page 410:
Track 63 Shuffle (qr=qce) A7 D7 5 7
- Page 414:
190 Part III: Beyond the Basics: Pl
- Page 418:
In this part . . . Part IV contains
- Page 422:
194 Part IV: Sounding Like the Mast
- Page 426:
Track 65 Shuffle (qr=qce) E7 3 A7 3
- Page 430:
Robert Johnson’s music embodied t
- Page 434:
200 Part IV: Sounding Like the Mast
- Page 438:
202 Part IV: Sounding Like the Mast
- Page 442:
204 Part IV: Sounding Like the Mast
- Page 446:
Track 71 Shuffle (qr=qce) C G7 C Fi
- Page 450:
208 Part IV: Sounding Like the Mast
- Page 454:
Open tunings favor the technical si
- Page 458:
Open D has the same relationships b
- Page 462:
214 Part IV: Sounding Like the Mast
- Page 466:
216 Part IV: Sounding Like the Mast
- Page 470:
Muddy Waters, leader of the pack Bo
- Page 474:
220 Part IV: Sounding Like the Mast
- Page 478:
Shuffle (qr=qce) A7 Track 82 T A B
- Page 482:
224 Part IV: Sounding Like the Mast
- Page 486:
Figure 12-8 shows an example of how
- Page 490:
228 Part IV: Sounding Like the Mast
- Page 494:
230 Part IV: Sounding Like the Mast
- Page 498:
Shuffle (qr=qce) A7 E7 Track 88 wit
- Page 502:
234 Part IV: Sounding Like the Mast
- Page 506:
236 Part IV: Sounding Like the Mast
- Page 510:
238 Part IV: Sounding Like the Mast
- Page 514:
funk style into a true psychedelic
- Page 518:
Track 92 Am G 1 5 8 5 8 5 T 7 7 7 5
- Page 522:
The Allmans, especially brother Dua
- Page 526:
You can hear him trade red-hot blue
- Page 530:
Track 95 Shuffle (qr=qce) A * w/pic
- Page 534:
250 Part IV: Sounding Like the Mast
- Page 538:
252 Part IV: Sounding Like the Mast
- Page 542:
In this part . . . There’s more t
- Page 546:
256 Part V: Gearing Up: Outfitting
- Page 550:
258 Part V: Gearing Up: Outfitting
- Page 554:
260 Part V: Gearing Up: Outfitting
- Page 558:
262 Part V: Gearing Up: Outfitting
- Page 562:
264 Part V: Gearing Up: Outfitting
- Page 566:
266 Part V: Gearing Up: Outfitting
- Page 570:
268 Part V: Gearing Up: Outfitting
- Page 574:
270 Part V: Gearing Up: Outfitting
- Page 578:
272 Part V: Gearing Up: Outfitting
- Page 582:
274 Part V: Gearing Up: Outfitting
- Page 586:
276 Part V: Gearing Up: Outfitting
- Page 590:
278 Part V: Gearing Up: Outfitting
- Page 594:
280 Part V: Gearing Up: Outfitting
- Page 598:
282 Part V: Gearing Up: Outfitting
- Page 602:
284 Part V: Gearing Up: Outfitting
- Page 606:
286 Part V: Gearing Up: Outfitting
- Page 610:
288 Part V: Gearing Up: Outfitting
- Page 614:
290 Part V: Gearing Up: Outfitting
- Page 618:
292 Part V: Gearing Up: Outfitting
- Page 622:
294 Part V: Gearing Up: Outfitting
- Page 626:
296 Part V: Gearing Up: Outfitting
- Page 630:
298 Part V: Gearing Up: Outfitting
- Page 634:
300 Part V: Gearing Up: Outfitting
- Page 638:
302 Part V: Gearing Up: Outfitting
- Page 642:
304 Part V: Gearing Up: Outfitting
- Page 646:
306 Part V: Gearing Up: Outfitting
- Page 650:
308 Part V: Gearing Up: Outfitting
- Page 654:
1. Pull on the string, gently but f
- Page 658:
312 Part V: Gearing Up: Outfitting
- Page 662:
314 Part V: Gearing Up: Outfitting
- Page 666:
In this part . . . The Part of Tens
- Page 670:
318 Part VI: The Part of Tens Elmor
- Page 674:
320 Part VI: The Part of Tens TEAM
- Page 678:
322 Part VI: The Part of Tens TEAM
- Page 682:
324 Part VI: The Part of Tens TEAM
- Page 686:
326 Part VI: The Part of Tens Blues
- Page 690:
328 Part VI: The Part of Tens Maste
- Page 694:
In this part . . . The Appendixes p
- Page 698:
The Elements of Music Notation Figu
- Page 702:
334 Part VII: Appendixes TEAM LinG
- Page 706:
336 Part VII: Appendixes TEAM LinG
- Page 710:
338 Part VII: Appendixes TEAM LinG
- Page 714:
340 Part VII: Appendixes TEAM LinG
- Page 718:
342 Part VII: Appendixes Using the
- Page 722:
344 Part VII: Appendixes TEAM LinG
- Page 726:
346 Part VII: Appendixes TEAM LinG
- Page 730:
348 Part VII: Appendixes TEAM LinG
- Page 734:
350 Blues Guitar For Dummies TEAM L
- Page 738:
352 Blues Guitar For Dummies TEAM L
- Page 742:
354 Blues Guitar For Dummies TEAM L
- Page 746:
356 Blues Guitar For Dummies TEAM L
- Page 750:
358 Blues Guitar For Dummies TEAM L
- Page 754:
360 Blues Guitar For Dummies TEAM L
- Page 758:
362 Blues Guitar For Dummies TEAM L
- Page 762:
364 Blues Guitar For Dummies TEAM L
- Page 766:
5. Limited Warranty. (a) WPI warran
- Page 770:
SPORTS, FITNESS, PARENTING, RELIGIO


![Genki - An Integrated Course in Elementary Japanese II [Second Edition] (2011), WITH PDF BOOKMARKS!](https://img.yumpu.com/58322134/1/180x260/genki-an-integrated-course-in-elementary-japanese-ii-second-edition-2011-with-pdf-bookmarks.jpg?quality=85)
![Genki - An Integrated Course in Elementary Japanese I [Second Edition] (2011), WITH PDF BOOKMARKS!](https://img.yumpu.com/58322120/1/182x260/genki-an-integrated-course-in-elementary-japanese-i-second-edition-2011-with-pdf-bookmarks.jpg?quality=85)