Greece PDF Download... - Flames of War
Greece PDF Download... - Flames of War
Greece PDF Download... - Flames of War

Create successful ePaper yourself
Turn your PDF publications into a flip-book with our unique Google optimized e-Paper software.
y Jökull Gislason
The Battle for <strong>Greece</strong> 2<br />
Firestorm: <strong>Greece</strong> 3<br />
Using the Map 4<br />
How Frestorm works 5<br />
General - Planning Phase 6<br />
Commander - Battle Phase 6<br />
Strategic Phase 9<br />
i<br />
Contents<br />
introduct on<br />
Campaign Outcome 10<br />
Turns 11<br />
Firestorm Troops 15<br />
Firestorm Terms 18<br />
The General’s <strong>War</strong>game 19<br />
Setting up the Campaign 20<br />
Firestorm: <strong>Greece</strong> Campaign Map 22<br />
With the publication <strong>of</strong> Burning Empires I would like to bring the Battle for <strong>Greece</strong> out in a larger context. The fierce<br />
resistance <strong>of</strong> Greeks against the Italian attack and the ill fated British Expeditionary Force against the powerful German<br />
invasion from a great background that can be played using the excellent Firestorm system.<br />
One <strong>of</strong> the good things about Firestorm is how simple the system is and how easy it is to twist and peak it to what is required.<br />
With this in mind there are a few differences between Firestorm: <strong>Greece</strong> and the two previous versions, Bagration and Market<br />
Garden.<br />
One is that it is smaller in scale than previous Firestorms and can easily be played by as few as two people. In fact I call it a<br />
mini campaign since it is best suited to a small group and can be played far more quickly.<br />
Secondly the game is spilt into 4 turns that resemble the entire Campaign. The first three turns focus on the Greco-Italian<br />
<strong>War</strong>, while turn 4 is known as the Battle <strong>of</strong> <strong>Greece</strong> and sees the overwhelming German Invasion. First turn is the initial Italian<br />
Invasion – Emergenza G (“Contingency G[reece]”). Turn two sees the Greek Counter-Offensive, Turn three the short Italian<br />
Spring Offensive – Primavera, led by Mussolini himself. Lastly in Turn four, the German Invasion – Unternehmen Marita<br />
(“Operation Marita”). To best represent the Battle <strong>of</strong> <strong>Greece</strong> each turn is played a little differently and guides you through<br />
the conflict trying to capture the essence <strong>of</strong> each stage. It also gives players a good opportunity to field their respective armies<br />
and have the best playing experience with their Italian and Greek armies that should centre in the Campaign.
You don’t need Firestorm–Bagration<br />
or market garden to plaY?<br />
Firestorm: <strong>Greece</strong> is mostly self-contained. We have included<br />
all <strong>of</strong> the rules you will need to play, so it is not necessary<br />
to own Firestorm: Bagration/Market Garden. <strong>Download</strong>able<br />
tokens are provided although you can easily substitute them<br />
with other models.<br />
For those who are Familiar with<br />
Firestorm, what is diFFerent?<br />
There are a few fundamental variations and differences<br />
between Firestorm: <strong>Greece</strong> and Firestorms Bagration and<br />
Market Garden. To help players out here is a list <strong>of</strong> the major<br />
differences:<br />
Aircraft: Unlike Bagration and Market Garden players do<br />
not receive Aircraft models on the table like other units, but<br />
have a number <strong>of</strong> sorties available to them. You can allocate<br />
a sortie to an attack or defence although the Aircraft can<br />
only be the second unit allocated to each attack. Sorties are<br />
provided for each turn so there is no need to roll for losses,<br />
you always get what is allocated for the turn. Once used they<br />
cannot be used again that turn.<br />
Attacker: In Firestorm: <strong>Greece</strong>, the player with the initiative<br />
automatically becomes the attacker in the <strong>Flames</strong> <strong>of</strong> <strong>War</strong> game,<br />
this supercedes any other special rules, both in missions and<br />
army lists.<br />
Attacks: In this version <strong>of</strong> Firestorm only an attacking player<br />
can capture a region. If the defender wins, he has done just<br />
that, successfully defended. Also in order to make an attack<br />
you must commit at least one Firestorm unit to the battle<br />
which effectively means you can only attack from regions<br />
containing Firestorm Troops. Empty areas can still be<br />
attacked into and defend.<br />
Mini-Campaign: Unlike Bagration and Market Garden this<br />
is not a large scale campaign and can in fact easily be played<br />
with only 2 players. If you have a larger group then I suggest<br />
you play more than one battle as part <strong>of</strong> the same attack and<br />
then the side with the most Victory Points wins. Work it out<br />
yourselves and be flexible.<br />
Turns: Each turn plays differently with regard to two things,<br />
determining initiative and number <strong>of</strong> battles. For example,<br />
Turn 1 has only 2 battles as the Royal Italian Army (“Regio<br />
Esercito”) was sent into a war it was unprepared for. Turn<br />
4 on the other hand has between 8 and 12 battles with<br />
the Germans having a strong lead in initiative. There is a<br />
reason to this suggested number <strong>of</strong> battles and that is to keep<br />
the campaign running efficiently and within a reasonable<br />
timeframe. I have played many Firestorm games and found<br />
this crucial to a good outcome. But feel free to adjust this to<br />
your needs.<br />
the historY<br />
The history is based on three major sources, Burning Empires<br />
itself, Crete by Antony Beevor which includes a section on<br />
the Battle <strong>of</strong> <strong>Greece</strong> and Wikipedia as well as a few other<br />
internet based sources.<br />
where is Crete?<br />
The Battle for Crete is a separate campaign. More importantly<br />
it uses different game mechanics which makes it hard to<br />
incorporate the two Campaigns. Possibly there is a Firestorm:<br />
Crete in the future. Maybe an enthusiastic gamer might wish<br />
to try his hand and make one?<br />
what ForCes should i plaY?<br />
The Greek, German and Italian from Burning Empires and<br />
British from Hellfire and Back. In fact the British Forces in<br />
the Campaign were New Zealand and Australian troops and<br />
an Armoured Brigade intended for the desert and are quite<br />
fitting!<br />
report BaCk!<br />
All feedback on the game is happily received and I would love<br />
to hear from you gamers as to how you find the Campaign.<br />
You can write your reports and comments on the forum<br />
under the Firestorm section.
THE baTTlE FoR GREECE<br />
Hitler always faces me with a fait accompli. This time I am going to pay him back in his own coin. He<br />
will find out from the papers that I have occupied <strong>Greece</strong>.<br />
—Benito Mussolini, speaking to Count Ciano<br />
Italy’s involvement in World <strong>War</strong> II was largely fuelled by<br />
the ambition <strong>of</strong> Benito Mussolini, the dictator <strong>of</strong> Italy <strong>of</strong>ten<br />
referred to as ‘Il Duce’ or Italian for ‘the leader’. Standing<br />
on the sidelines Mussolini saw the Germans go from success<br />
to success while having plans <strong>of</strong> his own for a new Italian<br />
Empire based on the Roman model known as Mare Nostrum<br />
(Latin for “Our Sea” referring to the Mediterranean) and<br />
was revived by Italian nationalists in 1861 who believed that<br />
Italy was the successor state to Roman Empire.<br />
Italy’s first step was the invasion <strong>of</strong> Albania in April 1939<br />
establishing a foothold in the Balkans and a springboard for<br />
further <strong>of</strong>fences. Following a German-Romanian pact in<br />
October 1940 without consulting Il Duce the Italian dictator<br />
feared further German influence in the Balkans and decided<br />
to pay the Germans back in their own coin by occupying<br />
<strong>Greece</strong>.<br />
Il Duce demanded from his Generals that an invasion <strong>of</strong><br />
<strong>Greece</strong> would be launched on the 28th October. For this<br />
the Italian Royal Army (“Regio Esercito”) was woefully ill<br />
prepared but no one would voice their sentiments directly<br />
to Il Duce. Nor had Mussolini taken into consideration<br />
the recommendations <strong>of</strong> the Italian Commission <strong>of</strong> <strong>War</strong><br />
Production, which had warned that Italy would not be able<br />
to sustain a full year <strong>of</strong> continuous warfare until 1949. On<br />
the 28th October 1940 the Italians presented the Greeks with<br />
an impossible ultimatum <strong>of</strong> allowing the Italian Army free<br />
passage to unspecified strategic locations in <strong>Greece</strong>. Ioannis<br />
Metaxas, the Prime Minister <strong>of</strong> <strong>Greece</strong> promptly responded<br />
with Oxi (Ochi or “No” in Greek). The Italians invaded the<br />
border before the deadline had passed.<br />
The Battle for <strong>Greece</strong> was in four distinct stages, the first<br />
three are between the Italians and Greeks and are known<br />
as the Greco-Italian <strong>War</strong>. The first is the Italian Invasion or<br />
Emergenza G (“Contingency G[<strong>Greece</strong>]”) focusing on the<br />
fighting between the 28th October and 13th November 1940.<br />
The second is the Greek Counter-Offensive between 14th November 1940 and 8th March 1941. The third, the short<br />
Italian Spring Offensive (“Primavera” – Italian for Spring)<br />
from the 9th March and 20th March. The fourth and final<br />
stage is Unternehmen Marita (“Operation Marita”) or the<br />
German Invasion.<br />
Both the Regio Esercito and the Hellenic Army were ill prepared<br />
and ill equipped for <strong>War</strong>. Both countries were poor, their forces<br />
weak, and lacking most modern equipment. But the fighting<br />
spirit <strong>of</strong> their men <strong>of</strong>ten made up for this. Emergenza G was<br />
a failure since the Regio Esercito could not sustain any large<br />
<strong>of</strong>fensive at that time. The Greek Counter-Offensive was far<br />
more successful and the Greeks captured territories far into<br />
Albania, but lacked the resources for a prolonged attack. The<br />
Primavera was almost a complete failure. On the 2nd March<br />
the British started Operation Lustre to send reinforcements<br />
in the form <strong>of</strong> an Expeditionary Force to <strong>Greece</strong>, composed<br />
<strong>of</strong> the 6th Australian Division, the New Zealand Division<br />
and the British 1st Armoured Brigade as well as elements <strong>of</strong><br />
the RAF (Royal Air Force). Churchill demanded that Middle<br />
East Command dispatch troops to support the Greeks. At<br />
the same time the British had almost conquered the Italians<br />
in North Africa at the end <strong>of</strong> Operation Compass. These<br />
reinforcements were intended to support the Greeks and take<br />
over part <strong>of</strong> their defences but were not in place when the<br />
Germans started Unternehmen Marita a blitzkrieg campaign<br />
that conquered <strong>Greece</strong> between the 6th and 30th <strong>of</strong> April. The<br />
Campaign saw the Germans in complete control over the<br />
Greek mainland but the British Expeditionary Force managed<br />
another Dunkirk-like withdrawal, saving the majority <strong>of</strong><br />
their troops while losing much <strong>of</strong> their heavy equipment.<br />
The Greeks formally surrendered to the Germans on the 21<br />
April as General Georgios Tsolakoglou wished to deny the<br />
Italians satisfaction <strong>of</strong> a victory they had not earned. This<br />
infuriated Il Duce who ordered further attacks against the<br />
Greek forces. Finally an armistice that included the Italians<br />
took place on the 23rd April. The Battle <strong>of</strong> <strong>Greece</strong> ended in<br />
an overwhelming German Victory.
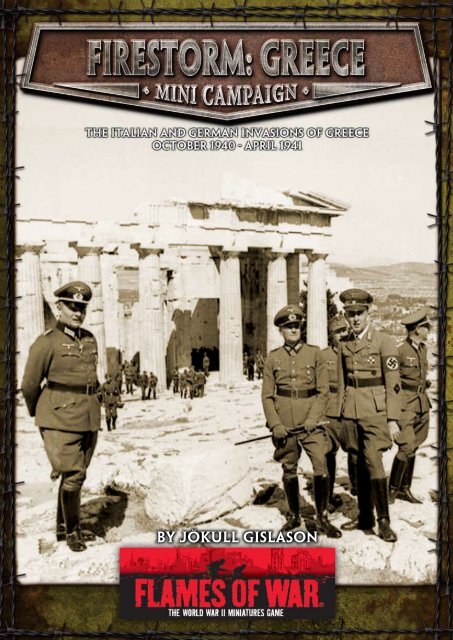
FiREsToRM: GREECE<br />
Firestorm: <strong>Greece</strong> covers the Battle <strong>of</strong> <strong>Greece</strong> using the<br />
Firestorm system. This campaign allows you to re-fight the<br />
battles <strong>of</strong> <strong>Greece</strong> on a grand scale. While the course and<br />
outcome <strong>of</strong> the real Battle <strong>of</strong> <strong>Greece</strong> can’t be changed, the<br />
outcome <strong>of</strong> your campaign is up to you. Either side can win.<br />
Although the odds are in favour <strong>of</strong> the Axis, the Allies stand<br />
a good chance if they can hold on to Athens.<br />
No matter who wins, the campaign is a great opportunity to<br />
get in plenty <strong>of</strong> <strong>Flames</strong> Of <strong>War</strong> games, play new opponents,<br />
win glory for your army, perhaps to meet new friends, and<br />
rewrite history along the way!<br />
whY plaY a Campaign?<br />
The short answer is to play more games, and to have those<br />
games mean something in a larger context. Rather than<br />
just adding to your tally <strong>of</strong> wins and losses, your victories<br />
could result in the encirclement <strong>of</strong> enemy forces, the capture<br />
<strong>of</strong> a vital territory, or cutting the enemy <strong>of</strong>f from their<br />
reinforcements. All <strong>of</strong> these things happen in the campaign<br />
and they all have a major effect on the games that follow.<br />
Every battle makes an immediate difference to the outcome<br />
<strong>of</strong> the whole campaign.<br />
As a club or shop, the benefits <strong>of</strong> a campaign are similar. It’s<br />
a great reason to get together with your friends and play lots<br />
<strong>of</strong> games. It’s also a good excuse to have a workshop weekend<br />
beforehand and build up the club’s stock <strong>of</strong> terrain!<br />
the Battle oF greeCe<br />
Firestorm: <strong>Greece</strong> uses a map to plot the strategic situation<br />
and show the effects <strong>of</strong> your tabletop games on the battles for<br />
<strong>Greece</strong>. All <strong>of</strong> the important units, territory, and objectives<br />
<strong>of</strong> the operation are represented on the map. Your units will<br />
clash at important locations in <strong>Greece</strong> with the best forces<br />
from both sides, such as the elite Libestandarte SS Adolf<br />
Hitler or the stoic Greek Etaireia Pezikoy.<br />
Campaign turns<br />
Firestorm: <strong>Greece</strong> is very different from previous Firestorms in<br />
that each turn determines what you can do. Turns 1 and 3<br />
simulate very limited <strong>of</strong>fensives while turns 2 and 4 simulate<br />
the greater fighting. To best simulate the fighting in <strong>Greece</strong><br />
the turns limit what you can do but give you a good chance<br />
to recreate the desperate battles and lighting war. The four<br />
turn limit also makes it a realistic commitment for both the<br />
organiser and the players.<br />
FlexiBilitY<br />
Within this campaign flexibility is king. Players use their<br />
normal <strong>Flames</strong> Of <strong>War</strong> forces to fight battles to capture areas,<br />
reinforced by the main combat units shown on the campaign<br />
map. Each game the player makes a new force to respond<br />
to the situation they face, allowing them to recover from<br />
previous defeats and fight on. While players may lose the<br />
support <strong>of</strong> main combat units destroyed in previous battles,<br />
they always get their core force. This has the advantage <strong>of</strong><br />
keeping the campaign fun right to the end. It is simply not<br />
possible for one side to become much stronger than the<br />
other, so every battle is winnable and every fight counts.<br />
This flexibility applies to players as well as their forces. While<br />
fielding a Greek or Italian force is nice from a historical<br />
viewpoint, it doesn’t matter if you don’t have one, you can<br />
fight with any force you have. Firestorm: <strong>Greece</strong> is best suited<br />
for standard 1000-1500 point games (I recommend 1250 as<br />
a starting force), but you certainly can play whatever points<br />
you and your opponent would like. Small games are generally<br />
resolved quickly, and you can sometimes get several games in<br />
during the space <strong>of</strong> a normal <strong>Flames</strong> Of <strong>War</strong> game. This helps<br />
generate more results which will keep your campaign moving<br />
quickly. Ultimately, the size <strong>of</strong> your force is not an issue. You<br />
can play big or small battles or anything in between. You can<br />
even swap sides if you want to (although turning traitor can<br />
mark you as a target for your former comrades!). All that<br />
matters is that you are playing games, contributing to the<br />
campaign’s outcome, and having fun.<br />
terrain<br />
The key to a successful Firestorm: <strong>Greece</strong> is to play the right<br />
terrain. The terrain is only <strong>of</strong> two types, open and rough.<br />
Ideally Rough Terrain should almost all be Rough Terrain,<br />
with plenty <strong>of</strong> hills and outcrops, maybe a small hamlet with<br />
a bit <strong>of</strong> foliage and hills with minimal open areas and roads.<br />
This will properly reflect the fighting in <strong>Greece</strong> and bring<br />
out the best in the Greeks and other mountain troops. Open<br />
terrain should be more open, easier tank country but still<br />
have a few Rough Patches.<br />
what are You waiting For?<br />
Read through the Firestorm: <strong>Greece</strong> rules, get everyone<br />
together, organise the venue, and start playing. There’s<br />
nothing else needed to begin, so you can start right away!
120<br />
100<br />
80<br />
60<br />
40<br />
20<br />
0<br />
20<br />
40<br />
60<br />
80<br />
100<br />
120<br />
Tirane<br />
allies viCTorY PoinT inDiCaTor<br />
axis<br />
a1<br />
vlore<br />
B1<br />
a3<br />
C1<br />
10vP<br />
Yugoslavia<br />
C2<br />
ioannina<br />
D1<br />
a4<br />
B3<br />
D2<br />
C3<br />
F1<br />
ionian You may sea move from Area 20vP D1 to<br />
GAME TURN<br />
allied reinForCements<br />
allied<br />
air sorties<br />
us ng the MaP<br />
The Firestorm: <strong>Greece</strong> campaign map forms the playing board for the campaign. It is divided into 17 areas. Each area is<br />
numbered with a letter and a number, like A1 or F2. Some areas are also marked with their value in Campaign Victory Points.<br />
Both sides have a Reinforcement Pool where troops that have been destroyed are placed prior to being rebuilt and sent back<br />
into action. The bottom <strong>of</strong> the map has a Campaign Turn Counter to indicate the current turn (out <strong>of</strong> 4 turns), a summary<br />
<strong>of</strong> the Turn Sequence, and the Victory Point Control Indicator showing which side is winning.<br />
Yugoslavia and Bulgaria<br />
These areas are only used a2 to place German<br />
20vP alBania<br />
forces on turn 4. They can never be attacked, B2<br />
only attacked from.<br />
Victory Point Control Indicator<br />
Campaign Turn Counter<br />
Area B4<br />
20 Campaign Victory Points<br />
F1 (Peloponnese) even though<br />
there is sea in between.<br />
allied<br />
Captured units<br />
B4<br />
20vP<br />
B4<br />
20vP<br />
C4<br />
larisa<br />
e1<br />
MeTaxas line<br />
B5<br />
Thessaloniki<br />
vólos<br />
F2<br />
50vP<br />
Bulgaria<br />
a5<br />
GREECE<br />
elevsis<br />
Piraievs<br />
numBer oF Battles<br />
1 2 3<br />
4 5 6<br />
7 8 9<br />
10 11 12<br />
Thessaloniki<br />
aThens<br />
kavala<br />
aegean sea<br />
axis reinForCements<br />
axis<br />
air sorties<br />
B6<br />
Terrain keY<br />
oPen<br />
rough<br />
iMPassaBle<br />
MeTaxas line<br />
axis reinForCements<br />
axis<br />
air sorties<br />
axis<br />
Captured units<br />
Turn Sequence Summary<br />
axis<br />
Captured units
Commanders<br />
How F restorm Works<br />
Commanders make up the bulk <strong>of</strong> players in Firestorm: <strong>Greece</strong>.<br />
They are the players that actually fight the tabletop battles<br />
that decide the outcome <strong>of</strong> the campaign. Commanders play<br />
their games <strong>of</strong> <strong>Flames</strong> Of <strong>War</strong> in the Battle Phase. Unlike<br />
other versions Firestorm: <strong>Greece</strong> can be easily played with<br />
only 2 players.<br />
Campaign turn<br />
Turns are the essence <strong>of</strong> Firestorm: <strong>Greece</strong>. Each turn is<br />
played differently from the last and are described further<br />
on. A campaign turn consists <strong>of</strong> three phases: the Planning<br />
Phase, the Battle Phase, and the Strategic Phase. In the<br />
Planning Phase at the start <strong>of</strong> the turn the Generals decide<br />
on their plans. The Commanders then execute the plans by<br />
playing games in the Battle Phase. There is no limit to the<br />
number <strong>of</strong> games that can be played in the Battle Phase, and<br />
each Commander can participate in as many battles as they<br />
want to. At the end <strong>of</strong> the campaign turn, both Generals<br />
reorganise their forces in the Strategic Phase ready for the<br />
next campaign turn.<br />
There are three types <strong>of</strong> participants in Firestorm: <strong>Greece</strong>: the<br />
Commanders, the Generals, and the Organiser. The rules for<br />
the campaign are separated into three parts corresponding to<br />
these three roles.<br />
two generals<br />
Each side has a General who is in charge <strong>of</strong> strategy. The<br />
General devises the plan in the Planning Phase for the<br />
Commanders to execute in the Battle Phase. Once the<br />
Commanders have fought all <strong>of</strong> their games, the two Generals<br />
redeploy and reinforce their armies in the Strategic Phase<br />
ready for the next campaign turn. Once the Generals have<br />
finished their planning, they step into the Commander’s role<br />
during the Battle Phase and play tabletop games. Then they<br />
step back into the General’s role for the Strategic Phase.<br />
one organiser<br />
The campaign also needs an Organiser to set it up and make<br />
sure that everything runs smoothly. The Organiser may<br />
choose to play in the campaign as well if they wish, or they<br />
may simply be the owner <strong>of</strong> the store where the campaign is<br />
being played. The chief responsibilities <strong>of</strong> the Organiser are<br />
selecting the scenario that will be played, arranging a suitable<br />
venue, and getting plenty <strong>of</strong> players involved.
GEnERal – PlanninG PHasE<br />
There are many ways <strong>of</strong> planning a battle and experienced generals will have their own way <strong>of</strong> doing things. This section<br />
outlines a simple step-by-step approach to planning your campaign that can help you on your way to victory. Choose the<br />
parts that work for you and use them to plan your victory.<br />
1. look up the turn requirements<br />
First thing you need to do is to read about the current<br />
turn and how it should be played. The number <strong>of</strong> games<br />
played in a turn and how to determine initiative. This is<br />
very clear and is well described in each turn listing.<br />
2. plaCe reinForCements<br />
Turn 1 lists the starting forces and each turn thereafter<br />
places new units at the player’s disposal. Usually these units<br />
are fixed to a specific map location. Just place them down<br />
as indicated. All Firestorm Troops in reserve after being<br />
destroyed can be placed anywhere in friendly territory.<br />
The Battle Phase is where you and your Commanders fight their battles.<br />
3. make moves iF allowed<br />
It says in the Turn summary if you are allowed to move<br />
your units and where. Otherwise units must stay where<br />
they are between turns. Only Germans can ever enter<br />
into Yugoslavia or Bulgaria, no other units from any<br />
other side may enter or attack them. Both Albania and<br />
<strong>Greece</strong> lacked good infrastructure and transport systems<br />
to allow quick relocation <strong>of</strong> troops.<br />
CoMManDER – baTTlE PHasE<br />
As the General you are expected to lead your army into battle. Taking your own force onto the battlefield and engaging the<br />
enemy inspires confidence. Once the Planning Phase is finished, its up to you and your Commanders to fight the Battle<br />
Phase. For the rest <strong>of</strong> the Campaign turn they will fight battles using the three steps <strong>of</strong> the Battle Phase: Manoeuvre Step,<br />
Combat Step, and After Action Step.<br />
1. seleCt an opponent<br />
Your opponents in Firestorm come from the other<br />
Commanders participating in the campaign. Find an<br />
opposing Commander and challenge them to a game <strong>of</strong><br />
<strong>Flames</strong> Of <strong>War</strong>. It doesn’t really matter if the people you play<br />
are on your side or even part <strong>of</strong> the campaign. If you can’t<br />
find an opposing Commander to play, just grab anyone who<br />
is available as the opposing Commander.<br />
2. determine initiative<br />
In Firestorm: <strong>Greece</strong> the initiative passes from one player to<br />
the other. Some turns also have a fixed attacker. Each turn<br />
has a description that shows how it works.<br />
If battles aren’t fixed then both players roll one dice and apply<br />
any turn modifiers. The side that has the higher score wins<br />
the initiative, becomes the attacker and therefore can choose<br />
where the battle will be fought. He will also be the attacker<br />
in any mission played. All the scenarios have modifiers that<br />
favour one player for that turn and determine what to do in<br />
a tie.<br />
sTEP onE – ManoEuVRE<br />
Each Commander fights <strong>Flames</strong> Of <strong>War</strong> battles to advance their armies on the campaign map. The more victorious battles<br />
Commanders fight during a Campaign Turn the better chance their army has to win the campaign.<br />
3. plaCe a Battle arrow<br />
After you win initiative, mark the areas on the Campaign<br />
map where you will battle using a Battle Arrow. If you win<br />
the initiative select an area that your side controls to attack<br />
from and an area that the enemy controls to attack into.<br />
Place a Battle Arrow pointing from your area into the enemy<br />
area you are attacking.<br />
Important: In Firestorm: <strong>Greece</strong> you are only allowed to attack<br />
from areas containing Firestorm Troops. The first must be<br />
a Ground Troop, Aircraft are not sufficient but can be the<br />
second Firestorm Troop. Empty areas may always defend.<br />
The Impassable Areas cannot be attacked into. Yugoslavia<br />
and Bulgaria cannot be attacked into. Tirane, Italian<br />
Command Centre can be attacked but not captured, instead<br />
the Allied player scores points for each successful attack<br />
against Tirane.
As this is a mini-campaign it is inadvisable to allow many<br />
Battle Arrows to go between the same area. Just finish each<br />
battle between two areas before placing arrows from the<br />
same areas. In the case that many are playing at the same<br />
time then just play two or more games simultaneously for<br />
the same areas either in combined games or determine the<br />
winner from the total score. Remember be flexible.<br />
4. Choose Firestorm troops<br />
Firestorm Troops represent the most powerful units that<br />
fought in <strong>Greece</strong>. You can strengthen your force with these<br />
troops. Both the Axis and Allies have Firestorm Troops to<br />
assist their armies in the campaign. You may add up to<br />
two Firestorm Troops from the area you are fighting into<br />
your <strong>Flames</strong> Of <strong>War</strong> force. Place these Firestorm Troops in<br />
the holes in the Battle Arrow. Treat these Firestorm Troops<br />
as extra Divisional Support choices in your force. You do<br />
not need to have Firestorm Troops to attack. Not having<br />
Firestorm Troops simply means that you will not gain<br />
additional troops for your <strong>Flames</strong> Of <strong>War</strong> games. Nor do<br />
you have to commit troops even if you have them, except the<br />
attacker must place 1 Firestorm Troop.<br />
airCraFt and metaxas line<br />
These work slightly differently than other Firestorm troops.<br />
In the case <strong>of</strong> Aircraft, each turn determines the number <strong>of</strong><br />
Aircraft sorties available to each army. This is the only way<br />
players can have Air Support in their games, they are not<br />
allowed to choose Air Support from their lists. These can be<br />
placed to support any battle, in the attackers case they may<br />
only be the second troop, the first must be a ground troop.<br />
Defenders can place Aircraft as their only troop. No more<br />
than one Aircraft sortie can be allocated to each battle, both<br />
in the normal and in the General‘s game. Once used they are<br />
placed aside and cannot be used again that turn. There is no<br />
need to roll to destroy them since they are not reused, but<br />
level <strong>of</strong> Air Support is determined separately each turn.<br />
If the Axis attack over the Metaxas Line (place their Battle<br />
Arrow over the line) it gives Greek defenders fortifications<br />
in addition to any Firestorm Troops they have. This can be<br />
in addition to the maximum two Firestorm Troops allowed.<br />
The Metaxas line only helps if the Greeks are defending.<br />
supplY<br />
sTEP TWo – CoMbaT<br />
There are no supply rules in Firestorm: <strong>Greece</strong>. But being<br />
surrounded will affect retreat and survival <strong>of</strong> Firestorm<br />
Troops.<br />
Once you are prepared for battle then you must identify your mission, bring your army to the table and battle your opponent<br />
in a <strong>Flames</strong> Of <strong>War</strong> game. Make sure both <strong>of</strong> you add your Firestorm Troops to your forces.<br />
1. identiFY Your mission<br />
You are now ready to fight a battle. The next step is deciding<br />
on the mission that you will play.<br />
The best way <strong>of</strong> choosing which mission to play is simply<br />
to decide with your opponent. Use the Turn Missions<br />
table to get inspiration as to the types <strong>of</strong> missions that suit<br />
<strong>Greece</strong>. These aren’t the only missions that you can fight in<br />
these types <strong>of</strong> terrain, but they represent some <strong>of</strong> the more<br />
common types <strong>of</strong> battles fought there.<br />
Important Change: In Firestorm: <strong>Greece</strong> the player with the<br />
initiative automatically becomes the attacker in the <strong>Flames</strong><br />
<strong>of</strong> <strong>War</strong> game, this supercedes any other special rules.<br />
2. plaY <strong>Flames</strong> oF war mission<br />
Now is your chance to prove your mettle under fire. Bring<br />
your <strong>Flames</strong> Of <strong>War</strong> army to the field and vanquish your foe<br />
for the glory <strong>of</strong> your side. Play the mission as a normal <strong>Flames</strong><br />
Of <strong>War</strong> game. Your campaign organiser will have arranged<br />
a suitable points value for the game. However, there is no<br />
reason that you and your opponent can’t agree on any other<br />
size <strong>of</strong> game. You could fight your battle with 800, 1000,<br />
1250, or more points. You might even want to mix things up<br />
playing different sized games throughout the campaign.<br />
Remember, although you both start with the same number<br />
<strong>of</strong> points, any Firestorm Troops that you add to your force<br />
are in addition to this. This could result in one side being<br />
considerably stronger than the other if the strategic situation<br />
is heavily in their favour. If you find yourself outnumbered<br />
like this, don’t panic. Fight hard and try to hold your<br />
positions while your comrades in other areas take advantage<br />
<strong>of</strong> your sacrifice to restore the situation.<br />
lend-lease ForCes<br />
Everyone can participate in a Firestorm campaign. If you do<br />
not have the right forces, use your normal force as a Lendlease<br />
force sent to support one side or the other. You could<br />
field any Early <strong>War</strong> force in place <strong>of</strong> the Burning Empires or<br />
Hellfire & Back Forces.<br />
Forces from any nationality can play in the campaign on either<br />
side. Use the normal Firestorm Troops for reinforcements.<br />
This can result in some unusual force compositions, e.g.<br />
French Char Company with Panzer III support.<br />
Ideally this is best played with their historical forces. But<br />
remember to be flexible and have fun!
No job is done until the paperwork is finished!<br />
At the end <strong>of</strong> your battle you need to take note <strong>of</strong> your Victory<br />
Points. Remove your Battle Arrow from the Campaign<br />
Map, unless there was already a Battle Arrow in place for<br />
these areas when you started your battle and it has not yet<br />
been removed. If there are multiple simultaneous battles in<br />
your area, leave your Battle Arrow in place and wait until<br />
the earlier battles are resolved before completing your After<br />
Action Step.<br />
1. roll to destroY<br />
Committing your Firestorm Troops to battle <strong>of</strong>fers great<br />
rewards, but brings great risk. Their destruction in battle will<br />
leave you weakened, hindering your general’s battle plan.<br />
All Firestorm Troops that fought in the battle are at risk<br />
<strong>of</strong> destruction in the campaign if they are defeated on the<br />
battlefield. While tactical losses can be made good by a<br />
victorious army, a defeated army must conduct a difficult<br />
retreat that can result in the total destruction <strong>of</strong> its best<br />
troops. For each Firestorm troop used in the battle, regardless<br />
<strong>of</strong> its fate during the game, the opposing Commander will<br />
roll a die. The score needed to destroy the Firestorm Troop<br />
in the campaign is given on the Roll to Destroy table and<br />
depends on the number <strong>of</strong> Victory Points that you scored.<br />
Remove any Firestorm Troops that are destroyed from the<br />
Campaign Map and place them in the Reinforcement Pool.<br />
Roll To DEsTRoy<br />
Your Score needed to Destroy<br />
Victory Points Enemy Firestorm Troops<br />
6+ 4+<br />
5 5+<br />
3 or 4 6<br />
2 or less No roll<br />
sTEP THREE – aFTER aCTion<br />
2. retreat deFeated troops<br />
When you have been defeated in battle you must surrender<br />
the battlefield to your opponent. In order to save your force<br />
from utter destruction retreat is your only recourse.<br />
If your opponent scored at least three Victory Points in the<br />
game and scored more Victory Points than you did, then<br />
you have been defeated and must retreat. After rolling for<br />
destruction, all remaining Firestorm Troops in the defeated<br />
Commander’s area must be retreated. Attacking troops<br />
simply return from the area they attacked from while<br />
defeated defending troops must retreat to any adjacent area<br />
<strong>of</strong> their choice that is under their control. If there are no<br />
adjacent friendly-controlled areas to retreat into, then all <strong>of</strong><br />
the Firestorm Troops in the area, including any that would<br />
normally be Destroyed, are captured and permanently<br />
removed from the campaign. This earns the victorious<br />
Commander extra Campaign Victory Points. Report the<br />
capture <strong>of</strong> these Firestorm Troops to your General.<br />
Special Rule, British Firestorm Troops are not counted as<br />
surrounded if they fight in areas F1 and F2 but rather have<br />
escaped by sea. If both these areas are occupied by the Axis<br />
and a British Firestorm Troop is destroyed it is immidiately<br />
captured even if it was not surrounded.<br />
Italian Troops defeated in Tirane (A1) remain where they are<br />
and do not have to retreat, nor can the Allies ever win that<br />
area. Instead the Allies score 10 VP for each successful attack<br />
against Tirane (A1).<br />
3. advanCe viCtorious troops<br />
As an attacker vanquishing your foe you have gained control<br />
<strong>of</strong> his position. To claim your prize, march your forces<br />
forward and take control <strong>of</strong> the battlefield. As the defender<br />
you have managed to defend your territory and remain in<br />
control but do not capture the attackers territory.<br />
If, as the attacker, you defeated your opponent, you now<br />
control the area the defeated forces retreated from. Place<br />
a Control marker on your new area to show that you now<br />
control it. As the victorious Commander, you may move<br />
up to four Firestorm Troops into the newly-controlled area<br />
from adjacent areas. The first troops to move into the newlyacquired<br />
area must be any surviving Firestorm Troops that<br />
you used in your battle. Once these troops have advanced,<br />
you may select the remaining Firestorm Troops to advance<br />
from any adjacent area.<br />
If there were multiple battles being fought in the areas you<br />
were fighting in, it is entirely possible for you to capture an<br />
area from the enemy and occupy it, while another player on<br />
your side loses the area that you just fought out <strong>of</strong>. While<br />
this can be disturbing, as it <strong>of</strong>ten leaves you cut <strong>of</strong>f, such is<br />
the ebb and flow <strong>of</strong> battle.
total viCtorY points<br />
The only thing to do in the Strategic Phase is to total your<br />
Campaign Victory Points. While this does not matter until<br />
the end <strong>of</strong> the campaign, it is useful to know how well you<br />
are doing as the campaign progresses.<br />
Both Generals now total the Campaign Victory Points that<br />
they have earned from capturing and holding objective areas<br />
and surrounding and capturing enemy Firestorm Troops.<br />
Capturing oBjeCtives<br />
Possession <strong>of</strong> key locations in <strong>Greece</strong> is critical to winning<br />
the campaign. These are the important locations that your<br />
army is fighting for.<br />
You receive the number <strong>of</strong> Campaign Victory Points shown<br />
on the Campaign Victory Point table below for each objective<br />
area that you hold.<br />
CaMPaiGn ViCToRy<br />
PoinT TablE<br />
Vlore (B1) 20 points<br />
Thessaloniki (B4) 20 points<br />
Ioannina (C1) 10 points<br />
Athens (F2) 60 points<br />
Peloponnese (F1) 20 points<br />
Special: Each successful attack against Tirane (A1) scores<br />
10 points for the Allies.<br />
FiREsToRM TRooPs<br />
CaPTuRED ViCToRy PoinTs<br />
British Firestorm Troops 10 points<br />
German Panzer Troops 10 points<br />
SS-Kradschützen 10 points<br />
Other German Firestorm Troops 5 points<br />
Italian/Greek Firestorm Troops 5 points<br />
sTRaTEGiC PHasE<br />
Capturing Firestorm troops<br />
Most units that are mauled in combat are pulled out <strong>of</strong><br />
the line and rebuilt before being thrown back into the fray.<br />
However, when a unit is cut <strong>of</strong>f and surrounded, it will be<br />
captured and totally destroyed if it loses a battle.<br />
While Firestorm Troops that are destroyed as a result <strong>of</strong><br />
participating in a battle are placed back in the Reinforcement<br />
Pool, those that are surrounded and unable to retreat are<br />
removed from the game instead (see page 24). Firestorm<br />
Troops that are surrounded and captured in this way earn the<br />
enemy Campaign Victory Points as shown on the Campaign<br />
Victory Points table.<br />
ending the Campaign turn<br />
Once you have worked out your victory points, all that<br />
remains to do is update the campaign map.<br />
The General with the higher Campaign Victory Point total<br />
subtracts the enemy Campaign Victory Point total from<br />
their own to find out their victory point advantage. Move<br />
the Victory Point marker to show which side is winning and<br />
by how much on the Victory Point Indicator on the right<br />
edge <strong>of</strong> the Campaign Map. The last thing to do is to move<br />
the Campaign Turn marker on to the next Campaign Turn<br />
at the bottom <strong>of</strong> the Campaign Map.
0<br />
CaMPaiGn ouTCoME<br />
No one can deny the victor’s laurels to the Greek soldier. But under conditions like these one can only say<br />
that the Italian soldier had earned the martyr’s crown a thousand times over.<br />
-Bauer The History <strong>of</strong> World <strong>War</strong> II<br />
At the end <strong>of</strong> the campaign, the final Campaign Victory Point totals determine the winning side. The extent <strong>of</strong> the victory<br />
depends on the difference between the two sides’ victory point totals.<br />
The side with the higher Campaign Victory Point total wins the campaign. There are four levels <strong>of</strong> victory in Firestorm based<br />
on the difference in Campaign Victory Points between the two sides.<br />
allied viCtorY<br />
The Allied side wins if it has more Campaign Victory<br />
Points then the Axis.<br />
allieD sTraTegiC viCTorY<br />
Win BY 100 CaMPaign PoinTs<br />
The Battle <strong>of</strong> <strong>Greece</strong> has become a new legend in its<br />
heroic history. Like the Greeks facing the Persians two<br />
thousand years before <strong>Greece</strong> has stood stalwart against<br />
a numerically superior foe and is a beacon <strong>of</strong> liberty<br />
among the free world.<br />
allieD oPeraTional viCTorY<br />
Win BY 60 CaMPaign PoinTs<br />
The defence <strong>of</strong> <strong>Greece</strong> has shown the world that the<br />
Germans are not invincible. While the Axis powers<br />
prepare for a new onslaught the Greeks and their Allies<br />
prepare to face them and even though the outcome is far<br />
from certain it has thrown German plans into disarray.<br />
allieD TaCTiCal viCTorY<br />
Win BY 40 CaMPaign PoinTs<br />
The Greeks have held out longer against the enemy<br />
than anyone could have expected and have fought with<br />
honour. Defeat is still eminent but the fight for <strong>Greece</strong><br />
still gives the world hope.<br />
axis viCtorY<br />
The Axis side wins if it has more Campaign Victory<br />
Points then the Allies.<br />
axis sTraTegiC viCTorY<br />
Win BY 100 CaMPaign PoinTs<br />
Germany has gone from victory to victory and much <strong>of</strong><br />
the European mainland is now under their firm control.<br />
The Acropolis is now added to many other prestige<br />
locations like Paris. Nothing can stop Germany now.<br />
More importantly the Southern Front is now secure<br />
before Barbarossa.<br />
This is the historical outcome <strong>of</strong> the Battle <strong>of</strong> <strong>Greece</strong>.<br />
axis oPeraTional viCTorY<br />
Win BY 60 CaMPaign PoinTs<br />
The Battle <strong>of</strong> <strong>Greece</strong> has ended in Victory. Once again<br />
the British are involved in a desperate retreat and have<br />
failed to save their Allies.<br />
axis TaCTiCal viCTorY<br />
Win BY 40 CaMPaign PoinTs<br />
The Battle <strong>of</strong> <strong>Greece</strong> has turned into a grim fight and<br />
will require more effort. But face has been saved and the<br />
outcome is almost a certainty. Just another push.<br />
draw<br />
The campaign is a draw if the total Campaign Victory Points for both sides are within 40 points.<br />
The Axis and Allied armies have fought themselves to a standstill. Germany must call on more forces to defeat the Allies<br />
and this will mean the postponement <strong>of</strong> Barbarossa or to start without many precious forces. But the oilfields <strong>of</strong> Romania<br />
must be secured and a war on 3 fronts ended.<br />
As the Greek Commander you know the end is near but you must press your desperate men on and hope it will not cause<br />
<strong>Greece</strong> too much suffering and the British are now tied down to one more conflict that they do not have the resources for.
TuRns<br />
Firestorm: <strong>Greece</strong> is played over 4 turns. Each turn is played differently to best simulate the battle Campaign itself.<br />
Each turn will determine the number <strong>of</strong> battles, initiative and the number <strong>of</strong> Air Sorties as well as containing information on<br />
deployment. Number <strong>of</strong> battles is a suggestion, if you feel you would rather play more battles feel free, but never go below<br />
the minimum although you can always roll <strong>of</strong>f a few as a General’s Game battle. Each turn has also a missions suggested, but<br />
this is only a suggestion, you can pick a scenario any way you like.<br />
TuRn – EMERGEnZa G<br />
the italian invasion 28 oCtoBer to 13 novemBer 1940<br />
“The time has come for <strong>Greece</strong> to fight for her independence. Greeks, now we must prove ourselves worthy<br />
<strong>of</strong> our forefathers and the freedom they bestowed upon us. Greeks, now fight for your Fatherland, for your<br />
wives, for your children and the sacred traditions. Now, above all, the struggle!”<br />
- Ioannis Metaxas<br />
The Italians attacked on the 28 November with the aim <strong>of</strong> occupying <strong>Greece</strong>. Mussolini was confident that the superiority<br />
<strong>of</strong> the Italian Army would quickly overcome any Greek resistance but this was a dream. The Italian army under Lieutenant<br />
General Visconti Prasca was ill prepared and the terrain was rough and favored the defenders. In addition communications<br />
and infrastructure in Albania was very weak and could not easily support large <strong>of</strong>fensive operations. After pushing through<br />
the initial defences the Italians quickly became involved in heavy fighting and the unexpected Greek resistance caught the<br />
Italian High Command by surprise. Enraged by the lack <strong>of</strong> progress, Mussolini reshuffled the command in Albania, replacing<br />
Prasca with General Ubaldo Soddu, his former Vice-Minister <strong>of</strong> <strong>War</strong>, on 9 November. Immediately upon arrival, Soddu<br />
ordered his forces to turn to the defensive. It was clear that the Italian invasion had failed.<br />
deploYment:<br />
iTalian ForCes<br />
B1-Ciamuria Corps<br />
2x Infantry<br />
1x Armour (M11/39)<br />
B2-Corizza Corps<br />
1x Alpine Infantry (from Ciamuria)<br />
1x Infantry<br />
greek ForCes<br />
C1 - 1x Infantry<br />
C2 - 1x Infantry<br />
B3 - 1x Infantry<br />
B4 - 2x Infantry<br />
B5 - 2x Infantry<br />
# Of battles: 2 Fixed attacks<br />
Initiative: Italy attacks, from B1 (Vlore) to C1 (Ioannina) and from B2 to C2.<br />
Air sorties: 1 Italian Aircraft<br />
Turn 1 only sees 2 predetermined attacks. Neither side was properly prepared for war and the attack soon came to an end.<br />
TuRn suGGEsTED Missions TablE<br />
1 2 3 4 5 6<br />
Free-for-All Dust Up Hold the Line No Retreat Breakthrough Surrounded
TuRn – THE GREEk CounTER-oFFEnsiVE<br />
14 novemBer 1940 to januarY 1941<br />
Greek reserves started reaching the front in early November, while Bulgarian inactivity allowed the Greek High Command to<br />
transfer the majority <strong>of</strong> its divisions from the Greco-Bulgarian border and deploy them in the Albanian front. This enabled<br />
Greek Commander-in-Chief, Lt. Gen. Alexandros Papagos, to establish numerical superiority by mid-November, prior to<br />
launching his counter-<strong>of</strong>fensive.<br />
The Greeks attacked along the entire front with a strong attack from Western Macedonia eventually occupying almost the<br />
entire area <strong>of</strong> southern Albania known as “Northern Epirus” and the strategically important Klisura pass. Their attack against<br />
Vlore failed but the Italians suffered heavy losses in its defence. By January Italy had rushed in enough reinforcements to<br />
contain the attack and the Greek advance was finally stopped.<br />
After January the fighting settled into a stalemate.<br />
deploYment:<br />
Greek and Italian forces may redeploy in their friendly<br />
territories. Italians must redeploy first. At least one Greek<br />
unit must be at B4 and B5.<br />
reinForCements:<br />
iTalian ForCes<br />
Anywhere in Albania<br />
2x Infantry<br />
# Of battles: 1D3* + 3 attacks<br />
greek ForCes<br />
Place anywhere in Greek Territory<br />
2x Infantry<br />
Initiative: Greeks receive +1 and win on ties (Remember the attacking player is also the Attacker in the mission played)<br />
Air sorties: 1 Italian Aircraft<br />
*To roll a D3, roll a standard 6 sided die with 1-2 being 1, 3-4 being 2 and 5-6 being 3.<br />
TuRn suGGEsTED Missions TablE<br />
1 2 3 4 5 6<br />
Free-for-All Free-for-all Cauldron No Retreat Breakthrough Fighting Withdrawal
TuRn – PRiMaVERa<br />
italian spring oFFensive 9 marCh to 20 marCh 1941<br />
The Spring Offensive was to be directed and observed by Mussolini himself. The attack was launched on 9 March and started<br />
with a heavy bombardment and followed by repeated infantry assaults. On the 14 March, Italian General Ugo Cavallero<br />
seeing that the attacks were unable to break through the Greek lines advised Mussolini to stop the <strong>of</strong>fensive. The Italians<br />
unsuccessfully assaulted a height codenamed “731” at least eighteen times. The Greeks implemented a strategy <strong>of</strong> active<br />
defence which included counter-attacks. The <strong>of</strong>fensive lasted to 20 March but obtained only limited conquests and finally<br />
the stalemate continued with operations on both sides scaled down.<br />
deploYment:<br />
Greek and Italian forces may redeploy in their friendly<br />
territories. Greeks redeploy first. At least one Greek unit<br />
must be at B4 and B5.<br />
reinForCements:<br />
iTalian ForCes<br />
Anywhere in Albania<br />
1x Infantry<br />
# Of battles: 1D3* + 2 attacks<br />
Initiative: Italians receive +1 and win on ties<br />
Air sorties: 1 Italian Aircraft<br />
greek ForCes<br />
None<br />
*To roll a D3, roll a standard 6 sided die with 1-2 being 1, 3-4 being 2 and 5-6 being 3.<br />
TuRn suGGEsTED Missions TablE<br />
1 2 3 4 5 6<br />
Free-for-All Hasty Attack No Retreat Breakthrough Fighting Withdrawal Counterattack
TuRn – unTERnEHMEn MaRiTa<br />
the german invasion 6 april to 30 april 1941<br />
With the complete failure <strong>of</strong> the Italian Invasion the Germans had to intervene. The British were increasing their influence<br />
in the Mediterranean and the Germans were about to start their invasion <strong>of</strong> the Soviet Union. First they had to secure their<br />
Southern Flank and importantly the Oil Fields in Romania from harm.<br />
Hitler entrusted his Generals to formulate a plan to invade <strong>Greece</strong> and they did. In Unternehemen Marita the plan was to<br />
move German forces through Bulgaria and invade <strong>Greece</strong> from that direction. The plan changed with events when Germany<br />
invaded Yugoslavia and the country surrendered after 11 days <strong>of</strong> fighting opening a new front to attack <strong>Greece</strong> from.<br />
At the same time the British were building up forces in <strong>Greece</strong>. The British Expeditionary force composed <strong>of</strong> the 1st Armoured<br />
Brigade, the 6th Australian Division and the New Zealand Division became known as W-Force after their Commander<br />
Lieutenant-General Sir Henry Maitland Wilson. The British force was to take over part <strong>of</strong> the Greek defence but was not yet<br />
in place when the Germans Attacked.<br />
What followed was a blitz. The Germans used their military efficiency and the tried and tested methods. With near complete<br />
Air Superiority they charged at the Allies. The Greeks, Australians and New Zealanders put up a spirited defence but their<br />
Commanders saw that the end was near and what followed was an ordered withdrawal. On the 20 April the Greeks started to<br />
negotiate a surrender followed by an Armistice on the 23 rd April. The Australians and New Zealanders put up a stiff defence<br />
at Thermopylae, the place made famous by the stand <strong>of</strong> Leonidas and the 300 Spartans, at the 24-25 th August but were then<br />
ordered to withdraw. The British started to evacuate troops from the 16 April and the last troops were rescued on the 30 th<br />
April, in a feat reminiscent <strong>of</strong> Dunkirk about 50.000 troops were evacuated but had lost much <strong>of</strong> their heavy equipment.<br />
The Battle <strong>of</strong> <strong>Greece</strong> ended with the Axis powers in complete control <strong>of</strong> <strong>Greece</strong>.<br />
deploYment:<br />
Greek and Italian forces may redeploy in their friendly<br />
territories. Greek units redeploy first. All Greek units must<br />
be in areas next to Italian units, except 1 infantry at B5 and<br />
the new Mechanised unit at B4.<br />
reinForCements:<br />
gerMan ForCes<br />
Bulgaria (A5)<br />
1x Tank<br />
2x Infantry<br />
Yugoslavia (A4)<br />
1x Tank<br />
1x SS-Kradschützen<br />
2x Infantry<br />
# Of battles: 2D3* + 6 attacks<br />
Initiative: Axis receives +2 and wins on ties.<br />
Air sorties: 3 German Aircraft, 1 Italian Aircraft and 1 British Aircraft<br />
greek ForCes<br />
B4 - 1x Mechanised Unit<br />
BriTish exPeDiTionarY ForCe “W” ForCe<br />
C4 - 1x Tank, 1x infantry<br />
E1 - 1x Infantry<br />
TuRn suGGEsTED Missions TablE<br />
1 2 3 4 5 6<br />
Free-for-All Dust Up Hasty Attack Breakthrough Fighting Withdrawal Hold the Line
GREEk<br />
bRiTisH<br />
6th Australian Divsion,<br />
New Zealand Division<br />
peZikoY - inFantrY x 9<br />
Reinforce your company with a Pezikoy platoon with 3 Pezikoy Squads (Command team, VB team and 6 rifle/MG teams).<br />
Rated as Fearless Trained Mountaineers.<br />
Infantry Range ROF AT Firepower<br />
Rifle/MG team 40cm 2 2 6<br />
VB team 20cm 2 1 4+ Can fire over friendly troops<br />
5th Cretan Div, 7th Infantry Div, 8th Infantry Div, 9th Infantry Div, 10 Infantry Div,<br />
11 Infantry Div, 15th Infantry Div, 18th Infantry Div and 4th Infantry Bgd.<br />
elaFrY tank platoon - meChanised x 1<br />
Reinforce your company with an Elafry Platoon with 3x L3/35 tankettes. Rated as Fearless Trained.<br />
Armour<br />
Name Mobility Front Side Top Notes and Equipment<br />
Weapon Range ROF AT Firepower<br />
L3/35 Half-Tracked 0 0 1 Twin hull MG<br />
hmg nest - metaxas line<br />
Reinforce your company with two HMG Nests<br />
FiREsToRM TRooPs<br />
alliED TRooPs<br />
19th Motorised Division<br />
HMG Nest 60cm ROF 6 Anti-tank 2 Firepower 6 ROF 2 When pinned down<br />
riFle platoon - inFantrY x 2<br />
Reinforce your company with a Rifle Platoon with 3 Rifle Squads (Command team, Light Mortar team and Anti-tank Rifle<br />
team and 6 rifle/MG teams). Rated as Confident Trained.<br />
Infantry Range ROF AT Firepower<br />
Rifle/MG team 40cm 2 2 6<br />
Light mortar 40cm 1 1 4+ Can fire over friendly troops<br />
Anti-tank Rifle team 40cm 1 4 5+ Tank Assault 3<br />
6th Australian Divsion, New Zealand Division<br />
British tank platoon - tank x 1<br />
Reinforce your company with an Armoured Platoon with 3 tanks (3x A10 Cruiser Mk IIA). Rated as Confident Trained.<br />
Armour<br />
Name Mobility Front Side Top Notes and Equipment<br />
Weapon Range ROF AT Firepower<br />
A10 Cruiser Mk IIA Fully-Tracked 2 2 1 Co-ax MG, Hull MG, Slow tank, Unreliable<br />
OQF 2 pdr gun 60cm 2 7 4+ Broadside, No HE, Tally Ho<br />
1st Armoured Brigade<br />
air support x 1<br />
Reinforce your company with Sporadic Air Support. Hurricane II is a dedicated air superiority fighter. It can only be used<br />
for Fighter Interception and cannot be used for Ground Attack. So overwhelming was the German Air Superiority that<br />
Commonwealth troops said the RAF stood for Rare As Fairies.<br />
No. 80 Squadron RAF
aXis TRooPs<br />
FuCilieri CompanY - inFantrY x 6<br />
Reinforce your company with a Fucilieri Company with 1 platoon (Command team and 8 rifle teams). Rated as Regular<br />
Infantry Range ROF AT Firepower<br />
Rifle Range 40cm ROF 1 AT 2 Firepower 6<br />
7th Lupi di Toscana 19th Venezia, 23rd Ferrara, 29th Piemonte, 49th Parma, 51st Siena Divisions<br />
alpini FuCilieri CompanY - inFantrY x 1<br />
Reinforce your company with a Fucilieri Company with 1 platoon (Command team and 8 rifle teams).<br />
Rated as Elite Mountaineers.<br />
Infantry Range ROF AT Firepower<br />
Rifle Range 40cm ROF 1 AT 2 Firepower 6<br />
3rd Julia Alpine Division<br />
Carri platoon - armour x 1<br />
Reinforce your company with a Carri Platoon with 3 tanks (Turn 1 3x M11/39, Turn 2+ 3xM13/40). Rated as Elite. Note<br />
that in turn 1 you get three M11/39 but from turn two you get three M13/40.<br />
Armour<br />
Name Mobility Front Side Top Notes and Equipment<br />
Weapon Range ROF AT Firepower<br />
M13/39 Fully-Tracked 2 1 1 Twin MG, Slow tank, Unreliable<br />
37/40 gun 60cm 2 5 4+ Hull mounted<br />
M13/40 Fully-Tracked 3 2 1 Co-ax MG, Twin hull MG, Slow tank, Unreliable<br />
47/32 gun 60cm 2 6 4+<br />
131st Centauro Armoured Division<br />
air support x 1<br />
Reinforce your company with Sporadic Air Support with FIAT CR.42 Falco.<br />
Aircraft Weapon To Hit AT Firepower<br />
FIAT CR.42 Falco MG 3+ 5 5+<br />
Bombs 4+ 5 2+<br />
Regia Aeronautica<br />
ital an
GERMan<br />
inFanterie platoon - inFantrY x 4<br />
Reinforce your company with a Rifle Platoon with 4 Infanterie Squads (Command team, light mortar team and 8 rifle/MG<br />
teams). Rated as Confident Veteran.<br />
Infantry Range ROF AT Firepower<br />
Rifle/MG team Range 40cm ROF 2 AT 2 Firepower 6<br />
Light mortar Range 40cm ROF 1 AT 1 Firepower 4+ Can fire over friendly troops<br />
5th Mountain, 6th Mountain, 73rd Infantry Division<br />
ss-kradsChÜtZen - inFantrY x 1<br />
Reinforce your company with SS-Kradschützen with 3 Schützen Squads (Command Motorcycle team, Motorcycle Light<br />
mortar team and 6 Motorcycle MG teams). Rated as Fearless Veteran.<br />
Infantry Range ROF AT Firepower<br />
MG team Range 40cm ROF 3 AT 2 Firepower 6<br />
Light mortar Range 40cm ROF 1 AT 1 Firepower 4+ Can fire over friendly troops<br />
Motorcycle & sidecar Jeep<br />
Leibstandarte SS Adolf Hitler Brigade<br />
panZer iii platoon - tank x 2<br />
Reinforce your company with a Panzer III Platoon with 3 tanks (3x Panzer III G). Rated as Confident Veteran.<br />
Armour<br />
Name Mobility Front Side Top Notes and Equipment<br />
Weapon Range ROF AT Firepower<br />
Panzer III G Fully-Tracked Front 3 Side 3 Top 1 Co-ax MG, Hull MG, Protected ammo<br />
5cm KwK gun Range 60cm ROF 3 AT 7 Firepower 4+<br />
2nd Panzerdivision and 9th Panzerdivision<br />
air support x 3<br />
Reinforce your company with Priority Air Support with Stuka Schwerpunkt.<br />
Aircraft Weapon To Hit AT Firepower<br />
Ju87B Stuka Bombs To hit 4+ AT 5 Firepower 2+ Stuka Schwerpunkt<br />
Von Richth<strong>of</strong>en Fliegerkorps VIII
After Action Step (page x): The commanders complete the<br />
After Action Step after fighting a battle. Troops advance,<br />
retreat or are destroyed in this step.<br />
Air Sorites (page x): Each turn players are provided with a<br />
number <strong>of</strong> Air Sorties. This is the only Air support available<br />
to players. Once sortie can be allocated to each battle and<br />
once used cannot be used again that turn.<br />
Area (page x): The campaign map is divided into areas. All<br />
movement is from one area to another, and all <strong>Flames</strong> Of<br />
<strong>War</strong> battles take place between two areas.<br />
Battle Arrow (page x): Battle arrows mark battles that are<br />
currently taking place on the campaign map. Place Firestorm<br />
Troops fighting in the battle in the holes on the battle arrow.<br />
In order to make an attack you must support it with at least<br />
one ground Firestorm Troop.<br />
Battle Phase (page x): Each turn the commanders fight<br />
<strong>Flames</strong> Of <strong>War</strong> games in the Battle Phase. Each game played<br />
in the phase has three steps: the Manoeuvre Step, the Combat<br />
Step, and the After Action Step.<br />
Campaign Map (page x): The campaign map portrays the<br />
area <strong>of</strong> <strong>Greece</strong> where the Battle for <strong>Greece</strong> took place. It<br />
also contains a key, the turn sequence, details <strong>of</strong> Firestorm<br />
Troops, the Campaign Turn Indicator, the Reinforcement<br />
Pools, and a Victory Point Indicator.<br />
Campaign Turn (page x): The campaign is divided into<br />
four campaign turns. Each Campaign turn is almost a mini<br />
campaign in itself where players act out distinct parts <strong>of</strong> the<br />
Battle for <strong>Greece</strong>. In each campaign turn the rules dictated<br />
how initiative is played, the number <strong>of</strong> Air Sorties is available<br />
and the recommended amount <strong>of</strong> battles to be played.<br />
Campaign Victory Points (page x): Campaign victory points<br />
are used to measure the success <strong>of</strong> each side in the campaign.<br />
Campaign victory points are awarded for capturing cities<br />
and other objectives, and for surrounding and capturing<br />
enemy forces.<br />
FiREsToRM TERMs<br />
Combat Step (page x): In the Combat Step <strong>of</strong> the Battle<br />
Phase commanders select the mission that they will play and<br />
fight a <strong>Flames</strong> Of <strong>War</strong> game.<br />
Commander (page x): Commanders are the players who<br />
fight the <strong>Flames</strong> Of <strong>War</strong> games that determine the campaign’s<br />
outcome.<br />
Control Marker (page x): Control markers identify areas<br />
that you control. When you advance into an area place a<br />
control marker in it to show that you now control it. In<br />
Firestorm <strong>Greece</strong> these are not really needed since the battle<br />
lines should be clear.<br />
Firestorm Troops (page x): Firestorm Troops are miniatures<br />
representing the key units in the campaign. Firestorm Troops<br />
can be committed to a battle giving extra troops in the <strong>Flames</strong><br />
Of <strong>War</strong> game that decides its outcome. For a complete list <strong>of</strong><br />
Firestorm Troops see pages 17-19.<br />
General (page x): Each side has a General who coordinates<br />
the side’s strategy in the Planning and Strategic Phases. Since<br />
Firestorm <strong>Greece</strong> is a mini-campaign this is much simpler<br />
than in Bagration or Market Garden.<br />
Metaxas line (page x): Any attacks against Greek forces over<br />
the Metaxas line provide two HMG Nests in addition to any<br />
Firestorm Troops.<br />
Reinforcements (page x): Firestorm Troops destroyed after a<br />
battle are placed in the Reinforcement Pool on the Campaign<br />
Map. They are returned to play at the begining <strong>of</strong> the next<br />
turn, subject to the Turns specifications.<br />
Reinforcement Pool (page x): The reinforcement pools at<br />
the bottom <strong>of</strong> the campaign map hold Firestorm Troops that<br />
were destroyed in the After Action Step.<br />
Victory Point Marker (page x): The advantage currently<br />
held by the winning side is shown by the position <strong>of</strong> the<br />
victory point marker on the victory point indicator on the<br />
side <strong>of</strong> the map.
THE GEnERal’s WaRGaME<br />
Generals have used wargames to test their plans for centuries.<br />
Manoeuvring pieces around on maps instead <strong>of</strong> troops on the<br />
battlefield allows them to fight battles in a matter <strong>of</strong> hours<br />
rather than days, and at little cost especially if they lose. If<br />
their strategy works, they can then apply it in the real battle.<br />
If it fails, they can come up with another plan before they<br />
have to commit their soldiers’ lives in action.<br />
In The General’s <strong>War</strong>game you command the Axis or Allied<br />
army in the Battle <strong>of</strong> <strong>Greece</strong> in 1940-41. As the General,<br />
you experience the ebb and flow <strong>of</strong> a large campaign that will<br />
decide the course <strong>of</strong> the war.<br />
The General’s <strong>War</strong>game is a fast-paced two-player game based<br />
on Firestorm: <strong>Greece</strong> that takes between a half an hour and<br />
an hour to play. When both players are constantly involved<br />
in planning and executing attacks, time flies and the hardest<br />
question is whether you can fit in another game!<br />
This makes it an ideal game when you have a few spare hours,<br />
but not enough space for a miniatures game, or you’ve just<br />
finished your <strong>Flames</strong> Of <strong>War</strong> game and have an hour to spare<br />
before you head <strong>of</strong>f home.<br />
Got a quiet evening? Grab a friend and relax with some<br />
drinks and snacks around the kitchen table! Travelling and<br />
want to take a game along? Grab Firestorm: <strong>Greece</strong> and play<br />
The General’s <strong>War</strong>game.<br />
As well as being a stand-alone game, The General’s <strong>War</strong>game<br />
is a great tool for generals playing the Firestorm: <strong>Greece</strong><br />
campaign. Before the campaign begins, you can run<br />
through a few games <strong>of</strong> The General’s <strong>War</strong>game to test out<br />
your strategies and see how they perform. Just like the real<br />
generals, this experience will help you make winning plans<br />
when the real campaign begins. You can also set up your map<br />
to match the campaign map and try out plans for the next<br />
turn. Run through each strategy a few times to see the most<br />
likely outcome, and then write your battle plan accordingly.<br />
Whether you play The General’s <strong>War</strong>game on its own or as<br />
part <strong>of</strong> a Firestorm: <strong>Greece</strong> campaign, remember above all else<br />
that, like Napoleon, your country needs lucky generals — so<br />
roll good dice.<br />
order one – planning phase<br />
1. Look up the turn requirements<br />
2. Place reinforcements<br />
3. Make Moves if Allowed<br />
order two - Battle phase<br />
(Repeat for each Battle)<br />
1. Roll for Initiative<br />
2. Place a Battle Arrow<br />
3. Choose Firestorm Troops<br />
4. Resolve the Battle<br />
5. Roll to Destroy<br />
6. Retreat Defeated Troops<br />
7. Advance Victorious Troops<br />
Check for Supply is not used in Firestorm: <strong>Greece</strong>.<br />
order three – strategiC phase<br />
1. Total Your Victory Points<br />
Bring in Reinforcements, Make Strategic Moves<br />
Moves are not used in Firestorm: <strong>Greece</strong>.<br />
Hitler calls Mussolini on the phone:<br />
“Benito aren’t you in Athens yet?”<br />
“I can’t hear you Adolf.”<br />
“I said aren’t you in Athens yet?”<br />
“I can’t hear you. You must be ringing from a long way<br />
<strong>of</strong>f, presumably London.”<br />
Joke circulating in Occupied France, winter 1940–41
order one – planning phase<br />
Set up the campaign as normal.<br />
1. Look up the turn requirements<br />
At the start <strong>of</strong> each turn there is a listing <strong>of</strong> things available<br />
and options. These work exactly the same in the General’s<br />
Game as in the standard game.<br />
2. Place reinforcements<br />
Any destroyed Firestrom Troops that were not captured last<br />
turn are now placed back on the map from the reinforcement<br />
pool.<br />
order two - Battle phase<br />
(Repeat for each Battle)<br />
1. Roll for Initiative<br />
Turn 1 has fixed battles and fixed attacker. After that both<br />
players roll one dice and after adding any turn modifiers the<br />
player with the higher roll is the attacker.<br />
0<br />
sett ng up the Campa gn Map<br />
FiREsToRM TRooP bonusEs<br />
Each Firestorm Troop placed on a Battle Arrow and<br />
committed to a battle gives a bonus to your die roll. Use<br />
the Firestorm Troop Bonuses table to determine your<br />
bonus for each Firestorm Troop placed on the Battle<br />
Arrow. Depending on the terrain attacked into your<br />
troops will have bonuses to help you win the battle.<br />
unit plain rough<br />
Greek Inf +1 +2<br />
Greek Motorised +1 +1<br />
Metaxas Line NA +1<br />
Italian Inf +1 +1<br />
Italian Mountain Inf +1 +2<br />
Italian Armour 11/39 +1 +1<br />
Italian Armour 13/40 +2 +1<br />
FIAT CR.42 +1 +1<br />
British Infantry +2 +2<br />
British Armour +3 +1<br />
RAF Fighter* +1* +1*<br />
LSSAH Kradschützen +3 +3<br />
German Infantry +2 +2<br />
German Armour +4 +2<br />
Ju 87B Stuka +3 +2<br />
*RAF Fighter only provides a bonus if there are Axis<br />
Aircraft present.<br />
2. Place a Battle Arrow<br />
After you win initiative, mark the areas on the Campaign<br />
map where you will battle using a Battle Arrow. If you win<br />
the initiative select an area that your side controls to attack<br />
from and an area that the enemy controls to attack into.<br />
Place a Battle Arrow pointing from your area into the enemy<br />
area you are attacking.<br />
Important: In Firestorm: <strong>Greece</strong> you are only allowed to attack<br />
from areas containing Firestorm Troops. The first must be<br />
a Ground Troop, Aircraft are not sufficient but can be the<br />
second Firestorm Troop. Empty areas may always defend.<br />
The Impassable Area cannot be attacked into. Yugoslavia and<br />
Bulgaria cannot be attacked into. Tirane, Italian Command<br />
Centre can be attacked but not captured, instead the Allied<br />
player scores points for each successful attack against<br />
Tirane.<br />
Conclude the outcome <strong>of</strong> each battle before going to the<br />
next.<br />
3. Choose Firestorm Troops<br />
Both players now allocate up to two Firestorm Troops<br />
to each battle. The Attacker must commit one ground<br />
Firestorm Troop to the battle however and if there are Greeks<br />
defending behind the Metaxas Line the receive a bonus for<br />
that as well.<br />
4. Resolve the Battle<br />
Generals plan to win battles by committing their strongest<br />
and freshest troops against the enemy’s weaknesses. However,<br />
despite the best laid plans <strong>of</strong> generals, it is fortune that<br />
ultimately decides battles.<br />
The battle is decided on the roll <strong>of</strong> dice. Each player rolls a<br />
die and adds the Firestorm Troop Bonuses for the Firestorm<br />
Troops that they committed and any applicable Situation<br />
Modifiers. The higher roll wins the battle. A tie with both<br />
players rolling the same score results in a draw in which case<br />
neither side advances or retreats.<br />
5. Roll to Destroy<br />
Committing your Firestorm Troops to battle <strong>of</strong>fers great<br />
rewards, but brings great risk. Their destruction in battle will<br />
leave you weakened, hindering your general’s battle plan.<br />
All Firestorm Troops that fought in the battle are at risk<br />
<strong>of</strong> destruction in the campaign if they are defeated on the<br />
battlefield. While tactical losses can be made good by a<br />
victorious army, a defeated army must conduct a difficult<br />
retreat that can result in the total destruction <strong>of</strong> its best<br />
troops. For each Firestorm troop used in the battle the<br />
opposing Commander will roll a die. The score needed to<br />
destroy the Firestorm Troop in the campaign is given on the<br />
Roll to Destroy table and depends on the difference between<br />
the dice rolled for that battle. Remove any Firestorm Troops<br />
that are destroyed from the Campaign Map and place them<br />
in the Reinforcement Pool.
6. Retreat Defeated Troops<br />
When you have been defeated in battle you must surrender<br />
the battlefield to your opponent. In order to save your force<br />
from utter destruction retreat is your only recourse.<br />
If your opponent scored at least three Victory Points in the<br />
game and scored more Victory Points than you did, then<br />
you have been defeated and must retreat. After rolling for<br />
destruction, all remaining Firestorm Troops in the defeated<br />
Commander’s area must be retreated. Attacking troops<br />
simply return from the area they attacked from while<br />
defeated defending troops must retreat to any adjacent area<br />
<strong>of</strong> their choice that is under their control. If there are no<br />
adjacent friendly-controlled areas to retreat into, then all <strong>of</strong><br />
the Firestorm Troops in the area, including any that would<br />
normally be Destroyed, are captured and permanently<br />
removed from the campaign. This earns the victorious<br />
Commander extra Campaign Victory Points. Report the<br />
capture <strong>of</strong> these Firestorm Troops to your General.<br />
Special Rules: British Firestorm Troops are not counted as<br />
surrounded if they fight in areas F1 and F2 but rather have<br />
escaped by sea. If both these areas are occupied by the Axis<br />
and a British Firestorm Troop is destroyed it is immidiately<br />
captured even if it was not surrounded.<br />
Italian Troops defeated in Tirane (A1) remain where they are<br />
and do not have to retreat, nor can the Allies ever win that<br />
area. Instead the Allies score 10 VP for each successful attack<br />
against Tirane (A1).<br />
7. Advance Victorious Troops<br />
As an attacker vanquishing your foe you have gained control<br />
<strong>of</strong> his position. To claim your prize, march your forces<br />
forward and take control <strong>of</strong> the battlefield. As the defender<br />
you have managed to defend your territory and remain in<br />
control but do not capture the attackers territory.<br />
If as attacker you defeated your opponent, you now control<br />
the area the defeated forces retreated from. Place a Control<br />
marker on your new area to show that you now control it.<br />
As the victorious Commander, you may move up to four<br />
Firestorm Troops into the newly-controlled area from<br />
adjacent areas. The first troops to move into the newlyacquired<br />
area mustbe any surviving Firestorm Troops that<br />
you used in your battle. Once these troops have advanced,<br />
you may select the remaining Firestorm Troops to advance<br />
from any adjacent area.<br />
Roll To DEsTRoy<br />
die roll diFFerenCe sCore needed to destroY sCore needed to destroY<br />
losing Firestorm troops winning Firestorm troops<br />
0 (Draw) 6 6<br />
1 or 2 6 6<br />
3 or 4 5+ -<br />
5 4+ -<br />
If there were multiple battles being fought in the areas you<br />
were fighting in, it is entirely possible for you to capture an<br />
area from the enemy and occupy it, while another player on<br />
your side loses the area that you just fought out <strong>of</strong>. While<br />
this can be disturbing, as it <strong>of</strong>ten leaves you cut <strong>of</strong>f, such is<br />
the ebb and flow <strong>of</strong> battle.<br />
Check for Supply is not used in Firestorm: <strong>Greece</strong>.<br />
order three – strategiC phase<br />
1. Total Your Victory Points<br />
Work this out exactly as you would in the normal Firestorm<br />
Game.<br />
EXaMPlE<br />
A Greek player wins the initiative and decides to launch<br />
two Greek Infantry from C2 against two Italian Infantry<br />
in B2. Both players roll a die and add their Firestorm<br />
Troop Bonuses. The Greek player rolls 5 and the Italian<br />
rolls a 4. Thanks to the Rough Terrain the Greeks add<br />
+4 (+2 for each infantry) to their score while the Italians<br />
only receive a +2 (+1 for each infantry) giving final<br />
scores <strong>of</strong> 9 and 6. This is a difference <strong>of</strong> 3, so the Greek<br />
player rolls a die for each <strong>of</strong> the Italian Infantry units<br />
and they are destroyed on a 5+. Now as the attacker<br />
the Greek player moves his troops to occupy B2 while<br />
the Italian player must retreat, choosing Tirane. Had the<br />
Italian player won by the same amount then he would<br />
have rolled for the Greek units, with any surviving units<br />
falling back to C2. The Italian player does not advance<br />
into C2 since they were defending.
120<br />
100<br />
80<br />
60<br />
40<br />
20<br />
0<br />
20<br />
40<br />
60<br />
80<br />
100<br />
120<br />
Tirane<br />
a1<br />
a3<br />
a2<br />
20vP alBania<br />
allies viCTorY PoinT inDiCaTor<br />
axis<br />
vlore<br />
B1<br />
ionian sea<br />
GAME TURN<br />
B2<br />
C1<br />
10vP<br />
Yugoslavia<br />
C2<br />
ioannina<br />
allied reinForCements<br />
allied<br />
air sorties<br />
D1<br />
allied<br />
Captured units<br />
a4<br />
B3<br />
D2<br />
C3<br />
F1<br />
20vP<br />
B4<br />
20vP<br />
C4<br />
larisa<br />
MeTaxas line<br />
B5<br />
Thessaloniki<br />
vólos<br />
Bulgaria<br />
a5<br />
GREECE<br />
e1<br />
aegean sea<br />
F2<br />
50vP<br />
elevsis<br />
Piraievs<br />
numBer oF Battles<br />
1 2 3<br />
4 5 6<br />
7 8 9<br />
10 11 12<br />
aThens<br />
Commander<br />
Battle phase<br />
orDer one-<br />
Manoeuvre sTeP<br />
1. Select an opponent<br />
2. Determine initiative<br />
3. Place a battle arrow<br />
4. Choose Firestorm Troops<br />
orDer TWo-<br />
CoMBaT sTeP<br />
1. Identify your mission<br />
2. Play <strong>Flames</strong> <strong>of</strong> <strong>War</strong> mission<br />
orDer Three-<br />
aFTer aCTion sTeP<br />
1. Roll to destroy<br />
2. Retreat defeated troops<br />
3. Advance victorious troops<br />
kavala<br />
B6<br />
Terrain keY<br />
general<br />
oPen<br />
rough<br />
iMPassaBle<br />
MeTaxas line<br />
orDer one-<br />
Planning Phase<br />
1. Look up the turn<br />
requirements<br />
2. Place reinforcements<br />
3. Make moves if allowed<br />
orDer TWo-<br />
BaTTle Phase<br />
1. Players fight the Battle<br />
Phase<br />
orDer Three-<br />
sTraTegiC Phase<br />
1. Total victory points<br />
axis reinForCements<br />
axis<br />
air sorties<br />
axis<br />
Captured units