Twin Sport Strollers Instruction Manual - Combi USA
Twin Sport Strollers Instruction Manual - Combi USA
Twin Sport Strollers Instruction Manual - Combi USA

You also want an ePaper? Increase the reach of your titles
YUMPU automatically turns print PDFs into web optimized ePapers that Google loves.
Be sure to carefully read this instruction manual before using the product to ensure proper use of<br />
the stroller, and keep it for future reference. Record the following information for quick reference.<br />
Note: Illustrations are only representative and not actual.<br />
Date Purchased: ___________________ Model Number: _______ - ____ Color _______________________________________________________________________<br />
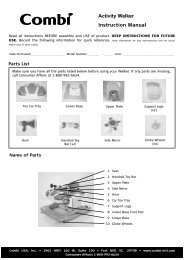
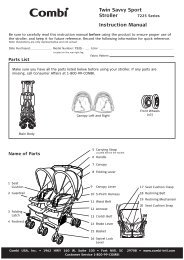
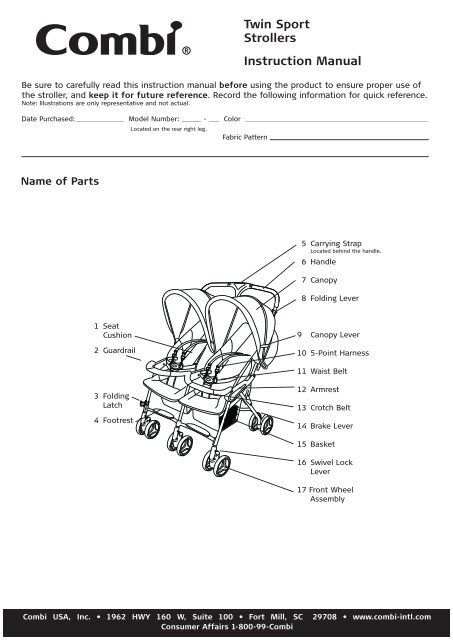
Name of Parts<br />
1 Pillow<br />
1 Seat<br />
Cushion<br />
2 Guardrail<br />
3 Folding<br />
Latch<br />
4 Footrest<br />
Located on the rear right leg.<br />
<strong>Twin</strong> <strong>Sport</strong><br />
<strong>Strollers</strong><br />
<strong>Instruction</strong> <strong>Manual</strong><br />
Fabric Pattern<br />
5 Carrying Strap<br />
Located behind the handle.<br />
6 Handle<br />
7 Canopy<br />
8 Folding Lever<br />
9 Canopy Lever<br />
10 5-Point Harness<br />
11 Waist Belt<br />
12 Armrest<br />
13 Crotch Belt<br />
14 Brake Lever<br />
15 Basket<br />
16 Swivel Lock<br />
Lever<br />
17 Front Wheel<br />
Assembly<br />
<strong>Combi</strong> <strong>USA</strong>, Inc. • 1962 HWY 160 W, Suite 100 • Fort Mill, SC 29708 • www.combi-intl.com<br />
Consumer Affairs 1-800-99-<strong>Combi</strong>
WARNINGS:<br />
ALL OPERATING AND ASSEMBLY PROCEDURES SHOULD BE PERFORMED BY AN ADULT.<br />
In the event of damage or problems, discontinue use and contact Consumer Affairs<br />
for instructions: 1-800-992-6624.<br />
WARNING<br />
AvOID SERIOUS INJURY FROM<br />
FALLING OR SLIDING OUT.<br />
ALWAYS USE RESTRAINT SYSTEM.<br />
WARNING<br />
Child may slip into leg openings<br />
and strangle. Never use<br />
in reclined carriage positions<br />
unless the permanently<br />
attached safety cover is used.<br />
WARNING<br />
DO NOT LIFT AND CARRY<br />
stroller while occupied. The<br />
stroller may fold.<br />
WARNING<br />
Do not allow your child to stand<br />
in or on the stroller.<br />
WARNING<br />
Do not allow a child to ride or sit<br />
on areas of stroller other than<br />
seat.<br />
WARNING<br />
To avoid finger entrapment or<br />
pinching, use care when folding<br />
and unfolding the stroller.<br />
Be certain the stroller is fully<br />
erected and locked in position<br />
before allowing your child near<br />
the stroller.<br />
FAILURE TO FOLLOW THESE INSTRUCTIONS AND<br />
WARNINGS COULD RESULT IN SERIOUS INJURY OR DEATH.<br />
WARNING<br />
Excessive weight in baskets<br />
(or items placed in baskets<br />
which overflow the top or<br />
side of baskets) may cause a<br />
hazardous condition. Do not<br />
load more than 10 lbs. (4.5kg)<br />
in each of the baskets.<br />
WARNING<br />
Completely remove all plastic<br />
bags and packing materials<br />
before using this product to<br />
prevent a possible choking<br />
hazard.<br />
WARNING<br />
Do not allow children to<br />
lean over sides of stroller. It<br />
may become unbalanced and tip<br />
over.<br />
WARNING<br />
Pulling stroller backward makes<br />
going up a curb difficult, and<br />
could pose a safety hazard.<br />
WARNING<br />
Stroller is intended for walking<br />
speed only. DO NOT use while<br />
jogging, skating, etc.<br />
WARNING<br />
NEvER LEAvE CHILD<br />
UNATTENDED.<br />
WARNING<br />
Do not hang items on handle<br />
or place items on canopy. This<br />
could cause the stroller to<br />
become unbalanced or tip<br />
over.<br />
WARNING<br />
Do not use the stroller<br />
on steep slopes, stairs,<br />
escalators, beaches, rough<br />
roads, mud, etc.<br />
WARNING<br />
Always engage both brakes<br />
when parking the stroller.<br />
Total Maximum weight of<br />
the children MUST not exceed<br />
90 lbs. (40 kg), 45 lbs per<br />
seat.<br />
Total Maximum Weight of<br />
Canopy pockets MUST not<br />
exceed 1.0 lbs.(0.5 kg).<br />
All products specifications are subject to change without notice. Sizes and weights are intended as guides and are approximations.<br />
<strong>Combi</strong>® reserves the right to modify the products in its line during the course of the year. Non contractual media. Colors are as accurate as the media in which they appear allows.<br />
©<strong>Combi</strong> <strong>USA</strong>, Inc. 2004<br />
- 2 -
Opening the Stroller<br />
1. Release folding latch by<br />
pulling it forward.<br />
Attaching the Canopy<br />
Using the Swivel Wheels<br />
- 3 -<br />
2. Grip the handle bar on each<br />
side and turn outward to open<br />
fully. (Holding from underneath<br />
will make the process easier.)<br />
3. Lift up the handle bar and<br />
snap it away from you. It will<br />
open and automatically lock<br />
into position.<br />
CAUTION<br />
Failure to fully secure the canopy holders can cause the<br />
holders to bend. When storing the stroller (by laying it<br />
down), be sure the canopy is off the ground to prevent it<br />
from bending.<br />
Attaching the Canopy<br />
1. Confirm the canopies will attach on the proper side and<br />
face the proper direction.<br />
2. Fully insert the canopy holder (male) into the canopy<br />
holder (female) until a click is heard.<br />
3. Fasten the velcro located on both<br />
sides around the handle and to the<br />
back of the seats.<br />
Velcro Canopy Canopy<br />
Removing the Canopy<br />
Left Right<br />
Pull the velcro apart, squeeze the bottom of the canopy<br />
holder (male) and pull the canopy off.<br />
To lock swivels, make sure the lock lever is behind<br />
the stroller frame; then lift all lock levers up.<br />
To unlock swivels, push all swivel lock levers down.
Using the Brakes<br />
Adjusting the Reclining Backrest<br />
1. To place the backrest in the upright postion, press<br />
and hold down the button on the recline mechanism<br />
and pull the strap tight while pushing the<br />
recline mechanism toward the seat back.<br />
2. To achieve a full recline, press and hold down the<br />
button on the recline mechanism and pull downward.<br />
Using the Guardrail<br />
To remove individual sides<br />
of the guardrail:<br />
(figure a)<br />
1. Press the release<br />
button located<br />
underneath the<br />
guardrail and pull out<br />
(figure a) .<br />
Note:<br />
To rotate either side<br />
of the guardrail to<br />
permit easy access,<br />
release center button<br />
and swing the guardrail<br />
out.<br />
2.Squeeze the buttons<br />
on the outside of<br />
the stroller and lift<br />
up to remove one<br />
side of the guardrail<br />
CAUTION<br />
Push the stroller forward to ensure that the<br />
brakes are properly engaged.<br />
To lock brakes, push all brake levers down. Brake<br />
levers are located on the back wheels only.<br />
To unlock brakes, lift all brake levers up.<br />
CAUTION<br />
Be careful when reclining the backrest while<br />
baby is in the stroller to prevent abrupt<br />
changes in seating position.<br />
To remove the<br />
complete guardrail:<br />
1. Squeeze both<br />
buttons on the<br />
underside of<br />
the middle section<br />
and lift up.<br />
2. Squeeze the<br />
buttons on<br />
both outside<br />
sections of the<br />
stroller and<br />
lift up to completely<br />
remove<br />
the guardrail.<br />
- 4 -
Using the Harness<br />
Harness Height Adjustment<br />
- 5 -<br />
WARNING<br />
Unbuckling the Harness<br />
1. Press levers down on right and left harness hooks<br />
to detach from buckle tongues.<br />
2. Press buckle button down (with <strong>Combi</strong> logo) and<br />
detach buckle tongues from buckle.<br />
Avoid serious injury from falling<br />
or sliding out. Always use the<br />
5-point harness.<br />
Buckling the Harness<br />
1. Place the crotch belt between the baby’s legs.<br />
2. Insert buckle tongues into buckle.<br />
3. Lift buckle with tongues inserted and attach right and left hook to holes in buckle<br />
tongue<br />
4. To adjust the harness or waist belt, loosen the slack on both sides of each<br />
buckle.<br />
1. Unhook the shoulder straps from the center buckle as shown in<br />
figure a.<br />
2. Pull the back seat cushion forward and pull the shoulder straps<br />
through the seat cushion as shown in figure b.<br />
3. To raise the height, thread both shoulder straps through the<br />
upper two loops. To lower the height, thread the shoulder straps<br />
through the lower two loops as shown in figure c.<br />
4. Thread the shoulder straps through the appropriate slot of the<br />
seat cushion depending on which height the straps are set at as<br />
shown in figure d.<br />
figure a<br />
figure b figure c figure d
Folding the Stroller<br />
1. Remove all items from the<br />
basket.<br />
2. Lock all front swivel wheels.<br />
3. Make sure seat backs are in<br />
the upright position.<br />
4. Fold both canopies by<br />
lifting up on<br />
the canopy levers.<br />
5. Remove all items<br />
from the back pocket<br />
of the canopy.<br />
6. While lifting<br />
up the folding<br />
levers on both<br />
sides of the<br />
handle, tilt the<br />
stroller back<br />
until it folds<br />
together.<br />
Using the Safety Cover (Boot)<br />
Velcro<br />
1<br />
2<br />
3<br />
Folding<br />
Latch<br />
7. Fold together by<br />
bringing the sides<br />
of the handle<br />
together until the<br />
canopies face each<br />
other in the<br />
middle.<br />
The stroller can be pulled behind<br />
you as shown in diagram A or<br />
carried over your shoulder as<br />
shown in diagram B.<br />
WARNING: Child may slip<br />
into leg openings and strangle.<br />
Never use in reclined carriage<br />
position(s) unless safety cover<br />
(boot) is securely fastened.<br />
Installing the Safety Cover (Boot)<br />
1. Lift the seat cushion and pull safety cover (boot) out.<br />
2. Place the safety cover (boot) over the guardrail and secure it<br />
with the velcro.<br />
8. Lock the folding latch to<br />
hold the stroller together.<br />
CAUTION<br />
Before folding the stroller,<br />
unfasten and store the<br />
safety cover (boot) under<br />
the seat. The stroller will<br />
not fold with it attached.<br />
- 6 -
Removing/Attaching the Seat Cushion<br />
Removing & Attaching the Front Swivel Wheels<br />
Place front swivel wheel<br />
assembly on the swivel<br />
shaft. The assembly is<br />
secure when it locks onto<br />
the shaft.<br />
Seat Base<br />
Velcro<br />
Attaching<br />
1. Attach Velcro at the bottom<br />
of the seat pad to Velcro on<br />
the stroller base.<br />
2. Pull top of seat pad forward;<br />
the seat pad can rest on the<br />
front guard rail.<br />
3. Insert buckle strap into slot at<br />
the bottom back of the seat<br />
pad.<br />
Removing<br />
1. Press levers down on<br />
right and left harness<br />
hooks to detach hooks<br />
from buckle tongues.<br />
2. Press buckle button<br />
down (with <strong>Combi</strong> logo)<br />
and detach buckle<br />
tongues from buckle.<br />
3. Remove shoulder pads<br />
from harness by pulling<br />
over harness<br />
hooks.<br />
4. Locate zipper on the back<br />
of the seat pad and locate<br />
the zipper in the seat bite<br />
of the stroller. Zip seat pad<br />
to stroller.<br />
5. Insert harness straps with<br />
hooks and harness straps<br />
with buckle tongues thru<br />
CAUTION<br />
If seat cushion is ripped or torn,<br />
do not use.<br />
Do not use the stroller without<br />
the seat cushion.<br />
4. Pull top of seat pad forward to<br />
detach Velcro..<br />
5. Pull all the harness straps<br />
through the top and side slots in<br />
cover.<br />
6. Unzip zipper at the base of the<br />
seat cover.<br />
7. Pull bottom of seat pad upward<br />
to detach Velcro<br />
slots on back of seat pad.<br />
6. Route harness through shoulder<br />
pads. Attach Velcro on<br />
top of seat pad to stroller.<br />
Removing the Swivel Wheels<br />
Press in the square button<br />
located at the bottom of the<br />
wheel holder while pulling the<br />
assembly off of the swivel<br />
shaft.<br />
Release Button<br />
Using the Basket CAUTION<br />
Do not place more than 10 lbs. in either basket. Remove<br />
all items from the basket before folding the stroller.<br />
- 7 -<br />
Removing<br />
1. Unfasten clips on<br />
front and side of basket.<br />
2. Remove basket from<br />
basket bar.<br />
Attaching<br />
Reverse the procedures for<br />
Removing.
Attaching the <strong>Combi</strong> Shuttle Infant Carrier<br />
Attaching the Car Seat<br />
1. Recline stroller seat to the full recline position.<br />
2. Insert <strong>Combi</strong> Shuttle into left side of stroller seat (while<br />
facing the stroller). Press the <strong>Combi</strong> Shuttle down firmly to<br />
ensure the seat locks into place on both sides.<br />
3. Attach safety cover, shown in figure b, to carrier handle.<br />
CAUTION<br />
The stroller gaurdrail must be used to<br />
ensure the <strong>Combi</strong> Shuttle fits securely with<br />
no rocking.<br />
Figure b<br />
WARNING AfteR INstAllAtIoN, lIft cAR seAt to veRIfy It Is<br />
secuRely locked oNto stRolleR.<br />
Removing the Car Seat<br />
1. Squeeze red lever located on the back of the <strong>Combi</strong> Shuttle<br />
infant carrier while lifting carrier upwards to release from<br />
stroller.<br />
CAUTION<br />
Infant seat must be attached to<br />
stroller in rear facing position<br />
only.<br />
- 8 -
Routine Maintenance<br />
Trouble Shooting<br />
- 9 -<br />
STORE IN A COOL AND DRY AREA, especially in the summer. Do not store the stroller in the trunk of<br />
a vehicle.<br />
SEAT CUSHION<br />
The seat cushion is machine washable. Set to gentle cycle using warm water and a mild detergent. Do<br />
not use bleach. Lay seat cushion flat to dry in shaded area. Do not machine dry. To prevent color fading,<br />
do not leave soaking for a long period. If the seat cushion is frayed or unraveling, discontinue use<br />
and call consumer affairs for further instruction.<br />
CANOPY, WAIST BELT, FIxED SEAT BASE, STROLLER PACk AND BASkET<br />
Hand wash with brush. Wipe out excess water with a dry cloth and dry in a shaded area. For stubborn<br />
dirt, dilute a mild detergent and apply directly to the dirty area. Wipe out the detergent.<br />
MAIN BODY<br />
Briskly wipe off any mud and dirt. To clean the body, wipe with a damp cloth then wipe out any traces<br />
of moisture on the body with a dry cloth. The main body might become moldy and musty if not wiped<br />
dry. Excessive exposure to the sun could cause premature color fading of stroller plastic and fabric.<br />
SWIvEL WHEELS<br />
After prolonged normal use, the wheels of your stroller may not swivel as easily as when the stroller<br />
was new. This is usually due to a buildup of dirt in the swivel mechanism. Before adding lubrication,<br />
test the swivel action to determine whether lubrication is necessary. Using compressed air* aimed<br />
at point (a) and (b), blow dirt from the swivel mechanisms. Do not use soap and water to wash<br />
wheels. Periodically check that all screws, bolts and nuts are tight.<br />
ADDING LUBRICANT<br />
Avoid lubricating the swivel wheels whenever possible. Excessive lubrication<br />
or adding lubricant to swivel wheels when new may cause them<br />
to develop a shimmy or wobble that may quicken their deterioration.<br />
Add a small amount of lubricant (silicone*) to the swivel shaft.<br />
Do not use lubricants because oil attracts dust and would hinder<br />
the movement rather than improve it.<br />
*Compressed air and silicone spray are available in varying size cans at most hardware<br />
stores.<br />
STROLLER WILL NOT FOLD<br />
- Check to see that the waist belt is not caught in the side.<br />
- Make sure front swivels are locked.<br />
- Remove all items from the basket.<br />
- Make sure the seat back is in the upright position.<br />
- Remove all items from back pocket of the canopy.<br />
DIFFICULT TO STEER/STROLLER PULLS TO ONE SIDE<br />
- Remove any items hanging from the handle.<br />
- Make sure weight in basket is distributed evenly.<br />
- Check that the brakes are not in the locked position.<br />
- Clean wheels and lubricate if necessary.<br />
DIFFICULT TO GET UP CURBS<br />
- Pulling stroller backward makes going<br />
up a curb difficult, and could pose a safety hazard.<br />
Pull the handle up to lift the rear wheels<br />
onto the curb, then pull the stroller backward<br />
until the front wheels clear.
- 10 -
Located on the rear right leg.<br />
Parts List for the <strong>Twin</strong> <strong>Sport</strong>.<br />
1. Canopy 30.00<br />
2. Seat Cushion (Right side when facing the front of stroller) 40.00<br />
3. Seat Cushion (Left side when facing the front of stroller) 40.00<br />
4. Guardrail (Right side when facing the front of stroller) 15.00<br />
5. Guardrail (Left side when facing the front of stroller) 15.00<br />
6. Guardrail Cover 5.00<br />
7. Basket 20.00<br />
8. Carrying Strap 12.00<br />
9. Rain Cover 19.99<br />
10. Folding Latch 5.00<br />
11. Front Wheel Assembly 10.00 each<br />
If you need to order other parts for your stroller, please call us tollfree<br />
at 1-800-992-6624.<br />
Shipping and Handling Fees: Add $8.00 for orders $34.99 and under. Add<br />
$13.00 for orders $35.00 and over. Note: Additional shipping charges will<br />
apply outside of the Continental U.S.<br />
<strong>Combi</strong> <strong>USA</strong> reserves the right to change pricing at any time.<br />
<strong>Twin</strong> <strong>Sport</strong><br />
Stroller<br />
<strong>Instruction</strong> <strong>Manual</strong><br />
If you would like to place an order for replacement parts, please fill out the form below and return<br />
it to the following address:<br />
<strong>Combi</strong> <strong>USA</strong>, Inc. or Fax this completed form to<br />
Attn: Consumer Affairs Department<br />
1962 Highway 160 W, Suite 100<br />
Fort Mill, SC 29708-8027<br />
803-548-3663<br />
IMPORTANT: We must have this information to process your order:<br />
Model Number: ______ - ______ Color & Pattern of Fabric: ______________________________________________________<br />
Ship To:<br />
Customer Name<br />
Street Address<br />
Street Address<br />
City, State, Zip<br />
Telephone Number<br />
Charge to my credit card:<br />
o VISA o MASTERCARD<br />
o DISCOVER<br />
Card Number<br />
Expiration Date __________ - ___________ - ____________<br />
Cardholder’s Signature<br />
Price Quantity Total<br />
Amount of Order<br />
ADD<br />
Shipping & Handling<br />
Sales Tax (6%)<br />
(SC residents only)<br />
Total<br />
o Check enclosed<br />
<strong>Combi</strong> <strong>USA</strong>, Inc. • 1962 HWY 160 W, Suite 100 • Fort Mill, SC 29708 • www.combi-intl.com<br />
Consumer Affairs 1-800-99-<strong>Combi</strong><br />
081607