
Create successful ePaper yourself
Turn your PDF publications into a flip-book with our unique Google optimized e-Paper software.
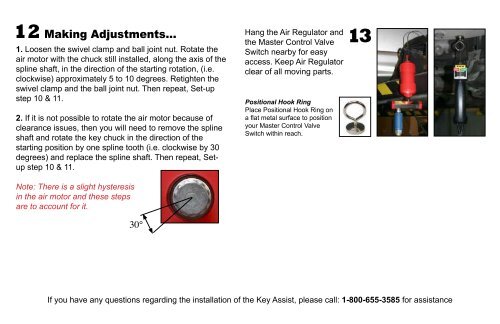
12 Making Adjustments...<br />
1. Loosen the swivel clamp and ball joint nut. Rotate the<br />
air motor with the chuck still installed, along the axis of the<br />
spline shaft, in the direction of the starting rotation, (i.e.<br />
clockwise) approximately 5 to 10 degrees. Retighten the<br />
swivel clamp and the ball joint nut. Then repeat, Set-up<br />
step 10 & 11.<br />
2. If it is not possible to rotate the air motor because of<br />
clearance issues, then you will need to remove the spline<br />
shaft and rotate the key chuck in the direction of the<br />
starting position by one spline tooth (i.e. clockwise by 30<br />
degrees) and replace the spline shaft. Then repeat, Setup<br />
step 10 & 11.<br />
Note: There is a slight hysteresis<br />
in the air motor and these steps<br />
are to account for it.<br />
30°<br />
Hang the Air Regulator and<br />
the Master Control Valve<br />
Switch nearby for easy<br />
access. Keep Air Regulator<br />
clear of all moving parts.<br />
Positional Hook Ring<br />
Place Positional Hook Ring on<br />
a flat metal surface to position<br />
your Master Control Valve<br />
Switch within reach.<br />
13<br />
If you have any questions regarding the installation of the <strong>Key</strong> <strong>Assist</strong>, please call: 1-800-655-3585 for assistance