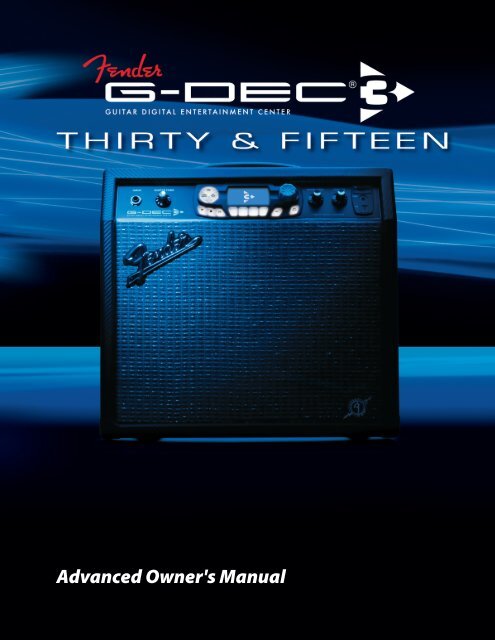
G-DEC 3 Advanced Owner's Manual - Fender
G-DEC 3 Advanced Owner's Manual - Fender
G-DEC 3 Advanced Owner's Manual - Fender

You also want an ePaper? Increase the reach of your titles
YUMPU automatically turns print PDFs into web optimized ePapers that Google loves.
<strong>Advanced</strong> <strong>Owner's</strong> <strong>Manual</strong>
<strong>Advanced</strong> <strong>Manual</strong><br />
Introduction<br />
This manual is your step-by-step guide to all the advanced<br />
features found on your G-<strong>DEC</strong> 3 amplifier. For information on<br />
using <strong>Fender</strong>® FUSE, Ableton® Live or Amplitube®, please see<br />
the separate manuals for each product on the G-<strong>DEC</strong> 3 DVD<br />
or log on to www.fender.com/support.<br />
Table of Contents<br />
Navigating the G-<strong>DEC</strong> 3 . . . . . . 2<br />
Using the encoder knob and the soft-keys<br />
Start-Stop Button . . . . . . . . 3<br />
Band track playback<br />
Quick Access . . . . . . . . . . 3<br />
Quick track audition and quick access presets<br />
Amp Menus. . . . . . . . . . . 4<br />
Selecting amp types and advanced amp settings<br />
FX Menus . . . . . . . . . . . 5<br />
Selecting effects and advanced effect settings<br />
Save Button . . . . . . . . . . 6<br />
Saving presets, copying and renaming presets<br />
Tap/Tuner Button . . . . . . . . 6<br />
Tapping delay intervals and the built-in instrument tuner<br />
Band Menus . . . . . . . . . . 7<br />
Selecting band tracks and advanced band settings<br />
Phrase Sampler . . . . . . . . . 8<br />
Phrase recording, overdubbing and phrase menus<br />
Phrase Menus . . . . . . . . . . 9<br />
Overdub menus and advanced phrase sampler settings<br />
Utility Menus . . . . . . . . . . 10<br />
Amplifier settings and quick access preset assignment<br />
SD Card Slot . . . . . . . . . . 11<br />
External storage of tracks and presets<br />
USB Port . . . . . . . . . . . . 11<br />
Connecting the G-<strong>DEC</strong> 3 to your computer<br />
Footswitch . . . . . . . . . . . 12<br />
Remote functions using the <strong>Fender</strong> ULT-4 footswitch<br />
FAQ . . . . . . . . . . . . . 12<br />
Where to go to ask questions, read threads and FAQs<br />
2<br />
Navigation<br />
There are just a few basics of G-<strong>DEC</strong> 3 navigation that you<br />
should know before you explore any further...<br />
Encoder Knob<br />
The big encoder knob always controls the highlighted item<br />
on screen. In play mode, the current Preset is highlighted, so<br />
turning the big knob will select presets. In other modes, turning<br />
the encoder knob will control everything from selecting<br />
effects to amplifier tone.<br />
������<br />
����<br />
�����<br />
������<br />
Soft-Keys<br />
���<br />
��������<br />
�����<br />
���<br />
The four plain keys below the display are called "soft-keys"<br />
and their functions are software defined. The display above<br />
each soft-key shows you the current function of each key.<br />
From play mode, for example, the soft-keys will take you to<br />
other modes, such as AMP, FX, BAND and PHRASE:<br />
Once you have entered a G-<strong>DEC</strong> 3 mode, the two soft-keys on<br />
the ends will take you to different menus within that mode.<br />
For instance, in Phrase mode, the two end soft-keys will take<br />
you to the DELETE and UNDO menus (3–or–4):<br />
♫ Sometimes,<br />
Highlighted item<br />
Soft keys<br />
fender.com<br />
3 Previous menu<br />
Soft key functions<br />
����<br />
Next menu 4<br />
Encoder Knob<br />
����<br />
��������<br />
����<br />
two soft-keys will have the same function,<br />
such as COMMIT, as shown above. Other times a softkey<br />
may have no function at all.<br />
Now you are ready to go wherever the music and your<br />
G-<strong>DEC</strong> 3 take you!
Start–Stop<br />
Press the START-STOP button to start and stop playback of the<br />
band track. The title of the band track is displayed below the<br />
amplifier and effects icons in play mode.<br />
������<br />
����<br />
�����<br />
������<br />
���<br />
��������<br />
�����<br />
���<br />
To start or stop the band track:<br />
����<br />
����<br />
��������<br />
����<br />
1. Press the START-STOP button to start playing the band<br />
track.<br />
2. Press the START-STOP button again to stop playing the<br />
band track.<br />
♫ There<br />
Start-Stop button<br />
is no "pause" button for the band track. Every time<br />
you start the band track it will play from the beginning<br />
of the track.<br />
Quick Access<br />
Press the QUICK ACCESS button to quickly find any<br />
song (or phrase) on the G-<strong>DEC</strong> 3 or SD card and<br />
instantly play it with the current preset. This is a faster<br />
way to "audition" tracks than using the Band File menu to find<br />
a song because Quick Access mode allows you to search for<br />
tracks in alphabetical order as well as sort tracks by location<br />
and file type.<br />
Another exciting feature of Quick Access Mode is that it turns<br />
the G-<strong>DEC</strong> 3 soft-keys into "quick preset keys" that allow you<br />
to instantly activate your three favorite presets by pressing<br />
the QA1 / QA2 / QA3 soft-keys:<br />
Quick Access button<br />
Quick Access Presets<br />
Auditioning Tracks<br />
Band Track title<br />
Track location & type<br />
Track title<br />
To quickly audition tracks for the current preset:<br />
1. Press the QUICK ACCESS button.<br />
2. Turn the big knob to scroll through the list of all band<br />
tracks and phrases on the G-<strong>DEC</strong> 3 and SD card.<br />
3. Press the START-STOP button to start/stop playing the<br />
selected track.<br />
♫ Try<br />
turning the big knob while a track is playing to automatically<br />
start each track the instant it is selected.<br />
To search for tracks by location and file type:<br />
1. Press the QUICK ACCESS button to activate Quick Access<br />
mode.<br />
2. Press the QUICK ACCESS button repeatedly to change<br />
the location and file type of the tracks listed for selection.<br />
Tracks will be grouped by two locations (HD or SD) and by<br />
four file types (WAV / PHRASE / MIDI / MP3).<br />
♫ Locations<br />
and file types that are not available will not<br />
appear as categories.<br />
To audition tracks in an endless (repeating) loop:<br />
1. Press the QUICK ACCESS button to activate Quick Access<br />
mode.<br />
2. Press the LOOP soft-key. The loop icon will appear in the<br />
display.<br />
3. Press the LOOP soft-key again to cancel track looping.<br />
Quick Access Presets<br />
To quickly access your three favorite presets:<br />
1. Press the QUICK ACCESS button.<br />
2. Press any of the three Quick Access soft-keys (QA1 / QA2 /<br />
QA3) to instantly activate the preset assigned to that key.<br />
♫ You<br />
can also activate your Quick Access Presets from a<br />
<strong>Fender</strong> ULT-4 footswitch. See Footswitch on page 12.<br />
To assign different presets to the QA1 / QA2 / QA3 keys:<br />
1. Press the QUICK ACCESS button to activate Quick Access<br />
mode.<br />
2. Press and HOLD any of the three Quick Access soft-keys<br />
(QA1 / QA2 / QA3) while turning the big knob to select the<br />
preset you want to assign.<br />
♫ You<br />
fender.com<br />
can also assign Quick Access Presets in the Utility<br />
Menus. See Utility Menus on page 10.<br />
3
Amp menus<br />
Use the Amp menus to select a different amplifier<br />
type for the current preset and adjust all amplifier settings,<br />
or to import the amp type (with all amp settings)<br />
from another preset.<br />
Amp Type—Use the Amp type menu to select one of the following<br />
22 amplifier types:<br />
Blackface Clean<br />
Blackface Drive<br />
Blackface Distorted<br />
Jazzmaster<br />
Garage Rock<br />
Garage Punk<br />
Very Distorted<br />
British Jangle<br />
British Blues<br />
British Steel<br />
Modern Crunch<br />
Modern Metal<br />
Modern Shred<br />
Hot Rod Grit<br />
Hot Rod Lead<br />
Acoustic Dreadnought Mahogany<br />
Acoustic Jumbo<br />
Acoustic Dreadnought Rosewood<br />
Acoustic Parlor (small body)<br />
Tweed Clean<br />
Tweed Drive<br />
Tweed Dirt<br />
Gain (Piezo Mix)—Use the Gain menu to adjust the amount<br />
of preamplifier gain and signal distortion. Use the Piezo Mix<br />
menu to blend the sound of an unamplified acoustic guitar<br />
with the sound of an acoustic guitar through a piezo pickup;<br />
rotate fully counter-clockwise for 100% unamplified, rotate<br />
fully clockwise for 100% piezo.<br />
♫ The<br />
4<br />
GAIN menu will change to PIEZO MIX only when<br />
one of the four Acoustic amplifier types is selected in the<br />
AMP TYPE menu, to provide an amplifier feature more<br />
appropriate for acoustic guitar playing styles.<br />
Amp Volume—Use the Amp Volume menu to adjust the<br />
loudness of the selected guitar amp type.<br />
Treble—Use the Treble menu to adjust the high-frequency<br />
tone of the selected amplifier type.<br />
Middle—Use the Middle menu to adjust the mid-frequency<br />
tone of the selected amplifier type.<br />
Bass—Use the Bass menu to adjust the low-frequency tone<br />
of the selected amplifier type.<br />
Compressor—Use the Compressor menu to select a level of<br />
signal compression.<br />
♫ Compression<br />
is used to "squeeze" the volume range of<br />
a signal to reduce high volume spikes and boost low<br />
volume sustain.<br />
Timbre—Use the Timbre menu to select one of the following<br />
timbre types:<br />
♫ Use<br />
None<br />
Full Body<br />
Full Stack<br />
Razors Edge<br />
Bright Light<br />
Bass Boost<br />
New Metal<br />
Super Bright<br />
Timbre to apply a complete tone adjustment in one<br />
simple step.<br />
Noise Gate—Use the Noise Gate menu to select one of four<br />
a noise gate levels.<br />
♫ Use<br />
fender.com<br />
Noise Gate to reduce the background static that can<br />
be especially annoying when playing softly.<br />
Import—Use the Import menu to copy the amplifier type<br />
and all the amp settings from another preset to the current<br />
preset.
FX menus<br />
Use the FX menus to select effects for the current preset<br />
and adjust all effect settings, or to import the<br />
effects (with all settings) from another preset.<br />
G-<strong>DEC</strong> 3 effects are grouped into four categories, STOMPBOX,<br />
MODULATION, DELAY and REVERB. You can choose one effect<br />
from each category for a maximum of four active effects at<br />
any one time. An icon appears on screen when an effect is<br />
currently selected for each category:<br />
To select effects and adjust effect settings, start by pressing<br />
the FX soft-key. The first menu is Stompbox effects where<br />
you can select one of five stompbox type effects. The menus<br />
following (4) the Stompbox menu are submenus of settings<br />
for the selected stompbox effect. Submenus will change<br />
depending on the effect you select, to provide the appropriate<br />
settings for that effect.<br />
♫ If<br />
no stompbox effect is selected, the next menu (4) will<br />
take you directly to the next category of effects (modulation).<br />
Effects Selection<br />
To select effects and adjust effect settings:<br />
1. Press the FX soft-key.<br />
2. The first menu is Stompbox. Here you can select one of<br />
five stompbox type effects or NO STOMPBOX by turning<br />
the big knob.<br />
3. Press the end soft-keys (3–or–4) to access other categories<br />
of effects and to adjust settings for the effects you<br />
have selected.<br />
Effects Menus<br />
Icons for each active effect category<br />
Stompbox—Use the Stompbox menu to select one of the<br />
following 5 effects:<br />
No Stompbox effect<br />
Overdrive<br />
Fixed Wah<br />
fender.com<br />
Touch Wah<br />
Fuzz<br />
Fuzz Touch Wah<br />
Modulation—Use the Modulation menu to select one of the<br />
following 13 effects:<br />
No Modulation effect<br />
Sine Chorus<br />
Tri Chorus<br />
Sine Flanger<br />
Tri Flanger<br />
Vibratone<br />
Vintage Tremolo<br />
Sine Tremolo<br />
Alienator<br />
Resolver<br />
Ring Modulation<br />
Step Filter<br />
Phaser<br />
Pitch Shift<br />
Delay—Use the Delay menu to select one of the following 9<br />
effects:<br />
No Delay effect<br />
Mono<br />
Echo Filter<br />
Stereo Echo Filter<br />
Multitap<br />
Ping Pong<br />
Ducking<br />
Reverse<br />
Tape<br />
Stereo Tape<br />
Reverb—Use the Reverb menu to select one of the following<br />
10 effects:<br />
No Reverb effect<br />
Small Hall<br />
Large Hall<br />
Small Room<br />
Large Room<br />
Small Plate<br />
Plate<br />
Ambient<br />
5
Arena<br />
'63 <strong>Fender</strong> Spring<br />
'65 <strong>Fender</strong> Spring<br />
Import—Use the Import menu to copy the effects, including<br />
all effect settings, from another preset to the current preset.<br />
Save Button<br />
Use the SAVE button when you want to save any<br />
changes that you have made to the current preset.<br />
You can save over the current preset or you can save<br />
over any other preset you choose.<br />
������<br />
����<br />
�����<br />
������<br />
���<br />
��������<br />
�����<br />
���<br />
When you make any change to the current preset, such as<br />
selecting a different band track or a new effect, the SAVE button<br />
will turn red to indicate that you have altered the current<br />
preset. Your changes up to this point are still temporary. To<br />
cancel your temporary changes, simply turn the big knob to<br />
select a different preset and then back again.<br />
Save Procedure<br />
To save a preset requires two presses of the SAVE button, one<br />
press to initiate the save process and then another press to<br />
confirm the save. If you decide that you want to cancel the<br />
save process after the first press of the SAVE button but before<br />
the second press, simply press the EXIT button to cancel the<br />
save. Your temporary changes to the current preset will still<br />
be active and the preset will only be reset when you select a<br />
different preset.<br />
To save your changes to the current preset:<br />
1. Press the SAVE button once.<br />
6<br />
Select target preset<br />
Save button<br />
Change preset name<br />
����<br />
����<br />
��������<br />
����<br />
2. Turn the big knob to select a target preset to save over. If<br />
you do not turn the knob, the default selection is the current<br />
preset.<br />
♫ Before<br />
you save over a preset, make a list of your least<br />
favorite presets to target as your new preset locations.<br />
3. Use the CURSOR soft-keys to highlight each character in<br />
the preset name, then use the big knob to change the<br />
character.<br />
4. Use the two center soft-keys to change character case,<br />
select numbers and insert blank spaces.<br />
5. After you have the target preset selected and the title of<br />
the new preset finished, press the SAVE button to confirm<br />
the save process.<br />
♫ You<br />
can use the Save Procedure even if you have NOT<br />
made any changes to the current preset (and the SAVE<br />
button is not red) if you want to simply change the<br />
name of the current preset or copy the current preset to<br />
another location.<br />
Tap / Tuner<br />
The TAP / TUNER button has two functions. First, it can be<br />
used to quickly set the delay interval of delay effects and<br />
the tempo of MIDI tracks. Secondly, it is used to activate the<br />
onboard instrument tuner.<br />
������<br />
����<br />
�����<br />
������<br />
���<br />
��������<br />
�����<br />
���<br />
Tap Button<br />
fender.com<br />
Select characters<br />
Change case / add space<br />
Tap / Tuner button<br />
If the current preset has a delay effect assigned to it, you can<br />
use the TAP button to set the delay interval of the delay effect<br />
simply by pressing the TAP button rhythmically in time with<br />
the desired delay interval.<br />
����<br />
����<br />
��������<br />
����
To set the delay interval of delay effects using TAP:<br />
1. Select a preset with a delay effect –or– select a delay<br />
effect for the current preset using the FX menus. (See FX<br />
Menus on page 5.)<br />
2. Press the TAP button repeatedly (twice minimum) in sync<br />
with the desired delay interval.<br />
♫ If<br />
you press the TAP button only one time, the delay<br />
interval will be set to the maximum length.<br />
To set the tempo of MIDI tracks using TAP:<br />
1. Select a preset with a MIDI band track –or– select a MIDI<br />
band track for the current preset using the Band menus.<br />
(See Band Menus on page 7.)<br />
2. Activate the Band Tempo menu. (See Band Menus on page<br />
7.)<br />
3. Press the TAP button repeatedly (twice minimum) in sync<br />
with the desired tempo for the band track.<br />
♫ If<br />
you press the TAP button only one time, the tempo setting<br />
of the MIDI band track will not be affected.<br />
Tuner Button<br />
The G-<strong>DEC</strong> 3 has a built-in instrument tuner that you can use<br />
to tune your guitar.<br />
To use the tuner:<br />
1. Press and hold the TAP button for 2 seconds.<br />
2. Strike any single string on your guitar and watch the tuner<br />
screen on the G-<strong>DEC</strong> 3. In the lower left corner you will see<br />
the note of the string being tuned.<br />
3. Turn the tuning peg on your guitar until the tuning needle<br />
on screen indicates the string is in tune, as shown above.<br />
♫ You<br />
Note of string played<br />
Tuning needle<br />
can also activate the Tuner from a <strong>Fender</strong> ULT-4<br />
footswitch. See Footswitch on page 12.<br />
4. Standard guitar tuning is as follows:<br />
5. Press any button on the G-<strong>DEC</strong> 3 to exit from the Tuner.<br />
Band menus<br />
Use the Band menus to select a new band track for the<br />
current preset and adjust all band track settings, or to<br />
import the band track (will all settings) from another<br />
preset.<br />
Band Track Selection<br />
To select a new band track:<br />
1. Press the BAND soft-key.<br />
2. The first menu is Band Type. Here you can select either<br />
MP3/WAV –or– MIDI as the band track file type.<br />
♫ Select<br />
MP3/WAV as the Band Type for the best results in<br />
most instances. MIDI is more useful for specialized purposes<br />
such as generating metronome clicks.<br />
3. Press the FILE soft-key to access the band track File selection<br />
menu.<br />
4. Turn the big knob to select a new band track.<br />
♫ Turning<br />
the big knob will scroll through all the band<br />
tracks on the G-<strong>DEC</strong> 3 hard drive (HD) in alphanumerical<br />
order and then continue with all the band tracks on<br />
the SD card (SD).<br />
5. Press EXIT.<br />
♫ The<br />
fender.com<br />
SAVE button will turn red to indicate a change to<br />
the current preset. To reset the band track, simply turn<br />
the big knob to a different preset and then back again.<br />
<strong>Advanced</strong> Band Menus<br />
Repeat—Use the Repeat menu to choose REPEAT for endless<br />
loop playback of the band track or ONCE for once through<br />
playback.<br />
7
♫ When<br />
REPEAT is selected, WAV and MIDI files provide<br />
smoother "gap free" loop playback than MP3 files.<br />
Speed (Tempo)—Use the Speed menu to adjust the playback<br />
speed of the band track. You can use this feature to learn<br />
fast licks by reducing the Band Speed so that you can hear<br />
each note more slowly.<br />
♫ This<br />
menu will become TEMPO if a MIDI file is selected<br />
as the band track.<br />
Pitch (Transpose)—Use the Pitch menu to adjust the playback<br />
pitch of the band track. You can use this feature to<br />
change the key signature of a song.<br />
♫ This<br />
menu will become TRANSPOSE if a MIDI file is<br />
selected as the band track.<br />
Mix (Drum Solo/Count In)—Use the Band Mix menu to<br />
choose STEREO, LEFT/RIGHT MIX, or CENTER CANCEL. STEREO<br />
is the normal setting. When LEFT/RIGHT MIX is selected, an<br />
additional menu will appear after Band Mix that allows you to<br />
adjust the left/right channel mix. CENTER CANCEL is useful for<br />
removing the lead guitar and vocal tracks from some songs.<br />
♫ This<br />
menu will become DRUM SOLO/COUNT IN if a MIDI<br />
file is selected as the band track.<br />
Import—Use the Import menu to import the band track with<br />
all of its settings from another preset.<br />
Phrase Sampler<br />
The most basic function of the Phrase Sampler is to record<br />
and play back phrases of G-<strong>DEC</strong> 3 audio. A recorded phrase<br />
can be used as a short backing track or as a tool to practice<br />
tricky riffs by playing the phrase in an endless loop. A more<br />
powerful function of the Phrase Sampler allows you to "overdub"<br />
(record in layers, over a previous phrase) so that you can<br />
hear yourself playing the rhythm AND lead guitars together in<br />
one phrase!<br />
The following step-by-step instructions start with the basic<br />
record and playback functions of the Phrase Sampler, then<br />
progress to overdubbing and the many other amazing features<br />
of the Phrase Sampler found in the Phrase Menus.<br />
8<br />
������<br />
����<br />
�����<br />
������<br />
Phrase Sampler keys<br />
PLAY / RECORD / DUB<br />
���<br />
��������<br />
�����<br />
���<br />
����<br />
����<br />
��������<br />
����<br />
Phrase Recording and Playback<br />
To record your guitar:<br />
1. Press the (record) button.<br />
2. Play guitar.<br />
3. Press the (record) button to stop recording –or– you<br />
can keep playing until the progress bar reaches the maximum<br />
phrase length.<br />
♫ Maximum<br />
phrase length depends on the Phrase Quality<br />
setting. See Phrase Menus on page 9.<br />
To play back your phrase:<br />
1. Press the (playback) button. Your recorded phrase<br />
plays back.<br />
2. Press the (playback) button again to stop playback.<br />
♫ You<br />
can set Phrase Playback to REPEAT to play phrases<br />
in an endless loop, or to ONCE to play phrases through<br />
just one time when playback is pressed. See Phrase<br />
Menus on page 9.<br />
To record the band track and your guitar:<br />
1. Press the START-STOP button to start the band track playing.<br />
2. Press the (record) button immediately –or– wait for<br />
the section of the song that you want to record and then<br />
press record.<br />
3. Play your guitar if you want to record it also.<br />
4. Press the (record) button to stop recording –or– you<br />
can keep playing until the progress bar reaches the maximum<br />
phrase length.<br />
♫ You<br />
fender.com<br />
can set the Phrase Sampler to record GUITAR, BAND<br />
or ALL in the Phrase Source menu. See Phrase Menus on<br />
page 9.<br />
Phrase Overdubbing<br />
The (dub) button gives the Phrase Sampler an overdub<br />
function which allows you to create multi-track phrases that<br />
feature you playing two or more guitars simultaneously!<br />
Every overdub must start with an original phrase, so first<br />
record something with the Phrase Sampler, such a simple<br />
chord progression (see "To record your guitar" above). This<br />
will be your "rhythm track." Now you can dub a "lead track"<br />
over the rhythm track.
To dub over an existing phrase:<br />
1. Press the (dub) button. You will hear the original<br />
phrase start to play back.<br />
2. Play guitar along with the original phrase.<br />
3. Press the (dub) button to stop recording – or – you can<br />
keep going until the progress bar reaches the end of the<br />
phrase.<br />
To play back your overdubbed phrase:<br />
1. Press the (playback) button. You will hear the original<br />
phrase and your overdub play back together.<br />
♫ If<br />
you press the (record) button accidentally, it will<br />
erase your overdub and start recording a new phrase.<br />
Overdubbing multiple layers<br />
You don't have to stop with one layer of overdubbing. You<br />
can add as many layers to your phrase as you want. Every time<br />
you press (dub) you can play a different section or instrument<br />
until you are playing every part in the band!<br />
♫ You<br />
can adjust the Dub Feedback setting so that every<br />
time you overdub another layer onto a phrase, the<br />
previous overdub layers will become quieter or fade out<br />
completely, making the newest overdub layers more<br />
audible. See Phrase Menus below.<br />
Phrase Menus<br />
Use the phrase menus to save, load or delete phrase<br />
samples and adjust all phrase sampler settings, or to<br />
work with the dub track options.<br />
Dub Commit—Use the Dub Commit menu when you want<br />
to make the overdub track "permanent" by mixing it together<br />
with the original phrase. The advantage of Dub Commit is<br />
that you can erase new overdub layers without erasing the<br />
previously "committed" overdub layer (See Dub Undo below).<br />
Dub Undo—Use the Dub Undo menu when you want to<br />
erase an overdub track and start over. Any overdub tracks that<br />
have been "committed" will not be affected (see Dub Commit<br />
above).<br />
Save Phrase—Use the Save Phrase menu to save the currently<br />
active phrase (all overdubbed layers are automatically<br />
committed). Turn the big knob to select the G-<strong>DEC</strong> 3 hard<br />
drive (HD) or a flash card (SD) as the save destination, then<br />
press either SAVE PHRASE soft-key.<br />
♫ Phrases<br />
are saved as .wav files with consecutively numbered<br />
filenames in the format: G<strong>DEC</strong>0000.wav<br />
Load Phrase—Use the Load Phrase menu to load any phrase<br />
file on the G-<strong>DEC</strong> 3 hard drive (HD) or SD card (SD). Turn the<br />
big knob to select a file, then press either LOAD PHRASE softkey.<br />
Phrase Level—Use the Phrase Level menu to adjust the volume<br />
level of phrase playback.<br />
Dub Feedback—Use the Dub Feedback to make previous<br />
overdub layers fade out as new overdub layers are recorded.<br />
When Dub Feedback is set to "10" the previous overdub layers<br />
will remain at their original volume levels. Lower Dub<br />
Feedback settings will decrease the volume level of previous<br />
overdub layers and a setting of "1" will cause previous overdubs<br />
to fade out completely.<br />
Phrase Mode—Phrase Mode only applies if you are using<br />
a MIDI file as a phrase. Select SYNCHRONOUS to have the<br />
phrase neatly trimmed to the nearest measure during playback.<br />
Select FREEFORM to disable this feature.<br />
Phrase Source—Use Phrase Source to select exactly what<br />
the Phrase Sampler records. You can choose to record just<br />
your GUITAR or just the BAND track or you can select ALL (normal<br />
setting) to record everything.<br />
♫ Try<br />
setting Phrase Source to GUITAR then record along<br />
with a band track. When you play the phrase back you<br />
can hear how good you sound without the band!<br />
Phrase Speed—Use the Phrase Speed menu to adjust the<br />
playback speed of the Phrase Sampler from 50% to 150%. You<br />
can use this feature to learn fast licks by recording a section of<br />
a song, then reducing the Phrase Speed so that you can hear<br />
each of the notes more slowly.<br />
♫ The<br />
Phrase DUB function is disabled if Phrase Speed is<br />
set to anything other than 100%.<br />
Phrase Pitch—Use the Phrase Pitch menu to adjust the playback<br />
pitch of the Phrase Sampler ±5 half steps. You can use<br />
this feature to change the key signature of a song.<br />
♫ The<br />
fender.com<br />
Phrase DUB function is disabled if Phrase Pitch is set<br />
to anything other than NO SHIFT.<br />
Phrase Playback—Use the Playback menu to choose REPEAT<br />
for endless loop phrase playback or ONCE for once through<br />
phrase playback.<br />
Phrase Quality—Select HI RES for maximum quality phrase<br />
recording with a total phrase length of 35 seconds or select<br />
LOW RES for normal quality phrase recording with a total<br />
phrase length of 2 min, 20 sec.<br />
9
Phrase Delete—Use the Delete menu to erase any phrase<br />
file. Select a file by turning the big knob, then press either of<br />
the DELETE soft-keys.<br />
♫ Memory<br />
Lock must be disabled in the Utility Menus to<br />
delete phrase files. See Utility Menus on page 10.<br />
Utility Menus<br />
Use the Utility menus for a variety of amplifier software<br />
and hardware settings. Press and hold the EXIT<br />
button for 2 seconds to activate the Utility menus.<br />
QA1 / QA2 / QA3—Use the first four Utility menus to assign<br />
Quick Access presets. See Quick Access on page 3.<br />
Memory Lock—Use the Memory Lock menu to prevent<br />
accidental preset modifications. You will still be able to make<br />
temporary changes to presets with Memory Lock ON, but you<br />
won't be able to save those changes until Memory Lock is<br />
switched OFF.<br />
Line Level—(G-<strong>DEC</strong> 3 THIRTY, ONLY) Use the Line Level<br />
menu to adjust the output level of the rear panel LINE OUT<br />
jacks to accommodate the input sensitivity of external audio<br />
equipment.<br />
Line Out— (G-<strong>DEC</strong> 3 THIRTY, ONLY) Use the Line Out menu<br />
to select the audio content sent out through the rear panel<br />
LINE OUT jacks. Choose ALL to send all G-<strong>DEC</strong> 3 audio to the<br />
LINE OUT jacks (normal setting) or choose BAND to send only<br />
the band track to the LINE OUT jacks.<br />
♫ For<br />
the most intense one-man band experience possible<br />
with the G-<strong>DEC</strong> 3 Thirty and a PA system: Connect the<br />
LINE OUT jacks to a PA sound system. Set the Line Out<br />
menu to BAND and the Speaker menu to GUITAR. Now<br />
the band track audio will play in stereo through the PA<br />
speakers and your guitar will play through the G-<strong>DEC</strong> 3<br />
speaker, creating a realistic band simulation!<br />
Speaker— (G-<strong>DEC</strong> 3 THIRTY, ONLY) Use the Speaker menu to<br />
select the audio content sent to the G-<strong>DEC</strong> 3 internal speaker.<br />
Choose ALL to send all G-<strong>DEC</strong> 3 audio to the speaker (normal<br />
setting) or choose GUITAR to send only your guitar audio to<br />
the G-<strong>DEC</strong> 3 speaker. See the Line Out ♫ note above.<br />
Import One Preset—Use the Import menu to import any<br />
one preset from an SD card inserted into the G-<strong>DEC</strong> 3.<br />
To import one preset from the SD card to the G-<strong>DEC</strong> 3:<br />
1. Press and hold the EXIT button to activate the Utility<br />
menus.<br />
10<br />
2. Use the soft-keys (3–or–4) to access the Import menu.<br />
3. Turn the big knob and select the preset you want to<br />
import.<br />
4. Press SAVE.<br />
5. Turn the big knob to select the preset you want to overwrite.<br />
6. Press SAVE again to confirm and finalize the preset import.<br />
♫ Any<br />
band track associated with the imported preset will<br />
only play if an SD card with the band track file (media) is<br />
plugged into the G-<strong>DEC</strong> 3. See ! note on page 11.<br />
Export One Preset—Use the Export One menu to export a<br />
single preset to an SD card inserted into the G-<strong>DEC</strong> 3.<br />
To export one preset from the G-<strong>DEC</strong> 3 to the SD card:<br />
1. Press and hold the EXIT button to activate the Utility<br />
menus.<br />
2. Use the soft-keys (3–or–4) to access the Export One<br />
menu.<br />
3. Turn the big knob and select the preset you want to<br />
export.<br />
4. Press either one of the EXPORT ONE soft-keys to export<br />
the selected preset.<br />
5. Turn the big knob to select the preset you want to save<br />
over.<br />
6. Press SAVE again to confirm and finalize the preset export.<br />
♫ Exporting<br />
a preset will overwrite any preset on the SD<br />
card with the same name! See ! note on page 11.<br />
Export All Presets—Use the Export All menu to export ALL<br />
presets to an SD card inserted into the G-<strong>DEC</strong> 3.<br />
To export all presets from the G-<strong>DEC</strong> 3 to the SD card:<br />
1. Press and hold the EXIT button to activate the Utility<br />
menus.<br />
2. Use the soft-keys (3–or–4) to access the Export All menu.<br />
3. Press either one of the EXPORT ALL soft-keys to export all<br />
presets.<br />
♫ Exporting<br />
fender.com<br />
presets will overwrite any presets on the SD<br />
card with the same names! See ! note on page 11.<br />
Restore All Presets—Use the Preset Restore menu to restore<br />
all presets on the G-<strong>DEC</strong> 3 to their original factory settings.<br />
Preset Restore will NOT restore any media (band tracks) if they<br />
have been deleted from the G-<strong>DEC</strong> 3 hard drive (HD), which<br />
can only be done using the <strong>Fender</strong> FUSE software interface or<br />
through the USB Drive menu.
! The IMPORT, EXPORT and RESTORE menus above do<br />
♫ The<br />
NOT transfer the band track files (media) associated<br />
with the presets. However, you CAN move appropriately<br />
licensed media files to and from the G-<strong>DEC</strong> 3 using the<br />
<strong>Fender</strong> FUSE software included on the G-<strong>DEC</strong> 3 DVD, or<br />
through the USB Drive menu (below).<br />
<strong>Fender</strong> FUSE software included with your G-<strong>DEC</strong> 3<br />
has backup and restore functions that DO transfer the<br />
media files (band tracks) along with the preset files.<br />
Format SD Card—Use the Format SD menu to format your<br />
SD card as “FAT32” if the pre-existing format is not recognized<br />
by the G-<strong>DEC</strong> 3. Warning: All files on your SD card will be<br />
erased by the formatting process.<br />
USB Drive—Use the USB Drive menu to connect the G-<strong>DEC</strong> 3<br />
to your computer to enable direct access to all media files on<br />
the G-<strong>DEC</strong> 3 hard drive (HD). You will find three folders on the<br />
G-<strong>DEC</strong> 3 HD:<br />
FOLDER NAME USED FOR FILE TYPES<br />
Audio Band Tracks .wav / .mp3<br />
Midi Band Tracks (MIDI) .mid<br />
Phrase Phrase Sampler files .wav<br />
♫ There<br />
is no menu function on the G-<strong>DEC</strong> 3 that allows<br />
you to copy media files (band tracks) directly between<br />
an SD card and the G-<strong>DEC</strong> 3 hard drive. However, you<br />
can accomplish this from your computer when the<br />
G-<strong>DEC</strong> 3 is connected as a USB drive.<br />
Memory Free Space—Use the Memory menu to see how<br />
much free space is available on the G-<strong>DEC</strong> 3 hard drive (HD)<br />
and on the SD card, if one is present.<br />
SD Card Slot<br />
Using SD flash memory cards with the G-<strong>DEC</strong> 3 will enhance<br />
your musical capabilities by providing storage for:<br />
• Thousands of Band tracks and Phrase samples (media).<br />
• Virtually unlimited number of presets that you can<br />
import/export or share with other G-<strong>DEC</strong> 3 players.<br />
There is only about 250 MB of storage available on the<br />
G-<strong>DEC</strong> 3 hard drive for media (band tracks and phrase sam-<br />
ples) so you may find it more convenient to carry the majority<br />
of your media on SD cards. The G-<strong>DEC</strong> 3 is compatible with SD<br />
and SDHC cards up to 8 GB.<br />
♫ Poor<br />
quality SD cards may be unreliable or cause choppy<br />
audio playback. For a list of recommended SD cards,<br />
log on to: www.fender.com/support/gdec3/faq/<br />
sdcard.php<br />
To prepare a pre-formatted SD card for use with your<br />
G-<strong>DEC</strong> 3:<br />
1. Insert an empty SD card into the SD slot on the front of the<br />
G-<strong>DEC</strong> 3. The G-<strong>DEC</strong> will automatically create the following<br />
folders on the SD card:<br />
FOLDER NAME USED FOR FILE TYPES<br />
Audio Band Tracks .wav / .mp3<br />
Midi Band Tracks (MIDI) .mid<br />
Phrase Phrase Sampler files .wav<br />
Presets Preset files .fuse<br />
2. The SD card is ready to use! You can fill the Audio and Midi<br />
folders with songs from your computer and then use them<br />
as backing tracks for presets on the G-<strong>DEC</strong> 3, or simply<br />
audition them from Quick Access mode.<br />
To import / export presets using an SD card:<br />
1. Insert your SD card in the SD slot.<br />
2. Use the Import Preset and Export Preset menus to perform<br />
the desired action (see Utility Menus on page 10).<br />
USB Port<br />
Use the USB port to connect the G-<strong>DEC</strong> 3 to your computer to<br />
take your music to the next level:<br />
• Connect to the (included) <strong>Fender</strong> FUSE software to control<br />
your G-<strong>DEC</strong> 3 from your computer and access bonus<br />
amp features not available from the G-<strong>DEC</strong> 3 alone.<br />
♫ Please<br />
see the <strong>Fender</strong> FUSE manual on the G-<strong>DEC</strong> 3 DVD<br />
for details.<br />
• Record and edit G-<strong>DEC</strong> 3 audio using the (included)<br />
Ableton® Live Lite 8 <strong>Fender</strong>® Edition software.<br />
♫ Please<br />
fender.com<br />
see the Ableton® Live Lite 8 <strong>Fender</strong> edition manual<br />
on the G-<strong>DEC</strong> 3 DVD for details.<br />
• Stream live audio and play with people around the<br />
world using <strong>Fender</strong>® BAND JAM, powered by eJamming®<br />
AUDiiO.<br />
11
♫ For<br />
a 30-day trial subscription, log on to: www.fender.<br />
com/ejamming<br />
• Connect G-<strong>DEC</strong> 3 to your computer as a USB drive to<br />
enable direct media file management (see USB Drive<br />
under Utility menus, on page 11).<br />
Footswitch<br />
Connect an (optional) <strong>Fender</strong> ULT-4 footswitch (P/N<br />
0994070000) to your G-<strong>DEC</strong> 3 to enable remote control of<br />
essential G-<strong>DEC</strong> 3 functions. The footswitch screen and LEDs<br />
show you some of the same information as the amplifier<br />
display, so you can, for example, tune your guitar and select<br />
presets by watching the footswitch without ever looking at<br />
the G-<strong>DEC</strong> 3 display!<br />
• Select Quick Access presets<br />
• Use the Tuner<br />
• Select presets (up/down)<br />
• Start/stop Band tracks<br />
• Use the Phrase Sampler (play/record/overdub)<br />
������<br />
������<br />
������<br />
����������<br />
���<br />
����<br />
����<br />
��������������������<br />
��� ���<br />
�� ������<br />
������ �������<br />
The footswitch has three modes that are indicated by the<br />
three LEDs labeled MODE 1, MODE 2 and MODE 3. The<br />
footswitch also has a Tuner mode which is indicated when all<br />
of the mode LEDs are off.<br />
To switch between modes, press the MODE button. To activate<br />
Tuner mode, press and hold the MODE button for 2<br />
seconds.<br />
Mode 1—In Mode 1 the footswitch is used to select Quick<br />
Access presets as indicated by the labels (QA1 / QA2 / QA3)<br />
under each button, in line with the MODE 1 LED. When you<br />
select a Quick Access preset, the number of the preset will<br />
appear in the display of the footswitch.<br />
Mode 2—In Mode 2 the footswitch is used to select presets<br />
and start/stop the band track as indicated by the labels<br />
(DOWN / UP / SELECT) under each button, in line with the<br />
MODE 2 LED. When you select a preset, the number of the<br />
preset will appear in the display of the footswitch.<br />
Mode 3—In Mode 3 the footswitch is used to operate the<br />
Phrase Sampler as indicated by the labels (PLAY / RECORD /<br />
OVERDUB) under each button, in line with the MODE 3 LED.<br />
The footswitch button LEDs indicate your Phrase sampler<br />
12<br />
fender.com<br />
actions, but the phrase progress bar is only displayed on the<br />
G-<strong>DEC</strong> 3 screen.<br />
Tuner Mode—Press and hold the MODE button for 2 seconds<br />
to activate the Tuner. The screen and the footswitch<br />
both will display the same tuner information so that you can<br />
look in either place to tune your guitar. The footswitch will<br />
display the nearest note. The button LEDs will indicate sharp<br />
and flat. "In tune" is indicated when the green LED below the<br />
footswitch display lights up.<br />
Press any footswitch button to exit Tuner mode.<br />
FAQ<br />
There are several great places you can go to learn more about<br />
the G-<strong>DEC</strong> 3 and music in general:<br />
• www.fender.com/support<br />
• Join a <strong>Fender</strong> Community forum where you can ask questions<br />
and read threads. There's even a forum just for the<br />
G-<strong>DEC</strong> 3: www.fender.com/community/forums<br />
• Log on to the <strong>Fender</strong> Knowledge Base to download<br />
"G-<strong>DEC</strong> 3 Performance Notes" and read "Frequently<br />
Asked Questions" (FAQ): www.fender.com/support/faqs.<br />
php<br />
• Find music theory learning materials and sheet music at<br />
Hal Leonard Publications: www.halleonard.com
A PRODUCT OF:<br />
FENDER MUSICAL INSTRUMENTS CORPORATION<br />
CORONA, CALIFORNIA, USA<br />
This product is covered by one or more of the following patents:<br />
R.O.C. Taiwan I290002; UK Pat. GB2435368B<br />
<strong>Fender</strong>®, G–<strong>DEC</strong>® , Blackface, <strong>Fender</strong>® FUSE, Jazzmaster and Hot Rod are trademarks of FMIC.<br />
Other trademarks are property of their respective owners.<br />
Copyright © 2010 FMIC. All rights reserved.<br />
AMPLIFICADOR DE AUDIO<br />
IMPORTADO POR: Instrumentos Musicales <strong>Fender</strong> S.A. de C.V., Calle Huerta # 132, Col. Carlos Pacheco,<br />
C.P. 228890, Ensenada, Baja California, Mexico.<br />
RFC: IMF870506R5A Hecho en China. Servicio de Cliente: 001-8665045875<br />
Supply of this product does not convey a license nor imply any right to distribute MPEG<br />
Layer-3 compliant content created with this product in revenue-generating broadcast systems<br />
(terrestrial, satellite, cable and/or other distribution channels), streaming applications<br />
(via Internet, intranets and/or other networks), other content distribution systems (pay-audio,<br />
or audio-on-demand-applications and the like) or on physical media (compact discs, digital<br />
versatile discs, semiconductor chips, hard drives, memory cards and the like) independent<br />
license for such use is required. For details, please visit http://mp3licensing.com<br />
部件部件名称<br />
(Part Name) 铅<br />
(PB)<br />
汞<br />
(Hg)<br />
有毒有害物质或元素<br />
(Hazardous Substances’ Name)<br />
镉 六价铬<br />
(Cd) (Cr 6+ 多溴联苯<br />
) (PBB)<br />
多溴二苯醚<br />
(PBDE)<br />
部分电子元件 x o o o o o<br />
部分机器加工金属部件 x o o o o o<br />
部分其他附属部件 x o o o o o<br />
O: 表示该有毒有害物质在该部件所有均质材料中的含量均在 SJ/T 11363-2006 规定的现量要求以下<br />
X: 表示该有毒有害物质至少在该部件的某一均质材料中的含量超出 SJ/T 11363-2006 规定的现量要求<br />
fender.com<br />
13
P/N 0081367000 (ENGLISH) REV A