

Honeywell Programmable Timer Switch (RPLS530A) - Programmable Wall Switch Installation and User Guide (English, French, Spanish)
Honeywell Programmable Timer Switch (RPLS530A) - Programmable Wall Switch Installation and User Guide (English, French, Spanish)
Honeywell Programmable Timer Switch (RPLS530A) - Programmable Wall Switch Installation and User Guide (English, French, Spanish)

Create successful ePaper yourself
Turn your PDF publications into a flip-book with our unique Google optimized e-Paper software.
<strong>RPLS530A</strong>/RPLS531A<br />
<strong>Installation</strong> <strong>and</strong> <strong>User</strong> <strong>Guide</strong><br />
<strong>Programmable</strong> <strong>Wall</strong> <strong>Switch</strong><br />
Applications<br />
The <strong>RPLS530A</strong>/RPLS531A switch can be used in a single-pole or 3-way<br />
installation with the following types of lighting:<br />
• Inc<strong>and</strong>escent<br />
• Halogen<br />
• Low-voltage halogen with transformer<br />
• Fluorescent<br />
The <strong>RPLS530A</strong>/RPLS531A switch cannot be used with a load below 40<br />
W, a load above 500 W or a motor.<br />
<strong>Installation</strong><br />
Cut power at the circuit breaker to avoid electric shock.<br />
Remove the existing switch. (For a 3-way installation, identify <strong>and</strong><br />
label the wire that is connected to the “common” screw.)<br />
Install the new switch (refer to the appropriate section below).<br />
Apply power at the circuit breaker.<br />
NOTE A:<br />
The white wire is not the neutral wire but the wire going to the load.<br />
SINGLE-POLE INSTALLATION<br />
Connect wires "2" <strong>and</strong> "C" of the <strong>RPLS530A</strong>/RPLS531A to the line<br />
(120 V) wire.<br />
EXISTING 3-WAY INSTALLATION<br />
120 VAC<br />
120 VAC<br />
Neutral<br />
120 VAC<br />
Line<br />
Line<br />
Neutral<br />
See NOTE A<br />
See NOTE A<br />
Red<br />
Jumper Red 3-wire cable<br />
1.<br />
2.<br />
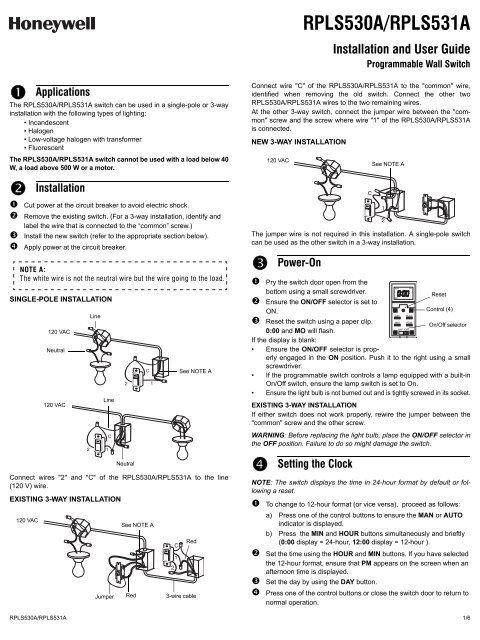
Connect wire "C" of the <strong>RPLS530A</strong>/RPLS531A to the "common" wire,<br />
identified when removing the old switch. Connect the other two<br />
<strong>RPLS530A</strong>/RPLS531A wires to the two remaining wires.<br />
At the other 3-way switch, connect the jumper wire between the "common"<br />
screw <strong>and</strong> the screw where wire "1" of the <strong>RPLS530A</strong>/RPLS531A<br />
is connected.<br />
NEW 3-WAY INSTALLATION<br />
The jumper wire is not required in this installation. A single-pole switch<br />
can be used as the other switch in a 3-way installation.<br />
Power-On<br />
Pry the switch door open from the<br />
bottom using a small screwdriver.<br />
Ensure the ON/OFF selector is set to<br />
ON.<br />
Reset the switch using a paper clip.<br />
0:00 <strong>and</strong> MO will flash.<br />
If the display is blank:<br />
• Ensure the ON/OFF selector is properly<br />
engaged in the ON position. Push it to the right using a small<br />
screwdriver.<br />
• If the programmable switch controls a lamp equipped with a built-in<br />
On/Off switch, ensure the lamp switch is set to On.<br />
• Ensure the light bulb is not burned out <strong>and</strong> is tightly screwed in its socket.<br />
EXISTING 3-WAY INSTALLATION<br />
If either switch does not work properly, rewire the jumper between the<br />
"common" screw <strong>and</strong> the other screw.<br />
WARNING: Before replacing the light bulb, place the ON/OFF selector in<br />
the OFF position. Failure to do so might damage the switch.<br />
<br />
120 VAC<br />
Setting the Clock<br />
See NOTE A<br />
Reset<br />
Control (4)<br />
On/Off selector<br />
NOTE: The switch displays the time in 24-hour format by default or following<br />
a reset.<br />
To change to 12-hour format (or vice versa), proceed as follows:<br />
a) Press one of the control buttons to ensure the MAN or AUTO<br />
indicator is displayed.<br />
b) Press the MIN <strong>and</strong> HOUR buttons simultaneously <strong>and</strong> brieftly<br />
(0:00 display = 24-hour, 12:00 display = 12-hour ).<br />
Set the time using the HOUR <strong>and</strong> MIN buttons. If you have selected<br />
the 12-hour format, ensure that PM appears on the screen when an<br />
afternoon time is displayed.<br />
Set the day by using the DAY button.<br />
Press one of the control buttons or close the switch door to return to<br />
normal operation.<br />
3.<br />
4.<br />
<strong>RPLS530A</strong>/RPLS531A 1/6
Selecting the Operating Mode<br />
The programmable switch has 2 operating modes: manual (MAN) <strong>and</strong><br />
automatic (AUTO). To switch mode, press the switch door for 3 seconds.<br />
Manual Mode<br />
The programmable switch operates as a regular switch.<br />
Briefly press the switch door to turn the lights On or Off.<br />
The mode (MAN) <strong>and</strong> state (ON or OFF) are displayed.<br />
Automatic Mode<br />
The programmable switch follows the programmed<br />
schedule. The mode (AUTO), state (ON or OFF) <strong>and</strong><br />
current program number are displayed.<br />
To temporarily override the programmed schedule, press the switch door.<br />
The new state (ON or OFF) will flash to show that this state is temporary.<br />
The override remains in effect until you press the switch door again or<br />
until the beginning of the next program.<br />
Programming<br />
6.<br />
You can set up to 7 programs. To set a program, you need to enter its<br />
start time (ON) <strong>and</strong> its end time (OFF).<br />
Pry the switch door open using a small screwdriver.<br />
Press the PGM button to display a program <strong>and</strong> its<br />
On or Off time. For example, when you first press<br />
PGM, program number 1 (P1) <strong>and</strong> its On time<br />
(ON) will appear. -:-- will appear instead of the<br />
time if the program is not set (inactive).<br />
Press the DAY button to select the day to which<br />
you want to apply the program.<br />
NOTE: If you want to apply the program to every<br />
day of the week, press DAY until all the days are<br />
displayed. (This still counts as 1 program, not 7)<br />
Press the HOUR <strong>and</strong> MIN buttons to set the ON time (time when<br />
you want the lights to turn on). If you have selected the 12-hour<br />
format, ensure that PM appears on the screen when an afternoon<br />
time is displayed.<br />
After you have programmed the ON time, press the PGM button to<br />
display the OFF time (time when you want the lights to turn off).<br />
Repeat steps 3 through 5 to program the OFF<br />
time. If the program ON time is set for every day of<br />
the week, the program OFF time will automatically<br />
be set for every day.<br />
To set another program, repeat steps 2 through 6.<br />
Programs that are not set will remain inactive.<br />
Press one of the control buttons or close the switch door to return to<br />
normal operation.<br />
Clearing a Program<br />
Press the PGM button until the desired program is selected. Hold the<br />
PGM button for 3 seconds. -:-- appears when the program is erased.<br />
<br />
Technical Specifications<br />
Supply: 120 VAC, 50 / 60 Hz<br />
Minimum load: 40 watts<br />
Maximum load: 500 watts<br />
Operating temperature range: 5°F to 122°F (-15°C to 50°C)<br />
Storage temperature range: -4°F to 122°F (-20°C to 50°C)<br />
Power outage: The programs are protected by a rechargeable battery.<br />
The screen is blank during the power outage.<br />
Certifications: CSA & UL<br />
5.<br />
7.<br />
Troubleshooting<br />
Blank display<br />
Faded or irregular<br />
display<br />
Cannot switch between<br />
24-hour format <strong>and</strong><br />
12-hour format<br />
Programs do not run as<br />
expected<br />
The metal plate is hot<br />
Warranty<br />
• Verify circuit breaker at main panel.<br />
• Verify if light bulb is burned out<br />
• Ensure the ON/OFF selector is at ON.<br />
• Reset the switch using a paper clip.<br />
• Load is less than 40 W<br />
• Ambient temperature is below freezing<br />
point<br />
First, press one of the control buttons so<br />
that MAN or AUTO appears on display.<br />
• Make sure the switch is properly programmed.<br />
• Note that -:-- indicates an inactive program,<br />
00:00 indicates midnight.<br />
• If the switch has been configured for<br />
12-hour format, check that PM appears on<br />
the left side of the screen when an afternoon<br />
time is displayed.<br />
This is normal with high loads (maximum of<br />
500 W).<br />
<strong>Honeywell</strong> warrants this product, excluding battery, to be free from defects in the<br />
workmanship or materials, under normal use <strong>and</strong> service, for a period of one (1)<br />
year from the date of purchase by the consumer. If at any time during the warranty<br />
period the product is determined to be defective or malfunctions, <strong>Honeywell</strong> shall<br />
repair or replace it (at <strong>Honeywell</strong>'s option).<br />
If the product is defective,<br />
(i) return it, with a bill of sale or other dated proof of purchase, to the place from<br />
which you purchased it, or<br />
(ii) call <strong>Honeywell</strong> Customer Care at 1-800-468-1502. Customer Care will make<br />
the determination whether the product should be returned to the following<br />
address: <strong>Honeywell</strong> Return Goods, Dock 4 MN10-3860, 1885 Douglas Dr N,<br />
Golden Valley, MN 55422, or whether a replacement product can be sent to<br />
you.<br />
This warranty does not cover removal or reinstallation costs. This warranty shall<br />
not apply if it is shown by <strong>Honeywell</strong> that the defect or malfunction was caused by<br />
damage which occurred while the product was in the possession of a consumer.<br />
<strong>Honeywell</strong>'s sole responsibility shall be to repair or replace the product within the<br />
terms stated above. HONEYWELL SHALL NOT BE LIABLE FOR ANY LOSS OR<br />
DAMAGE OF ANY KIND, INCLUDING ANY INCIDENTAL OR CONSEQUENTIAL<br />
DAMAGES RESULTING, DIRECTLY OR INDIRECTLY, FROM ANY BREACH OF<br />
ANY WARRANTY, EXPRESS OR IMPLIED, OR ANY OTHER FAILURE OF THIS<br />
PRODUCT. Some states do not allow the exclusion or limitation of incidental or<br />
consequential damages, so this limitation may not apply to you.<br />
THIS WARRANTY IS THE ONLY EXPRESS WARRANTY HONEYWELL MAKES<br />
ON THIS PRODUCT. THE DURATION OF ANY IMPLIED WARRANTIES,<br />
INCLUDING THE WARRANTIES OF MERCHANTABILITY AND FITNESS FOR A<br />
PARTICULAR PURPOSE, IS HEREBY LIMITED TO THE ONE-YEAR DURATION<br />
OF THIS WARRANTY. Some states do not allow limitations on how long an implied<br />
warranty lasts, so the above limitation may not apply to you.<br />
This warranty gives you specific legal rights, <strong>and</strong> you may have other rights which<br />
vary from state to state.<br />
If you have any questions concerning this warranty, please write <strong>Honeywell</strong> Customer<br />
Relations, 1985 Douglas Dr, Golden Valley, MN 55422 or call<br />
1-800-468-1502.<br />
<br />
Customer Assistance<br />
If you have any questions about your light switch, go to<br />
http://yourhome.honeywell.com, or call <strong>Honeywell</strong> Customer Care<br />
toll-free at 1-800-468-1502.<br />
8.<br />
9.<br />
10.<br />
<strong>RPLS530A</strong>/RPLS531A 2/6
<strong>RPLS530A</strong>/RPLS531A<br />
Mode d’installation et d’emploi<br />
Interrupteur mural programmable<br />
Applications<br />
L’interrupteur <strong>RPLS530A</strong>/RPLS531A peut être utilisé aussi bien pour une<br />
installation unipolaire que pour une installation à 3 voies avec les types<br />
d’éclairage suivants :<br />
• Inc<strong>and</strong>escent<br />
• Halogène<br />
• Halogène basse tension avec transformateur<br />
• Fluorescent<br />
Le <strong>RPLS530A</strong>/RPLS531A ne peut être utilisé avec une charge inférieure<br />
à 40 W , une charge supérieure à 500 W ou un moteur.<br />
<strong>Installation</strong><br />
2.<br />
Mettre le circuit hors tension à partir du disjoncteur afin d'éviter tout<br />
risque de choc électrique.<br />
Enlever l’interrupteur existant (pour une installation à 3 voies, identifier<br />
et marquer le fil relié à la borne «commun»).<br />
Installer le nouvel interrupteur (voir la section appropriée ci-dessous).<br />
Remettre le circuit sous tension à partir du disjoncteur.<br />
NOTE A:<br />
Le fil blanc n’est pas le fil neutre, mais un fil raccordé à la charge.<br />
INSTALLATION UNIPOLAIRE<br />
Relier les fils «2» et «C» du <strong>RPLS530A</strong>/RPLS531A à la ligne 120 Vca.<br />
INSTALLATION EXISTANTE À 3 VOIES<br />
120 Vca<br />
120 Vca<br />
120 Vca<br />
neutre<br />
ligne<br />
raccord<br />
ligne<br />
neutre<br />
Voir la NOTE A<br />
rouge<br />
Voir la NOTE A<br />
rouge<br />
câble trifilaire<br />
Relier le fil «C» du <strong>RPLS530A</strong>/RPLS531A au fil «commun» que vous<br />
avez identifié lorsque vous avez enlevé l’ancien interrupteur. Relier les<br />
deux autres fils du <strong>RPLS530A</strong>/RPLS531A aux deux fils restants.<br />
1.<br />
Pour l’autre interrupteur à 3 voies, relier le fil de raccord (fourni) entre la<br />
borne «commun» et la borne sur laquelle le fil «1» du <strong>RPLS530A</strong>/RPLS531A<br />
est branché.<br />
NOUVELLE INSTALLATION À 3 VOIES<br />
Le fil de raccord n’est pas requis dans cette installation. Dans le cas<br />
d’une installation à 3 voies, l’autre interrupteur peut être un interrupteur<br />
unipolaire.<br />
Démarrage<br />
Soulevez le bas du couvercle de<br />
l’interrupteur à l’aide d’un petit<br />
tournevis.<br />
S’assurer que le sélecteur ON/<br />
OFF est placé à ON.<br />
Réinitialiser l’interrupteur à<br />
l’aide d’un trombone. 0:00<br />
clignotera à l’écran.<br />
Si rien n’est affiché à l’écran :<br />
• S’assurer que le sélecteur ON/OFF est bien mis à la position ON. Le<br />
placer bien à droite à l’aide d’un petit tournevis.<br />
• Si l’interrupteur comm<strong>and</strong>e une lampe munie d’un interrupteur intégré,<br />
placer son interrupteur à «Marche» (On).<br />
• S’assurer que l’ampoule n’est pas brûlée et est bien vissée.<br />
INSTALLATION EXISTANTE À 3 VOIES<br />
Si l’un ou l’autre des interrupteurs ne fonctionne pas, rebrancher le fil de<br />
raccord entre la borne «commun» et l’autre borne.<br />
MISE EN GARDE : Avant de remplacer l'ampoule, placer le sélecteur<br />
ON/OFF (marche/arrêt) à la position OFF, faute de quoi l’interrupteur<br />
risque d’être endommagé.<br />
<br />
120 Vca Voir la NOTE A<br />
Régler l’horloge<br />
réinitialisation<br />
touche de contrôle (4)<br />
sélecteur On/Off<br />
NOTA : L’interrupteur affiche l’heure en format 24 heures par défaut ou<br />
après une réinitialisation.<br />
Pour basculer entre le format 12 heures et le format 24 heures, procéder<br />
comme suit :<br />
a) Appuyer sur l’une des touches de contrôle afin de s’assurer que<br />
l’indicateur MAN ou AUTO est affiché.<br />
b) Appuyer simultanément et brièvement sur les touches MIN et<br />
HOUR (affichage 0:00 = 24 heures; affichage 12:00 = 12<br />
heures).<br />
Régler l’heure à l’aide des touches HOUR et MIN. Si le format 12<br />
heures est sélectionné, s’assurer que PM apparaît lorsque l’heure<br />
de l’après-midi est affichée.<br />
Régler le jour à l’aide de la touche DAY.<br />
Appuyer sur une touche de contrôle ou replacer le couvercle de<br />
l’interrupteur.<br />
3.<br />
4.<br />
<strong>RPLS530A</strong>/RPLS531A 3/6
L’interrupteur a 2 modes de fonctionnement : manuel (MAN) et automatique<br />
(AUTO). Pour changer de mode, appuyer sur l’interrupteur pendant 3<br />
secondes.<br />
Mode manuel<br />
L’interrupteur programmable fonctionne comme un interrupteur<br />
conventionnel. Appuyer sur l’interrupteur pour allumer<br />
ou éteindre la lumière. Le mode (MAN) et l’état de<br />
marche/arrêt (ON ou OFF) sont affichés.<br />
Mode automatique<br />
L’interrupteur suit l’horaire programmé. Le mode (AUTO),<br />
l’état de marche/arrêt (ON ou OFF) et le numéro du programme<br />
en cours sont affichés.<br />
Pour déroger temporairement à l’horaire programmé, appuyer sur l’interrupteur.<br />
Le nouvel état (ON ou OFF) clignotera pour indiquer que l’état est temporaire.<br />
La dérogation reste active jusqu’à ce qu’on appuie de nouveau sur<br />
l’interrupteur ou jusqu’au début du prochain programme.<br />
Programmation<br />
6.<br />
Vous pouvez enregistrer jusqu'à 7 programmes. Pour enregistrer un<br />
programme, vous devez régler l’heure du début (ON) et l’heure de la fin<br />
(OFF).<br />
Soulevez le bas du couvercle de l’interrupteur à l’aide d’un petit<br />
tournevis.<br />
Appuyer sur la touche PGM pour afficher un<br />
programme et l’heure du début (ON) du programme<br />
ou l’heure de la fin (OFF) du programme. Par<br />
exemple, lorsque vous appuyez sur PGM pour la<br />
première fois, le programme 1 (P1) et l’heure du<br />
début (ON) sont affichés. -:-- est affiché au lieu de l’heure si le<br />
programme n’est pas enregistré (c.-à-d. s’il est inactif).<br />
Appuyer sur DAY pour sélectionner le jour du<br />
programme.<br />
NOTA : Si vous désirez que le programme se répète<br />
tous les jours, appuyer sur DAY jusqu’à ce que les 7<br />
jours soient affichés. (Ceci compte pour 1 programme et non 7.)<br />
Appuyer sur HOUR et MIN pour régler l’heure du début du programme<br />
(ON) (heure à laquelle vous voulez que la lumière s'allume). Si le format<br />
d’affichage 12 heures est utilisé, s’assurer que la mention PM apparaît<br />
lorsque l’heure de l’après-midi est affichée.<br />
Une fois l’heure du début du programme enregistrée,<br />
appuyer de nouveau sur PGM pour afficher l’heure de<br />
la fin du programme.<br />
Répéter les étapes 3 à 5 pour régler la fin du<br />
programme (OFF) (l'heure à laquelle vous voulez que<br />
la lumière s’éteigne).<br />
Pour régler un autre programme, répéter les étapes 2 à 6. Les<br />
programmes non réglés resteront inactifs.<br />
Appuyer sur une touche de contrôle ou replacer le couvercle de<br />
l’interrupteur.<br />
Effacer un programme<br />
Appuyer sur la touche PGM jusqu’à ce que le programme désiré soit<br />
sélectionné. Appuyer ensuite sur la touche PGM pendant 3 secondes. L'écran<br />
affiche - :-- lorsque le programme est effacé.<br />
<br />
Modes de fonctionnement<br />
Fiche technique<br />
Alimentation : 120 Vca, 50 / 60 Hz<br />
Charge : 40 W minimum, 500 W maximum<br />
Température de fonctionnement : -15 °C à 50 °C (5 °F à 122 °F)<br />
Température d’entreposage : -20 °C à 50 °C (-4 °F à 122 °F)<br />
Panne de courant : L'interrupteur est muni d'une pile rechargeable pour<br />
sauvegarder vos programmes lors d’une panne de courant. Cependant,<br />
l'écran reste éteint durant la panne.<br />
Certifications : CSA & UL<br />
5.<br />
7.<br />
Dépannage<br />
Écran éteint<br />
Affichage pâle ou<br />
irrégulier<br />
Incapable de changer<br />
le format de l’heure<br />
(24 heures ou 12<br />
heures)<br />
Les programmes ne<br />
fonctionnent pas<br />
correctement<br />
La plaque métallique<br />
est chaude<br />
Garantie<br />
<strong>Honeywell</strong> garantit ce produit, à l'exception des piles, contre tout vice de fabrication ou<br />
de matière dans la mesure où il en est fait une utilisation et un entretien convenables, et<br />
ce, pour un (1) an à partir de la date d'achat par le consommateur. En cas de<br />
défectuosité ou de mauvais fonctionnement pendant la période de garantie, <strong>Honeywell</strong><br />
remplacera ou réparera le produit (au gré de <strong>Honeywell</strong>).<br />
Si le produit est défectueux,<br />
(i)<br />
• Vérifier le disjoncteur sur le panneau<br />
électrique.<br />
• Vérifier si l’ampoule est brûlée.<br />
• S’assurer que le sélecteur ON/OFF est placé à<br />
ON.<br />
• Réinitialiser l’interrupteur à l’aide d’une<br />
trombone.<br />
• La charge est inférieure à 40 W.<br />
• La température ambiante est inférieure à 0 °C.<br />
Appuyer d’abord sur l’une des touches de<br />
contrôle afin que le mot MAN ou AUTO s’affiche<br />
à l’écran.<br />
le retourner, accompagné d'une preuve d'achat indiquant la date d'achat, à l’endroit<br />
où il a été acheté, ou<br />
(ii) s'adresser au Service à la clientèle de <strong>Honeywell</strong> en composant le 1-800-468-<br />
1502. Le Service à la clientèle déterminera alors si le produit doit être retourné à<br />
l'adresse suivante : <strong>Honeywell</strong> Return Goods, Dock 4 MN10-3860, 1885 Douglas<br />
Dr N, Golden Valley, MN 55422, ou si un produit de remplacement peut vous être<br />
expédié.<br />
La présente garantie ne couvre pas les frais de retrait ou de réinstallation. La présente<br />
garantie ne s'appliquera pas s'il est démontré que la défectuosité ou le mauvais<br />
fonctionnement est dû à un endommagement du produit alors que le consommateur<br />
l'avait en sa possession.<br />
La responsabilité de <strong>Honeywell</strong> se limite à réparer ou à remplacer le produit<br />
conformément aux modalités susmentionnées. HONEYWELL N'EST EN AUCUN CAS<br />
RESPONSABLE DES PERTES OU DOMMAGES, Y COMPRIS LES DOMMAGES<br />
INDIRECTS OU ACCESSOIRES DÉCOULANT DIRECTEMENT OU INDIRECTEMENT<br />
D'UNE VIOLATION QUELCONQUE D'UNE GARANTIE, EXPRESSE OU TACITE,<br />
APPLICABLE AU PRÉSENT PRODUIT NI DE TOUTE AUTRE DÉFECTUOSITÉ DU<br />
PRÉSENT PRODUIT. Certaines provinces ne permettent pas l'exclusion ou la restriction<br />
des dommages indirects et, par conséquent, la présente restriction peut ne pas<br />
s'appliquer.<br />
LA PRÉSENTE GARANTIE TIENT LIEU DE TOUTES LES AUTRES GARANTIES,<br />
EXPRESSES OU TACITES, ET LES GARANTIES DE VALEUR MARCHANDE ET DE<br />
CONFORMITÉ À UNE FIN PARTICULIÈRE SONT PAR LES PRÉSENTES EXCLUES<br />
APRÈS LA PÉRIODE DE UN AN DE LA PRÉSENTE GARANTIE Certaines provinces ne<br />
permettent pas de limiter la durée des garanties tacites et, par conséquent, la présente<br />
limitation peut ne pas s'appliquer.<br />
La présente garantie donne au consommateur des droits légaux spécifiques et peut-être<br />
certains autres droits qui peuvent varier d'une province à l'autre.<br />
Pour toute question concernant la présente garantie, prière d'écrire au Service à la<br />
clientèle de <strong>Honeywell</strong> à l'adresse suivante : <strong>Honeywell</strong> Customer Relations, 1985<br />
Douglas Drive, Golden Valley, MN 55422, ou encore composer le 1-800-468-1502.<br />
<br />
• S’assurer que l’interrupteur est bien<br />
programmé.<br />
• Noter que - :-- indique un programme inactif.<br />
• Si l’interrupteur a été configuré en format 12<br />
heures, s’assurer que le mot PM apparaìt à<br />
l’écran lorsque l’heure de l’après-midi est<br />
affichée.<br />
Cette situation est normale lorsque la charge<br />
est élevée (maximum de 500 W).<br />
Service à la clientèle<br />
Si vous avez des questions sur le fonctionnement de votre interrupteur<br />
programmable, veuillez consulter http://yourhome.honeywell.com,<br />
ou vous adresser au Service à la clientèle de <strong>Honeywell</strong> en composant<br />
sans frais le 1-800-468-1502.<br />
8.<br />
9.<br />
10.<br />
<strong>RPLS530A</strong>/RPLS531A 4/6
<strong>RPLS530A</strong>/RPLS531A<br />
Guía de instalación y uso<br />
Interruptor mural programable<br />
Descripción<br />
El interruptor <strong>RPLS530A</strong>/RPLS531A puede utilizarse tanto con una<br />
instalación unipolar (2 cables) o con una instalación de interruptores múltiples<br />
de 3 vías para los siguientes tipos de iluminación:<br />
• Inc<strong>and</strong>escente<br />
• Halógena<br />
• Halógena de baja tensión con transformador<br />
• Fluorescente<br />
El <strong>RPLS530A</strong>/RPLS531A no puede utilizarse con una carga inferior<br />
a 40 W, superior a 500 W ni con un motor.<br />
Instalación<br />
2.<br />
Desconectar el circuito con el interruptor automático para evitar todo<br />
riesgo de electrocución.<br />
Retirar el interruptor existente (en el caso de una instalación de<br />
interruptores múltiples de 3 vías, identificar el cable conectado al<br />
terminal “común”).<br />
Instalar el nuevo interruptor (referirse a la sección apropiada más<br />
abajo).<br />
Reconectar el circuito con el interruptor automático.<br />
INSTALACIÓN UNIPOLAR<br />
NOTA A: El cable blanco no es neutro sino un cable que va a la carga.<br />
Conectar los cables “2” y “C” del <strong>RPLS530A</strong>/RPLS531A a la línea de 120<br />
Vca.<br />
INSTALACIÓN EXISTENTE DE 3 VÍAS<br />
120 VAC<br />
120 VAC<br />
neutro<br />
120 VAC<br />
línea<br />
línea<br />
neutro<br />
Ver la NOTA A<br />
Ver la NOTA A<br />
puente rojo cable triple<br />
Conectar el cable “C” del <strong>RPLS530A</strong>/RPLS531A al cable “común” identificado<br />
cu<strong>and</strong>o se retiró el antiguo interruptor. Conectar los otros dos<br />
cables del <strong>RPLS530A</strong>/RPLS531A a los dos cables restantes.<br />
rojo<br />
1.<br />
En el otro interruptor de 3 vías, conectar el cable de puente (provisto)<br />
entre el terminal “común” y el terminal donde está conectado el cable “1”<br />
del <strong>RPLS530A</strong>/RPLS531A.<br />
NUEVA INSTALACIÓN DE 3 VÍAS<br />
No es necesario un cable de puente en esta instalación. En el caso<br />
de una instalación de 3 vías, el otro interruptor puede ser un interruptor<br />
unipolar.<br />
Encendido<br />
Levantar la parte inferior de la tapa<br />
del interruptor con un pequeño<br />
destornillador.<br />
Asegurarse de que el selector ON/<br />
OFF esté en ON.<br />
Presionar en Reinicialización con<br />
la ayuda de un sujetapapeles. 0:00<br />
parpadeará en la pantalla.<br />
Si en la pantalla no apareciera nada:<br />
• Asegurarse de que el selector ON/OFF esté bien colocado en ON.<br />
Empujarlo a la derecha con un pequeño destornillador.<br />
• Si el interruptor controla una lámpara con un interruptor integrado,<br />
poner el interruptor de la lámpara en “encendido” (On).<br />
• Asegurarse de que la bombilla no esté quemada y que esté bien<br />
atornillada.<br />
INSTALACIÓN EXISTENTE DE TRES VÍAS<br />
Si uno de los interruptores no funcionara, reconectar el cable de puente<br />
entre el terminal “común” y el otro terminal.<br />
ADVERTENCIA: Antes de reemplazar la bombilla, poner el selector “ON/<br />
OFF” (encendido/apagado) en la posición “OFF”, de lo contrario el<br />
interruptor puede dañarse .<br />
<br />
120 VAC Ver la NOTA A<br />
Ajuste de la hora y el día<br />
reinicialización<br />
botón de control (4)<br />
selector On/Off<br />
NOTA: El interruptor viene de fábrica con el formato de 24 horas, que<br />
aparece también luego de una reinicialización<br />
Para cambiar entre el formato de 12 horas y el formato de 24 horas,<br />
proceder de la siguiente manera:<br />
a) Presionar uno de los botones de control para que el indicador<br />
MAN o AUTO aparezca en pantalla.<br />
b) Presionar los botones MIN y HOUR simultánea y brevemente<br />
(aparecerá: 0:00 para el formato de 24 horas y 12:00 para el<br />
formato de 12 horas).<br />
Ajustar la hora con los botones HOUR y MIN. Si se selecciona el<br />
formato de 12 horas, asegurarse de que PM aparezca en la pantalla<br />
si el ajuste se hace después del mediodía.<br />
Ajustar el día con el botón DAY.<br />
Presionar un botón de control o cerrar la tapa del interruptor para<br />
volver al funcionamiento normal.<br />
3.<br />
4.<br />
<strong>RPLS530A</strong>/RPLS531A 5/6
Modos de funcionamiento<br />
El interruptor tiene dos modos de funcionamiento: manual (MAN) y<br />
automático (AUTO). Para cambiar de modo, presionar el interruptor durante 3<br />
segundos hasta que aparezca el modo deseado.<br />
Modo manuall<br />
El interruptor programable funciona como un interruptor<br />
convencional. Presionar el interruptor para encender o<br />
apagar la luz. Aparecen en la pantalla el modo manual<br />
(MAN) y el estado de encendido/apago (ON u OFF).<br />
Modo automático<br />
El interruptor sigue el horario programado. Aparecen en la<br />
pantalla el modo automático (AUTO), el número del programa<br />
en curso y el estado de encendido/apago (ON u<br />
OFF).<br />
Para cancelar temporariamente el horario programado, presionar el interruptor.<br />
El nuevo estado (ON u OFF) parpadeará en la pantalla para indicar que la<br />
situación es temporaria. La cancelación quedará activada hasta que se presione<br />
nuevamente el interruptor o hasta el inicio del programa siguiente.<br />
Programación<br />
6.<br />
Se pueden registrar hasta 7 programas. Para registrar un programa, debe<br />
definirse la hora de inicio (ON) y la hora de finalización (OFF).<br />
Levantar la parte inferior de la tapa del interruptor con un pequeño<br />
destornillador.<br />
Presionar el botón PGM para visualizar un programa,<br />
la hora de inicio (ON) y la hora de finalización (OFF).<br />
Por ejemplo, cu<strong>and</strong>o se presiona PGM por primera<br />
vez, el programa 1 (P1) y la hora de inicio (ON)<br />
aparecen en pantalla. Aparece -:-- en lugar de la<br />
hora si el programa no fue registrado (es decir, está inactivo).<br />
Presionar DAY para seleccionar el día del programa.<br />
Si se desea que el programa se repita todos días de<br />
la semana, presionar DAY hasta que aparezcan todos<br />
los días.<br />
Presionar HOUR y MIN para ajustar la hora de inicio<br />
del programa (ON, la hora a la que la luz debe encenderse). Si el<br />
interruptor está configurado en formato de 12 horas, verificar que PM<br />
aparezca en la pantalla después del mediodía.<br />
Una vez ingresado ON, la hora de inicio del<br />
programa, presionar de nuevo PGM para visualizar<br />
OFF, la hora de finalización del programa.<br />
Repetir las etapas 3 a 5 para ajustar OFF, la hora de<br />
finalización del programa. Si la hora de inicio se<br />
ajusta para cada día de la semana, la hora de finalización se ajustará<br />
automáticamente para cada día<br />
Para definir otro programa, repetir las etapas 2 a 6. Los programas no<br />
definidos permanecerán inactivos.<br />
Presionar un botón de control o cerrar la tapa del interruptor para volver<br />
al funcionamiento normal.<br />
Borrar un programa<br />
Presionar el botón PGM hasta seleccionar el programa deseado. Mantener<br />
presionado durante 3 segundos. En la pantalla aparecerá - :-- cu<strong>and</strong>o se<br />
haya borrado el programa.<br />
<br />
Especificaciones técnicas<br />
<br />
Alimentación : 120 Vca, 50 / 60 Hz<br />
Carga mínima : 40 watts<br />
Carga máxima : 500 watts<br />
Temperatura de funcionamiento : -15 °C a 50 °C (5 °F a 122 °F)<br />
Temperatura de almacenamiento : -20 °C a 50 °C (-4 °F a 122 °F)<br />
Corte de corriente : El interruptor tiene una pila recargable para<br />
salvaguardar los programas en caso de un corte de electricidad. Sin<br />
embargo, la pantalla se apaga durante el corte.<br />
Certificaciones : CSA y UL<br />
5.<br />
Solución de problemas<br />
Pantalla apagada<br />
Visualización pálida o<br />
irregular<br />
No se puede cambiar<br />
entre el formato de 24 y<br />
el de 12 horas<br />
Los programas no funcionan<br />
como deberían<br />
La placa metálica está<br />
caliente<br />
Garantía<br />
• Verificar el interruptor general del panel de alimentación.<br />
• Verificar que la bombilla no esté quemada.<br />
• Verificar que el selector On/Off esté en On.<br />
• Presionar firmemente en Reinicialización con ayuda<br />
de un sujetapapeles.<br />
• La carga es inferior a 40 W.<br />
• La temperatura ambiente es inferior a 0°C.<br />
Presionar primero un botón de control para que las<br />
palabras MAN o AUTO aparezcan en la pantalla.<br />
• Verificar que el interruptor esté bien programado.<br />
• Tener en cuenta que - :-- indica un programa<br />
inactivo y 00:00 indica medianoche.<br />
• Si el interruptor está configurado en formato de 12<br />
horas, asegurarse de que PM aparezca a la izquierda<br />
de la pantalla después del mediodía.<br />
<strong>Honeywell</strong> garantiza por un período de un (1) año, a partir de la fecha de compra<br />
por el consumidor, que este producto, sin incluir las baterías, no presentará defectos<br />
en los materiales ni en lo referente a la mano de obra, en condiciones normales<br />
de uso y de servicio. Si en cualquier momento, durante el período de vigencia de la<br />
garantía, se determina que el producto es defectuoso o que funciona mal, <strong>Honeywell</strong><br />
lo reparará o lo reemplazará (a elección de <strong>Honeywell</strong>).<br />
Si el producto es defectuoso:<br />
I. Devuélvalo al lugar donde lo compró, acompañado por la factura de compra<br />
o de otra prueba de compra que incluya la fecha.<br />
II. Llame al servicio de atención al cliente de <strong>Honeywell</strong>, al 1-800-468-1502. El<br />
servicio de atención al cliente determinará si el producto debe devolverse a la<br />
siguiente dirección: <strong>Honeywell</strong> Return Goods, Dock 4 MN10-3860, 1885<br />
Douglas Dr N, Golden Valley, MN 55422; o si se le enviará un producto de<br />
reemplazo.<br />
Esta garantía no cubre los costos de desinstalación y reinstalación. Esta garantía<br />
no será válida si se demuestra que el defecto o el mal funcionamiento se deben a<br />
un daño que ocurrió cu<strong>and</strong>o el producto estaba en posesión del consumidor.<br />
La única responsabilidad de <strong>Honeywell</strong> será la de reparar o reemplazar el producto<br />
de acuerdo con los términos aquí establecidos. HONEYWELL NO SERA<br />
RESPONSABLE DE NINGUNA PERDIDA NI DE NINGUN DAÑO DE NINGUN<br />
TIPO, INCLUIDOS LOS DAÑOS IMPREVISTOS O DERIVADOS QUE<br />
RESULTEN, DIRECTA O INDIRECTAMENTE, DEL INCUMPLIMIENTO DE CUAL-<br />
QUIER GARANTIA, EXPRESA O IMPLICITA, O DE CUALQUIER OTRA FALLA<br />
DE ESTE PRODUCTO. Algunos estados no permiten la exclusión o la limitación<br />
de los daños imprevistos o derivados, por lo tanto, es posible que la limitación no<br />
se aplique.<br />
ESTA ES LA UNICA GARANTIA EXPRESA QUE HONEYWELL HACE SOBRE<br />
ESTE PRODUCTO. LA DURACION DE CUALQUIER GARANTIA IMPLICITA,<br />
INCLUIDAS LAS GARANTIAS DE APTITUD E IDONEIDAD PARA UN FIN<br />
DETERMINADO, QUEDA, POR EL PRESENTE, LIMITADA A LA DURACION DE<br />
UN AÑO DE ESTA GARANTIA. Algunos estados no permiten limitaciones en<br />
cuanto a la duración de las garantías implícitas. Por lo tanto, es posible que la limitación<br />
anterior no se aplique en su caso.<br />
Esta garantía le brinda derechos legales específicos, y usted puede tener otros<br />
derechos que varían para cada estado.<br />
Si tiene preguntas acerca de esta garantía, escriba a <strong>Honeywell</strong> Customer Relations,<br />
1985 Douglas Dr, Golden Valley, MN 55422, o llame al 1-800-468-1502.<br />
<br />
Asistencia técnica<br />
Es normal cu<strong>and</strong>o la carga es elevada (máximo de<br />
500 W)<br />
Si tiene preguntas acerca del funcionamiento del interruptor<br />
programable, visite http://yourhome.honeywell.com o llame sin cargo<br />
al servicio de atención al cliente de <strong>Honeywell</strong>, al 1-800-468-1502.<br />
7.<br />
8.<br />
9.<br />
69-2458EFS-03<br />
<strong>RPLS530A</strong>/RPLS531A Printed in USA / Imprimé aux É.-U. / Impreso en EE.UU. 2016-08-24 6/6<br />
6


