

Honeywell Wi-Fi 9000 with Voice Control - 7-Day Programmable Thermostat (TH9320WFV6007) - Wi-Fi 9000 Programmable Thermostat with Voice Control Owner's Manual (English,French,Spanish)
Honeywell Wi-Fi 9000 with Voice Control - 7-Day Programmable Thermostat (TH9320WFV6007) - Wi-Fi 9000 Programmable Thermostat with Voice Control Owner's Manual (English,French,Spanish)
Honeywell Wi-Fi 9000 with Voice Control - 7-Day Programmable Thermostat (TH9320WFV6007) - Wi-Fi 9000 Programmable Thermostat with Voice Control Owner's Manual (English,French,Spanish)

Create successful ePaper yourself
Turn your PDF publications into a flip-book with our unique Google optimized e-Paper software.
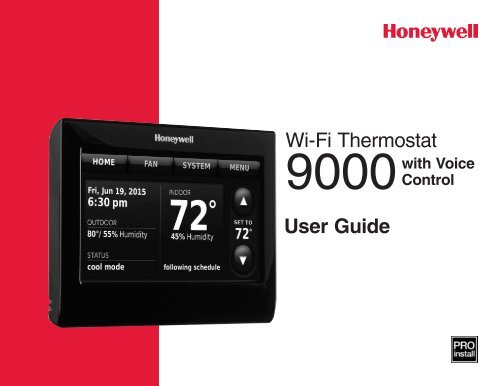
<strong>Wi</strong>-<strong>Fi</strong> <strong>Thermostat</strong><br />
<strong>9000</strong><br />
User Guide<br />
<strong>with</strong> <strong>Voice</strong><br />
<strong>Control</strong>
Features of your <strong>Wi</strong>-<strong>Fi</strong> thermostat<br />
<strong>Wi</strong>th your new thermostat, you can:<br />
• Connect to the Internet to monitor and control your heating/cooling system.<br />
• View and change your heating/cooling system settings.<br />
• View and set temperature and schedules.<br />
• Receive alerts via email and get automatic upgrades.<br />
• View outdoor temperature and humidity (requires <strong>Wi</strong>-<strong>Fi</strong> set up and registration).<br />
Need Help?<br />
For assistance please visit http://yourhome.honeywell.com,<br />
or call toll-free: 1-888-235-6569<br />
33-00020EFS—03<br />
ii
Welcome<br />
Congratulations on your purchase of a <strong>Honeywell</strong> <strong>Wi</strong>-<strong>Fi</strong> color touchscreen programmable<br />
thermostat. When registered to <strong>Honeywell</strong>’s Total Connect Comfort Solutions, you can<br />
remotely monitor and control the heating and cooling system in your home or business—<br />
you can stay connected to your comfort system wherever you go.<br />
<strong>Honeywell</strong>’s Total Connect Comfort is the perfect solution if you travel frequently, own a<br />
vacation home, a business, or manage an investment property or if you are simply looking<br />
for peace of mind.
Table of contents<br />
About your new thermostat<br />
Home screen quick reference...............3<br />
Business screen quick reference..........4<br />
Installation<br />
Connecting to your <strong>Wi</strong>-<strong>Fi</strong> network.........6<br />
Registering your thermostat online.......9<br />
Operation<br />
Setting the time/date...........................13<br />
Setting the fan.....................................14<br />
Selecting system mode.......................15<br />
Preset energy-saving schedules.........16<br />
Adjusting program schedules..............17<br />
Overriding schedules–home................20<br />
Overriding schedules–business..........21<br />
<strong>Voice</strong> <strong>Control</strong>.......................................22<br />
Viewing equipment status...................25<br />
Setting vacation hold–home................26<br />
Setting holiday/event schedules–<br />
business...........................................27<br />
Setting custom events–business.........28<br />
Setting holiday schedule–business.....30<br />
Setting holiday override–business.......31<br />
33-00020EFS—03 2<br />
Initiating occupancy mode–business...32<br />
Customizing screen color....................33<br />
Setting preferences.............................34<br />
Cleaning the thermostat screen..........35<br />
Adjusting security settings...................36<br />
Smart Response Technology..............37<br />
Pre-occupancy purge..........................38<br />
Compressor protection........................39<br />
Auto changeover.................................40<br />
Setting advanced preferences.............41<br />
Disconnecting your <strong>Wi</strong>-<strong>Fi</strong> network.......44<br />
Reconnecting your <strong>Wi</strong>-<strong>Fi</strong> network.......45<br />
Unregistering your thermostat.............46<br />
Changing system setup.......................47<br />
Appendices<br />
Frequently asked questions................53<br />
Getting help and responding to<br />
alerts................................................56<br />
Software updates................................58<br />
Troubleshooting...................................59<br />
Limited warranty..................................62
Quick reference: home use<br />
HOME. Touch to display Home screen.<br />
FAN. Select fan mode.<br />
SYSTEM. Select system mode (heat/cool).<br />
MENU. Touch to display options. Start here to<br />
set a program schedule.<br />
Current schedule. Change temperature<br />
setting and select temporary or permanent<br />
hold.<br />
Indoor conditions. Shows indoor temperature<br />
and humidity.<br />
Current date and time.<br />
Current status. Shows system mode (heat/<br />
cool).<br />
Outdoor conditions. Outdoor temperature<br />
and humidity appear after registration.<br />
3 33-00020EFS—03
Quick reference: business use<br />
HOME. Touch to display Home screen.<br />
FAN. Select fan mode.<br />
SYSTEM. Select system mode (heat/cool).<br />
MENU. Touch to display options. Start here to<br />
set a program schedule.<br />
<strong>Thermostat</strong> location. Quickly identify which<br />
thermostat is in control of a specific area.<br />
Current schedule. Touch an arrow to change<br />
temperature setting and set a temporary hold.<br />
Override. Touch to temporarily override the<br />
program schedule.<br />
Indoor conditions. Shows indoor temperature<br />
and humidity.<br />
Current date and time.<br />
Current status. Shows system mode (heat/<br />
cool).<br />
Outdoor conditions. Outdoor temperature<br />
and humidity appear after registration.<br />
33-00020EFS—03 4
Setting up your thermostat<br />
Setting up your <strong>Wi</strong>-<strong>Fi</strong> programmable touchscreen thermostat is easy.<br />
1<br />
2<br />
Connect it to your home wireless network.<br />
Register online for remote access.<br />
5 33-00020EFS—03
Connecting to your <strong>Wi</strong>-<strong>Fi</strong> network<br />
1 Connect the <strong>Wi</strong>-<strong>Fi</strong> network.<br />
1a Touch MENU > <strong>Wi</strong>-<strong>Fi</strong> Setup.<br />
-OR-<br />
Touch Yes to connect the thermostat to<br />
your <strong>Wi</strong>-<strong>Fi</strong> network.<br />
The screen displays the message “Searching for<br />
wireless networks. Please wait...” after which it<br />
displays a list of all <strong>Wi</strong>-<strong>Fi</strong> networks it can find.<br />
2 Select the network.<br />
2a Touch the name of the network you<br />
want to use. The thermostat displays a<br />
password page.<br />
<strong>Wi</strong>-<strong>Fi</strong> Setup<br />
Yes<br />
MENU<br />
Your Network<br />
Note: If your home network is not<br />
shown on the list, touch Rescan.<br />
33-00020EFS—03 6
Connecting to your <strong>Wi</strong>-<strong>Fi</strong> network<br />
2b Using the keyboard, touch the<br />
characters that spell out your home<br />
network password.<br />
2c Touch Done. The thermostat displays<br />
“Connecting to your network. Please<br />
wait...” then shows a “Connection<br />
Successful” screen.<br />
2d Touch Next to display the registration<br />
information screen.<br />
2e Note your <strong>Thermostat</strong> MAC and<br />
<strong>Thermostat</strong> CRC. You need these<br />
numbers to complete online<br />
registration.<br />
Done<br />
Next<br />
7 33-00020EFS—03
Connecting to your <strong>Wi</strong>-<strong>Fi</strong> network<br />
To register your thermostat, follow the<br />
instructions beginning on page 9.<br />
Note: The Register Online screen remains<br />
active until you complete registration and/or<br />
touch Done.<br />
Note: If you touch Done before you register<br />
online, your home screen displays an<br />
orange alert button telling you to register.<br />
Touching that button displays registration<br />
information and an option to snooze the<br />
task.<br />
Register<br />
online for<br />
remote<br />
access<br />
Press for info<br />
Done<br />
33-00020EFS—03 8
Registering your thermostat online<br />
To view and set your <strong>Wi</strong>-<strong>Fi</strong> thermostat<br />
remotely, you must have a Total Connect<br />
Comfort account. Use the following steps.<br />
1 Open the Total Connect Comfort web<br />
site.<br />
Go to mytotalconnectcomfort.com<br />
M31570<br />
M31570<br />
9 33-00020EFS—03
Registering your thermostat online<br />
2 Login or create an account.<br />
If you have an account,<br />
click Login<br />
– or –<br />
click Create An Account<br />
2a Follow the instructions on the screen.<br />
2b Check your email for an activation<br />
message from My Total Connect<br />
Comfort. This may take several<br />
minutes.<br />
Note: If you do not receive a response,<br />
check your junk mailbox or use an alternate<br />
e-mail address.<br />
2c Follow activation instructions in<br />
the email.<br />
2d Log in.<br />
33-00020EFS—03 10
Registering your thermostat online<br />
3 Register your <strong>Wi</strong>-<strong>Fi</strong> thermostat.<br />
After you are logged in to your Total<br />
Connect Comfort account, register<br />
your thermostat.<br />
3a Follow the instructions on<br />
the screen. After adding your<br />
thermostat location, you must<br />
enter the thermostat’s unique<br />
identifiers:<br />
• MAC ID<br />
• MAC CRC<br />
Note: These IDs are listed on the<br />
Register Online screen or on the<br />
<strong>Thermostat</strong> ID Card included in the<br />
thermostat package. The IDs are not<br />
case sensitive.<br />
<strong>Thermostat</strong> ID Card<br />
Use the MAC ID and CRC ID to register<br />
this product at mytotalconnectcomfort.com<br />
Carte d’identification de thermostat<br />
Utilisez l’identification MAC et l’identification CRC pour<br />
enregistrer ce produit à mytotalconnectcomfort.com<br />
Tarjeta de identificación del termostato<br />
Utilice la identificación MAC y la identificación CRC para<br />
inscribir este producto en mytotalconnectcomfort.com<br />
® U.S. Registered Trademark.<br />
© 2012 <strong>Honeywell</strong> International Inc.<br />
69-2723EFS—01 M.S. 04-12<br />
Printed in U.S.A.<br />
MAC ID<br />
HONEYWELL MODEL: RTH8580WF<br />
MAC ID: MAC CRC:<br />
69-2723EFS-01<br />
MAC CRC<br />
11 33-00020EFS—03
Registering your thermostat online<br />
When the thermostat is<br />
successfully registered, the Total<br />
Connect Comfort registration<br />
screen will display a SUCCESS<br />
message.<br />
You can now control your<br />
thermostat from anywhere<br />
through your laptop, tablet, or<br />
smartphone.<br />
Total Connect Comfort free<br />
app is available for Apple ®<br />
iPhone ® , iPad ®<br />
and iPod<br />
touch ® devices at iTunes ®<br />
or at Google Play ® for all<br />
Android devices.<br />
GET IT ON<br />
Download on<br />
iTunes<br />
33-00020EFS—03 12
Setting the time/date<br />
1 Touch the current time. The screen<br />
displays Set Time/Set Date.<br />
2 Touch Set Time or Set Date.<br />
3 Touch p or q until the proper time/<br />
date is displayed.<br />
4 Touch Done to save or Cancel to ignore<br />
changes.<br />
Note: This thermostat will automatically<br />
update for daylight saving time (if<br />
observed in your area) and all date/time<br />
information is stored. If the thermostat<br />
is connected to <strong>Wi</strong>-<strong>Fi</strong> and registered to<br />
Total Connect Comfort, the current time is<br />
updated from the internet.<br />
Fri, Jun 14, 2013<br />
6:30 pm<br />
30<br />
Done<br />
13 33-00020EFS—03
Setting the fan<br />
1 Touch FAN to display fan settings.<br />
2 Touch On, Automatic, Circulate, or Follow<br />
Schedule.<br />
3 Touch Done to save and exit.<br />
On: Fan is always on.<br />
Automatic: Fan runs only when the<br />
heating or cooling system is on.<br />
Circulate: Fan runs randomly about<br />
35% of the time (home use only).<br />
Follow Schedule: Fan controlled by<br />
program (see pages 16-21).<br />
Note: Touch Auto or On to temporarily<br />
override the programmed fan schedule.<br />
Done<br />
FAN<br />
33-00020EFS—03 14
Setting system mode<br />
1 Touch SYSTEM to display system settings.<br />
2 Touch desired option:<br />
Heat: <strong>Thermostat</strong> controls only the<br />
heating system.<br />
Cool: <strong>Thermostat</strong> controls only the<br />
cooling system.<br />
Off: Heating/cooling systems are off.<br />
Automatic: <strong>Thermostat</strong> selects heating<br />
or cooling as needed depending on the<br />
indoor temperature.<br />
Emergency Heat (heat pumps<br />
<strong>with</strong> aux. heat): <strong>Control</strong>s auxiliary/<br />
emergency heat. Compressor is locked<br />
out.<br />
3 Touch Done to save and exit.<br />
Note: The Automatic and Emergency Heat<br />
system settings may not appear, depending<br />
on how your thermostat was installed.<br />
Done<br />
SYSTEM<br />
15 33-00020EFS—03
Preset energy-saving schedules<br />
This thermostat uses default Energy Saver settings that can reduce your<br />
heating/cooling expenses. To customize settings, see next page.<br />
Home Use<br />
Period<br />
Start time<br />
Heat<br />
(Mon-Fri)<br />
Cool<br />
(Mon-Fri)<br />
Heat<br />
(Sat-Sun)<br />
Cool<br />
(Sat-Sun)<br />
Wake 6:00 am 70° 78° 70° 78°<br />
Leave 8:00 am 62° 85° 62° 85°<br />
Return 6:00 pm 70° 78° 70° 78°<br />
Sleep 10:00 pm 62° 82° 62° 82°<br />
Business Use<br />
Period<br />
Start time<br />
Heat<br />
Cool<br />
Occupied 1 8:00 am 70° 75° On<br />
Unoccupied 1 10:00 pm 55° 85° Auto<br />
Occupied 2* 12:00 am 70° 75° On<br />
Unoccupied 2* 12:00 am 55° 85° Auto<br />
* Period 2 is cancelled by default. If you activate it, the values shown above are<br />
default settings.<br />
Fan<br />
33-00020EFS—03 16
Adjusting program schedules<br />
1 Touch MENU.<br />
2 Select Create/Edit Schedule.<br />
• Touch View/Edit to view the full<br />
schedule and make a quick<br />
adjustment.<br />
• Touch Guide Me to create a schedule<br />
by answering simple questions.<br />
• Touch I’ll do it myself to manually<br />
create a program schedule. See<br />
page 18.<br />
Note: To reduce costs, use the pre-set<br />
Energy Saver settings described on<br />
page 16.<br />
Create / Edit Schedule<br />
MENU<br />
17 33-00020EFS—03
Adjusting program schedules<br />
If you selected I’ll do it myself on the Create/<br />
Edit Schedule screen (page 17), follow<br />
these steps:<br />
1 Select the days to schedule, touch Next.<br />
2 Touch Wake to set your Wake time for<br />
selected days.<br />
Next<br />
Heat: 70°<br />
Cool: 78°<br />
Fan: Auto<br />
6:00 am<br />
WAKE<br />
33-00020EFS—03 18
Adjusting program schedules<br />
3 Touch p or q to set Heat and Cool<br />
temperatures for the Wake period, then<br />
touch Done.<br />
4 Touch other time periods (Leave, Return,<br />
Sleep) to set time and temperatures for<br />
each.<br />
5 Touch Done to save and exit.<br />
Note: Touch Delete Period to eliminate any<br />
unwanted time period.<br />
Note: Touch Fan Settings to customize fan<br />
settings for any time period.<br />
Done<br />
19 33-00020EFS—03
Overriding schedules: home use<br />
1 Touch p or q to adjust the<br />
temperature (right side of screen)<br />
and the Hold Until time (left side). The<br />
schedule will resume when the Hold<br />
Until time expires.<br />
2 Touch Switch to Permanent Hold to keep<br />
the same temperature until you change<br />
it or resume the program schedule.<br />
3 Touch Cancel Hold at any time to<br />
resume the program schedule.<br />
Switch To<br />
Permanent Hold<br />
33-00020EFS—03 20
Overriding schedules: business use<br />
Touch p or q to adjust the temperature.<br />
It will be maintained until the hold time<br />
you set.<br />
• To change the hold time, touch the<br />
Hold Until arrow buttons. This time can<br />
be adjusted up to the maximum time<br />
set on the Override Duration screen in<br />
Advanced Preferences (page 41).<br />
• Touch Override to use a pre-set occupied<br />
temperature if a person uses the room<br />
during an unoccupied period. The new<br />
temperature will be maintained for 1 hour<br />
and can be adjusted up to the maximum<br />
time set on the Override Duration screen<br />
in Advanced Preferences (page 41).<br />
The programmed schedule will resume when<br />
the override timer expires. Touch Cancel Hold<br />
at any time to resume the program schedule.<br />
OVERRIDE<br />
21 33-00020EFS—03
<strong>Voice</strong> <strong>Control</strong><br />
This thermostat has a voice control feature you<br />
can use to “talk” to your thermostat. This feature<br />
is turned on or not during initial setup or by<br />
following the steps below (see page 8).<br />
MENU<br />
To use <strong>Voice</strong> <strong>Control</strong>, follow these steps:<br />
1 Touch MENU and select <strong>Voice</strong> <strong>Control</strong>.<br />
2 Select from the different options:<br />
<strong>Voice</strong> On/Off - turns <strong>Voice</strong> <strong>Control</strong> on or off.<br />
When off, the thermostat functions as a regular<br />
thermostat.<br />
Volume - adjusts thermostat speaker volume.<br />
Sensitivity - changes the sensitivity of the<br />
thermostat’s audio receiver. The higher the<br />
number, the more receptive the thermostat will<br />
be to a voice command, but it will also be more<br />
likely to pick up something as a command that<br />
was not directed at the thermostat.<br />
3 For available commands, see page 23 or<br />
wifithermostat.com/voicecommands.<br />
<strong>Voice</strong> <strong>Control</strong><br />
33-00020EFS—03 22
<strong>Voice</strong> <strong>Control</strong><br />
To start <strong>Voice</strong> <strong>Control</strong>, say “Hello, thermostat” to the thermostat. The thermostat will<br />
respond, and you can tell it what to do. A common exchange <strong>with</strong> the thermostat using<br />
<strong>Voice</strong> <strong>Control</strong> might be as follows.<br />
1 “Hello, <strong>Thermostat</strong>.”<br />
This phrase activates <strong>Voice</strong> <strong>Control</strong>.<br />
2 “Hello! Please say a command.”<br />
3 “Make it 5 degrees warmer / cooler.”<br />
See full list of commands on page 24.<br />
4 “One moment please… changing setpoint to…”<br />
If thermostat does not respond at step 2 or 4,<br />
return to step 1.<br />
Note: The voice commands for this thermostat<br />
are in <strong>English</strong> only.<br />
23 33-00020EFS—03
<strong>Voice</strong> <strong>Control</strong><br />
Available Commands:*<br />
“Make it warmer / cooler”:<br />
Changes the temperature setting 1 degree F<br />
“Make it much warmer / cooler”:<br />
Changes the temperature setting 4 degrees F<br />
“Make it (1–10) degrees warmer / cooler”:<br />
User selects temperature setting change between 1 and 10<br />
degrees F<br />
“I’m feeling hot / cold”:<br />
Changes the temperature setting 1 degree F<br />
“What can I say?”:<br />
Provides a list of available commands<br />
*For current command list:<br />
wifithermostat.com/voicecommands<br />
33-00020EFS—03 24
Viewing equipment status<br />
1 Touch MENU.<br />
2 Select Equipment Status.<br />
3 Touch p or q to view the status of<br />
all the equipment your thermostat<br />
is controlling. Depending on how<br />
your thermostat was installed, the<br />
Equipment Status screen can report<br />
data about the following systems:<br />
• Heating and cooling<br />
• Fan<br />
• <strong>Thermostat</strong> information<br />
Equipment Status<br />
MENU<br />
Done<br />
25 33-00020EFS—03
Setting vacation hold: home use<br />
This feature helps you save energy while<br />
you are away, and restores comfortable<br />
settings just before you return home.<br />
1 Touch MENU.<br />
2 Select Vacation Mode.<br />
3 Touch p or q to select the date you<br />
leave, then touch Next for further<br />
scheduling details, including times of<br />
day, temperature settings, return date,<br />
and return settings.<br />
4 Review your selections on the last<br />
display, and touch Done to save your<br />
settings. Touch Back, then Cancel to<br />
ignore the changes.<br />
Vacaon Mode<br />
MENU<br />
Next<br />
Done<br />
33-00020EFS—03 26
Setting holiday/event schedules: business use<br />
This feature helps you conserve energy<br />
when the workplace is unoccupied for<br />
special events and holidays.<br />
1 Touch MENU.<br />
2 Select Holiday/Event Scheduler.<br />
3 Select the item you want to schedule.<br />
• Custom Events lets you set up<br />
other days for special schedules.<br />
• US and Canadian Holiday options<br />
let you select from a list of holidays<br />
commonly observed in each<br />
country.<br />
4 Make selections as prompted on each<br />
screen. For more information, see next<br />
two pages.<br />
5 Touch Done to save your settings.<br />
Holiday / Event Scheduler<br />
Custom events<br />
MENU<br />
27 33-00020EFS—03
Setting custom events: business use<br />
This feature lets you customize<br />
temperature settings to be maintained<br />
during a specific event. You can set up an<br />
event for a specific date or day in a month.<br />
The thermostat resumes normal scheduling<br />
after the event.<br />
1 Select Custom events from the Holiday/<br />
Event Scheduler menu.<br />
2 Select Create a new event.<br />
Custom events<br />
Create a new event<br />
33-00020EFS—03 28
Setting custom events: business use<br />
3 Select Specific Date or Month/Weekday.<br />
• For Specific Date, you are prompted<br />
to select the start date, settings,<br />
end date, and frequency for the<br />
event.<br />
• For Month/Weekday, you are<br />
prompted to select the month, day<br />
of the week, week of the month,<br />
settings, length of event, and<br />
frequency of the event.<br />
4 Review the settings and touch Done to<br />
save them. Touch Back, then Cancel to<br />
ignore the changes.<br />
Next<br />
Done<br />
29 33-00020EFS—03
Setting holiday schedule: business use<br />
This feature lets you customize temperature<br />
settings to be maintained on specified national<br />
holidays. The thermostat resumes normal<br />
scheduling between selected holidays.<br />
1 Select US Holidays or Canadian Holidays from<br />
the Holiday/Event Scheduler menu.<br />
2 Select Add/Edit Holidays. A list of national<br />
holidays is displayed.<br />
3 Touch the check box next to each holiday for<br />
which you want to maintain specific settings,<br />
(Touch p or q to scroll through the holiday<br />
list.) then touch Next.<br />
Set the holiday schedule for Occupied<br />
or Unoccupied temperatures, depending<br />
whether the building will be in use.<br />
4 Touch p or q to select the Heat and Cool<br />
temperatures.<br />
5 Review the settings and touch Done to save<br />
them. Touch Back, then Cancel to ignore the<br />
changes.<br />
Next<br />
33-00020EFS—03 30
Setting holiday override: business use<br />
This feature lets you customize temperature<br />
settings to be maintained from now until<br />
a specified date. The thermostat resumes<br />
normal scheduling on the date you select.<br />
1 Touch MENU.<br />
2 Select Holiday Mode to display<br />
temperatures while you are away on<br />
holiday.<br />
3 Touch p or q to select the Heat and<br />
Cool temperatures, then touch Next to<br />
select return date.<br />
4 Review the settings and touch Done to<br />
save them. Touch Back, then Cancel to<br />
ignore the changes.<br />
Note: The cool temperature can only be set<br />
higher than the unoccupied program setting<br />
and the heat temperature can only be set<br />
lower than the unoccupied program setting.<br />
Holiday Mode<br />
MENU<br />
Done<br />
31 33-00020EFS—03
Initiating occupancy mode: business use<br />
This feature keeps temperature at an<br />
energy-saving level until you touch Press<br />
to start occupancy. When you arrive, touch<br />
the button to maintain a comfortable<br />
temperature while the room is occupied.<br />
Touch the p or q buttons to set the<br />
temperature or the Hold Until time. The<br />
temperature is maintained until the time<br />
you set. Temperature returns to an energysaving<br />
level after the timer expires, or the<br />
“Occupied” period ends.<br />
Press to start<br />
occupancy<br />
33-00020EFS—03 32
Customizing screen color<br />
You can customize your thermostat display<br />
to match your décor.<br />
1 Touch Menu.<br />
2 Touch Color Themes.<br />
3 Select the name of a color to use<br />
a predefined background, or select<br />
Custom to define you own background<br />
color and text.<br />
• If you select a color name, the<br />
screen shows an example on the left.<br />
Touch Done to accept that selection.<br />
• If you touch Custom, the screen gives<br />
you instructions. Touch Next to step<br />
through the choices; touch Done<br />
when you are satisfied <strong>with</strong> your<br />
changes.<br />
Color Themes<br />
MENU<br />
Done<br />
Next<br />
33 33-00020EFS—03
Setting preferences<br />
Preference menu options let you select<br />
how the thermostat displays information or<br />
responds to certain situations.<br />
1 Touch MENU and select Preferences.<br />
2 Select an option and follow prompts:<br />
• Reminders<br />
• Utility Schedule Options<br />
• Backlight<br />
• Smart Response Technology<br />
• Advanced Preferences<br />
• Restore Default Schedule<br />
3 Touch Done to save your settings.<br />
Touch Cancel to ignore changes.<br />
Preferences<br />
MENU<br />
33-00020EFS—03 34
Cleaning the thermostat screen<br />
When you select the Clean Screen<br />
option, the screen is locked so you don’t<br />
accidentally change settings while you<br />
clean.<br />
1 Touch MENU.<br />
2 Select Clean Screen. A prompt asks if you<br />
want to clean the screen for 30 seconds.<br />
3 Touch Yes. A countdown timer displays<br />
elapsed time until the screen is<br />
reactivated.<br />
Note: Do NOT spray any liquid directly<br />
on the thermostat. Spray liquids onto a<br />
cloth, then use the damp cloth to clean<br />
the screen. Use water or household glass<br />
cleaner. Avoid abrasive cleansers.<br />
Clean Screen<br />
Yes<br />
MENU<br />
35 33-00020EFS—03
Adjusting security settings<br />
You can adjust security options to prevent<br />
unauthorized changes to system settings.<br />
MENU<br />
1 Touch MENU and select Security Settings.<br />
2 Select Change Lock Mode.<br />
3 Select an option and follow prompts:<br />
Unlocked: Full access allowed.<br />
Partially locked: Only temperature<br />
can be changed.<br />
Fully locked: No access allowed.<br />
Note: If you choose to use a password for<br />
additional security, write it here for reference:<br />
Security Sengs<br />
Change Lock Mode<br />
33-00020EFS—03 36
Smart Response Technology<br />
This feature (home use only) allows the<br />
thermostat to “learn” how long the heating/<br />
cooling system takes to reach programmed<br />
temperature settings, so the temperature is<br />
reached at the time you set.<br />
For example: Set the Wake time to 6:00 am,<br />
and the temperature to 70°. The heat will<br />
come on before 6:00 am, so the temperature<br />
is 70° by 6:00 am.<br />
Note: Select Smart Response Technology<br />
in the Preferences menu (page 34).<br />
The message “in recovery” is displayed<br />
when the system is activated before a<br />
scheduled time period.<br />
37 33-00020EFS—03
Pre-occupancy purge<br />
This business use feature turns on the<br />
fan 1 to 3 hours before each “occupied”<br />
time period, to provide a comfortable<br />
work environment when you arrive.<br />
33-00020EFS—03 38
Compressor protection<br />
The thermostat keeps the compressor<br />
off for a few minutes before restarting,<br />
to prevent equipment damage. During<br />
this “off” time, the message “waiting for<br />
equipment” is displayed on screen.<br />
39 33-00020EFS—03
Auto changeover<br />
This feature is used in climates where<br />
both air conditioning and heating are used<br />
on the same day.<br />
When the system is set to Automatic, the<br />
thermostat automatically selects heating<br />
or cooling depending on the indoor<br />
temperature.<br />
Heat and cool settings must be at least<br />
3 degrees apart. The thermostat will<br />
automatically adjust settings to maintain<br />
this 3-degree separation.<br />
Note: Select Auto Changeover on the<br />
Heating and Cooling System Changeover<br />
screen under Advanced Preferences. See<br />
“Setting advanced preferences” on page<br />
41.<br />
33-00020EFS—03 40
Setting advanced preferences<br />
You can change options for a number of<br />
system functions. Although many options,<br />
such as language and temperature indication<br />
settings are the same for all setups, others<br />
depend on the type of system you have.<br />
1 Touch MENU. The thermostat displays a<br />
list of options.<br />
2 Select Preferences > Advanced Preferences.<br />
The thermostat displays the first screen of<br />
options that you can change.<br />
3 On each screen, make changes as<br />
needed, then touch Next to display new<br />
options. Repeat this step until you have<br />
made all changes.<br />
Tables on pages 42-43 explain the<br />
screens and options under Advanced<br />
Preferences.<br />
4 When you have made all changes, press<br />
Done to save and exit.<br />
Preferences<br />
Advanced Preferences<br />
MENU<br />
Next<br />
41 33-00020EFS—03
Setting advanced preferences<br />
Advanced Preferences Options (MENU > Preferences > Advanced Preferences)<br />
Screen Title<br />
Scheduling Options<br />
Temperature Indication<br />
Scale<br />
Heating and Cooling<br />
System Changeover<br />
Number of Schedule<br />
Periods<br />
Pre-occupancy Purge<br />
Duration *<br />
Type of Override *<br />
Override Duration *<br />
Settings and Options<br />
Select Non-programmable or <strong>Programmable</strong>. <strong>Programmable</strong> uses<br />
default or customized programming to automatically raise and<br />
lower temperature settings for different times of day.<br />
Select Fahrenheit or Celsius.<br />
Select <strong>Manual</strong> or Automatic.<br />
Select 2 Periods Per <strong>Day</strong> or 4 Periods Per <strong>Day</strong>. (See page 16).<br />
Select how long the fan will run before each occupied period: Off,<br />
1, 2, or 3 hours.<br />
Select Standard to maintain the programmed periods or Initiate<br />
Occupancy to use energy-saving settings until a user presses<br />
Start Occupancy.<br />
Select how long to maintain temperature during an override: 1-10<br />
hours or No Limit.<br />
* Available when thermostat is installed in Business mode.<br />
33-00020EFS—03 42
Setting advanced preferences<br />
Advanced Preferences Options (concluded)<br />
Screen Title<br />
Early Recovery for<br />
Heating *<br />
Early Recovery for<br />
Cooling *<br />
Temperature Limits<br />
Keypad Lockout<br />
Clock Format<br />
<strong>Day</strong>light Saving Time<br />
Indoor Display Offsets<br />
Settings and Options<br />
Select No to begin recovery on schedule or Yes to ramp up<br />
temperature early.<br />
Select No to begin recovery on schedule or Yes to ramp down<br />
temperature early.<br />
Select the Minimum Cool and Maximum Heat Limit.<br />
Select Unlocked/Partially Locked/Locked.<br />
Select 12 Hour or 24 Hour.<br />
Select Off or On. If set to On, the system will automatically change<br />
time/date to account for daylight saving.<br />
Select the number of degrees to offset indoor temperature or<br />
percentage to offset indoor humidity.<br />
* Available when thermostat is installed in Business mode.<br />
43 33-00020EFS—03
Disconnecting your <strong>Wi</strong>-<strong>Fi</strong> network<br />
If you need to disconnect the thermostat<br />
from your <strong>Wi</strong>-<strong>Fi</strong> network (for example,<br />
you’re replacing your router), follow these<br />
steps:<br />
1 Touch MENU.<br />
2 Select <strong>Wi</strong>-<strong>Fi</strong> Setup.<br />
3 Touch Disconnect from Network. The<br />
thermostat will display a question to<br />
confirm your selection.<br />
4 Touch Yes to confirm that you want<br />
to disconnect from the network. The<br />
thermostat will display the <strong>Wi</strong>-<strong>Fi</strong> Setup<br />
screen.<br />
5 Touch OK to display the menu.<br />
<strong>Wi</strong>-<strong>Fi</strong> Setup<br />
Disconnect from<br />
Network<br />
Yes<br />
MENU<br />
33-00020EFS—03 44
Reconnecting your <strong>Wi</strong>-<strong>Fi</strong> network<br />
1 Touch MENU.<br />
2 Select <strong>Wi</strong>-<strong>Fi</strong> Setup.<br />
3 Touch the name of the network you want<br />
to use. The thermostat may display a<br />
password page.<br />
4 To enter a password, touch characters to<br />
spell out your home network password,<br />
then touch Done.<br />
5 The thermostat displays “Connecting<br />
to your network. Please wait...” then a<br />
“Connection Successful” screen.<br />
6 Touch Next.<br />
• If your thermostat is registered, you<br />
will see your signal strength and other<br />
status information. Touch Done.<br />
• If the screen displays “Register<br />
Online for Remote Access,” follow<br />
instructions on page 9.<br />
<strong>Wi</strong>-<strong>Fi</strong> Setup<br />
MENU<br />
45 33-00020EFS—03
Unregistering your thermostat<br />
If you remove the thermostat from your<br />
Total Connect Comfort website account<br />
(for example, you’re moving and leaving<br />
the thermostat behind), follow these<br />
steps:<br />
1 On mytotalconnectcomfort.com log<br />
into your account.<br />
2 Under My Account, select Edit My<br />
Profile.<br />
3 Click the Delete My Account button.<br />
Your thermostat will display an orange<br />
button that says Register Online.<br />
33-00020EFS—03 46
Changing system setup<br />
If the thermostat is reset to factory default<br />
settings, you need to change the thermostat<br />
settings to match your heating/cooling system.<br />
Your contractor did this when the thermostat<br />
was installed. Follow these steps to setup the<br />
thermostat, or call your contractor to do it.<br />
1 Touch MENU. The thermostat displays a list<br />
of options.<br />
2 Select System Setup. The thermostat<br />
displays the first screen of options that you<br />
can change.<br />
3 On each screen, make changes as needed<br />
then touch Next to display new options.<br />
Repeat this step until you have made all<br />
changes. Tables on pages 48-49<br />
explain the System Setup screens and<br />
options.<br />
4 When you have made all changes, press<br />
Done to save and exit.<br />
System Setup<br />
Touch the Help button<br />
to see information<br />
about screen options.<br />
MENU<br />
Next<br />
47 33-00020EFS—03
Changing system setup<br />
Note: Touch the orange Help button on any screen for more information.<br />
System Setup Options (MENU > System Setup)<br />
Screen Title<br />
Language<br />
<strong>Thermostat</strong> installed<br />
in<br />
Your thermostat<br />
location<br />
Your thermostat<br />
controls<br />
Your system type<br />
Your forced air<br />
heating system type<br />
Efficiency of your<br />
heating system<br />
Your heating system<br />
type<br />
Settings and Options<br />
<strong>English</strong>/Français/Español.<br />
Home/Business (<strong>Thermostat</strong> is used in a residential (default) or<br />
commercial setting).<br />
Touch THERMOSTAT button to display a screen where you can enter a<br />
custom name using a keypad. If you have only one thermostat, you can<br />
leave the name as THERMOSTAT. For business installations you can check<br />
a box to display the thermostat name on the home screen.<br />
Select Heating or Cooling or both (default).<br />
Select Forced Air (default), Heat Pump, or Hot Water or Steam. Each option<br />
offers different choices on the following screens.<br />
Select how your forced air system is powered: Gas/Oil (default) or Electric.<br />
Select Standard Efficiency Forced Air (default) or High Efficiency Forced<br />
Air.<br />
If you selected Hot Water or Steam on “Your system type,” select the<br />
specific heating system here.<br />
33-00020EFS—03 48
Changing system setup<br />
System Setup Options (concluded)<br />
Screen Title<br />
Number of cooling<br />
stages<br />
Number of heating<br />
stages<br />
Your fan control<br />
Type of changeover<br />
valve<br />
Number of heat<br />
pump compressor<br />
stages<br />
Your backup heat<br />
Settings and Options<br />
Select 1 Stage (default) or 2 Stages. If you are unsure, note which wires<br />
are connected: ‘Y’ wire only (1 stage) or ‘Y’ and ‘Y2.’<br />
Select 1 Stage (default) or 2 Stages. If you are unsure, note which wires<br />
are connected: ‘W’ wire only (1 stage) or ‘W’ and ‘W2.’<br />
Select whether your thermostat (default) or heating system controls the fan.<br />
If you selected Heat Pump on “Your system type,“ select whether it uses a<br />
cooling changeover valve (default) or heating changeover valve. f you are<br />
unsure, note which wires you have connected.<br />
Select 1 Stage (default) or 2 Stages. If you are unsure, note which wires<br />
are connected: ‘Y’ wire only (1 stage) or ‘Y’ and ‘Y2.’<br />
No or Yes (default) you can determine whether you have backup heat.<br />
49 33-00020EFS—03
System setup<br />
Note: Your contractor already setup<br />
your thermostat. You should not need<br />
to perform any setup. Follow these<br />
instructions only if you do a factory reset.<br />
Before connecting to your <strong>Wi</strong>-<strong>Fi</strong> network,<br />
you need to set initial thermostat options<br />
to define your heating/cooling system:<br />
• Language<br />
• Home or business<br />
You can customize other options later.<br />
Follow prompts on the screen to select<br />
appropriate options.<br />
1 Touch the language you want the<br />
thermostat to display, then touch Next.<br />
2 Select Home or Business installation,<br />
then touch Next.<br />
Next<br />
Next<br />
33-00020EFS—03 50
System setup<br />
3 Touch Next, or name the thermostat<br />
location—touch THERMOSTAT and<br />
follow the rest of the instructions.<br />
4 Select what your thermostat will control<br />
and touch Next.<br />
Note: Touch the orange Help button on any<br />
screen for more information.<br />
Next<br />
Next<br />
51 33-00020EFS—03
System setup<br />
5 Select your system type and touch<br />
Next. The system type determines other<br />
selections for completing initial setup.<br />
Use the checklist from Step 6d when<br />
making selections.<br />
6 Touch Next after making selections on<br />
each screen.<br />
7 Touch Done on the last screen. The<br />
thermostat displays an option to<br />
connect to your <strong>Wi</strong>-<strong>Fi</strong> network.<br />
Note: Touch the orange Help button on<br />
any screen for more information.<br />
Next<br />
33-00020EFS—03 52
Frequently asked questions<br />
Q:<br />
<strong>Wi</strong>ll my thermostat still work if I lose my <strong>Wi</strong>-<strong>Fi</strong> connection?<br />
A:<br />
Yes, the thermostat will operate your heating and/or cooling system <strong>with</strong> or <strong>with</strong>out<br />
<strong>Wi</strong>-<strong>Fi</strong>.<br />
Q:<br />
How do I find the password to my router?<br />
A:<br />
Contact the manufacturer of the router or check the router documentation.<br />
Q:<br />
Why isn’t my thermostat connecting to my <strong>Wi</strong>-<strong>Fi</strong> router even though it is very<br />
close to the thermostat?<br />
A:<br />
Verify that the password entered for the <strong>Wi</strong>-<strong>Fi</strong> router is correct.<br />
Q:<br />
My thermostat is unable to register to the Total Connect Comfort website.<br />
A:<br />
Verify that the thermostat is correctly enrolled on your home <strong>Wi</strong>-<strong>Fi</strong> network. At<br />
Menu > <strong>Wi</strong>-<strong>Fi</strong> Setup, check for the <strong>Wi</strong>-<strong>Fi</strong>-signal strength icon. Verify that the <strong>Wi</strong>-<strong>Fi</strong><br />
router has a good internet connection. On your computer, verify that you can open<br />
the site at mytotalconnectcomfort.com If you cannot open the site, switch off the<br />
internet modem for a few seconds, then power it back on.<br />
53 33-00020EFS—03
Frequently asked questions<br />
Q:<br />
I registered on the Total Connect Comfort website but was unable to login<br />
using my new account.<br />
A:<br />
Check your email and ensure that you received an activation email. Follow the<br />
instructions to activate your account and then login to the website.<br />
Q:<br />
I have signed up on Total Connect Comfort website and have not received a<br />
confirmation email.<br />
A:<br />
Check for the email in your Junk or Deleted folder.<br />
Q:<br />
Is there a way to extend the signal strength?<br />
A:<br />
Most standard routers can be set up to be a repeater. You can also purchase and<br />
install a <strong>Wi</strong>-<strong>Fi</strong> repeater.<br />
Q:<br />
The thermostat is not responding to my voice commands in any condition.<br />
A:<br />
During thermostat device setup or in the <strong>Voice</strong> <strong>Control</strong> Menu, you must say Yes, to<br />
the Device Usage Agreement to activate <strong>Voice</strong> <strong>Control</strong> on the thermostat. Also check<br />
your <strong>Wi</strong>-<strong>Fi</strong> connection as <strong>Voice</strong> <strong>Control</strong> requires <strong>Wi</strong>-<strong>Fi</strong> connectivity to function.<br />
33-00020EFS—03 54
Frequently asked questions<br />
Q:<br />
The thermostat is not responding to my voice in certain home locations.<br />
A:<br />
You should be <strong>with</strong>in direct line of sight to the thermostat when using <strong>Voice</strong> <strong>Control</strong>.<br />
The distance and proximity of use depends on certain conditions, like floor plans,<br />
thermostat location, and noise levels. <strong>Voice</strong> <strong>Control</strong> might not function correctly<br />
when initiating commands from distances greater than 15 feet, especially when<br />
communicating around walls, structures, or from other enclosed rooms.<br />
Q:<br />
Why is my thermostat having a hard time hearing my voice?<br />
A:<br />
The sensitivity setting might be too low. Set it to a higher number. See page 22.<br />
Q:<br />
Why is my thermostat responding to voices that aren’t directed at it?<br />
A:<br />
The sensitivity setting might be too high. Set it to a lower number. See page 22.<br />
55 33-00020EFS—03
Getting help and responding to alerts<br />
Your thermostat offers two types of<br />
assistance, if these assistance options<br />
do not answer your questions, review<br />
the FAQs (pages 53-54) and<br />
troubleshooting tips (page 59).<br />
On screen help<br />
Most displays include an orange Help<br />
button.<br />
1 Touch Help to display instructions for<br />
using the screen.<br />
2 Touch OK to redisplay the original<br />
screen.<br />
Help<br />
OK<br />
33-00020EFS—03 56
Getting help and responding to alerts<br />
On screen alerts<br />
Your home screen will display a large<br />
orange button when you need to correct a<br />
setting or system problem.<br />
1 Touch the button, the thermostat<br />
displays instructions for completing the<br />
task to which you were alerted.<br />
2 Touch OK on the instruction display,<br />
then carry out the task. When the task<br />
is complete, the alert button will no<br />
longer be displayed.<br />
Replace Air<br />
<strong>Fi</strong>lter<br />
Press for info<br />
OK<br />
57 33-00020EFS—03
Software updates<br />
<strong>Honeywell</strong> periodically issues updates<br />
to the software for this thermostat. The<br />
updates occur automatically through your<br />
<strong>Wi</strong>-<strong>Fi</strong> connection. All your settings are<br />
saved, so you will not need to make any<br />
changes after the update occurs.<br />
Updates occur in the early morning. After<br />
your thermostat receives the software, it<br />
reboots, briefly displaying the <strong>Honeywell</strong><br />
logo. The screen then shows “Updating<br />
software…” <strong>with</strong> a green progress bar.<br />
When the update is complete, your home<br />
screen will appear as usual.<br />
Note: If you are not connected to <strong>Wi</strong>-<strong>Fi</strong> or<br />
registered at Total Connect Comfort, you<br />
will not get automatic updates.<br />
33-00020EFS—03 58
Troubleshooting<br />
If you have difficulty <strong>with</strong> your thermostat, please try the following suggestions. Most<br />
problems can be corrected quickly and easily.<br />
Display is<br />
blank<br />
• Check circuit breaker and reset if necessary.<br />
• Make sure power switch at heating and cooling system is on.<br />
• Make sure furnace door is closed securely.<br />
“Wait” appears<br />
on the screen<br />
• Compressor protection feature is engaged. Wait 5 minutes for the system<br />
to restart safely, <strong>with</strong>out damage to the compressor.<br />
Heating or<br />
cooling system<br />
does not<br />
respond<br />
• Touch SYSTEM to set system to Heat. Make sure the temperature is set<br />
higher than the Inside temperature.<br />
• Touch SYSTEM to set system to Cool. Make sure the temperature is set<br />
lower than the Inside temperature.<br />
• Check circuit breaker and reset if necessary.<br />
• Make sure power switch at heating and cooling system is on.<br />
• Make sure furnace door is closed securely.<br />
• If “Wait” is displayed, the compressor protection timer is on. Wait 5 minutes<br />
for the system to restart safely, <strong>with</strong>out damaging the compressor (see<br />
page 39).<br />
59 33-00020EFS—03
Glossary<br />
Heat Pump heating/cooling system<br />
Heat pumps are used to heat and cool a home. If your old thermostat has a setting for auxiliary or<br />
emergency heat, you likely have a heat pump.<br />
Conventional heating/cooling system<br />
Non–heat pump type systems; these include air handlers, furnaces or boilers that run on natural<br />
gas, oil or electricity. They may or may not include an air conditioner.<br />
MAC ID, MAC CRC<br />
Alphanumeric codes that uniquely identify your thermostat.<br />
33-00020EFS—03 60
Regulatory information<br />
FCC Compliance Statement (Part 15.19) (USA only)<br />
This device complies <strong>with</strong> Part 15 of the FCC Rules. Operation<br />
is subject to the following two conditions:<br />
1 This device may not cause harmful interference, and<br />
2 This device must accept any interference received, including<br />
interference that may cause undesired operation.<br />
FCC Warning (Part 15.21) (USA only)<br />
Changes or modifications not expressly approved by the party<br />
responsible for compliance could void the user’s authority to<br />
operate the equipment.<br />
FCC Interference Statement (Part 15.105 (b)) (USA only)<br />
This equipment has been tested and found to comply <strong>with</strong><br />
the limits for a Class B digital device, pursuant to Part 15<br />
of the FCC Rules. These limits are designed to provide<br />
reasonable protection against harmful interference in a<br />
residential installation. This equipment generates uses and<br />
can radiate radio frequency energy and, if not installed and<br />
used in accordance <strong>with</strong> the instructions, may cause harmful<br />
interference to radio communications. However, there is<br />
no guarantee that interference will not occur in a particular<br />
installation. If this equipment does cause harmful interference<br />
to radio or television reception, which can be determined by<br />
turning the equipment off and on, the user is encouraged to try<br />
to correct the interference by one of the following measures:<br />
• Reorient or relocate the receiving antenna.<br />
• Increase the separation between the equipment and<br />
receiver.<br />
• Connect the equipment into an outlet on a circuit different<br />
from that to which the receiver is connected.<br />
• Consult the dealer or an experienced radio/TV technician<br />
for help.<br />
Section 7.1.2 of RSS-GEN<br />
Under Industry Canada regulations, this radio transmitter<br />
may only operate using an antenna of type and maximum<br />
(or lesser) gain approved for the transmitter by Industry<br />
Canada. To reduce potential radio interference to other users,<br />
the antenna type and its gain should be so chosen that the<br />
equivalent isotropically radiated power (e.i.r.p.) is not more than<br />
that necessary for successful communication.<br />
Section 7.1.3 of RSS-GEN<br />
Operation is subject to the following two conditions:<br />
1 This device may not cause interference, and<br />
2 This device must accept any interference, including<br />
interference that may cause undesired operation of the<br />
device.<br />
61 33-00020EFS—03
5-year limited warranty<br />
<strong>Honeywell</strong> warrants this product, excluding battery, to be free from defects in the workmanship or materials, under<br />
normal use and service, for a period of five (5) years from the date of purchase by the consumer. If at any time during<br />
the warranty period the product is determined to be defective or malfunctions, <strong>Honeywell</strong> shall repair or replace it (at<br />
<strong>Honeywell</strong>’s option).<br />
If the product is defective,<br />
(i) return it, <strong>with</strong> a bill of sale or other dated proof of purchase, to the place from which you purchased it; or<br />
(ii) call <strong>Honeywell</strong> Customer Care at 1-888-235-6569. Customer Care will make the determination whether the product<br />
should be returned to the following address: <strong>Honeywell</strong> Return Goods, Dock 4 MN10-3860, 1885 Douglas Dr. N., Golden<br />
Valley, MN 55422, or whether a replacement product can be sent to you.<br />
This warranty does not cover removal or reinstallation costs. This warranty shall not apply if it is shown by <strong>Honeywell</strong> that<br />
the defect or malfunction was caused by damage which occurred while the product was in the possession of a consumer.<br />
<strong>Honeywell</strong>’s sole responsibility shall be to repair or replace the product <strong>with</strong>in the terms stated above. HONEYWELL<br />
SHALL NOT BE LIABLE FOR ANY LOSS OR DAMAGE OF ANY KIND, INCLUDING ANY INCIDENTAL OR<br />
CONSEQUENTIAL DAMAGES RESULTING, DIRECTLY OR INDIRECTLY, FROM ANY BREACH OF ANY WARRANTY,<br />
EXPRESS OR IMPLIED, OR ANY OTHER FAILURE OF THIS PRODUCT. Some states do not allow the exclusion or<br />
limitation of incidental or consequential damages, so this limitation may not apply to you.<br />
THIS WARRANTY IS THE ONLY EXPRESS WARRANTY HONEYWELL MAKES ON THIS PRODUCT. THE DURATION<br />
OF ANY IMPLIED WARRANTIES, INCLUDING THE WARRANTIES OF MERCHANTABILITY AND FITNESS FOR A<br />
PARTICULAR PURPOSE, IS HEREBY LIMITED TO THE FIVE-YEAR DURATION OF THIS WARRANTY. Some states do<br />
not allow limitations on how long an implied warranty lasts, so the above limitation may not apply to you.<br />
This warranty gives you specific legal rights, and you may have other rights which vary from state to state.<br />
If you have any questions concerning this warranty, please write <strong>Honeywell</strong> Customer Relations, 1985 Douglas Dr,<br />
Golden Valley, MN 55422 or call 1-888-235-6569.<br />
33-00020EFS—03 62
63 33-00020EFS—03
33-00020EFS-03<br />
Automation and <strong>Control</strong> Systems<br />
<strong>Honeywell</strong> International Inc.<br />
1985 Douglas Drive North<br />
Golden Valley, MN 55422<br />
<strong>Honeywell</strong> Ltd<br />
705 Montrichard Avenue<br />
Saint-Jean-sur-Richelieu, Québec<br />
J2X 5K8<br />
yourhome.honeywell.com<br />
® U.S. Registered Trademark.<br />
Apple, iPhone, iPad, iPod touch and iTunes are trademarks of Apple Inc.<br />
All other trademarks are the property of their respective owners.<br />
© 2014 <strong>Honeywell</strong> International Inc.<br />
33-00020EFS—03 Rev. M.S. 02-14<br />
Printed in U.S.A.
<strong>Thermostat</strong> <strong>Wi</strong>-<strong>Fi</strong><br />
<strong>9000</strong><br />
avec<br />
commande<br />
vocale<br />
Guide de l’utilisateur
Caractéristiques de votre thermostat <strong>Wi</strong>-<strong>Fi</strong><br />
Avec votre nouveau thermostat, vous pouvez :<br />
• Vous connecter à Internet pour surveiller et contrôler votre système de chauffage/<br />
refroidissement.<br />
• Consulter et modifier les réglages de votre système de chauffage/refroidissement.<br />
• Consulter et régler la température et les programmes.<br />
• Recevoir des alertes par courrier électronique et obtenir des mises à jour<br />
automatiques.<br />
• Afficher la température et l’humidité extérieures (nécessite de configurer le réseau<br />
<strong>Wi</strong>-<strong>Fi</strong> et d’enregistrer le produit).<br />
Besoin d’aide?<br />
Pour obtenir de l’aide, veuillez visiter http://yourhome.honeywell.com<br />
ou appeler le numéro gratuit : 1-888-235-6569<br />
33-00020EFS—03<br />
ii
Bienvenue<br />
Nous vous félicitons de votre achat d’un thermostat programmable à écran tactile couleur<br />
<strong>Wi</strong>-<strong>Fi</strong> <strong>Honeywell</strong>. Après vous être enregistré auprès du service Total Connect Comfort<br />
d’<strong>Honeywell</strong>, vous pouvez surveiller et contrôler à distance le système de chauffage et de<br />
refroidissement de votre domicile ou de votre entreprise — vous pouvez rester connecté<br />
à votre service confort où que vous soyez.<br />
Le système Total Connect Comfort de <strong>Honeywell</strong> est la solution parfaite si vous voyagez<br />
fréquemment, possédez une maison de vacances ou une entreprise ou gérez un<br />
immeuble de placement, ou tout simplement si vous recherchez la tranquillité d’esprit.
Table des matières<br />
À propos du nouveau thermostat<br />
Référence rapide : utilisation résidentielle........ 3<br />
Référence rapide : utilisation commerciale....... 4<br />
Installation<br />
Connexion à votre réseau <strong>Wi</strong>-<strong>Fi</strong>........................ 6<br />
Enregistrement de votre<br />
thermostat en ligne............................................ 9<br />
Fonctionnement<br />
Réglage de l’heure/la date.............................. 13<br />
Réglage du ventilateur.................................... 14<br />
Sélection du mode du système....................... 15<br />
Programmes d’économie d’énergie<br />
préconfigurés................................................... 16<br />
Réglage des horaires de programmation....... 17<br />
Dérogation aux programmes : résidentielle..... 20<br />
Dérogation aux programmes :<br />
commerciale.................................................... 21<br />
Commande vocale.......................................... 22<br />
Affichage du statut de l’équipement................ 25<br />
Réglage du maintien pendant<br />
les vacances : résidentielle............................. 26<br />
Réglage des programmes<br />
vacances/jours fériés : commerciale............... 27<br />
Réglage des événements<br />
personnalisés : commerciale........................... 28<br />
33-00020EFS—03 2<br />
Réglage du programme des<br />
jours fériés : commerciale............................... 30<br />
Réglage du programme des<br />
jours fériés : utilisation commerciale............... 31<br />
Lancement du mode Occupé :<br />
commerciale.................................................... 32<br />
Personnalisation de la couleur de l’écran....... 33<br />
Préférences de réglage................................... 34<br />
Nettoyage de l’écran du thermostat................ 35<br />
Réglages de sécurité...................................... 36<br />
Technologie Smart Response......................... 37<br />
Balayage avant occupation............................. 38<br />
Protection du compresseur............................. 39<br />
Commutation automatique.............................. 40<br />
Réglage des préférences avancées................ 41<br />
Déconnexion du réseau <strong>Wi</strong>-<strong>Fi</strong>......................... 44<br />
Reconnexion au réseau <strong>Wi</strong>-<strong>Fi</strong>......................... 45<br />
Déconnexion de votre thermostat................... 46<br />
Modification de la configuration du système... 47<br />
Annexes<br />
Foire aux questions......................................... 53<br />
Obtenir de l’aide et répondre aux alertes....... 56<br />
Mises à jour logicielles.................................... 58<br />
Dépannage...................................................... 59<br />
Garantie limitée............................................... 62
Référence rapide : utilisation résidentielle<br />
ACCUEIL. Touchez pour afficher l’écran<br />
Accueil.<br />
VENTILATEUR. Sélectionnez le mode du<br />
ventilateur.<br />
SYSTÈME. Sélectionnez le mode du système<br />
(chauffage/refroidissement).<br />
MENU. Touchez pour afficher les options.<br />
Commencez ici pour configurer un<br />
programme.<br />
Programme en cours. Modifiez le réglage<br />
de la température et sélectionnez le maintien<br />
provisoire ou permanent.<br />
Conditions intérieures. Affiche la<br />
température et l’humidité intérieures.<br />
Heure et date actuelles.<br />
Statut en cours. Affiche le mode du système<br />
(chauffage/refroidissement).<br />
Conditions extérieures. La température<br />
et l’humidité extérieures s’affichent après<br />
l’enregistrement.<br />
3 33-00020EFS—03
Référence rapide : utilisation commerciale<br />
33-00020EFS—03 4<br />
ACCUEIL. Touchez pour afficher l’écran Accueil.<br />
VENTILATEUR. Sélectionnez le mode du<br />
ventilateur.<br />
SYSTÈME. Sélectionnez le mode du système<br />
(chauffage/refroidissement).<br />
MENU. Touchez pour afficher les options.<br />
Commencez ici pour configurer un programme.<br />
Emplacement du thermostat. Identifie rapidement<br />
le thermostat contrôlant une zone spécifique.<br />
Programme en cours. Touchez une flèche pour<br />
modifier le réglage de température et régler le<br />
maintien provisoire.<br />
Dérivation. Touchez pour déroger provisoirement au<br />
programme.<br />
Conditions intérieures. Affiche la température et<br />
l’humidité intérieures.<br />
Heure et date actuelles.<br />
Statut en cours. Affiche le mode du système<br />
(chauffage/refroidissement).<br />
Conditions extérieures. La température et l’humidité<br />
extérieures s’affichent après l’enregistrement.
Configuration de votre thermostat<br />
La configuration de votre thermostat programmable à écran tactile couleur <strong>Wi</strong>-<strong>Fi</strong> est<br />
facile.<br />
1<br />
2<br />
Connectez-le au réseau sans fil de votre domicile.<br />
Enregistrez-vous en ligne pour bénéficier de l’accès à distance.<br />
5 33-00020EFS—03
Connexion à votre réseau <strong>Wi</strong>-<strong>Fi</strong><br />
1 Connectez le réseau <strong>Wi</strong>-<strong>Fi</strong>.<br />
1a Touchez MENU > Configuration <strong>Wi</strong>-<strong>Fi</strong>.<br />
-OU-<br />
Touchez Oui pour connecter le thermostat<br />
à votre réseau <strong>Wi</strong>-<strong>Fi</strong>.<br />
L’écran affiche le message « Recherche de<br />
réseaux sans fil. Veuillez patienter... » après<br />
lequel une liste de tous les réseaux <strong>Wi</strong>-<strong>Fi</strong><br />
détectés s’affiche.<br />
2 Sélectionnez le réseau.<br />
2a Touchez le nom du réseau que vous<br />
souhaitez utiliser. Le thermostat affiche la<br />
page du mot de passe.<br />
Remarque : Si votre réseau<br />
résidentiel n’est pas affiché sur la<br />
liste, touchez Rebalayer.<br />
Configuration <strong>Wi</strong>-<strong>Fi</strong><br />
Oui<br />
Publique<br />
Votre réseau<br />
Voisin<br />
MENU<br />
33-00020EFS—03 6
Connexion à votre réseau <strong>Wi</strong>-<strong>Fi</strong><br />
2b En utilisant le clavier, touchez les<br />
caractères pour saisir le mot de passe<br />
de votre réseau résidentiel.<br />
2c Touchez Terminé. Le thermostat affiche<br />
“Connexion au réseau en cours.<br />
Veuillez patienter...” puis affiche l’écran<br />
“Connexion réussie”.<br />
2d Touchez Suivant pour afficher l’écran<br />
des informations d’enregistrement.<br />
2e Notez les identifiants MAC et CRC du<br />
thermostat. Ces identifiants sont requis<br />
pour terminer l’enregistrement en<br />
ligne.<br />
Inscrivez le mot de passe de votre réseau <strong>Wi</strong>-<strong>Fi</strong><br />
Terminé<br />
Votre thermostat est bien connecté à votre<br />
réseau<br />
Suivant<br />
7 33-00020EFS—03
Connexion à votre réseau <strong>Wi</strong>-<strong>Fi</strong><br />
Pour enregistrer votre thermostat, suivez<br />
les instructions commençant à la page<br />
9.<br />
Remarque : L’écran Enregistrement<br />
en ligne reste actif jusqu’à ce que<br />
l’enregistrement soit terminé et/ou que vous<br />
touchiez Terminé.<br />
Remarque : Si vous touchez Terminé<br />
avant de vous enregistrer en ligne, votre<br />
écran d’accueil affiche un bouton d’alerte<br />
orange vous indiquant de procéder à<br />
l’enregistrement. Touchez ce bouton pour<br />
afficher les informations d’enregistrement<br />
et une option pour retarder l’exécution de<br />
cette tâche.<br />
Enregistrezvous<br />
en ligne<br />
pour bénéficier<br />
de l acceès à<br />
distance.<br />
Appuyez pour info<br />
Terminé<br />
33-00020EFS—03 8
Enregistrement de votre thermostat en ligne<br />
Pour visualiser et régler votre thermostat<br />
<strong>Wi</strong>-<strong>Fi</strong> à distance, vous devez posséder<br />
un compte Total Connect Comfort. Voici<br />
comment procéder.<br />
1 Ouvrez le site web Total Connect<br />
Comfort.<br />
Allez à mytotalconnectcomfort.com<br />
M31570<br />
M31570<br />
9 33-00020EFS—03
Enregistrement de votre thermostat en ligne<br />
2 Ouvrez une session ou créez un compte.<br />
Si vous possédez un compte, cliquez sur<br />
Login (Ouvrir une session) une session<br />
– ou –<br />
cliquez sur Create An Account (Créer un<br />
compte)<br />
2a Suivez les instructions à l’écran.<br />
2b Consultez votre messagerie et<br />
recherchez le message d’activation<br />
provenant de My Total Connect<br />
Comfort. Ceci peut prendre plusieurs<br />
minutes.<br />
Remarque : Si vous ne recevez aucune<br />
réponse, consultez votre boîte de pourriels ou<br />
utilisez une autre adresse électronique.<br />
2c Suivez les instructions d’activation<br />
figurant dans le message.<br />
2d Ouvrez une session.<br />
33-00020EFS—03 10
Enregistrement de votre thermostat en ligne<br />
3 Enregistrez votre thermostat <strong>Wi</strong>-F.<br />
Lorsque vous avec accès à votre<br />
compte Total Connect Comfort,<br />
enregistrez votre thermostat.<br />
3a Suivez les instructions à<br />
l’écran. Après avoir ajouté<br />
l’emplacement de votre<br />
thermostat, vous devez entrer<br />
les identifiants uniques de votre<br />
thermostat :<br />
• MAC ID<br />
• MAC CRC<br />
Remarque : Ces identifiants figurent<br />
sur l’écran d’enregistrement en ligne<br />
ou sur la carte d’identification du<br />
thermostat fournie dans la boîte du<br />
thermostat. Ces identifiants ne sont<br />
pas sensibles à la casse.<br />
<strong>Thermostat</strong> ID Card<br />
Use the MAC ID and CRC ID to register<br />
this product at mytotalconnectcomfort.com<br />
Carte d’identification de thermostat<br />
Utilisez l’identification MAC et l’identification CRC pour<br />
enregistrer ce produit à mytotalconnectcomfort.com<br />
Tarjeta de identificación del termostato<br />
Utilice la identificación MAC y la identificación CRC para<br />
inscribir este producto en mytotalconnectcomfort.com<br />
® U.S. Registered Trademark.<br />
© 2012 <strong>Honeywell</strong> International Inc.<br />
69-2723EFS—01 M.S. 04-12<br />
Printed in U.S.A.<br />
MAC ID<br />
HONEYWELL MODEL: RTH8580WF<br />
MAC ID: MAC CRC:<br />
69-2723EFS-01<br />
MAC CRC<br />
11 33-00020EFS—03
Enregistrement de votre thermostat en ligne<br />
Lorsque le thermostat est<br />
convenablement enregistré,<br />
l’écran d’enregistrement Total<br />
Connect Comfort affiche un<br />
message de réussite.<br />
Vous pouvez maintenant<br />
contrôler votre thermostat de<br />
n’importe quel endroit au moyen<br />
de votre ordinateur portatif,<br />
de votre tablette ou de votre<br />
téléphone intelligent.<br />
L’application Total Connect<br />
Comfort gratuite et est<br />
disponible pour les dispositifs<br />
iPhone ® , iPad ® et iPod touch ®<br />
d’Apple ® sur iTunes ® ou sur<br />
Google Play ® pour tous les<br />
dispositifs Android.<br />
GET IT ON<br />
Download on<br />
iTunes<br />
33-00020EFS—03 12
Réglage de l’heure/la date<br />
1 Touchez l’heure courante. L’écran<br />
affiche Régler l’heure/Régler la date.<br />
2 Touchez Régler l’heure ou Régler la<br />
date.<br />
3 Touchez p ou q jusqu’à ce que<br />
l’heure/la date adéquates s’affichent.<br />
4 Touchez Terminé pour enregistrer ou<br />
Annuler pour ignorer les changements.<br />
Remarque : Ce thermostat se mettra à<br />
jour automatiquement à l’heure d’été/<br />
d’hiver (si respecté dans votre zone)<br />
et l’information de la date/heure est<br />
enregistrée. Si le thermostat est connecté<br />
au <strong>Wi</strong>-<strong>Fi</strong> et est enregistré au Total<br />
Connect Comfort, l’heure courante est<br />
mise à jour à partir de l’Internet.<br />
ven, 14 juin, 2013<br />
6:30 pm<br />
Terminé<br />
13 33-00020EFS—03
Réglage du ventilateur<br />
1 Touchez VENTILATEUR pour afficher les<br />
réglages du ventilateur.<br />
2 Touchez Marche, Automatique, Circulation ou<br />
Suivre le programme.<br />
3 Touchez Terminé pour enregistrer et quitter.<br />
Marche : le ventilateur est toujours activé.<br />
Automatique : le ventilateur fonctionne<br />
uniquement lorsque le système de<br />
chauffage ou de refroidissement est en<br />
marche.<br />
Circulation : le ventilateur fonctionne de<br />
façon aléatoire, environ 35 % du temps<br />
(utilisation résidentielle uniquement).<br />
Suivre le programme : ventilateur<br />
contrôlé par le programme (voir les pages<br />
16-21).<br />
Remarque : Touchez Automatique ou Marche<br />
pour déroger provisoirement au programme du<br />
ventilateur.<br />
Terminé<br />
VENTILATEUR<br />
33-00020EFS—03 14
Réglage du mode du système<br />
1 Touchez SYSTÈME pour afficher les réglages<br />
du système.<br />
2 Touchez l’option désirée :<br />
Chauffage : Le thermostat commande<br />
uniquement le système de chauffage.<br />
Refroidissement : Le thermostat<br />
commande uniquement le système de<br />
refroidissement.<br />
Arrêt : Les systèmes de chauffage et de<br />
refroidissement sont arrêtés.<br />
Automatique : Le thermostat sélectionne<br />
le chauffage ou le refroidissement selon<br />
le besoin en fonction de la température<br />
ambiante.<br />
Chauffage d’urgence (thermopompes<br />
avec chauffage auxiliaire) : commande<br />
le chauffage auxiliaire/d’urgence. Le<br />
compresseur est verrouillé.<br />
3 Touchez Terminé pour enregistrer et quitter.<br />
Terminé<br />
SYSTÉME<br />
Remarque : Les réglages<br />
de système Automatique et<br />
Chauffage d’urgence peuvent<br />
ne pas s’afficher, selon la manière<br />
dont votre thermostat a été installé.<br />
15 33-00020EFS—03
Programmes d’économie d’énergie préconfigurés<br />
Ce thermostat utilise les réglages de l’économiseur d’énergie par défaut pour obtenir<br />
une réduction des coûts de chauffage/refroidissement. Pour personnaliser les<br />
réglages, consultez la page suivante.<br />
Utilisation<br />
résidentielle<br />
Période Heure de début<br />
Chauffage<br />
(Lun-Ven)<br />
Refroidissement<br />
(Lun-Ven)<br />
Chauffage<br />
(Sam-Dim)<br />
Refroidissement<br />
(Sam-Dim)<br />
Réveil 6 h 00 70° 78° 70° 78°<br />
Départ 8 h 00 62° 85° 62° 85°<br />
Retour 18 h 00 70° 78° 70° 78°<br />
Sommeil 22 h 00 62° 82° 62° 82°<br />
Utilisation<br />
commerciale<br />
Période<br />
Heure de début Chauffage Refroidissement Ventilateur<br />
Occupée 1 8 h 00 70° 75° Marche<br />
Inoccupée 1 22 h 00 55° 85° Auto<br />
Occupée 2* 12 h 00 70° 75° Marche<br />
Inoccupée 2* 12 h 00 55° 85° Auto<br />
* La période 2 est annulée par défaut. Si elle est activée, les valeurs ci-dessus sont<br />
les réglages par défaut.<br />
33-00020EFS—03 16
Réglage des horaires de programmation<br />
1 Touchez MENU.<br />
2 Sélectionnez Créer/Modifier l’horaire.<br />
• Touchez Afficher/Modifier pour voir<br />
le programme complet et faire un<br />
réglage rapide.<br />
• Touchez Aidez-moi pour créer un<br />
programme en répondant à de<br />
simples questions.<br />
• Touchez Je le ferai moi-même pour<br />
créer un programme manuellement.<br />
Consultez la page 18<br />
Remarque : Pour réduire les coûts,<br />
utilisez les réglages préconfigurés de<br />
l’économiseur d’énergie décrits à la page<br />
16.<br />
Créer / Modif ier I horaire<br />
MENU<br />
17 33-00020EFS—03
Réglage des horaires de programmation<br />
Si vous sélectionnez Je le ferai moi-même<br />
sur l’écran Créer/Modifier programme (page<br />
17), suivez ces étapes :<br />
1 Sélectionnez les jours à programmer puis<br />
Suivant.<br />
2 Touchez Réveil pour régler l’heure de<br />
réveil pour les jours sélectionnés.<br />
Suivant<br />
Chau: 70°<br />
Refr: 78°<br />
Vent: Auto<br />
6:00 am<br />
RÉVEIL<br />
33-00020EFS—03 18
Réglage des horaires de programmation<br />
3 Touchez p ou q pour régler les<br />
températures de chauffage et de<br />
refroidissement pour la période de réveil,<br />
puis touchez Terminé.<br />
4 Touchez les autres périodes de temps<br />
(Départ, Retour, Sommeil) pour régler<br />
l’heure et les températures de chaque<br />
période.<br />
5 Touchez Terminé pour enregistrer et<br />
quitter.<br />
Remarque : Touchez Supprimer période<br />
pour éliminer toute période de temps non<br />
souhaitée.<br />
Remarque : Touchez Réglages ventilateur<br />
pour personnaliser les réglages du<br />
ventilateur pour les périodes souhaitées.<br />
Terminé<br />
19 33-00020EFS—03
Dérogation aux programmes : utilisation résidentielle<br />
1 Touchez p ou q pour régler la<br />
température (côté droit de l’écran) et la<br />
durée Maintien jusqu’à (côté gauche).<br />
Le programme reprend lorsque la<br />
durée Maintien jusqu’à a expiré.<br />
2 Sélectionnez Passez à maintien<br />
permanent pour maintenir la même<br />
température jusqu’à la prochaine<br />
modification ou jusqu’à la reprise du<br />
programme configuré.<br />
3 Touchez Annuler maintien à tout<br />
moment pour réactiver le programme<br />
configuré.<br />
Passez à<br />
Mainen Permanent<br />
33-00020EFS—03 20
Dérogation aux programmes : utilisation commerciale<br />
Touchez p ou q pour ajuster la température.<br />
Celle-ci restera en vigueur jusqu’à la durée de<br />
maintien réglée.<br />
• Pour modifier la durée de maintien, touchez<br />
les boutons fléchés Maintien jusqu’à. Cette<br />
heure peut être ajustée jusqu’à la durée<br />
maximum réglée sur l’écran Durée de la<br />
dérogation dans les Préférences avancées<br />
(page 41).<br />
• Touchez Dérivation pour utiliser une<br />
température pour période occupée préréglée<br />
si une personne est présent durant une<br />
période non occupée. La nouvelle température<br />
est maintenue pendant une heure et peut<br />
être réglée pour la durée maximale définie<br />
sur l’écran Durée de la dérogation dans les<br />
Préférences avancées (page 41).<br />
Le programme réglé reprend à la fin de la durée<br />
de la dérogation. Touchez Annuler Maintien à tout<br />
moment pour réactiver le programme configuré.<br />
DÉRIVATION<br />
21 33-00020EFS—03
Commande vocale<br />
Ce thermostat comprend une fonction de<br />
commande vocale que vous pouvez utiliser pour «<br />
parler » à votre thermostat. Cette fonction peut être<br />
activée durant la configuration initiale ou en suivant<br />
les étapes suivantes (voir la page 8).<br />
Pour utiliser la commande vocale, suivez ces<br />
étapes :<br />
1 Touchez MENU et sélectionnez Commande<br />
vocale.<br />
2 Sélectionnez parmi les options :<br />
Commande vocale activée/inactivée - active<br />
ou désactive la Commande vocale. Lorsque<br />
désactivée, le thermostat fonctionne comme<br />
un thermostat ordinaire.<br />
Volume - règle le volume du haut-parleur du<br />
thermostat.<br />
Sensibilité - modifie la sensibilité du récepteur<br />
audio du thermostat. Plus le chiffre est haut,<br />
plus le thermostat sera réceptif à la commande<br />
vocale, mais il sera aussi plus susceptible<br />
de capter autre chose ressemblant à une<br />
commande non dirigé au thermostat.<br />
3 Pour les commandes disponibles, consultez<br />
la page 23 ou wifithermostat.com/<br />
voicecommands<br />
33-00020EFS—03 22<br />
Commande vocale<br />
MENU
Commande vocale<br />
Pour débuter la Commande vocale, dites « Hello thermostat » au thermostat. Le<br />
thermostat répondra, et vous pouvez lui dire quoi faire. Une conversation ordinaire avec<br />
le thermostat en utilisant la Commande vocale peut avoir l’air de ceci :<br />
1 “Hello, <strong>Thermostat</strong>.”<br />
(Bonjour thermostat)<br />
Cette phrase active la Commande vocale.<br />
2 “Hello! Please say a command.”<br />
(Bonjour! Veuillez donnez une commande.)<br />
3 “Make it 5 degrees warmer / cooler.”<br />
(Refroidis/réchauffe la pièce de 5 degrés.)<br />
Consultez la liste complète des commandes<br />
à la page 24.<br />
4 “One moment please… changing setpoint to…”<br />
(Un moment s’il vous plaît... changement du<br />
point de consigne à ...)<br />
Si le thermostat ne répond pas aux étapes 2 ou 4, retournez à l’étape 1.<br />
Remarque : Les commandes vocales pour ce thermostat sont uniquement en anglais.<br />
23 33-00020EFS—03
Commande vocale<br />
Commandes disponibles :*<br />
“Make it warmer / cooler”:<br />
Modifie le réglage de la température de 1 degré F<br />
“Make it much warmer / cooler”:<br />
Modifie le réglage de la température de 4 degrés F<br />
“Make it (1–10) degrees warmer / cooler”:<br />
L’utilisateur sélectionne la modification du réglage<br />
de température entre 1 et 10 degrés F<br />
“I’m feeling hot / cold”:<br />
Modifie le réglage de la température de 1 degré F<br />
“What can I say?”:<br />
Fournit une liste de commandes disponibles<br />
*Pour la liste de commandes courantes :<br />
wifithermostat.com/voicecommands<br />
33-00020EFS—03 24
Affichage du statut de l’équipement<br />
1 Touchez MENU.<br />
2 Sélectionnez État du matriel.<br />
3 Touchez p ou q pour afficher le statut<br />
de tout l’équipement contrôlé par le<br />
thermostat. En fonction de l’installation<br />
du thermostat, l’écran de statut de<br />
l’équipement peut indiquer les données<br />
relatives aux systèmes suivants :<br />
• Chauffage et refroidissement<br />
• Ventilateur<br />
• Informations relatives au thermostat<br />
État du matériel<br />
MENU<br />
Terminé<br />
25 33-00020EFS—03
Réglage du maintien pendant les vacances : utilisation résidentielle<br />
Cette caractéristique vous permet<br />
d’économiser de l’énergie en votre<br />
absence et restaure une température<br />
confortable juste avant votre retour.<br />
1 Touchez MENU.<br />
2 Sélectionnez Mode vacances.<br />
3 Touchez p ou q pour sélectionner la<br />
date de départ, puis touchez Suivant<br />
pour afficher plus de détails de<br />
programmation, y compris les heures<br />
du jour, les réglages de température,<br />
la date de retour et les réglages de<br />
retour.<br />
4 Passez en revue vos sélections sur le<br />
dernier affichage, et touchez Terminé<br />
pour enregistrer vos réglages. Touchez<br />
Retour puis Annuler pour ignorer les<br />
changements.<br />
Mode Vacances<br />
MENU<br />
Suivant<br />
Terminé<br />
33-00020EFS—03 26
Réglage des programmes vacances/jours fériés : utilisation commerciale<br />
Cette fonction permet de conserver de l’énergie<br />
lorsque personne ne se trouve sur le lieu de travail<br />
durant les jours fériés et les événements spéciaux.<br />
1 Touchez MENU.<br />
2 Sélectionnez Gestionnaire des jours fériés/<br />
événements.<br />
3 Sélectionnez l’article à programmer.<br />
• Événements personnalisés vous permet<br />
de configurer d’autres jours pour les<br />
programmes spéciaux.<br />
• Les options Jours fériés pour les<br />
américains et canadiens vous permettent<br />
de sélectionner une liste des jours fériés<br />
généralement observés par chaque pays.<br />
4 Répondez aux invites de chaque écran. Pour<br />
plus d’informations, consultez les deux pages<br />
suivantes.<br />
5 Touchez Terminé pour enregistrer vos réglages.<br />
Gesonnaire des jours fériés /<br />
événements<br />
Événements<br />
personnalisés<br />
MENU<br />
27 33-00020EFS—03
Réglage des événements personnalisés : utilisation commerciale<br />
Cette fonction vous permet de<br />
personnaliser les réglages de température<br />
à maintenir durant un événement<br />
spécifique. Vous pouvez configurer un<br />
événement pour une date ou un jour<br />
spécifique du mois. Le thermostat reprend<br />
le programme normal après l’événement.<br />
1 Sélectionnez Événements personnalisés<br />
dans le menu Gestionnaire des jours<br />
fériés/événements.<br />
2 Sélectionnez Créer un nouvel événement.<br />
Événements<br />
personnalisés<br />
Créer un nouvel<br />
événement<br />
33-00020EFS—03 28
Réglage des événements personnalisés : utilisation commerciale<br />
3 Sélectionnez Date spécifique ou Mois/<br />
Jour de la semaine.<br />
• Pour Date spécifique, vous êtes<br />
invité à sélectionner la date de<br />
début, les réglages, la date de fin et<br />
la fréquence de l’événement.<br />
• Pour Mois/Jour de la semaine, vous<br />
êtes invité à sélectionner le mois,<br />
le jour de la semaine, la semaine<br />
du mois, les réglages, la durée de<br />
l’événement et la fréquence de<br />
l’événement.<br />
4 Passez les réglages en revue et<br />
touchez Terminé pour les enregistrer.<br />
Touchez Retour puis Annuler pour<br />
ignorer les changements.<br />
Suivant<br />
Terminé<br />
29 33-00020EFS—03
Réglage du programme des jours fériés : utilisation commerciale<br />
Cette fonction vous permet de personnaliser<br />
les réglages de température à maintenir durant<br />
un jour férié national spécifique. Le thermostat<br />
reprend le programme normal entre les jours<br />
fériés sélectionnés.<br />
1 Sélectionnez Jours fériés américains ou Jours<br />
fériés canadiens dans le menu Gestionnaire<br />
des jours fériés/événements.<br />
2 Sélectionnez Ajouter/Modifier jours fériés. Une<br />
liste des jours fériés nationaux s’affiche.<br />
3 Touchez la case à cocher près de chaque jour<br />
férié pour lequel vous souhaitez maintenir des<br />
réglages spécifiques. (Touchez p ou q pour<br />
défiler dans la liste des jours fériés.) Puis<br />
touchez Suivant.<br />
Réglez le programme des jours fériés pour<br />
les températures en périodes Occupées et<br />
Non occupées, en fonction de l’occupation du<br />
bâtiment.<br />
4 Touchez p ou q pour sélectionner<br />
les températures de chauffage et de<br />
refroidissement.<br />
5 Passez les réglages en revue et touchez<br />
Terminé pour les enregistrer. Touchez Retour<br />
puis Annuler pour ignorer les changements.<br />
33-00020EFS—03 30<br />
Suivant
Réglage du programme des jours fériés : utilisation commerciale<br />
Cette fonction vous permet de personnaliser<br />
les réglages de température à maintenir à partir<br />
de maintenant jusqu’à une date spécifiée. Le<br />
thermostat reprend le programme normal à la<br />
date sélectionnée.<br />
1 Touchez MENU.<br />
2 Sélectionnez Mode Jours fériés pour afficher<br />
les températures lors de votre absence durant<br />
les jours fériés.<br />
3 Touchez p ou q pour sélectionner<br />
les températures de chauffage et de<br />
refroidissement, puis sélectionnez Suivant pour<br />
sélectionner la date de retour.<br />
4 Passez les réglages en revue et touchez<br />
Terminé pour les enregistrer. Touchez Retour<br />
puis Annuler pour ignorer les changements.<br />
Remarque : Le réglage de la température de<br />
refroidissement ne peut être que supérieur au<br />
réglage du programme en période non occupée<br />
et le réglage de la température de chauffage ne<br />
peut être qu’inférieur au réglage du programme<br />
en période non occupée.<br />
Mode Jours fériés<br />
MENU<br />
Terminé<br />
31 33-00020EFS—03
Lancement du mode Occupé : utilisation commerciale<br />
Cette fonction maintient la température à<br />
un niveau économique jusqu’à ce que vous<br />
touchiez Appuyer pour commencer la période<br />
occupée. À l’arrivée, touchez le bouton pour<br />
maintenir une température confortable<br />
pendant que la pièce est occupée.<br />
Touchez les boutons p ou q pour régler<br />
la température ou la durée de maintien. La<br />
température est maintenue jusqu’à l’heure<br />
réglée. La température revient à un niveau<br />
d’économie d’énergie après expiration du<br />
temporisateur ou à la fin de la période<br />
Occupée.<br />
Appuyer pour lancer<br />
I occupaon<br />
33-00020EFS—03 32
Personnalisation de la couleur de l’écran<br />
Vous pouvez personnaliser l’affichage de votre<br />
thermostat pour l’assortir à votre décor.<br />
1 Touchez Menu.<br />
2 Touchez Thèmes de couleurs.<br />
3 Sélectionnez le nom d’une couleur à<br />
utiliser comme arrière-plan prédéfini, ou<br />
sélectionnez Personnaliser pour définir votre<br />
propre couleur d’arrière-plan et de police.<br />
• En choisissant un nom de couleur,<br />
l’écran affiche un échantillon sur la<br />
gauche. Touchez Terminé pour accepter<br />
celle sélection.<br />
• En touchant Personnaliser, l’écran vous<br />
fournira des instructions. Touchez Suivant<br />
pour passez à l’étape suivante; touchez<br />
Terminé lorsque vous êtes satisfait de vos<br />
modifications.<br />
Thémes de couleurs<br />
MENU<br />
Terminé<br />
Suivant<br />
33 33-00020EFS—03
Réglages des préférences<br />
Les options du menu Préférences vous<br />
permettent de sélectionner la façon dont<br />
le thermostat affiche les informations ou<br />
répond à certaines situations.<br />
1 Touchez MENU et sélectionnez<br />
Préférences.<br />
2 Sélectionnez une option et suivez les<br />
invites :<br />
• Rappels<br />
• Options du calendrier utilitaire<br />
• Rétroéclairage<br />
• Technologie Smart Response<br />
• Préférences avancées<br />
• Restaurer le programme par défaut<br />
3 Touchez Terminé pour enregistrer vos<br />
réglages. Touchez Annuler pour ignorer<br />
les changements.<br />
Préférences<br />
MENU<br />
33-00020EFS—03 34
Nettoyage de l’écran du thermostat<br />
Lorsque vous sélectionnez l’option de<br />
nettoyage de l’écran, l’écran se verrouille<br />
pour que les réglages ne soient pas<br />
modifiés accidentellement durant le<br />
nettoyage.<br />
1 Touchez MENU.<br />
2 Sélectionnez Nettoyer l’écran. Une<br />
invite vous demande si vous souhaitez<br />
nettoyer l’écran pendant 30 secondes.<br />
3 Touchez Oui. Une minuterie montre le<br />
temps écoulé jusqu’à ce que l’écran soit<br />
réactivé.<br />
Remarque : Ne pulvérisez AUCUN liquide<br />
directement sur le thermostat. Pulvérisez<br />
les liquides sur un chiffon, puis utilisez<br />
le chiffon humide pour nettoyer l’écran.<br />
N’utilisez pas d’eau ni de nettoyant à vitres<br />
ménager. Évitez les produits de nettoyage<br />
abrasifs.<br />
Neoyer I écran<br />
Oui<br />
MENU<br />
35 33-00020EFS—03
Réglages de sécurité<br />
Vous pouvez régler les options de sécurité<br />
pour éviter les modifications non autorisées<br />
des réglages du système.<br />
1 Touchez MENU et sélectionnez Réglages<br />
de sécurité.<br />
2 Sélectionnez Modifier mode de<br />
verrouillage.<br />
3 Sélectionnez une option et suivez les<br />
invites :<br />
Déverrouillé : accès intégral permis.<br />
Partiellement verrouillé : seule la<br />
température peut être modifiée.<br />
Complètement verrouillé : Aucun<br />
accès permis.<br />
Remarque : Si un mot de passe est choisi<br />
pour plus de sécurité, notez-le ici pour<br />
référence :<br />
Réglage de sécurité<br />
Modifier mode de<br />
verrouillage<br />
MENU<br />
33-00020EFS—03 36
Technologie Smart Response<br />
Cette fonction permet au thermostat<br />
(résidentiel uniquement) “d’apprendre”<br />
combien de temps il faut à votre système de<br />
chauffage/refroidissement pour atteindre le<br />
réglage de température programmé, afin que<br />
la température voulue soit atteinte à l’heure<br />
programmée.<br />
Par exemple : réglez l’heure de réveil à 6<br />
heures et la température à 70°. Le chauffage<br />
est mis en fonction avant 6 heures de<br />
manière à ce que la température soit de 70°<br />
à 6 heures.<br />
Remarque : Sélectionnez Technologie<br />
Select Smart Response dans le menu<br />
Préférence (page 34).<br />
Le message “en reprise” s’affiche lorsque<br />
le système est activé avant une période de<br />
temps programmée.<br />
37 33-00020EFS—03
Balayage avant occupation<br />
Cette fonction pour utilisation<br />
commerciale active le ventilateur de 1<br />
heure à 3 heures avant chaque période<br />
occupée pour fournir un environnement<br />
de travail confortable à l’arrivée.<br />
33-00020EFS—03 38
Protection du compresseur<br />
Le thermostat maintient le compresseur<br />
arrêté pendant quelques minutes avant un<br />
redémarrage, pour éviter d’endommager<br />
l’équipement. Pendant cette durée d’arrêt,<br />
le message “En attente du matériel”<br />
s’affiche à l’écran.<br />
39 33-00020EFS—03
Commutation automatique<br />
Cette fonction est utilisée dans les climats<br />
où le conditionnement d’air et le chauffage<br />
sont utilisés le même jour.<br />
Lorsque le système est réglé sur<br />
Automatique, le thermostat sélectionne<br />
automatiquement le chauffage ou<br />
le refroidissement en fonction de la<br />
température intérieure.<br />
L’écart entre les réglages de chauffage<br />
et de refroidissement doit être d’au<br />
moins 3 degrés. Le thermostat ajuste<br />
automatiquement les réglages afin de<br />
maintenir ces 3 degrés d’écart.<br />
Remarque : Sélectionnez Commutation<br />
automatique sur l’écran de Commutation<br />
du système de chauffage et de<br />
refroidissement dans Préférences<br />
avancées. Voir “Réglage des préférences<br />
avancées” à la page 41.<br />
33-00020EFS—03 40
Réglage des préférences avancées<br />
Vous pouvez modifier des options pour plusieurs<br />
fonctions du système. Bien que de nombreuses<br />
options, telles que la langue et les réglages<br />
d’indication de température, soient les mêmes<br />
pour toutes les configurations, d’autres dépendent<br />
du type de système utilisé.<br />
1 Touchez MENU. Le thermostat affiche une liste<br />
d’options.<br />
2 Sélectionnez Préférences > Préférences<br />
avancées. Le thermostat affiche le premier<br />
écran d’options que vous pouvez modifier.<br />
3 Sur chaque écran, effectuez les modifications<br />
selon le besoin puis touchez Suivant pour<br />
afficher les nouvelles options. Répétez cette<br />
étape jusqu’à ce que tous les changements<br />
aient été effectués.<br />
Les tableaux aux pages 42-43 expliquent<br />
les écrans et les options sous Préférences<br />
avancées.<br />
4 Lorsque toutes les modifications ont été<br />
effectuées, touchez Terminé pour enregistrer<br />
et quitter.<br />
Préférences<br />
Préférences avancées<br />
MENU<br />
Suivant<br />
41 33-00020EFS—03
Réglage des préférences avancées<br />
Options des préférences avancées (MENU > Préférences > Préférences avancées)<br />
Titre de l’écran<br />
Options de<br />
programmation<br />
Échelle d’indication de<br />
température<br />
Commutation de<br />
système de chauffage et<br />
refroidissement<br />
Nombre de périodes<br />
programmées<br />
Durée du balayage<br />
avant occupation *<br />
Type de priorité *<br />
Réglages et options<br />
Sélectionnez Non programmable ou <strong>Programmable</strong>. L’option<br />
<strong>Programmable</strong> utilise la programmation par défaut ou une<br />
programmation personnalisée pour augmenter ou réduire<br />
automatiquement les réglages de températures pour différentes<br />
périodes de la journée.<br />
Sélectionnez Fahrenheit ou Celsius.<br />
Sélectionnez Manuel ou Automatique.<br />
Sélectionnez 2 périodes par jour ou 4 périodes par jour. (Voir la page<br />
“Calendriers économiseurs d’énergie préréglés” à la page 16.)<br />
Sélectionnez la durée de fonctionnement du ventilateur avant chaque<br />
période occupée : arrêt, 1, 2 ou 3 heures.<br />
Sélectionnez Standard pour maintenir les périodes programmées ou<br />
Initier occupation pour utiliser les réglages économiseurs d’énergie<br />
jusqu’à ce qu’un utilisateur appuie sur Commencer occupation.<br />
* Disponible lorsque le thermostat est installé en mode Commercial.<br />
33-00020EFS—03 42
Réglage des préférences avancées<br />
Options de préférences avancées (fin)<br />
Titre de l’écran<br />
Durée de la dérogation *<br />
Récupération précoce<br />
pour le chauffage *<br />
Récupération précoce<br />
pour le refroidissement *<br />
Limites de température<br />
Verrouillage du clavier<br />
Format de l’horloge<br />
Heure d’été/hiver<br />
Décalage d’affichage de<br />
la température/humidité<br />
intérieure<br />
Réglages et options<br />
Sélectionnez la durée de maintien de la température durant une<br />
dérogation : 1-10 heures ou pas de limite.<br />
Sélectionnez Non pour lancer la récupération à l’heure programmée<br />
ou Oui pour lancer une rampe de température ascendante précoce.<br />
Sélectionnez Non pour lancer la récupération à l’heure programmée<br />
ou Oui pour lancer une rampe de température descendante précoce.<br />
Sélectionnez la limite de refroidissement minimum et la limite de<br />
chauffage maximum.<br />
Sélectionnez Déverrouillé/Partiellement verrouillé/Verrouillé.<br />
Sélectionnez 12 heures ou 24 heures.<br />
Sélectionnez Arrêt ou Marche. Si le réglage est sur Marche, le<br />
système passe automatiquement à l’heure d’hiver/d’été.<br />
Sélectionnez le nombre de degrés de décalage de la température<br />
intérieure ou le pourcentage de décalage de l’humidité intérieure.<br />
* Disponible lorsque le thermostat est installé en mode Commercial.<br />
43 33-00020EFS—03
Déconnexion du réseau <strong>Wi</strong>-<strong>Fi</strong><br />
Si vous devez débrancher le thermostat<br />
de votre réseau <strong>Wi</strong>-<strong>Fi</strong> (par exemple pour<br />
remplacer le routeur), suivez ces étapes :<br />
1 Touchez MENU.<br />
2 Sélectionnez Configuration <strong>Wi</strong>-<strong>Fi</strong>.<br />
3 Touchez Déconnecter du réseau. Ce<br />
thermostat affiche une question pour<br />
confirmer votre sélection.<br />
4 Touchez Oui pour confirmer que vous<br />
souhaitez vous déconnecter du réseau.<br />
Le thermostat affiche l’écran de<br />
configuration <strong>Wi</strong>-<strong>Fi</strong>.<br />
5 Touchez OK pour afficher le menu.<br />
Configuration <strong>Wi</strong>-<strong>Fi</strong><br />
Votre réseau<br />
Inconnu<br />
Déconnecter du réseau<br />
MENU<br />
Êtes-vous sûr de vouloir vous déconnecter de<br />
votre réseau?<br />
Oui<br />
33-00020EFS—03 44
Reconnexion au réseau <strong>Wi</strong>-<strong>Fi</strong><br />
1 Touchez MENU.<br />
2 Sélectionnez Configuration <strong>Wi</strong>-<strong>Fi</strong>.<br />
3 Touchez le nom du réseau que vous souhaitez<br />
utiliser. Le thermostat peut afficher la page du<br />
mot de passe.<br />
4 Pour inscrire un mot de passe, touchez les<br />
caractères pour écrire le mot de passe de<br />
votre réseau résidentiel, puis touchez sur<br />
Terminé.<br />
5 Le thermostat affiche « Connexion au réseau<br />
en cours. Veuillez patienter... » puis affiche<br />
l’écran « Connexion réussie ».<br />
6 Touchez Suivant.<br />
• Si votre thermostat est enregistré, vous verrez<br />
la force de votre signal et d’autres informations<br />
de statut. Touchez Terminé.<br />
• Si l’écran affiche « Enregistrez-vous en ligne<br />
pour bénéficier de l’accès à distance », suivez<br />
les instructions à la page 9.<br />
Publique<br />
Votre réseau<br />
Voisin<br />
Configuration <strong>Wi</strong>-<strong>Fi</strong><br />
MENU<br />
45 33-00020EFS—03
Déconnexion de votre thermostat<br />
Si vous annulez l’enregistrement de votre<br />
thermostat sur le site Web Total Connect<br />
Comfort (par exemple vous déménagez<br />
sans emporter le thermostat), suivez ces<br />
étapes :<br />
1 Sur mytotalconnectcomfort.com,<br />
ouvrez votre compte.<br />
2 Dans Mon Compte, sélectionnez<br />
Modifier mon profil.<br />
3 Cliquez sur le bouton Delete My<br />
Account (Supprimer mon compte).<br />
Votre thermostat affiche un bouton<br />
orange indiquant Enregistrez-vous en<br />
ligne.<br />
33-00020EFS—03 46
Modification de la configuration du système<br />
Si le thermostat est réinitialisé aux paramètres<br />
d’usine par défaut, modifiez les réglages du<br />
thermostat en fonction de votre système de<br />
chauffage/refroidissement. Votre entrepreneur<br />
a procédé à ceci lorsque le thermostat a été<br />
installé. Suivez ces étapes pour configurer le<br />
thermostat, ou appelez votre entrepreneur pour<br />
qu’il le fasse lui-même.<br />
1 Touchez MENU. Le thermostat affiche une liste<br />
d’options.<br />
2 Sélectionnez Configuration du système. Le<br />
thermostat affiche le premier écran d’options<br />
que vous pouvez modifier.<br />
3 Sur chaque écran, effectuez les modifications<br />
selon le besoin puis touchez Suivant pour afficher<br />
les nouvelles options. Répétez cette étape jusqu’à<br />
ce que tous les changements aient été effectués.<br />
Les tableaux aux pages 48-49 expliquent les<br />
écrans et les options de configuration du système.<br />
4 Lorsque toutes les modifications ont été effectuées,<br />
touchez Terminé pour enregistrer et quitter.<br />
Conf iguration du système<br />
Touchez le bouton<br />
Aide pour afficher les<br />
informations sur les<br />
options d’écran.<br />
MENU<br />
Suivant<br />
47 33-00020EFS—03
Modification de la configuration du système<br />
Remarque : Touchez le bouton Aide orange sur n’importe quel écran pour obtenir plus<br />
d’informations.<br />
Options de configuration du système (MENU > Configuration du système)<br />
Titre de l’écran<br />
Langue<br />
<strong>Thermostat</strong> installé dans<br />
L’emplacement de votre<br />
thermostat<br />
Votre thermostat contrôle<br />
Votre type de système<br />
Votre type de système de<br />
chauffage à air pulsé<br />
Efficacité de votre<br />
système de chauffage<br />
Votre type de système de<br />
chauffage<br />
Réglages et options<br />
<strong>English</strong>/Français/Español.<br />
Résidentielle/Commerciale (le thermostat est utilisé pour une<br />
application résidentielle (défaut) ou commerciale).<br />
Touchez le bouton THERMOSTAT pour afficher un écran où vous<br />
pouvez entrer un nom personnalisé en utilisant le clavier. Si vous<br />
n’avez qu’un thermostat, vous pouvez laisser le mot THERMOSTAT.<br />
Pour les installations commerciales, vous pouvez cocher une case<br />
pour afficher le nom d’un thermostat sur l’écran d’accueil.<br />
Sélectionnez Chauffage ou Refroidissement ou les deux (défaut).<br />
Sélectionnez air pulsé (défaut), thermopompe, eau chaude ou vapeur.<br />
Chaque option offre différents choix sur les écrans suivants.<br />
Sélectionnez le type de système à air pulsé : gaz/mazout (défaut) ou<br />
électrique<br />
Sélectionnez Air pulsé efficacité standard (défaut) ou Air pulsé haute<br />
efficacité.<br />
Si vous avez sélectionné Eau chaude ou Vapeur sur « Votre type de<br />
système», sélectionnez le système de chauffage spécifique ici.<br />
33-00020EFS—03 48
Modification de la configuration du système<br />
Options de configuration du système (fin)<br />
Titre de l’écran<br />
Nombre d’étages de<br />
refroidissement<br />
Nombre d’étages de<br />
chauffage<br />
Votre régulateur de<br />
ventilateur<br />
Type de vanne de<br />
commutation<br />
Nombre d’étages du<br />
compresseur de la<br />
thermopompe<br />
Votre chauffage de<br />
secours<br />
Réglages et options<br />
Sélectionnez 1 étage (défaut) ou 2 étages. Si vous n’êtes pas sûr,<br />
notez les fils que vous avez connectés. <strong>Fi</strong>l Y uniquement (1 étage)<br />
ou Y et Y2.<br />
Sélectionnez 1 étage (défaut) ou 2 étages. Si vous n’êtes pas sûr,<br />
notez les fils que vous avez connectés. <strong>Fi</strong>l W uniquement (1 étage)<br />
ou W et W2.<br />
Sélectionnez si votre thermostat (défaut) ou votre système de<br />
chauffage contrôle le ventilateur.<br />
Si vous sélectionnez Thermopompe sur « Votre type de système »,<br />
sélectionnez si une vanne de commutation de refroidissement<br />
(défaut) ou de chauffage est utilisée. Si vous n’êtes pas sûr, notez les<br />
fils que vous avez connectés.<br />
Sélectionnez 1 étage (défaut) ou 2 étages. Si vous n’êtes pas sûr,<br />
notez les fils que vous avez connectés. <strong>Fi</strong>l Y uniquement (1 étage) ou<br />
Y et Y2.<br />
Non ou Oui (défaut) vous pouvez déterminer si vous avez un<br />
chauffage de secours.<br />
49 33-00020EFS—03
Configuration du système<br />
Remarque : Votre entrepreneur a déjà configuré<br />
votre thermostat. Aucun réglage n’est requis.<br />
Suivez ces instructions uniquement si vous<br />
avez réalisé une réinitialisation aux paramètres<br />
d’usine.<br />
Avant d’effectuer la connexion à votre réseau<br />
<strong>Wi</strong>-<strong>Fi</strong>, vous devez régler les options initiales du<br />
thermostat pour définir le système de chauffage/<br />
refroidissement :<br />
• Langue<br />
• Résidence ou Commerce<br />
Vous pouvez personnaliser d’autres options plus<br />
tard.<br />
Suivez les invites sur l’écran pour sélectionner<br />
les options appropriées.<br />
1 Touchez la langue que vous souhaitez voir<br />
sur le thermostat, puis touchez Suivant.<br />
2 Sélectionnez l’application Résidence ou<br />
Commerce, puis touchez Suivant.<br />
33-00020EFS—03 50<br />
Suivant<br />
Suivant
Configuration du système<br />
3 Touchez Suivant ou renommez le<br />
thermostat en touchant THERMOSTAT<br />
et en suivant le reste des instructions.<br />
4 Sélectionnez votre type de système et<br />
touchez Suivant.<br />
Remarque : Touchez le bouton Aide<br />
orange sur n’importe quel écran pour<br />
obtenir plus d’informations.<br />
Suivant<br />
Suivant<br />
51 33-00020EFS—03
Configuration du système<br />
5 Sélectionnez votre type de<br />
système et touchez Suivant.<br />
Le type de système détermine<br />
d’autres sélections pour terminer la<br />
configuration initiale. Utilisez la liste<br />
de vérification de l’étape 6d pour<br />
faire les sélections.<br />
6 Touchez Suivant après avoir effectué<br />
les sélections sur chaque écran.<br />
7 Touchez Terminé sur le dernier écran.<br />
Le thermostat affiche l’option de<br />
connexion à votre réseau <strong>Wi</strong>-<strong>Fi</strong>.<br />
Remarque : Touchez le bouton Aide<br />
orange sur n’importe quel écran pour<br />
obtenir plus d’informations.<br />
Suivant<br />
33-00020EFS—03 52
Foire aux questions<br />
Q:<br />
Mon thermostat fonctionnera-t-il toujours si je perds ma connexion <strong>Wi</strong>-<strong>Fi</strong>?<br />
R:<br />
Oui, le thermostat actionnera votre système de chauffage et/ou de refroidissement<br />
avec ou sans <strong>Wi</strong>-<strong>Fi</strong>.<br />
Q:<br />
Comment puis-je trouver le mot de passe de mon routeur?<br />
R:<br />
Contactez le fabriquant du routeur ou vérifiez la documentation du routeur.<br />
Q:<br />
Pourquoi mon thermostat ne se connecte-t-il pas à mon routeur <strong>Wi</strong>-<strong>Fi</strong> même si<br />
celui-ci est très proche du thermostat?<br />
R:<br />
Vérifiez que le mot de passe saisi pour le routeur <strong>Wi</strong>-<strong>Fi</strong> est correct.<br />
Q:<br />
Il est impossible d’enregistrer mon thermostat sur le site Total Connect<br />
Comfort.<br />
R:<br />
Vérifiez que le thermostat est correctement enregistré dans le réseau <strong>Wi</strong>-<strong>Fi</strong><br />
résidentiel. Dans Menu > Configuration <strong>Wi</strong>-<strong>Fi</strong>, vérifiez l’icône de puissance du signal<br />
<strong>Wi</strong>-<strong>Fi</strong>. Vérifiez que le routeur <strong>Wi</strong>-<strong>Fi</strong> dispose d’une bonne connexion à Internet. Sur<br />
votre ordinateur, vérifiez que vous pouvez ouvrir le site sur mytotalconnectcomfort.<br />
com. Si ce n’est pas le cas, éteignez le modem pendant quelques secondes, puis<br />
rallumez-le.<br />
53 33-00020EFS—03
Foire aux questions<br />
Q:<br />
Je suis enregistré sur le site Total Connect Comfort mais je n’ai pas pu ouvrir<br />
de session en utilisant mon nouveau compte.<br />
R:<br />
Consultez votre messagerie et vérifiez que vous avez reçu le message d’activation.<br />
Suivez les instructions d’activation de votre compte, puis ouvrez une session sur le<br />
site web.<br />
Q:<br />
Je me suis enregistré sur le site Total Connect Comfort et n’ai pas reçu de<br />
message de confirmation.<br />
R:<br />
Vérifiez que le message ne se trouve pas dans le dossier des pourriels ou des<br />
messages effacés.<br />
Q:<br />
Y a-t-il un moyen d’accroître la force du signal?<br />
R:<br />
La plupart des routeurs standard peuvent être configurés comme répéteur. Vous<br />
pouvez également acheter et installer un répéteur <strong>Wi</strong>-<strong>Fi</strong>.<br />
Q:<br />
Le thermostat ne répond pas à mes commandes vocales sous aucune<br />
conditions.<br />
R:<br />
Durant la configuration du thermostat ou dans le menu de la Commande vocale,<br />
vous devez répondre « Yes (oui) », au Consentement d’utilisation de l’appareil pour<br />
activer la Commande vocale sur le thermostat. Vérifiez aussi votre connexion <strong>Wi</strong>-<strong>Fi</strong><br />
puisque la Commande vocale requiert la connectivité <strong>Wi</strong>-<strong>Fi</strong> pour fonctionner.<br />
33-00020EFS—03 54
Foire aux questions<br />
Q:<br />
Le thermostat ne répond pas à mes commandes vocales dans certains<br />
endroits de la maison.<br />
R:<br />
Vous devez être en ligne directe visuelle avec le thermostat lorsque vous utilisé la<br />
Commande vocale. La distance et la proximité d’utilisation dépendent de certaines<br />
conditions, comme la disposition des pièces, l’emplacement du thermostat et<br />
du niveau de bruit. La Commande vocale peut ne pas fonctionner correctement<br />
lorsque des commandes sont données à plus de 4,6 m (15 pi), spécialement en<br />
communiquant autour de murs, structures ou à partir d’une pièce fermée.<br />
Q:<br />
Pourquoi mon thermostat a-t-il de la difficulté à entendre ma voix?<br />
R:<br />
Le réglage de la sensibilité peut être trop faible. Réglez-le à un niveau plus élevé.<br />
Voir la page 22.<br />
Q:<br />
Pourquoi mon thermostat répond-il aux voix qui ne lui sont pas dirigées?<br />
R:<br />
Le réglage de la sensibilité peut être trop élevé. Réglez-le à un niveau plus faible.<br />
Voir la page 22.<br />
55 33-00020EFS—03
Obtenir de l’aide et répondre aux alertes<br />
Votre thermostat offre deux types<br />
d’assistance. Si ces options d’assistance<br />
ne répondent pas à vos questions,<br />
consultez la foire aux questions (pages<br />
53-54) et les conseils de dépannage<br />
(page 59).<br />
Aide sur écran<br />
La plupart des écrans comprennent un<br />
bouton Aide orange.<br />
1 Touchez Aide pour afficher les<br />
instructions d’utilisation de l’écran.<br />
2 Touchez OK pour afficher de nouveau<br />
l’écran d’origine.<br />
Aide<br />
OK<br />
33-00020EFS—03 56
Obtenir de l’aide et répondre aux alertes<br />
Alertes à l’écran<br />
Votre écran d’accueil affichera un gros<br />
bouton orange lorsque vous devrez<br />
corriger un réglage ou un problème avec<br />
le système.<br />
1 Touchez le bouton, le thermostat<br />
affichera les instructions nécessaires<br />
pour compléter la tâche pour laquelle<br />
vous avez été alerté.<br />
2 Touchez OK sur l’écran d’instructions,<br />
puis effectuez la tâche. Lorsque la<br />
tâche est complétée, le bouton d’alerte<br />
disparaîtra.<br />
Remplacez<br />
le filtre á air<br />
Appuyez pour info<br />
OK<br />
57 33-00020EFS—03
Mises à jour logicielles<br />
<strong>Honeywell</strong> publie régulièrement des mises<br />
à jour pour le logiciel de ce thermostat. Ces<br />
mises à jour se font automatiquement par<br />
l’intermédiaire de votre connexion <strong>Wi</strong>-<strong>Fi</strong>.<br />
Tous vos réglages sont enregistrés, de<br />
sorte que vous n’avez à effectuer aucune<br />
modification après la mise à jour.<br />
Les mises à jour ont lieu tôt le matin.<br />
Une fois votre thermostat mis à jour, il<br />
est relancé et affiche brièvement le logo<br />
<strong>Honeywell</strong>. L’écran affiche “Mise à jour<br />
logicielle...” avec une barre de progression<br />
verte. Une fois la mise à jour terminée,<br />
votre écran d’accueil s’affiche comme<br />
d’habitude<br />
Remarque : Si le thermostat n’est pas<br />
connecté au <strong>Wi</strong>-<strong>Fi</strong> et est enregistré à Total<br />
Connect Comfort, vous n’obtiendrez pas de<br />
mises à jour automatiques.<br />
33-00020EFS—03 58
Dépannage<br />
En cas de difficultés avec le thermostat, essayez les suggestions suivantes. La plupart<br />
des problèmes peuvent être réglés rapidement et facilement.<br />
Rien n’apparaît<br />
à l’écran<br />
« Patientez »<br />
apparaît à<br />
l’écran<br />
Le système de<br />
chauffage ou de<br />
refroidissement<br />
ne répond pas<br />
• Vérifiez le disjoncteur et réinitialisez-le si nécessaire.<br />
• Assurez-vous que l’interrupteur de marche-arrêt du système de chauffage<br />
et de refroidissement est sur marche.<br />
• Assurez-vous que la porte de l’appareil de chauffage est bien fermée.<br />
• La fonction de protection du compresseur est activée. Attendez 5<br />
minutes que le système se remette en marche en toute sécurité sans<br />
endommager le compresseur.<br />
• Touchez SYSTÈME pour régler le système sur Chauffage. Vérifiez que le<br />
réglage de température est supérieur à la température intérieure.<br />
• Touchez SYSTÈME pour régler le système sur Refroidissement. Vérifiez que<br />
le réglage de température est inférieur à la température intérieure.<br />
• Vérifiez le disjoncteur et réinitialisez-le si nécessaire.<br />
• Assurez-vous que l’interrupteur de marche-arrêt du système de chauffage<br />
et de refroidissement est sur marche.<br />
• Assurez-vous que la porte de l’appareil de chauffage est bien fermée.<br />
• Si Patientez s’affiche, la minuterie de protection du compresseur est<br />
activée. Attendez 5 minutes que le système se remette en marche en<br />
toute sécurité sans endommager le compresseur (voir page 39).<br />
59 33-00020EFS—03
Glossaire<br />
Système de chauffage/refroidissement à thermopompe<br />
Des thermopompes sont utilisées pour chauffer et refroidir une résidence. Si votre ancien<br />
thermostat comporte un réglage pour chauffage auxiliaire ou d’urgence, vous avez probablement<br />
une thermopompe.<br />
Système de chauffage/refroidissement conventionnel<br />
Systèmes sans thermopompe; ceux-ci incluent des appareils de traitement d’air, des chaudières<br />
ou des chauffe-eau qui fonctionnent au gaz naturel, au mazout ou à l’électricité. Ils peuvent ou<br />
non inclure un appareil de conditionnement d’air.<br />
MAC ID, MAC CRC<br />
Codes alphanumériques identifiant de manière unique votre thermostat.<br />
33-00020EFS—03 60
Informations réglementaires<br />
Déclaration de conformité à la FCC (Partie 15.19) (États-<br />
Unis uniquement)<br />
Cet appareil est conforme à la partie 15 du règlement de la<br />
FCC. Son fonctionnement est soumis aux deux conditions<br />
suivantes :<br />
1 Ce dispositif ne doit pas causer d’interférences nuisibles, et<br />
2 Ce dispositif doit accepter toutes les interférences reçues,<br />
y compris celles pouvant causer un fonctionnement non<br />
souhaité.<br />
Avertissement de la FCC (Partie 15.21) (États-Unis<br />
uniquement)<br />
Toute modification qui n’est pas autorisée expressément par la<br />
partie responsable de la conformité de l’appareil peut rendre<br />
l’utilisateur inapte à faire fonctionner l’équipement.<br />
Déclaration relative aux interférences de la FCC (Partie<br />
15.105 (b)) (États-Unis uniquement)<br />
Cet équipement a été testé et est conforme aux limites des<br />
dispositifs numériques de Classe B, conformément à la Partie<br />
15 du règlement de la FCC. Ces limites sont conçues pour<br />
fournir une protection raisonnable contre les interférences<br />
nuisibles dans une installation résidentielle. Cet équipement<br />
génère, utilise et peut émettre de l’énergie de radiofréquence,<br />
et s’il n’est pas installé et utilisé conformément aux instructions,<br />
peut causer des interférences nuisibles aux communications<br />
radio. Il n’y a toutefois aucune garantie qu’une interférence<br />
ne se produira pas dans une installation particulière. Si cet<br />
équipement cause des interférences nuisibles à la réception<br />
radio et télévision, ce qui peut être déterminé en éteignant le<br />
dispositif et en le remettant en marche, il est recommandé à<br />
l’utilisateur de tenter de corriger l’interférence par l’une des<br />
mesures suivantes :<br />
• Réorientez ou déplacez l’antenne réceptrice.<br />
• Augmentez la séparation entre l’équipement et le récepteur.<br />
• Branchez l’équipement dans la prise d’un circuit différent de<br />
celui auquel le récepteur est connecté.<br />
• Consultez le distributeur ou un technicien radio/TV<br />
compétent pour obtenir de l’aide.<br />
Section 7.1.2 de RSS-GEN<br />
Conformément aux normes d’Industrie Canada, ce<br />
transmetteur radio ne peut fonctionner qu’avec une antenne<br />
dont le type et le gain maximum sont approuvés par<br />
Industrie Canada. Pour réduire les risques d’interférences<br />
radio encourus par d’autres utilisateurs, le type et le gain de<br />
l’antenne doivent être choisis de façon à ce que la puissance<br />
rayonnée isotrope équivalente (p.i.r.e.) ne soit pas supérieure à<br />
celle nécessaire à l’établissement d’une bonne communication.<br />
Section 7.1.3 de RSS-GEN<br />
Son fonctionnement est soumis aux deux conditions suivantes :<br />
1 Ce dispositif ne doit pas causer d’interférences, et<br />
2 Ce dispositif doit accepter toutes les interférences, y compris<br />
celles pouvant causer un fonctionnement non souhaité.<br />
61 33-00020EFS—03
Garantie limitée de 5 ans<br />
<strong>Honeywell</strong> garantit ce produit, à l’exception des piles, contre tout défaut de pièce ou de main-d’oeuvre, durant une<br />
période de cinq (5) ans à partir de la date d’achat si le produit est utilisé et entretenu convenablement. Si, à n’importe<br />
quel moment de la période de garantie, le produit est défectueux, <strong>Honeywell</strong> le réparera ou le remplacera (à sa<br />
discrétion).<br />
Si le produit est défectueux,<br />
(i) renvoyez-le avec la facture ou une autre preuve d’achat date au lieu d’achat; ou<br />
(ii) appelez le service à la clientèle de <strong>Honeywell</strong> en composant le 1-888-235-6569. Le service à la clientèle déterminera<br />
si le produit doit être retourné à l’adresse suivante : <strong>Honeywell</strong> Return Goods, Dock 4MN10-3860, 1885 Douglas Dr. N.,<br />
Golden Valley, MN 55422, ou si un produit de remplacement peut vous être expédié.<br />
La présente garantie ne couvre pas les frais de retrait ou de réinstallation. La présente garantie ne s’applique pas s’il<br />
est démontré par <strong>Honeywell</strong> que la défaillance ou le mauvais fonctionnement sont dus à un endommagement du produit<br />
alors que le consommateur l’avait en sa possession.<br />
La responsabilité exclusive de <strong>Honeywell</strong> se limite à réparer ou à remplacer le produit conformément aux modalités<br />
susmentionnées. HONEYWELL N’EST EN AUCUN CAS RESPONSABLE DES PERTES OU DOMMAGES, Y COMPRIS<br />
LES DOMMAGES INDIRECTS OU ACCESSOIRES DÉCOULANT DIRECTEMENT OU INDIRECTEMENT D’UNE<br />
VIOLATION QUELCONQUE D’UNE GARANTIE, EXPRESSE OU TACITE, APPLICABLE AU PRÉSENT PRODUIT,<br />
OU TOUTE AUTRE DÉFAILLANCE DU PRÉSENT PRODUIT. Certaines provinces ne permettent pas l’exclusion ou la<br />
restriction des dommages indirects ou accessoires et, par conséquent, la présente restriction peut ne pas s’appliquer.<br />
CETTE GARANTIE EST LA SEULE GARANTIE EXPRESSE FAITE PAR HONEYWELL POUR CE PRODUIT.<br />
LA DURÉE DE TOUTE GARANTIE IMPLICITE, INCLUANT LES GARANTIES DE QUALITÉ MARCHANDE OU<br />
D’ADAPTATION À UNE UTILISATION PARTICULIÈRE, EST LIMITÉE PAR LES PRÉSENTES À LA PÉRIODE DE CINQ<br />
ANNÉES DE LA PRÉSENTE GARANTIE. Certaines provinces ne permettent pas de limiter la durée des garanties<br />
tacites et, par conséquent, la présente limitation peut ne pas s’appliquer.<br />
La présente garantie donne au consommateur des droits spécifiques et certains autres droits qui peuvent varier d’une<br />
province à l’autre.<br />
Pour toute question concernant la présente garantie, prière d’écrire aux Services à la clientèle de <strong>Honeywell</strong> à l’adresse<br />
suivante : <strong>Honeywell</strong> Customer Relations, 1985 Douglas Dr, Golden Valley, MN 55422 ou composer le 1-888-235-6569.<br />
33-00020EFS—03 62
63 33-00020EFS—03
33-00020EFS-03<br />
Systèmes d’automatisation et de régulation<br />
<strong>Honeywell</strong> International Inc.<br />
1985 Douglas Drive North<br />
Golden Valley, MN 55422<br />
<strong>Honeywell</strong> Ltd<br />
705 Montrichard Avenue<br />
Saint-Jean-sur-Richelieu, Québec<br />
J2X 5K8<br />
yourhome.honeywell.com<br />
® Marque de commerce déposée américaine.<br />
Apple, iPhone, iPad, iPod touch et iTunes sont<br />
des marques de commerce de Apple Inc.<br />
Toutes les autres marques de commerce sont<br />
propriété de leurs propriétaires respectifs.<br />
© 2014 <strong>Honeywell</strong> International Inc.<br />
33-00020EFS—03 Rev. M.S. 02-14<br />
Imprimé aux États-Unis
Termostato <strong>Wi</strong><strong>Fi</strong><br />
<strong>9000</strong><br />
con control<br />
de voz<br />
Guía del usuario
Características del termostato con conexión <strong>Wi</strong><strong>Fi</strong><br />
Con el nuevo termostato, podrá realizar lo siguiente:<br />
• Conectarse a Internet para supervisar y controlar el sistema de calefacción/<br />
refrigeración.<br />
• Ver y modificar las configuraciones del sistema de calefacción/refrigeración.<br />
• Ver y configurar la temperatura y los cronogramas.<br />
• Recibir alertas por correo electrónico y obtener actualizaciones automáticas.<br />
• Ver la temperatura y humedad exterior (requiere configuración <strong>Wi</strong><strong>Fi</strong> y estar<br />
registrado).<br />
¿Necesita ayuda?<br />
Para obtener ayuda visite http://yourhome.honeywell.com,<br />
o llame gratis al: 1-888-235-6569<br />
33-00020EFS—03<br />
ii
Bienvenido<br />
Felicitaciones por la compra del termostato con pantalla táctil a color, programable con<br />
conexión <strong>Wi</strong><strong>Fi</strong> de <strong>Honeywell</strong>. Cuando se registre en Total Connect Comfort Solutions de<br />
<strong>Honeywell</strong>, puede supervisar y controlar de manera remota el sistema de calefacción<br />
y refrigeración de su hogar o empresa; puede permanecer conectado a su sistema de<br />
confort dondequiera que vaya.<br />
Total Connect Comfort de <strong>Honeywell</strong> es la solución perfecta si usted viaja<br />
frecuentemente, tiene un hogar de vacaciones, una empresa, o si administra una<br />
propiedad de inversión o, simplemente, busca tranquilidad.
Índice<br />
Acerca de su nuevo termostato<br />
Referencia rápida: uso doméstico................. 3<br />
Referencia rápida: uso empresarial............... 4<br />
Instalación<br />
Conexión de la red <strong>Wi</strong><strong>Fi</strong>................................ 6<br />
Registro del termostato en línea................... 9<br />
Funcionamiento<br />
Configuración de la hora y la fecha............. 13<br />
Configuración del ventilador........................ 14<br />
Configuración de la modalidad del sistema... 15<br />
Cronogramas predeterminados para<br />
ahorro de energía........................................ 16<br />
Ajuste de los cronogramas del programa.... 17<br />
Anulación de las programaciones:<br />
doméstico.................................................... 20<br />
Anulación de las programaciones:<br />
empresarial.................................................. 21<br />
<strong>Control</strong> de voz............................................. 22<br />
Visualización del estado del equipo............ 25<br />
Configuración del mantenimiento<br />
en vacaciones: doméstico........................... 26<br />
Configurar programación de días festivos/<br />
eventos: comercial....................................... 27<br />
Configuración de eventos<br />
personalizados: empresarial........................ 28<br />
Configuración de la programación<br />
de días festivos: empresarial....................... 30<br />
33-00020EFS—03 2<br />
Configuración de la anulación<br />
de días festivos: uso empresarial................ 31<br />
Inicio de la modalidad de ocupación:<br />
empresarial.................................................. 32<br />
Cómo personalizar el color de la pantalla... 33<br />
Configuración de las preferencias............... 34<br />
Limpieza de la pantalla del termostato........ 35<br />
Ajuste de las configuraciones<br />
de seguridad................................................ 36<br />
Tecnología Smart Response....................... 37<br />
Purga previa a la ocupación........................ 38<br />
Protección del compresor............................ 39<br />
Conversión automática................................ 40<br />
Configuración de<br />
preferencias avanzadas............................... 41<br />
Desconexión de la red <strong>Wi</strong><strong>Fi</strong>......................... 44<br />
Reconexión de su red <strong>Wi</strong><strong>Fi</strong>......................... 45<br />
Baja del termostato..................................... 46<br />
Cambio de la configuración del sistema...... 47<br />
Apéndices<br />
Preguntas frecuentes.................................. 53<br />
Cómo obtener ayuda y reaccionar<br />
ante las alertas............................................ 56<br />
Actualizaciones de software........................ 58<br />
Localización y solución de problemas......... 59<br />
Garantía limitada......................................... 62
Referencia rápida: uso doméstico<br />
HOGAR. Presione para visualizar la pantalla<br />
de inicio.<br />
VENTILADOR. Seleccione una modalidad<br />
para el ventilador.<br />
SISTEMA. Seleccione la modalidad del<br />
sistema (calefacción/refrigeración).<br />
MENÚ. Presione para visualizar las opciones.<br />
Comience aquí para configurar un cronograma<br />
del programa.<br />
Cronograma actual. Cambie la configuración<br />
de la temperatura y seleccione el<br />
mantenimiento temporal o permanente.<br />
Condiciones interiores. Muestra la<br />
temperatura y la humedad interior.<br />
Fecha y hora actuales.<br />
Estado actual. Muestra la modalidad del<br />
sistema (calefacción/refrigeración).<br />
Condiciones exteriores. Después de<br />
registrarla, se muestra la temperatura y la<br />
humedad exterior.<br />
3 33-00020EFS—03
Referencia rápida: uso empresarial<br />
33-00020EFS—03 4<br />
HOGAR. Presione para visualizar la pantalla de<br />
inicio.<br />
VENTILADOR. Seleccione una modalidad para<br />
el ventilador.<br />
SISTEMA. Seleccione la modalidad del sistema<br />
(calefacción/refrigeración).<br />
MENÚ. Presione para visualizar las opciones.<br />
Comience aquí para configurar un cronograma<br />
del programa.<br />
Ubicación del termostato. Identifique<br />
rápidamente qué termostato controla un sector<br />
determinado.<br />
Cronograma actual. Toque una flecha para<br />
cambiar la configuración de la temperatura y<br />
seleccionar una configuración temporal.<br />
Anulación. Toque esta opción para anular<br />
temporalmente el cronograma del programa.<br />
Condiciones interiores. Muestra la temperatura<br />
y la humedad interior.<br />
Fecha y hora actuales.<br />
Estado actual. Muestra la modalidad del sistema<br />
(calefacción/refrigeración).<br />
Condiciones exteriores. Después de registrarla,<br />
se muestra la temperatura y la humedad exterior.
Configuración del termostato<br />
Configurar el termostato con pantalla táctil, programable con conexión <strong>Wi</strong><strong>Fi</strong> es fácil.<br />
1<br />
2<br />
Conéctelo a su red inalámbrica doméstica.<br />
Regístrelo a través de Internet para obtener acceso remoto.<br />
5 33-00020EFS—03
Conexión de la red <strong>Wi</strong><strong>Fi</strong><br />
1 Conecte la red <strong>Wi</strong><strong>Fi</strong>.<br />
1a Toque MENÚ > Configuración <strong>Wi</strong><strong>Fi</strong>.<br />
-O-<br />
Toque Sí para conectar el termostato a su<br />
red <strong>Wi</strong><strong>Fi</strong>.<br />
En la pantalla, se visualiza el mensaje<br />
“Búsqueda de redes inalámbricas. Espere…”;<br />
luego, se muestra una lista de todas las redes<br />
<strong>Wi</strong><strong>Fi</strong> que se han encontrado..<br />
2 Seleccione la red.<br />
2a Toque el nombre de la red que desea<br />
utilizar. El termostato muestra una página<br />
de contraseña.<br />
¿Desea conectar este termostato a una red de<br />
<strong>Wi</strong><strong>Fi</strong> ahora?<br />
Público<br />
Configuración <strong>Wi</strong>-<strong>Fi</strong><br />
Sí<br />
MENÚ<br />
Su red<br />
Nota: En caso de que su red<br />
doméstica no aparezca en la lista,<br />
toque Reescanear.<br />
Vecino<br />
33-00020EFS—03 6
Conexión de la red <strong>Wi</strong><strong>Fi</strong><br />
2b Use el teclado para introducir la<br />
contraseña de su red doméstica.<br />
2c Toque Terminado. El termostato<br />
muestra el mensaje “Conectándose a<br />
su red. Espere...” y, luego, aparece la<br />
pantalla “Conexión satisfactoria.”<br />
2d Toque Siguiente para visualizar la<br />
pantalla de información de registro.<br />
2e Ingrese los números de identificación<br />
MAC y CRC de su termostato.<br />
Necesita estos números para<br />
completar el registro a través de<br />
Internet.<br />
Ingrese la contraseña de la red <strong>Wi</strong><strong>Fi</strong> para su red<br />
Su termostato se ha conectado<br />
sasfactoriamente a su red<br />
Terminado<br />
Siguiente<br />
7 33-00020EFS—03
Conexión de la red <strong>Wi</strong><strong>Fi</strong><br />
Para registrar su termostato, siga las<br />
instrucciones disponibles a partir de la página<br />
9.<br />
Nota: La pantalla Registro a través de Internet<br />
permanece activa hasta que haya completado<br />
el registro o hasta que toque Terminado.<br />
Nota: Si toca Terminado antes de registrarlo a<br />
través de Internet, la pantalla de inicio muestra<br />
un botón anaranjado de alerta que le informa<br />
que debe registrar su termostato. Al tocar<br />
dicho botón, aparece la información de registro<br />
y una opción para posponer dicha tarea.<br />
Regístrelo a<br />
través de<br />
Internet para<br />
obtener acceso<br />
remoto<br />
Presionar para info<br />
Terminado<br />
33-00020EFS—03 8
Registro del termostato en línea<br />
Para ver y configurar el termostato con<br />
conexión <strong>Wi</strong><strong>Fi</strong> de manera remota, debe<br />
tener una cuenta en Total Connect<br />
Comfort. Siga los siguientes pasos.<br />
1 Abra el sitio web Total Connect<br />
Comfort.<br />
Vaya a mytotalconnectcomfort.com<br />
M31570<br />
M31570<br />
9 33-00020EFS—03
Registro del termostato en línea<br />
2 Inicie sesión o cree una cuenta.<br />
Si tiene una cuenta, haga clic en<br />
Login (Inicio de sesión),<br />
o bien,<br />
haga clic en Create An Account<br />
(Crear una cuenta).<br />
2a Siga las instrucciones en la pantalla.<br />
2b Revise su correo electrónico para<br />
verificar si tiene un mensaje de<br />
activación de My Total Connect<br />
Comfort. Esto puede demorar varios<br />
minutos.<br />
Nota: Si no recibió un mensaje de<br />
activación, revise su correo no deseado o<br />
use otra dirección de correo electrónico.<br />
2c Siga las instrucciones de activación que<br />
se encuentran en el correo electrónico.<br />
2d Inicie sesión.<br />
33-00020EFS—03 10
Registro del termostato en línea<br />
3 Registre su termostato con<br />
conexión <strong>Wi</strong><strong>Fi</strong>.<br />
Después de que haya iniciado<br />
sesión en su cuenta Total Connect<br />
Comfort, registre el termostato.<br />
3a Siga las instrucciones en la<br />
pantalla. Después de añadir la<br />
ubicación del termostato, debe<br />
ingresar los datos particulares<br />
de su termostato, a saber:<br />
• MAC ID<br />
• MAC CRC<br />
Nota: Estas identificaciones se<br />
encuentran en la pantalla Registro a<br />
través de Internet o en la tarjeta de<br />
identificación del termostato que se<br />
incluye en el paquete del termostato.<br />
Las identificaciones no distinguen<br />
mayúsculas de minúsculas.<br />
<strong>Thermostat</strong> ID Card<br />
Use the MAC ID and CRC ID to register<br />
this product at mytotalconnectcomfort.com<br />
Carte d’identification de thermostat<br />
Utilisez l’identification MAC et l’identification CRC pour<br />
enregistrer ce produit à mytotalconnectcomfort.com<br />
Tarjeta de identificación del termostato<br />
Utilice la identificación MAC y la identificación CRC para<br />
inscribir este producto en mytotalconnectcomfort.com<br />
® U.S. Registered Trademark.<br />
© 2012 <strong>Honeywell</strong> International Inc.<br />
69-2723EFS—01 M.S. 04-12<br />
Printed in U.S.A.<br />
MAC ID<br />
(Número de<br />
identificación<br />
personal MAC)<br />
HONEYWELL MODEL: RTH8580WF<br />
MAC ID: MAC CRC:<br />
MAC CRC<br />
(Número de<br />
identificación<br />
personal CRC)<br />
69-2723EFS-01<br />
11 33-00020EFS—03
Registro del termostato en línea<br />
Cuando el termostato se haya<br />
registrado correctamente, la<br />
pantalla de registro de Total<br />
Connect Comfort le mostrará el<br />
mensaje REGISTRO EXITOSO.<br />
Ahora, puede controlar su<br />
termostato desde cualquier lugar<br />
a través de su computadora<br />
portátil, computadora tipo tableta<br />
o teléfono inteligente.<br />
La aplicación gratuita de<br />
Total Connect Comfort se<br />
encuentra disponible para<br />
los dispositivos Apple ®<br />
iPhone ® , iPad ® y iPod touch ®<br />
en iTunes ® o en Google Play ® ,<br />
para todos los dispositivos<br />
Android .<br />
GET IT ON<br />
Download on<br />
iTunes<br />
33-00020EFS—03 12
Configuración de la hora y la fecha<br />
1 Toque la hora actual. La pantalla<br />
muestra Configurar hora/Configurar fecha.<br />
2 Toque Configurar hora o Configurar fecha.<br />
3 Toque s o t hasta que aparezcan la<br />
hora y la fecha correctas.<br />
4 Toque Terminado para guardar o<br />
Cancelar para ignorar los cambios.<br />
Nota: Este termostato se actualizará<br />
automáticamente para el horario de<br />
verano (si se observa en su área) y<br />
almacena toda la información de fecha/<br />
hora. Si el termostato está conectado<br />
a <strong>Wi</strong>-<strong>Fi</strong> y registrado a Total Connect<br />
Comfort, la hora actual se actualiza desde<br />
el Internet.<br />
Vie, Jun 14, 2013<br />
6:30 pm<br />
Terminado<br />
13 33-00020EFS—03
Configuración del ventilador<br />
1 Toque la opción VENTILADOR para mostrar<br />
las configuraciones del ventilador.<br />
VENTILADOR<br />
2 Toque Encendido, Automático, Circulación o<br />
Seguir el cronograma.<br />
Terminado<br />
3 Toque Terminado para guardar y salir.<br />
Encendido: El ventilador está siempre<br />
encendido.<br />
Automático: El ventilador funciona<br />
solo cuando el sistema de calefacción o<br />
refrigeración está encendido.<br />
Circulación: El ventilador funciona de forma<br />
aleatoria, aproximadamente, el 35% del<br />
tiempo (uso doméstico únicamente).<br />
Seguir el cronograma: El ventilador<br />
está controlado mediante configuraciones<br />
programadas (consulte las páginas<br />
16-21).<br />
Note: Toque Automático (Auto) o Encendido<br />
para anular temporalmente el cronograma<br />
programado del ventilador.<br />
33-00020EFS—03 14
Configuración de la modalidad del sistema<br />
1 Toque SISTEMA para mostrar las<br />
configuraciones del sistema.<br />
2 Toque la opción deseada:<br />
Calefacción: El termostato controla<br />
solamente el sistema de calefacción.<br />
Refrigeración: El termostato controla<br />
solamente el sistema de refrigeración.<br />
Apagado: Se apagan los sistemas de<br />
calefacción/refrigeración.<br />
Automático: El termostato selecciona<br />
la calefacción o la refrigeración<br />
según fuera necesario, conforme a la<br />
temperatura interior.<br />
Calefacción de emergencia (bombas<br />
de calor con calefacción auxiliar):<br />
<strong>Control</strong>a la calefacción auxiliar/de<br />
emergencia. El compresor se bloquea.<br />
3 Toque Terminado para guardar y salir.<br />
Terminado<br />
SISTEMA<br />
Note: Es posible que no aparezcan<br />
las configuraciones del sistema<br />
Automático y Calefacción de<br />
emergencia; esto depende de<br />
cómo se instaló el termostato.<br />
15 33-00020EFS—03
Cronogramas predeterminados para ahorro de energía<br />
Este termostato usa las configuraciones de ahorro de energía predeterminadas<br />
que pueden disminuir los gastos de calefacción/refrigeración. Para personalizar el<br />
termostato, consulte la siguiente página.<br />
Uso doméstico<br />
Calefacción Refrigeración Calefacción Refrigeración<br />
Hora de (de lunes a (de lunes a (sábados y (sábados y<br />
Período inicio viernes) viernes) domingos) domingos)<br />
Despertar 6:00 am 70 °F (21.1 °C) 78 °F (25.5 °C) 70 °F (21.1 °C) 78 °F (25.5 °C)<br />
Salir 8:00 am 62 °F (16.6 °C) 85 °F (29.4 °C) 62 °F (16.6 °C) 85 °F (29.4 °C)<br />
Regresar 6:00 pm 70 °F (21.1 °C) 78 °F (25.5 °C) 70 °F (21.1 °C) 78 °F (25.5 °C)<br />
Dormir 10:00 pm 62 °F (16.6 °C) 82 °F (27.7 °C) 62 °F (16.6 °C) 82 °F (27.7 °C)<br />
Uso empresarial<br />
Período<br />
Hora de<br />
inicio<br />
Ocupado 1 8:00 am 70 °F (21.1 °C) 75 °F (23.8 °C) Encendido<br />
Desocupado 1 10:00 pm 55 °F (12.7 °C) 85 °F (29.4 °C) Automático<br />
Ocupado 2* 12:00 am 70 °F (21.1 °C) 75 °F (23.8 °C) Encendido<br />
Desocupado 2* 12:00 am 55 °F (12.7 °C) 85 °F (29.4 °C) Automático<br />
33-00020EFS—03 16<br />
Calor<br />
Refrigeración<br />
Ventilador<br />
* El período 2 se cancela de forma predeterminada. Si lo activa, los valores<br />
mostrados anteriormente se convierten en configuraciones predeterminadas.
Ajuste de los cronogramas del programa<br />
1 Toque MENÚ.<br />
2 Seleccione Crear/editar horario.<br />
• Toque Ver/editar para ver la<br />
programación completa y realizar<br />
ajustes rápidos.<br />
• Toque Guíame para crear una<br />
programación respondiendo<br />
preguntas simples.<br />
• Toque Lo haré yo mismo para crear<br />
de forma manual un cronograma del<br />
programa. Consulte la página 18.<br />
Nota: Para disminuir costos, use las<br />
configuraciones de ahorro de energía<br />
preestablecidas que se describen en la<br />
página 16.<br />
Crear / Editar horario<br />
MENÚ<br />
17 33-00020EFS—03
Ajuste de los cronogramas del programa<br />
Si seleccionó Lo haré yo mismo en la pantalla<br />
Crear/editar programación (página 17),<br />
siga los siguientes pasos:<br />
1 Seleccione los días para programar,<br />
toque Siguiente.<br />
2 Toque Despertar para establecer el<br />
horario del período Despertar para los<br />
días seleccionados.<br />
Siguiente<br />
6:00 am<br />
DESPERTAR<br />
33-00020EFS—03 18
Ajuste de los cronogramas del programa<br />
3 Presione s o t para configurar<br />
la temperatura de Calefacción y<br />
Refrigeración del período Despertar.<br />
Luego, toque Terminado.<br />
4 Toque otros períodos (Salir, Regresar,<br />
Dormir) para configurar la hora y las<br />
temperaturas para cada uno de ellos.<br />
5 Toque Terminado para guardar y salir.<br />
Nota: Toque Borrar período para eliminar los<br />
períodos no deseados.<br />
Nota: Toque Ventilador ajustes para<br />
personalizar las configuraciones del<br />
ventilador para cualquier período.<br />
Terminado<br />
19 33-00020EFS—03
Anulación de las programaciones: uso doméstico<br />
1 Toque s o t para configurar la<br />
temperatura (lado derecho de la<br />
pantalla) y la hora indicada en<br />
Sostener hasta (lado izquierdo). La<br />
programación se reanudará cuando<br />
finalice el tiempo de “Sostener hasta”.<br />
2 Toque Cambiar a sost. permanente para<br />
mantener la misma temperatura hasta<br />
que la cambie o reinicie el cronograma<br />
del programa.<br />
3 Toque Reiniciar Horario en cualquier<br />
momento para reanudar el cronograma<br />
del programa.<br />
Cambiar a<br />
sost. permanente<br />
33-00020EFS—03 20
Anulación de las programaciones: uso empresarial<br />
Toque s o t para configurar la temperatura.<br />
La temperatura nueva se mantendrá hasta el<br />
tiempo de “pausa” que usted configure.<br />
• Para cambiar el tiempo de pausa, toque los<br />
botones con flechas Sostener hasta. Puede<br />
configurar este tiempo hasta el tiempo<br />
máximo configurado en la pantalla Duración<br />
de la anulación en Preferencias avanzadas<br />
(página 41).<br />
• Toque Anulación para utilizar una temperatura<br />
de ocupación preestablecida si una persona<br />
usa la habitación durante un período<br />
desocupado. La nueva temperatura podrá<br />
mantenerse durante una hora y regularse hasta<br />
el tiempo máximo configurado en la pantalla<br />
Duración de la anulación en Preferencias<br />
avanzadas (página 41).<br />
El cronograma programado se reanudará<br />
cuando el temporizador de anulación finalice.<br />
Toque Reiniciar Horario en cualquier momento<br />
para reanudar el cronograma del programa.<br />
ANULACIÓN<br />
21 33-00020EFS—03
<strong>Control</strong> de voz<br />
Este termostato tiene una función de control<br />
MENÚ<br />
de voz que puede utilizar para “hablarle” al<br />
termostato. Esta función se activa o no durante la<br />
configuración inicial o siguiendo los pasos que se<br />
indican a continuación (consulte la página 8).<br />
Para usar el control de voz, siga estos pasos:<br />
1 Toque MENU y seleccione <strong>Control</strong> de voz.<br />
<strong>Control</strong> de voz<br />
2 Seleccione entre diferentes opciones:<br />
Voz activada/desactivada - activa o desactiva el<br />
control de voz. Cuando está desactivado, el<br />
termostato funciona como un termostato normal.<br />
Volumen - ajusta el volumen del altavoz del<br />
termostato.<br />
Sensibilidad - cambia la sensibilidad del receptor<br />
de audio del termostato. Mientras más alto<br />
sea el número, mayor receptividad tendrá el<br />
termostato a una orden de voz, pero existirá<br />
mayor probabilidad de que capte otra cosa como una orden que no fue dirigida a él.<br />
3 Para las órdenes disponibles, consulte la página 23 o<br />
wifithermostat.com/voicecommands<br />
33-00020EFS—03 22
<strong>Control</strong> de voz<br />
Para iniciar el control de voz, diga “Hello, thermostat” (Hola termostato) al termostato. El<br />
termostato responderá y usted puede decirle lo que desea que haga. Un intercambio<br />
común con el termostato utilizando el control de voz podría ser como sigue.<br />
1 “Hello, <strong>Thermostat</strong>.”<br />
(Hola termostato)<br />
Esta frase activa el control de voz.<br />
2 “Hello! Please say a command.”<br />
(¡Hola! Por favor dé una orden.)<br />
3 “Make it 5 degrees warmer / cooler.”<br />
(Sube / baja la temperatura 5 grados)<br />
Consulte la lista completa de las órdenes<br />
en la página 24.<br />
4 “One moment please… changing setpoint to…”<br />
(Un momento por favor... cambiando el punto<br />
de ajuste a...)<br />
Si el termostato no responde en el paso 2 o el 4, regrese al paso 1.<br />
Nota: Las órdenes de voz para este termostato son en inglés únicamente.<br />
23 33-00020EFS—03
<strong>Control</strong> de voz<br />
Órdenes disponibles:*<br />
“Make it warmer / cooler”:<br />
Cambia la configuración de la temperatura en<br />
1 grado F<br />
“Make it much warmer / cooler”:<br />
Cambia la configuración de la temperatura en<br />
4 grados F<br />
“Make it (1–10) degrees warmer / cooler”:<br />
El usuario selecciona los cambios en la<br />
configuración de temperatura entre<br />
1 y 10 grados F<br />
“I’m feeling hot / cold”:<br />
Cambia la configuración de la temperatura en<br />
1 grado F<br />
“What can I say?”:<br />
Proporciona una lista de órdenes disponibles<br />
*Para la lista de órdenes actual:<br />
wifithermostat.com/voicecommands<br />
33-00020EFS—03 24
Visualización del estado del equipo<br />
1 Toque MENÚ.<br />
2 Seleccione Estatus del equipo.<br />
3 Toque s o t para ver el estado de<br />
todos los equipos que controla su<br />
termostato. Según la manera en que<br />
se instaló su termostato, la pantalla<br />
de estado del equipo puede generar<br />
información sobre los siguientes<br />
sistemas:<br />
• Calefacción y refrigeración<br />
• Ventilador<br />
• Información del termostato<br />
Estatus del equipo<br />
MENÚ<br />
Terminado<br />
25 33-00020EFS—03
Configuración del mantenimiento en vacaciones: uso doméstico<br />
Esta función le permite ahorrar energía<br />
mientras se encuentra fuera de casa, y<br />
restituye las configuraciones de confort<br />
poco antes de que regrese a su casa.<br />
1 Toque MENÚ<br />
2 Seleccione Modo vacaciones.<br />
3 Toque s o t para seleccionar la<br />
fecha en que se marcha; luego, toque<br />
Siguiente para obtener más detalles<br />
sobre la programación; se incluyen<br />
horas del día, configuraciones de<br />
temperatura, fecha de regreso y<br />
configuraciones para el regreso.<br />
4 Revise lo que ha elegido en la última<br />
pantalla y toque Terminado para<br />
guardar sus configuraciones. Toque<br />
Previo; luego, Cancelar para ignorar los<br />
cambios.<br />
Modo vaciones<br />
MENÚ<br />
Siguiente<br />
Terminado<br />
33-00020EFS—03 26
Configurar programación de días festivos/eventos: uso comercial<br />
Esta función contribuye a conservar energía<br />
cuando el lugar de trabajo está desocupado<br />
durante eventos especiales o días festivos.<br />
1 Toque MENÚ.<br />
2 Seleccione Programador de vacaciones/eventos.<br />
3 Seleccione el ítem que desea programar.<br />
• Eventos personalizados le permite<br />
configurar otros días para programaciones<br />
especiales.<br />
• Las opciones de Días festivos de EE. UU<br />
y Canadá le permiten elegir de una lista<br />
de días festivos comúnmente observados<br />
en cada país.<br />
4 Elija según se le instruya en cada pantalla. Para<br />
obtener más información, consulte las dos páginas<br />
siguientes.<br />
5 Toque Terminado para guardar sus configuraciones.<br />
Programador de vacaiones /<br />
eventos<br />
Eventos personalizados<br />
MENÚ<br />
27 33-00020EFS—03
Configuración de eventos personalizados: uso empresarial<br />
Esta función le permite personalizar<br />
configuraciones de temperaturas para<br />
mantenerlas durante un evento específico.<br />
Puede configurar un evento para una fecha<br />
específica o un día del mes. El termostato<br />
reanuda la programación normal después<br />
del evento.<br />
1 Seleccione Eventos personalizados del<br />
menú Programación de días festivos/<br />
eventos.<br />
2 Seleccione Crear nuevo evento.<br />
Eventos personalizados<br />
Crear nuevo evento<br />
33-00020EFS—03 28
Configuración de eventos personalizados: uso empresarial<br />
3 Seleccione Fecha específica o Mes/Día<br />
de la semana.<br />
• Para la opción Fecha específica,<br />
debe seleccionar la fecha de inicio,<br />
las configuraciones, la fecha de<br />
finalización y la frecuencia del<br />
evento.<br />
• Para la opción Mes/Día de la<br />
semana, debe seleccionar un mes,<br />
un día de la semana, una semana<br />
del mes, las configuraciones, la<br />
duración del evento y la frecuencia<br />
del evento.<br />
4 Revise las configuraciones y toque<br />
Terminado para guardarlas. Toque<br />
Previo; luego, Cancelar para ignorar los<br />
cambios.<br />
Siguiente<br />
Terminado<br />
29 33-00020EFS—03
Configuración de la programación de días festivos: uso empresarial<br />
Esta función le permite personalizar configuraciones<br />
de temperaturas para mantenerlas durante días<br />
festivos nacionales específicos. El termostato<br />
reanuda la programación normal entre uno y otro<br />
día festivo seleccionado.<br />
1 Seleccione Días festivos de EE. UU. o Canadá del<br />
menú Programación de días festivos/evento.<br />
2 Seleccione Agregar/Editar días festivos. Aparecerá<br />
una lista de los días festivos nacionales.<br />
3 Toque la casilla al lado de cada día festivo<br />
en el cual desea mantener una configuración<br />
específica, (toque s o t para desplazarse por<br />
la lista de días festivos) y, luego, toque Siguiente.<br />
Configure la programación de días festivos<br />
para temperaturas de ocupado o desocupado,<br />
dependiendo si el edificio estará en uso.<br />
4 Toque s o t para seleccionar las temperaturas<br />
de calefacción y refrigeración.<br />
5 Revise las configuraciones y toque Terminado<br />
para guardarlas. Toque Previo; luego, Cancelar<br />
para ignorar los cambios.<br />
Siguiente<br />
33-00020EFS—03 30
Configuración de la anulación de días festivos: uso empresarial<br />
Esta función le permite personalizar<br />
MENÚ<br />
configuraciones de temperaturas para<br />
mantenerlas desde ahora hasta una fecha<br />
específica. El termostato reanuda la programación<br />
normal en la fecha que usted seleccione.<br />
Modalidad de día fest ivo<br />
1 Toque MENÚ.<br />
2 Seleccione Modalidad de día festivo para<br />
mostrar las temperaturas mientras usted se<br />
encuentra de vacaciones.<br />
3 Toque s o t para seleccionar las<br />
temperaturas de calefacción y refrigeración;<br />
luego, toque Siguiente para seleccionar la<br />
fecha de regreso.<br />
4 Revise las configuraciones y toque Terminado<br />
para guardarlas. Toque Previo; luego, Cancelar<br />
para ignorar los cambios.<br />
Nota: La temperatura de refrigeración solo se<br />
puede establecer en un valor más alto que<br />
la configuración del programa del período<br />
desocupado y la configuración de la temperatura<br />
de calefacción solo se puede establecer en un<br />
Terminado<br />
valor más bajo que la configuración del programa<br />
del período desocupado.<br />
31 33-00020EFS—03
Inicio de la modalidad de ocupación: uso empresarial<br />
Esta función mantiene la temperatura en un<br />
nivel de ahorro de energía hasta que toque<br />
Presionar para iniciar el período de ocupación.<br />
Cuando usted llegue, toque el botón para<br />
mantener una temperatura confortable<br />
mientras la habitación esté ocupada.<br />
Toque los botones s o t para configurar la<br />
temperatura o la hora de Sostener hasta. La<br />
temperatura se mantiene solamente hasta el<br />
tiempo que usted configuró. La temperatura<br />
regresa a un nivel para ahorro de energía<br />
después de que finalice el temporizador o el<br />
período “Ocupado”.<br />
Presione para iniciar el<br />
período de ocupación<br />
33-00020EFS—03 32
Cómo personalizar el color de la pantalla<br />
Puede personalizar la pantalla del termostato<br />
para adaptarla a su decoración.<br />
1 Toque Menú.<br />
2 Toque Temas de color.<br />
3 Elija el nombre de un color para usar en<br />
un fondo predeterminado o seleccione<br />
Personalizar para definir su propio color de<br />
fondo y texto.<br />
• Si selecciona el nombre de un color,<br />
la pantalla muestra un ejemplo a la<br />
izquierda. Toque Terminado para aceptar<br />
esa preferencia.<br />
• Si toca Personalizado, la pantalla le<br />
muestra instrucciones. Toque Siguiente<br />
para avanzar por las opciones; toque<br />
Terminado cuando esté satisfecho con<br />
sus cambios.<br />
Temas de color<br />
MENÚ<br />
Terminado<br />
Siguiente<br />
33 33-00020EFS—03
Configuración de las preferencias<br />
Las opciones del menú de preferencias le<br />
permiten seleccionar cómo el termostato<br />
muestra la información o responde ante<br />
ciertas situaciones.<br />
1 Toque MENÚ y seleccione Preferencias.<br />
2 Seleccione una opción y siga las<br />
instrucciones:<br />
• Recordatorios<br />
• Opciones del programa del servicio<br />
eléctrico<br />
• Luz posterior<br />
• Tecnología Smart Response<br />
• Preferencias avanzadas<br />
• Restablecer programación<br />
predeterminada<br />
3 Toque Terminado para guardar sus<br />
configuraciones. Toque Cancelar para<br />
ignorar los cambios.<br />
Preferencias<br />
MENÚ<br />
33-00020EFS—03 34
Limpieza de la pantalla del termostato<br />
Cuando selecciona la opción Limpiar<br />
pantalla, esta se bloquea para que no<br />
cambie accidentalmente la configuración<br />
mientras limpia.<br />
1 Toque MENÚ.<br />
2 Seleccione Limpiar pantalla. Una<br />
instrucción le pregunta si desea limpiar<br />
la pantalla durante 30 segundos.<br />
3 Toque Sí. Un contador de cuenta<br />
regresiva muestra el tiempo transcurrido<br />
hasta que se reactive la pantalla.<br />
Nota: NO rocíe ningún líquido directamente<br />
sobre el termostato. Rocíe los líquidos<br />
sobre un paño, después utilice el paño<br />
húmedo para limpiar la pantalla. Utilice<br />
agua o el limpiador para vidrios que utiliza<br />
en casa. Evite utilizar limpiadores abrasivos.<br />
Limpiar pantalla<br />
Sí<br />
MENÚ<br />
35 33-00020EFS—03
Ajuste de las configuraciones de seguridad<br />
Se pueden utilizar las opciones de seguridad<br />
para evitar cambios no autorizados en las<br />
configuraciones del sistema.<br />
1 Toque MENÚ y seleccione Configuraciones<br />
de seguridad.<br />
2 Seleccione Cambiar modo de bloqueo.<br />
3 Seleccione una opción y siga las<br />
instrucciones:<br />
Desbloqueado: Acceso total permitido.<br />
Parcialmente bloqueado: Solo se<br />
puede cambiar la temperatura.<br />
Totalmente bloqueado: Acceso no<br />
permitido.<br />
Nota: Si elige utilizar una contraseña para<br />
mayor seguridad, escríbala aquí para su<br />
referencia:<br />
Conf iguraciones de seguridad<br />
Cambiar modo<br />
de bloqueo<br />
MENÚ<br />
33-00020EFS—03 36
Tecnología Smart Response<br />
Esta característica (uso doméstico<br />
únicamente) permite que el termostato “sepa”<br />
cuánto demora el sistema de calefacción/<br />
refrigeración en alcanzar las configuraciones<br />
de temperatura programadas, de manera que<br />
se alcance esa temperatura a la hora que<br />
usted configuró.<br />
Por ejemplo: Configure la hora de despertarse<br />
a las 6:00 a. m. y la temperatura en 70 °F<br />
(21.1 °C). La calefacción se encenderá antes<br />
de las 6:00 a. m., para que la temperatura esté<br />
en 70 °F (21.1 °C) a las 6:00 a. m.<br />
Nota: Seleccione Tecnología Smart Response<br />
en el menú Preferencias (página 34).<br />
Se mostrará el mensaje “in recovery” (en<br />
recuperación) cuando el sistema esté activado<br />
antes de un período programado.<br />
37 33-00020EFS—03
Purga previa a la ocupación<br />
Esta función de uso empresarial<br />
enciende el ventilador de 1 a 3 horas<br />
antes del período “ocupado”, para brindar<br />
un ambiente de trabajo confortable<br />
cuando usted llegue.<br />
33-00020EFS—03 38
Protección del compresor<br />
El termostato conserva el compresor<br />
apagado durante unos minutos antes de<br />
volver a arrancar, para evitar daños al<br />
equipo. Durante el tiempo que permanece<br />
apagado, el mensaje “esperando por el<br />
equipo” se muestra en la pantalla.<br />
39 33-00020EFS—03
Conversión automática<br />
Esta función se usa en climas en los que el<br />
acondicionador de aire y la calefacción se<br />
utilizan durante el mismo día.<br />
Cuando el sistema está configurado<br />
en Automático, el termostato elige<br />
automáticamente cuándo calentar o<br />
refrigerar, según la temperatura interior.<br />
Las configuraciones de calefacción y<br />
refrigeración deben tener, al menos,<br />
una diferencia de tres grados. El<br />
termostato ajustará automáticamente<br />
las configuraciones para mantener esta<br />
diferencia de tres grados.<br />
Nota: Seleccione Conversión automática<br />
en la pantalla Conversión del sistema<br />
de calefacción y refrigeración que se<br />
encuentra en Preferencias avanzadas.<br />
Consulte la sección Configuración de<br />
preferencias avanzadas en la página 41).<br />
33-00020EFS—03 40
Configuración de preferencias avanzadas<br />
Puede cambiar las opciones en diversas funciones<br />
del sistema. Si bien muchas de las opciones,<br />
como las configuraciones que indican el idioma<br />
y la temperatura, son las mismas para todas<br />
configuraciones, existen otras que dependen del<br />
tipo de sistema que posea.<br />
1 Toque MENÚ. El termostato muestra una lista<br />
de opciones.<br />
2 Seleccione Preferencias > Preferencias<br />
avanzadas. El termostato muestra la primera<br />
pantalla de opciones que puede modificar.<br />
3 En cada pantalla, realice los cambios<br />
necesarios; luego, toque Siguiente para<br />
visualizar las nuevas opciones. Vuelva a realizar<br />
este paso hasta que haya realizado todos los<br />
cambios.<br />
Las tablas que figuran en las páginas 42-43<br />
explican las pantallas y las opciones disponibles<br />
en Preferencias avanzadas.<br />
4 Cuando haya implementado todas las<br />
modificaciones, presione Terminado para<br />
guardar y salir.<br />
Preferencias<br />
Preferencias avanzadas<br />
MENÚ<br />
Siguiente<br />
41 33-00020EFS—03
Configuración de preferencias avanzadas<br />
Opciones de Preferencias avanzadas (MENÚ > Preferencias ><br />
Preferencias avanzadas)<br />
Título de la pantalla<br />
Opciones de programación<br />
Escala de indicación de<br />
temperatura<br />
Cambio del sistema de<br />
calefacción y refrigeración<br />
Cantidad de períodos<br />
programados<br />
Duración de la purga previa<br />
a la ocupación *<br />
Tipo de anulación *<br />
Configuraciones y opciones<br />
Seleccione la opción No programable o Programable. La opción<br />
Programable usa programación predeterminada o personalizada<br />
para subir y bajar automáticamente las configuraciones de<br />
temperatura en distintos momentos del día.<br />
Seleccione Fahrenheit o Celsius.<br />
Seleccione <strong>Manual</strong> o Automático.<br />
Seleccione dos períodos por día o cuatro períodos por día.<br />
(Consulte la página 16).<br />
Seleccione cuánto tiempo funcionará el ventilador antes de cada<br />
período ocupado: Apagado, 1, 2 o 3 horas.<br />
Seleccione la opción Estándar (Standard) para mantener los<br />
períodos programados o la opción Iniciar la modalidad de<br />
ocupación para usar las configuraciones de ahorro de energía<br />
hasta que un usuario presione Iniciar ocupación.<br />
* Disponible cuando el termostato esté instalado en el modo comercial.<br />
33-00020EFS—03 42
Configuración de preferencias avanzadas<br />
Opciones de preferencias avanzadas (finalización)<br />
Título de la pantalla<br />
Duración de la anulación *<br />
Recuperación temprana<br />
para calefacción *<br />
Recuperación temprana<br />
para refrigeración *<br />
Límites de temperatura<br />
Bloqueo del teclado<br />
Formato del reloj<br />
Horario de verano<br />
Desplazamiento de pantalla<br />
en interiores<br />
Configuraciones y opciones<br />
Seleccione cuánto tiempo se debe mantener la temperatura<br />
durante una anulación: 1-10 horas o Sin límite.<br />
Seleccione No para comenzar la recuperación según la<br />
programación o Sí para aumentar la temperatura antes.<br />
Seleccione No para comenzar la recuperación según la<br />
programación o Sí para disminuir la temperatura temprano.<br />
Seleccione el límite mínimo de refrigeración y el límite máximo de<br />
calefacción.<br />
Seleccione Desbloqueado/Parcialmente bloqueado/Bloqueado.<br />
Seleccione 12 horas o 24 horas.<br />
Seleccione Desactivado (Off) o Activado (On). Si selecciona<br />
Activado (On), el sistema cambiará automáticamente el horario o<br />
la fecha según el horario de verano.<br />
Seleccione la cantidad de grados necesarios para desplazar<br />
la temperatura en interiores o el porcentaje para desplazar la<br />
humedad en interiores.<br />
* Disponible cuando el termostato esté instalado en el modo comercial.<br />
43 33-00020EFS—03
Desconexión de la red <strong>Wi</strong><strong>Fi</strong><br />
Si necesita desconectar el termostato de<br />
su red <strong>Wi</strong><strong>Fi</strong> (por ejemplo, para cambiar el<br />
enrutador), siga estos pasos:<br />
1 Toque MENÚ.<br />
2 Seleccione Configuración <strong>Wi</strong><strong>Fi</strong>.<br />
3 Toque Desconectar de la red. El<br />
termostato mostrará una pregunta para<br />
confirmar su selección.<br />
4 Toque Sí para confirmar que desea<br />
desconectarse de la red. El termostato<br />
mostrará la pantalla de configuración<br />
<strong>Wi</strong><strong>Fi</strong>.<br />
5 Toque OK para mostrar el menú.<br />
Configuración <strong>Wi</strong>-<strong>Fi</strong><br />
Su red<br />
Desconocido<br />
Desconectar de la red<br />
MENÚ<br />
¿Está seguro de que desea desconectarse de su<br />
red?<br />
Sí<br />
33-00020EFS—03 44
Reconexión de su red <strong>Wi</strong><strong>Fi</strong><br />
1 Toque MENÚ.<br />
2 Seleccione Configuración <strong>Wi</strong><strong>Fi</strong>.<br />
3 Toque el nombre de la red que desea<br />
utilizar. El termostato puede mostrar una<br />
página de contraseña.<br />
4 Para ingresar una contraseña, toque<br />
caracteres para deletrear su contraseña de<br />
red doméstica, luego toque Terminado.<br />
5 El termostato muestra “Conectándose a su<br />
red. Favor esperar...” luego una pantalla de<br />
“Conexión satisfactoria.”<br />
6 Toque Siguiente.<br />
• Si su termostato está registrado, verá la<br />
potencia de su señal y otra información<br />
del estatus. Toque Terminado.<br />
• Si la pantalla muestra “Regístrelo a<br />
través de Internet para obtener acceso<br />
remoto” siga las instrucciones de la<br />
página 9.<br />
Configuración <strong>Wi</strong>-<strong>Fi</strong><br />
MENÚ<br />
45 33-00020EFS—03
Baja del termostato<br />
Si usted retira el termostato de su cuenta<br />
en el sitio web Total Connect Comfort<br />
(por ejemplo, si se muda y deja el<br />
termostato), siga los siguientes pasos:<br />
1 Desde mytotalconnectcomfort.com,<br />
inicie sesión en su cuenta.<br />
2 En Mi cuenta, seleccione Editar mi<br />
perfil.<br />
3 Haga clic en el botón Borrar mi<br />
cuenta.<br />
Su termostato mostrará un botón<br />
anaranjado que sugiere Registrarlo a<br />
través de Internet.<br />
33-00020EFS—03 46
Cambio de la configuración del sistema<br />
Si el termostato se restablece a la configuración<br />
predeterminada en fábrica, debe cambiar la<br />
configuración del termostato para adaptarlo<br />
a su sistema de calefacción/refrigeración. Su<br />
contratista hizo esto cuando instaló el termostato.<br />
Siga estos pasos para configurar el termostato o<br />
llame a su contratista para que lo haga.<br />
1 Toque MENÚ. El termostato muestra una lista<br />
de opciones.<br />
2 Seleccione Configuración del sistema. El<br />
termostato muestra la primera pantalla de<br />
opciones que puede modificar.<br />
3 En cada pantalla, realice los cambios necesarios; luego,<br />
toque Siguiente para visualizar las nuevas opciones.<br />
Vuelva a realizar este paso hasta que haya realizado<br />
todos los cambios. Las tablas de las páginas 48-49<br />
explican las pantallas y las opciones de la configuración<br />
del sistema.<br />
4 Cuando haya implementado todas las modificaciones,<br />
presione Terminado para guardar y salir.<br />
Configuración del sistema<br />
MENÚ<br />
Siguiente<br />
Toque el botón de<br />
ayuda para obtener<br />
información sobre las<br />
opciones de la pantalla.<br />
47 33-00020EFS—03
Cambio de la configuración del sistema<br />
Note: Para obtener más información, toque el botón anaranjado de ayuda<br />
que se encuentra en cualquier pantalla.<br />
Opciones de la configuración del sistema (MENÚ > Configuración del sistema )<br />
Título de la pantalla<br />
Idioma<br />
Termostato instalado en<br />
Ubicación de su<br />
termostato<br />
<strong>Control</strong>es del termostato<br />
Tipo de sistema<br />
Tipo de sistema de<br />
calefacción/refrigeración<br />
por aire forzado<br />
Eficacia del sistema de<br />
calefacción<br />
Tipo de sistema de<br />
calefacción<br />
Configuraciones y opciones<br />
<strong>English</strong>/Français/Español.<br />
33-00020EFS—03 48<br />
Hogar/comercio (El termostato se utiliza en un ambiente residencial<br />
(predeterminado) o comercial).<br />
Toque el botón TERMOSTATO para mostrar una pantalla donde pueda<br />
ingresar un nombre personalizado utilizando un teclado numérico. Si<br />
tiene solo un termostato, puede dejarle el nombre como THERMOSTATO.<br />
En instalaciones comerciales, puede marcar una casilla para mostrar el<br />
nombre del termostato en la pantalla de inicio.<br />
Seleccione Calefacción o refrigeración o ambos (predeterminado).<br />
Seleccione Aire forzado (predeterminado), bomba de calor o agua caliente<br />
o vapor. Cada opción ofrece diferentes posibilidades en las siguientes<br />
pantallas.<br />
Seleccione el tipo de alimentación del sistema de aire forzado: Gas/fuel<br />
(predeterminado) o eléctrico.<br />
Seleccione Aire forzado de eficacia estándar (predeterminado) o Aire<br />
forzado de gran eficacia.<br />
Si seleccionó agua caliente o vapor en “Tipo de sistema”, seleccione el<br />
sistema de calefacción específico aquí.
Cambio de la configuración del sistema<br />
Cambio de la configuración del sistema (finalización)<br />
Título de la pantalla<br />
Cantidad de etapas de<br />
refrigeración<br />
Cantidad de etapas de<br />
calefacción<br />
<strong>Control</strong> del ventilador<br />
Tipo de válvula de<br />
cambio<br />
Cantidad de etapas del<br />
compresor de la bomba<br />
de calor<br />
Calefacción de reserva<br />
Configuraciones y opciones<br />
Seleccione 1 etapa (predeterminado) o 2 etapas. Si no está seguro,<br />
observe cuáles cables ha conectado: Cable ‘Y’ solamente (1 etapa) o ‘Y’ y<br />
‘Y2.’<br />
Seleccione 1 etapa (predeterminado) o 2 etapas. Si no está seguro,<br />
observe cuáles cables ha conectado: Cable ‘W’ solamente (1 etapa) o ‘W’ y<br />
‘W2.’<br />
Seleccione qué controla el ventilador: el termostato (predeterminado) o el<br />
sistema de calefacción.<br />
Si seleccionó la bomba de calor en “Tipo de sistema”, elija si utiliza una<br />
válvula de cambio de refrigeración (predeterminado) o una válvula de<br />
cambio de calefacción. Si no está seguro, observe cuáles cables ha<br />
conectado.<br />
Seleccione 1 etapa (predeterminado) o 2 etapas. Si no está seguro,<br />
observe cuáles cables ha conectado: Cable ‘Y’ solamente (1 etapa) o ‘Y’ y<br />
‘Y2.’<br />
Mediante No o Sí (predeterminado) puede determinar si tiene calefacción<br />
de reserva.<br />
49 33-00020EFS—03
Configuración del sistema<br />
Nota: Su contratista ya configuró su termostato.<br />
No es necesario que haga ninguna configuración.<br />
Siga estas instrucciones solo si restablece la<br />
configuración predeterminada en fábrica.<br />
Antes de conectarse a su red <strong>Wi</strong><strong>Fi</strong>, debe<br />
configurar las opciones iniciales del termostato<br />
para establecer su sistema de calefacción/<br />
refrigeración:<br />
• Idioma<br />
• Hogar o Comercial<br />
En otro momento, puede personalizar otras<br />
opciones.<br />
Siga las instrucciones que aparecen en la pantalla<br />
para seleccionar las opciones adecuadas.<br />
1 Toque el idioma que desea que el termostato<br />
muestre y, luego, toque Siguiente.<br />
2 Seleccione Instalación para el hogar o<br />
comercio, luego toque Siguiente.<br />
Siguiente<br />
Siguiente<br />
33-00020EFS—03 50
Configuración del sistema<br />
3 Toque Siguiente o identifique la<br />
ubicación del termostato—toque<br />
THERMOSTAT y siga el resto de las<br />
instrucciones.<br />
4 Seleccione lo que controlará su<br />
termostato y toque Siguiente.<br />
Nota: Para obtener más información, toque<br />
el botón anaranjado de ayuda que se<br />
encuentra en cualquier pantalla.<br />
Siguiente<br />
Siguiente<br />
51 33-00020EFS—03
Configuración del sistemato<br />
5 Seleccione el tipo de sistema y toque<br />
Siguiente. El tipo de sistema determina<br />
otras opciones para finalizar el proceso<br />
de configuración inicial. Utilice la lista<br />
de comprobación del paso 6d cuando<br />
haga uso de las opciones.<br />
6 Toque Siguiente después de hacer uso<br />
de las opciones de cada pantalla.<br />
7 Toque Terminado en la última pantalla.<br />
El termostato muestra una opción para<br />
conexión a su red <strong>Wi</strong>-<strong>Fi</strong>.<br />
Nota: Para obtener más información,<br />
toque el botón anaranjado de ayuda que<br />
se encuentra en cualquier pantalla.<br />
Siguiente<br />
33-00020EFS—03 52
Preguntas frecuentes<br />
P : ¿Mi termostato seguirá funcionando si pierdo la conexión <strong>Wi</strong><strong>Fi</strong>?<br />
R:<br />
Sí, el termostato pondrá en funcionamiento el sistema de calefacción o refrigeración<br />
con o sin conexión <strong>Wi</strong><strong>Fi</strong>.<br />
P : ¿Cómo encuentro la contraseña de mi enrutador?<br />
R:<br />
Comuníquese con el fabricante del enrutador o revise la documentación del<br />
enrutador.<br />
P : ¿Por qué el termostato no se conecta al enrutador <strong>Wi</strong><strong>Fi</strong> aunque se encuentren<br />
muy cerca?<br />
R:<br />
Verifique que la contraseña ingresada en el enrutador <strong>Wi</strong><strong>Fi</strong> sea correcta.<br />
P:<br />
No puedo registrar mi termostato en el sitio web Total Connect Comfort.<br />
R:<br />
Verifique que el termostato esté inscrito correctamente en su red doméstica <strong>Wi</strong><strong>Fi</strong>.<br />
Desde MENÚ > Configuración <strong>Wi</strong><strong>Fi</strong>, verifique el icono de la potencia de la señal<br />
<strong>Wi</strong><strong>Fi</strong>. Verifique que el enrutador <strong>Wi</strong><strong>Fi</strong> tenga una buena conexión a Internet. Verifique<br />
en su computadora que pueda abrir el sitio en mytotalconnectcomfort.com. Si no<br />
puede abrir el sitio, apague el módem de Internet durante algunos segundos y<br />
vuelva a encenderlo.<br />
53 33-00020EFS—03
Preguntas frecuentes<br />
P:<br />
Me registré en el sitio web Total Connect Comfort, pero no pude iniciar sesión<br />
con mi nueva cuenta.<br />
R:<br />
Revise su correo electrónico y asegúrese de haber recibido un mensaje de<br />
activación. Siga las instrucciones para activar su cuenta y, luego, inicie sesión en el<br />
sitio web.<br />
P:<br />
Me he registrado en el sitio web Total Connect Comfort y no he recibido un<br />
mensaje de confirmación por correo electrónico.<br />
R:<br />
Revise que el mensaje no esté en la carpeta Correo no deseado o Eliminados.<br />
P : ¿Hay alguna forma de ampliar la potencia de la señal?<br />
R:<br />
La mayoría de los enrutadores estándar se pueden configurar para que actúen<br />
como repetidores. También puede comprar e instalar un repetidor <strong>Wi</strong><strong>Fi</strong>.<br />
P:<br />
El termostato no está respondiendo a mis órdenes de voz en ninguna de las<br />
condiciones.<br />
R:<br />
Durante la configuración del dispositivo del termostato o en el Menú de control de<br />
voz, debe decir Sí al acuerdo de uso del dispositivo para activar el control de voz en<br />
el termostato. También verifique su conexión <strong>Wi</strong><strong>Fi</strong> ya que control de voz requiere la<br />
conexión <strong>Wi</strong><strong>Fi</strong> para funcionar.<br />
33-00020EFS—03 54
Preguntas frecuentes<br />
P:<br />
El termostato no está respondiendo a mi voz en ciertos lugares de mi hogar.<br />
R:<br />
Usted debe estar en una línea visual directa del termostato cuando utilice el control<br />
de voz. La distancia y la proximidad del uso dependen de ciertas condiciones, tales<br />
como los planos de planta, la ubicación del termostato y los niveles de sonido. Es<br />
posible que el control de voz no funcione correctamente cuando inicia las órdenes<br />
a una distancia superior a 15 pies (4.6 m), especialmente cuando se comunica<br />
alrededor de paredes, estructuras o desde otras habitaciones interiores.<br />
P : ¿Por qué le resulta difícil al termostato escuchar mi voz?<br />
R:<br />
Es posible que la configuración de sensibilidad esté demasiado baja. Configure a un<br />
número más alto. Consulte la página 22.<br />
P : ¿Por qué el termostato responde a voces que no están dirigidas a él?<br />
R:<br />
Es posible que la configuración de sensibilidad esté demasiado alta. Configure a un<br />
número más bajo. Consulte la página 22.<br />
55 33-00020EFS—03
Cómo obtener ayuda y reaccionar ante las alertas<br />
Su termostato proporciona dos tipos de<br />
asistencia. En caso de que estas opciones<br />
de asistencia no aclaren sus dudas,<br />
consulte las preguntas más frecuentes<br />
(páginas 53-54) y los consejos sobre<br />
la localización y solución de problemas<br />
(página 59).<br />
Ayuda en la pantalla<br />
La mayoría de las pantallas incluyen un<br />
botón anaranjado de ayuda.<br />
1 Toque Ayuda para visualizar las<br />
instrucciones de uso de la pantalla.<br />
2 Toque OK para volver a mostrar la<br />
pantalla original.<br />
Ayuda<br />
OK<br />
33-00020EFS—03 56
Cómo obtener ayuda y reaccionar ante las alertas<br />
Alertas de pantalla<br />
Su pantalla principal mostrará un botón<br />
grande anaranjado cuando necesite<br />
corregir una configuración o un problema<br />
del sistema.<br />
1 Toque el botón, el termostato muestra<br />
instrucciones para finalizar la tarea<br />
sobre la cual se le alertó.<br />
2 Toque OK en la pantalla de<br />
instrucciones y luego lleve a cabo la<br />
tarea. Cuando la tarea haya finalizado,<br />
el botón de alerta no seguirá<br />
mostrándose.<br />
Reemplace<br />
el filtro de<br />
aire<br />
Presionar para info<br />
OK<br />
57 33-00020EFS—03
Actualizaciones del software<br />
<strong>Honeywell</strong> realiza actualizaciones<br />
periódicas del software para este<br />
termostato. Las actualizaciones se<br />
efectúan automáticamente a través de su<br />
conexión <strong>Wi</strong><strong>Fi</strong>. Todas sus configuraciones<br />
permanecen guardadas, de modo que no<br />
necesita hacer cambios después de que<br />
ocurra la actualización.<br />
Las actualizaciones se realizan durante<br />
las primeras horas del día. Una vez que<br />
su termostato reciba el software, este<br />
se reinicia y se muestra brevemente el<br />
logotipo de <strong>Honeywell</strong>. Luego, la pantalla<br />
muestra el mensaje “Actualizando el<br />
software...” y se observa una barra<br />
de progreso verde. Cuando finaliza<br />
la actualización, su pantalla de inicio<br />
aparecerá como es habitual.<br />
Nota: Si no está conectado a <strong>Wi</strong><strong>Fi</strong> ni<br />
registrado en Total Connect Comfort, no<br />
recibirá actualizaciones automáticas.<br />
33-00020EFS—03 58
Localización y solución de problemas<br />
Si tiene dificultades con el termostato, intente seguir las sugerencias que se indican<br />
a continuación. La mayoría de los problemas se pueden solucionar de manera fácil y<br />
rápida.<br />
La pantalla<br />
está en blanco<br />
El sistema de<br />
calefacción o<br />
refrigeración no<br />
responde<br />
• Revise el interruptor de circuito y, si es necesario, reinícielo.<br />
• Asegúrese de que el interruptor de energía del sistema de calefacción y<br />
refrigeración esté encendido.<br />
• Asegúrese de que la puerta del sistema de calefacción esté bien cerrada.<br />
• Toque SISTEMA para configurar el sistema a Calefacción. Asegúrese de<br />
que la temperatura sea más alta que la temperatura interior.<br />
• Toque SISTEMA para configurar el sistema a Refrigeración. Asegúrese de<br />
que la temperatura sea más baja que la temperatura interior.<br />
• Revise el interruptor de circuito y, si es necesario, reinícielo.<br />
• Asegúrese de que el interruptor de energía del sistema de calefacción y<br />
refrigeración esté encendido.<br />
• Asegúrese de que la puerta del sistema de calefacción esté bien cerrada.<br />
• Si, en la pantalla, aparece “Esperar” (“Wait”), el temporizador de<br />
protección del compresor está encendido. Espere cinco minutos para que<br />
el sistema se vuelva a iniciar de forma segura, sin dañar el compresor<br />
(consulte la página 39).<br />
59 33-00020EFS—03
Glosario<br />
Sistema de refrigeración/calefacción de bomba de calor<br />
Las bombas de calor se utilizan para calentar y refrigerar una casa. Si su termostato existente<br />
tiene una configuración de calefacción auxiliar o de emergencia, es probable que tenga una<br />
bomba de calor.<br />
Sistema de calefacción/refrigeración convencional<br />
Estos sistemas no cuentan con una bomba de calor. Incluyen controladores de aire, equipos de<br />
calefacción o calderas que funcionan con gas natural, aceite o electricidad. Pueden o no incluir un<br />
aire acondicionado.<br />
MAC ID, MAC CRC<br />
Códigos alfanuméricos que identifican de forma exclusiva al termostato.<br />
33-00020EFS—03 60
Información reguladora<br />
Declaración de conformidad con las regulaciones FCC<br />
(Sección 15.19) (solo en los EE. UU.)<br />
Este dispositivo cumple con la Sección 15 de las regulaciones<br />
FCC. El funcionamiento está sujeto a las dos condiciones<br />
siguientes:<br />
1 Este dispositivo no debe causar interferencia perjudicial.<br />
2 Este dispositivo deberá aceptar cualquier interferencia que<br />
se reciba, incluso la interferencia que pudiese causar el<br />
funcionamiento no deseado.<br />
Advertencia de la FCC (Sección 15.21) (solo en los EE.<br />
UU.)<br />
Los cambios o las modificaciones que no hayan sido<br />
expresamente aprobados por la parte responsable del<br />
cumplimiento de las regulaciones podrían anular la autoridad<br />
del usuario para hacer funcionar el equipo.<br />
Declaración de la FCC sobre interferencias (Sección<br />
15.105(b)) (solo en los EE. UU.)<br />
Este equipo fue probado y cumple con los límites de los<br />
dispositivos digitales clase B, conforme a la Sección 15 de<br />
las regulaciones FCC. Estos límites están diseñados para<br />
ofrecer una protección razonable contra la interferencia<br />
perjudicial en una instalación residencial. Este equipo genera<br />
usos y puede irradiar energía de frecuencia de radio y, si no<br />
se instala y se utiliza según las instrucciones, puede producir<br />
una interferencia perjudicial en la comunicación radial. Sin<br />
embargo, no se garantiza que no habrá interferencia en una<br />
instalación particular. Si este equipo produce una interferencia<br />
perjudicial en la recepción televisiva o radial, lo cual puede<br />
determinarse al apagar y encender el equipo, se recomienda<br />
que el usuario intente corregir la interferencia con una o más<br />
de las siguientes medidas:<br />
• Vuelva a orientar y ubicar la antena receptora.<br />
• Aumente la distancia entre el equipo y el receptor.<br />
• Conecte el equipo a un tomacorriente en un circuito<br />
diferente a aquel en el que está conectado el receptor.<br />
• Consulte con su distribuidor o con un técnico experto en<br />
radio/televisión para recibir ayuda.<br />
Sección 7.1.2 de RSS-GEN<br />
De acuerdo con las regulaciones de la industria de Canadá,<br />
este transmisor de radio puede funcionar únicamente utilizando<br />
un tipo de antena y una ganancia máxima (o inferior) aprobada<br />
para el transmisor por la industria de Canadá. Para disminuir la<br />
interferencia potencial del radio con otros usuarios, el tipo de<br />
antena y su ganancia deben ser elegidas de tal forma que la<br />
potencia isótropa radiada equivalente (e.i.r.p.) no sea mayor de<br />
lo necesario para una comunicación eficaz.<br />
Sección 7.1.3 de RSS-GEN<br />
El funcionamiento está sujeto a las dos condiciones siguientes:<br />
1 Este dispositivo no debe causar interferencia.<br />
2 Este dispositivo deberá aceptar cualquier interferencia,<br />
incluso la interferencia que pudiese causar el<br />
funcionamiento no deseado del dispositivo.<br />
61 33-00020EFS—03
Garantía limitada de 5 años<br />
<strong>Honeywell</strong> garantiza este producto, a excepción de la batería, por el término de cinco (5) años contra cualquier defecto<br />
de fabricación o de los materiales, a partir de la fecha de compra por parte del consumidor, en condiciones normales de<br />
uso y servicio. Si en cualquier momento durante el período de garantía se verifica que el producto tiene un defecto o que<br />
funciona mal, <strong>Honeywell</strong> lo reparará o reemplazará (a elección de <strong>Honeywell</strong>).<br />
Si el producto está defectuoso,<br />
(i) llévelo al lugar donde lo compró, junto con la factura de compra u otra prueba de compra que incluya la fecha en la<br />
que compró el producto; o<br />
(ii) comuníquese con el Servicio de Atención al Cliente de <strong>Honeywell</strong>, llamando al 1-888-235-6569. En el Servicio de<br />
Atención al Cliente, determinarán si el producto debe ser devuelto a la siguiente dirección: <strong>Honeywell</strong> Return Goods,<br />
Dock 4 MN10-3860, 1885 Douglas Dr. N., Golden Valley, MN 55422, o si se le puede enviar un producto de reemplazo.<br />
Esta garantía no cubre los gastos de remoción ni de reinstalación. Esta garantía no se aplicará si <strong>Honeywell</strong> demuestra<br />
que el defecto o funcionamiento inadecuado fue causado por daños que se produjeron mientras el producto estuvo en<br />
posesión de un consumidor. La única responsabilidad de <strong>Honeywell</strong> será la de reparar o reemplazar el producto dentro<br />
de los términos mencionados anteriormente. HONEYWELL NO SERÁ RESPONSABLE POR LA PÉRDIDA NI EL DAÑO<br />
DE NINGÚN TIPO, QUE INCLUYE CUALQUIER DAÑO INCIDENTAL O CONSECUENTE QUE RESULTE, DIRECTA O<br />
INDIRECTAMENTE, DE CUALQUIER INCUMPLIMIENTO DE CUALQUIER GARANTÍA, EXPRESA O IMPLÍCITA, O DE<br />
CUALQUIER OTRA FALLA DE ESTE PRODUCTO. Algunos estados no permiten la exclusión o limitación de los daños<br />
incidentales o consecuentes, por lo que esta limitación podría no aplicarse en su caso.<br />
ESTA GARANTÍA ES LA ÚNICA GARANTÍA EXPRESA QUE HONEYWELL REALIZA SOBRE ESTE PRODUCTO.<br />
LA DURACIÓN DE CUALQUIERA DE LAS GARANTÍAS IMPLÍCITAS, INCLUIDAS LAS GARANTÍAS DE APTITUD E<br />
IDONEIDAD PARA UN FIN DETERMINADO, QUEDA, POR EL PRESENTE, LIMITADA A LA DURACIÓN DE CINCO<br />
AÑOS DE ESTA GARANTÍA. Algunos estados no permiten limitaciones en relación con la duración de una garantía<br />
implícita, de manera tal que la limitación anterior puede no aplicarse en su caso.<br />
Esta garantía le otorga derechos legales específicos, pero es posible que usted goce de otros derechos que varían de<br />
un estado a otro. Si tiene preguntas acerca de esta garantía, escriba a <strong>Honeywell</strong> Customer Relations, 1985 Douglas<br />
Dr., Golden Valley, MN 55422 o llame al 1-888-235-6569.<br />
33-00020EFS—03 62
33-00020EFS-03<br />
Automatización y control desenlace<br />
<strong>Honeywell</strong> International Inc.<br />
1985 Douglas Drive North<br />
Golden Valley, MN 55422<br />
<strong>Honeywell</strong> Ltd<br />
705 Montrichard Avenue<br />
Saint-Jean-sur-Richelieu, Québec<br />
J2X 5K8<br />
yourhome.honeywell.com<br />
® Marca Registrada en los E.U.A.<br />
Apple, iPhone, iPad, iPod touch y iTunes son marcas comerciales de Apple Inc.<br />
Todas las demás marcas comerciales son propiedad de sus respectivos dueños.<br />
© 2014 <strong>Honeywell</strong> International Inc.<br />
33-00020EFS—03 Rev. M.S. 02-14<br />
Impreso en EE. UU.


