National Gypsum Construction Guide - 12th Edition
National Gypsum Construction Guide - 12th Edition
National Gypsum Construction Guide - 12th Edition

You also want an ePaper? Increase the reach of your titles
YUMPU automatically turns print PDFs into web optimized ePapers that Google loves.
INSTALLATION<br />
INTERIOR APPLICATIONS<br />
WALL FRAMING: Studs<br />
should be spaced a maximum<br />
of 8" o.c. Edges/ends of<br />
PermaBase Flex parallel to<br />
framing should be continuously<br />
supported. Provide additional<br />
blocking when necessary to<br />
permit proper PermaBase Flex<br />
attachment. Do not install<br />
PermaBase Flex directly over<br />
protrusions from stud plane<br />
such as heavy brackets or fastener<br />
heads.<br />
Studs above a shower floor<br />
should be either notched or<br />
furred to accommodate the<br />
thickness of the waterproof<br />
membrane or pan. The surround<br />
opening for a tub or precast<br />
shower receptor should<br />
not be more than 1/4" longer<br />
than unit to be installed.<br />
CEILING FRAMING: The<br />
deflection of the complete ceiling<br />
assembly due to dead load<br />
(including insulation,<br />
PermaBase Flex, bonding<br />
material and facing material)<br />
should not exceed L/360. The<br />
dead load applied to the ceiling<br />
frame should not exceed<br />
10 psf. Ceiling joist or furring<br />
channel should not exceed 8"<br />
o.c. Edges of PermaBase Flex<br />
parallel to framing should be<br />
continuously supported.<br />
Provide additional blocking<br />
when necessary to permit<br />
proper PermaBase attachment.<br />
PERMABASE FLEX CEMENT<br />
BOARD: Apply PermaBase<br />
Flex with ends and edges<br />
closely butted but not forced<br />
together. Stagger end joints in<br />
successive courses. Drive fasteners<br />
into field of cement<br />
board first, working toward<br />
ends and edges. Space fasteners<br />
maximum 8" o.c. for walls,<br />
6" o.c. for ceilings with perimeter<br />
fasteners at least 3/8" and<br />
less than 5/8" from ends and<br />
edges. Ensure PermaBase Flex<br />
is tight to framing.<br />
JOINT REINFORCEMENT:<br />
Trowel bonding material to<br />
completely fill the tapered<br />
recessed board joints and gaps<br />
between each panel. On nontapered<br />
joints apply a 6" wide,<br />
approx. 1/16" thick coat of<br />
bonding material over entire<br />
joint. For all joints, immediately<br />
embed 2" alkali-resistant<br />
fiberglass mesh tape fully into<br />
applied bonding material and<br />
allow to cure. Same bonding<br />
material should be applied to<br />
corners, control joints, trims or<br />
other accessories. Feather<br />
bonding material over fasteners<br />
to fully conceal.<br />
EXTERIOR APPLICATIONS<br />
WALL FRAMING: Studs<br />
should be spaced a maximum<br />
of 8" o.c. Edges/ends of<br />
PermaBase Flex parallel to<br />
framing should be continuously<br />
supported. Provide additional<br />
blocking when necessary to<br />
permit proper PermaBase Flex<br />
attachment. Do not install<br />
PermaBase Flex directly over<br />
protrusions from stud plane<br />
such as heavy brackets or fastener<br />
heads.<br />
WEATHER BARRIER: While<br />
PermaBase Flex is unaffected<br />
by moisture, a water barrier<br />
must be installed to protect the<br />
cavity. It should be installed<br />
according to the manufacturer‘s<br />
specifications.<br />
CEILING FRAMING: The<br />
deflection of the complete ceiling<br />
assembly due to dead load<br />
(including insulation,<br />
PermaBase Flex, bonding<br />
material and facing material)<br />
should not exceed L/360. The<br />
dead load applied to the ceiling<br />
frame should not exceed<br />
10 psf. Ceiling joist or furring<br />
channel should not exceed 8"<br />
o.c. (Edges of PermaBase Flex<br />
parallel to framing should be<br />
continuously supported.)<br />
Provide additional blocking<br />
when necessary to permit<br />
proper PermaBase Flex attachment.<br />
PERMABASE FLEX CEMENT<br />
BOARD: Apply PermaBase<br />
Flex with ends and edges<br />
closely butted but not forced<br />
together. Stagger end joints in<br />
successive courses. Drive fasteners<br />
into field of cement<br />
board first, working toward<br />
ends and edges. Space fasteners<br />
maximum 8" o.c. for walls,<br />
6" o.c. for ceilings with perimeter<br />
fasteners at least 3/8" and<br />
less than 5/8" from ends and<br />
Interior Installation<br />
Exterior Installation<br />
edges. Ensure PermaBase Flex<br />
is tight to framing.<br />
JOINT REINFORCEMENT:<br />
Trowel bonding material to<br />
completely fill the tapered<br />
recessed board joints and gaps<br />
between each panel. On nontapered<br />
joints apply a 6" wide,<br />
approx. 1/16" thick coat of<br />
bonding material over entire<br />
joint. For all joints, immediately<br />
embed 4" alkali-resistant<br />
fiberglass mesh tape fully into<br />
applied bonding material and<br />
allow to cure. Same bonding<br />
material should be applied to<br />
corners, control joints, trims or<br />
other accessories. Feather<br />
bonding material over fasteners<br />
to fully conceal.<br />
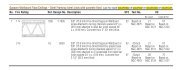
CONTROL JOINTS: For interior<br />
installations, allow a maximum<br />
of 30 lineal feet between<br />
control joints. For exterior<br />
installations, allow a maximum<br />
of 16 lineal feet between control<br />
joints. (For exterior tile<br />
09 28 00/NGC<br />
applications, control joints<br />
should be used a maximum of<br />
every 12'.) A control joint must<br />
be installed but not limited to<br />
the following locations: where<br />
expansion joints occur in the<br />
framing or building (discontinue<br />
all cross furring members<br />
located behind joint); when<br />
boards abut dissimilar materials;<br />
where framing material<br />
changes; at changes at building<br />
shape or structural system; at<br />
each story separation. Place<br />
control joints at corners of window<br />
and door openings, or follow<br />
specifications of architect.<br />
GENERAL: All framing should<br />
comply with local building<br />
code requirements and be<br />
designed to provide support<br />
with a maximum allowable<br />
deflection of L/360 under all<br />
intended live (including wind)<br />
and dead loads.<br />
PERMABASE ® BRAND CEMENT BOARD<br />
155<br />
09 28 00