hebt-5v bun toaster - AJ Antunes & Co.
hebt-5v bun toaster - AJ Antunes & Co.
hebt-5v bun toaster - AJ Antunes & Co.

You also want an ePaper? Increase the reach of your titles
YUMPU automatically turns print PDFs into web optimized ePapers that Google loves.
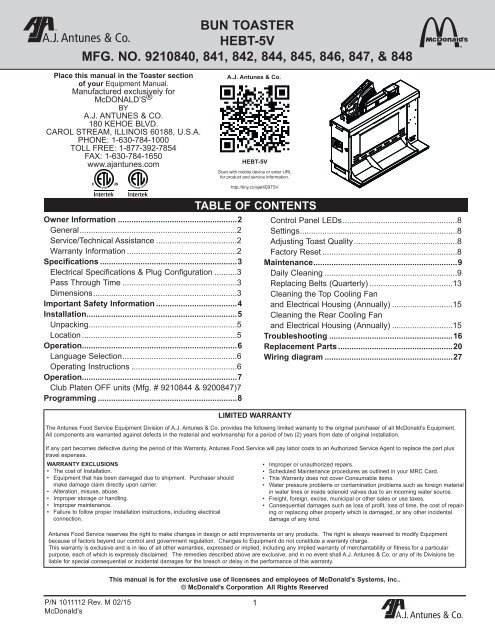
BUN TOASTER<br />
A.J. <strong>Antunes</strong> & <strong>Co</strong>.<br />
HEBT-5V HEBT-5V BUN TOASTER<br />
MFG. NO. 9210840, 841, 842, 844, 845, 846, 847, & 848<br />
Place this manual in the Toaster section<br />
of your Equipment Manual.<br />
Manufactured exclusively for<br />
McDONALD’S ®<br />
BY<br />
A.J. ANTUNES & CO.<br />
180 KEHOE BLVD.<br />
CAROL STREAM, ILLINOIS 60188, U.S.A.<br />
PHONE: 1-630-784-1000<br />
TOLL FREE: 1-877-392-7854<br />
FAX: 1-630-784-1650<br />
www.ajantunes.com<br />
A.J. <strong>Antunes</strong> & <strong>Co</strong>.<br />
HEBT-5V<br />
Scan with mobile device or enter URL<br />
for product and service information.<br />
Owner Information......................................................2<br />
General.......................................................................2<br />
Service/Technical Assistance.....................................2<br />
Warranty Information..................................................2<br />
Specifications..............................................................3<br />
Electrical Specifications & Plug <strong>Co</strong>nfiguration...........3<br />
Pass Through Time....................................................3<br />
Dimensions.................................................................3<br />
Important Safety Information.....................................4<br />
Installation...................................................................5<br />
Unpacking...................................................................5<br />
Location......................................................................5<br />
Operation.....................................................................6<br />
Language Selection....................................................6<br />
Operating Instructions................................................6<br />
Operation.....................................................................7<br />
Club Platen OFF units (Mfg. # 9210844 & 9200847).7<br />
Programming...............................................................8<br />
http://tiny.cc/ajaHEBT5V<br />
TABLE OF CONTENTS<br />
LIMITED WARRANTY<br />
<strong>Co</strong>ntrol Panel LEDs....................................................8<br />
Settings.......................................................................8<br />
Adjusting Toast Quality...............................................8<br />
Factory Reset.............................................................8<br />
Maintenance.................................................................9<br />
Daily Cleaning............................................................9<br />
Replacing Belts (Quarterly)......................................13<br />
Cleaning the Top <strong>Co</strong>oling Fan<br />
and Electrical Housing (Annually)............................15<br />
Cleaning the Rear <strong>Co</strong>oling Fan<br />
and Electrical Housing (Annually)............................15<br />
Troubleshooting........................................................16<br />
Replacement Parts....................................................20<br />
Wiring diagram..........................................................27<br />
The <strong>Antunes</strong> Food Service Equipment Division of A.J. <strong>Antunes</strong> & <strong>Co</strong>. provides the following limited warranty to the original purchaser of all McDonald’s Equipment.<br />
All components are warranted against defects in the material and workmanship for a period of two (2) years from date of original installation.<br />
If any part becomes defective during the period of this Warranty, <strong>Antunes</strong> Food Service will pay labor costs to an Authorized Service Agent to replace the part plus<br />
travel expenses.<br />
WARRANTY EXCLUSIONS<br />
• The cost of Installation.<br />
• Equipment that has been damaged due to shipment. Purchaser should<br />
make damage claim directly upon carrier.<br />
• Alteration, misuse, abuse.<br />
• Improper storage or handling.<br />
• Improper maintenance.<br />
• Failure to follow proper Installation instructions, including electrical<br />
connection.<br />
• Improper or unauthorized repairs.<br />
• Scheduled Maintenance procedures as outlined in your MRC Card.<br />
• This Warranty does not cover <strong>Co</strong>nsumable items.<br />
• Water pressure problems or contamination problems such as foreign material<br />
in water lines or inside solenoid valves due to an incoming water source.<br />
• Freight, foreign, excise, municipal or other sales or use taxes.<br />
• <strong>Co</strong>nsequential damages such as loss of profit, loss of time, the cost of repairing<br />
or replacing other property which is damaged, or any other incidental<br />
damage of any kind.<br />
<strong>Antunes</strong> Food Service reserves the right to make changes in design or add improvements on any products. The right is always reserved to modify Equipment<br />
because of factors beyond our control and government regulation. Changes to Equipment do not constitute a warranty charge.<br />
This warranty is exclusive and is in lieu of all other warranties, expressed or implied, including any implied warranty of merchantability or fitness for a particular<br />
purpose, each of which is expressly disclaimed. The remedies described above are exclusive, and in no event shall A.J. <strong>Antunes</strong> & <strong>Co</strong>. or any of its Divisions be<br />
liable for special consequential or incidental damages for the breach or delay in the performance of this warranty.<br />
This manual is for the exclusive use of licensees and employees of McDonald’s Systems, Inc..<br />
© McDonald’s <strong>Co</strong>rporation All Rights Reserved<br />
P/N 1011112 Rev. M 02/15<br />
McDonald’s<br />
1<br />
A.J. <strong>Antunes</strong> & <strong>Co</strong>.
HEBT-5V BUN TOASTER<br />
General<br />
This manual provides the safety, installation, and<br />
operating procedures for this unit. Please read this<br />
manual prior to installing and operating the unit.<br />
This unit is manufactured from the finest materials<br />
available and assembled to Roundup’s strict quality<br />
standards. This unit has been tested at the factory to<br />
ensure dependable trouble-free operation.<br />
OWNER INFORMATION<br />
Fill in the information below and have it handy when<br />
calling your Authorized Service Agency for assistance.<br />
The serial number is on the specification plate located<br />
on the rear of the unit.<br />
Purchased From:<br />
Date of Purchase:<br />
Model No.:<br />
Service/Technical Assistance<br />
If you experience any problems with the installation or<br />
operation of your unit, contact your Authorized Service<br />
Agency.<br />
Warranty Information<br />
Please read the full text of the Limited Warranty in this<br />
manual.<br />
If the unit arrives damaged, contact the carrier immediately<br />
and file a damage claim with them. Save all<br />
packing materials when filing a claim. Freight damage<br />
claims are the responsibility of the purchaser and are<br />
not covered under warranty.<br />
The warranty does NOT extend to:<br />
• Damages caused in shipment or damage as result<br />
of improper use.<br />
• Installation of electrical service.<br />
• Normal maintenance as outlined in this manual.<br />
• Malfunction resulting from improper maintenance.<br />
Serial No.:<br />
Mfg. No.:<br />
Network ID Number:<br />
Refer to the service agency directory packaged with<br />
your manual and fill in the information below:<br />
Authorized Service Agency<br />
Name:<br />
Phone No.:<br />
Address:<br />
Use only genuine Roundup replacement parts in this<br />
unit. Use of replacement parts other than those supplied<br />
by the manufacturer will void the warranty. Your<br />
Authorized Service Agency has been factory trained<br />
and has a complete supply of parts for this <strong>toaster</strong>.<br />
You may also contact the factory at 1-877-392-7854<br />
(North America only), or 630-784-1000 if you have<br />
trouble locating your local Authorized Service Agency.<br />
• Damage caused by abuse or careless handling.<br />
• Damage from moisture into electrical components.<br />
• Damage from tampering with, removal of, or<br />
changing any preset control or safety device.<br />
IMPORTANT! Keep these instructions for future reference. If the unit<br />
changes ownership, be sure this manual accompanies the equipment.<br />
A.J. <strong>Antunes</strong> & <strong>Co</strong>.<br />
2<br />
P/N 1011112 Rev. M 02/15<br />
McDonald’s
R<br />
HEBT-5V BUN TOASTER<br />
SPECIFICATIONS<br />
Electrical Specifications & Plug <strong>Co</strong>nfiguration<br />
Model &<br />
Mfg. No<br />
HEBT-5V<br />
9210840<br />
(International)<br />
Volt Watts Hz.<br />
230 4600 50/60<br />
Plug<br />
Description<br />
IEC-309 Pin & Sleeve,<br />
32 Amp., 230 Volt<br />
Plug<br />
<strong>Co</strong>nfiguration<br />
HEBT-5V<br />
9210841<br />
(Australia)<br />
220-240 4430-5250 50/60<br />
Marechal 32 Amp.,<br />
220-250 Volt<br />
HEBT-5V<br />
9210842<br />
(New Zealand)<br />
220-240 4430-5250 50/60<br />
Marechal 32 Amp.,<br />
220-250 Volt<br />
HEBT-5V<br />
9210844<br />
(Europe -Club Off)<br />
220-240 4430-5250 50/60<br />
IEC-309 Pin & Sleeve,<br />
32 Amp., 230 Volt<br />
HEBT-5V<br />
9210845<br />
(Japan)<br />
208 4600 50/60<br />
L6-30P 30 Amp.,<br />
250 Volt,<br />
Straight Twist Lock<br />
HEBT-5V<br />
9210846<br />
(Domestic)<br />
208 4800 50/60<br />
Pin & Sleeve Plug<br />
30 Amps, 250 VAC<br />
HEBT-5V<br />
9210847<br />
(Europe - Club Off)<br />
230 3600 50/60<br />
IEC-309 Pin & Sleeve,<br />
16 Amp., 220-250 Volt<br />
HEBT-5V<br />
9210848<br />
(Europe - Club on)<br />
230 3600 50/60<br />
IEC-309 Pin & Sleeve,<br />
16 Amp., 220-250 Volt<br />
Pass Through Time<br />
For all HEBT-5V units the pass through time is<br />
17 seconds (+/- 2 seconds).<br />
CAUTION<br />
All electrical connections must be in accordance with<br />
local electrical codes and any other applicable codes.<br />
Dimensions<br />
35.37”<br />
(898.4 mm)<br />
32.61”<br />
(828 mm)<br />
15.55”<br />
(394.9 mm)<br />
P/N 1011112 Rev. M 02/15<br />
McDonald’s<br />
3<br />
A.J. <strong>Antunes</strong> & <strong>Co</strong>.
HEBT-5V BUN TOASTER<br />
IMPORTANT SAFETY INFORMATION<br />
In addition to the warnings and cautions in this manual,<br />
use the following guidelines for safe operation of the<br />
unit.<br />
• Read all instructions before using equipment.<br />
• For your safety, the equipment is furnished with<br />
a properly grounded cord connector. Do NOT<br />
attempt to defeat the grounded connector.<br />
• Install or locate the equipment only for its intended<br />
use as described in this manual. Do NOT use<br />
corrosive chemicals in and/or on this equipment.<br />
• Do NOT operate this equipment if it has a<br />
damaged cord or plug, if it is not working properly,<br />
or if it has been damaged or dropped.<br />
• This equipment should be serviced by qualified<br />
personnel only. <strong>Co</strong>ntact the nearest Authorized<br />
Service Agency for adjustment or repair.<br />
• Do NOT block or cover any openings on the unit.<br />
• Do NOT immerse cord or plug in water.<br />
• Keep cord away from heated surfaces.<br />
• Do NOT allow cord to hang over edge of table or<br />
counter.<br />
• Do NOT clean this appliance with a water jet.<br />
The following warnings and cautions appear throughout<br />
this manual and should be carefully observed.<br />
• Turn the unit off, wait for the cool-down procedure<br />
to complete its cycle, and disconnect the power<br />
cord before performing any service or maintenance<br />
on the unit.<br />
NOTE: Turning off the power switch does NOT turn<br />
off all power to the unit. When the unit is plugged<br />
in and turned off, an LED light flashes to indicate<br />
that the power cord is plugged in.<br />
• The procedures in this chapter may include<br />
the use of chemical products. These chemical<br />
products will be highlighted with bold face letters<br />
followed by the abbreviated HCS (Hazard<br />
<strong>Co</strong>mmunication Standard). See Hazard<br />
<strong>Co</strong>mmunication Standard manual for the appropriated<br />
Material Safety Data Sheets (MSDS).<br />
• The equipment should be grounded according to<br />
local electrical codes to prevent the possibility of<br />
electrical shock. It requires a grounded receptacle<br />
with separate electrical lines, protected by<br />
fuses or circuit breaker of the proper rating.<br />
• Bread may burn. Therefore <strong>toaster</strong>s must not be<br />
used near or below curtains or other combustible<br />
walls and materials. Failure to maintain safe<br />
operating distances may cause discoloration or<br />
combustion.<br />
WARNING<br />
To avoid possible personal injury and/or damage<br />
to the unit, all inspections, tests, and repair<br />
of electrical equipment should be performed by<br />
QUALIFIED SERVICE PERSONNEL. The unit MUST<br />
be completely shut down and unplugged before<br />
any internal servicing, except when electrical<br />
tests are required. Use extreme care during electrical<br />
circuit tests. Live circuits will be exposed.<br />
CAUTION<br />
All electrical connections must be in accordance<br />
with local electrical codes and any other applicable<br />
codes.<br />
CAUTION<br />
Bread may burn. Therefore <strong>toaster</strong>s must not be<br />
used near or below curtains or other combustible<br />
walls and materials. Failure to maintain safe operating<br />
distances may cause discoloration or combustion.<br />
CAUTION<br />
NEVER unplug the power cord while the unit is<br />
running! Use the proper shutdown procedure<br />
before unplugging the power cord.<br />
WARNING<br />
ELECTRICAL SHOCK HAZARD. FAILURE TO<br />
FOLLOW THE INSTRUCTIONS IN THIS MANUAL<br />
COULD RESULT IN SERIOUS INJURY OR DEATH.<br />
• Electrical ground is required on this appliance.<br />
• Do NOT modify the power supply cord plug. If<br />
it does not fit the outlet, have a proper outlet<br />
installed by a qualified electrician.<br />
• Do NOT use an extension cord with this appliance.<br />
• The <strong>toaster</strong> should be grounded according to local<br />
electrical codes to prevent the possibility of electrical<br />
shock. It requires a grounded receptacle with<br />
separate electrical lines, protected by fuses or circuit<br />
breaker of the proper rating.<br />
• Check with a qualified electrician if you are unsure<br />
if the appliance is properly grounded.<br />
A.J. <strong>Antunes</strong> & <strong>Co</strong>.<br />
4<br />
P/N 1011112 Rev. M 02/15<br />
McDonald’s
HEBT-5V BUN TOASTER<br />
INSTALLATION<br />
Unpacking<br />
1. Open the large box. It contains:<br />
• HEBT-5V <strong>toaster</strong><br />
• Accessories box<br />
2. Remove the accessories box from the large box.<br />
3. With the help of another person, carefully remove<br />
the HEBT-5V from the large box.<br />
4. Remove all protective coverings from the unit.<br />
5. Open the Accessories Box. It contains:<br />
• Owner’s Manual<br />
• Angular Bun Feeder<br />
• Bun Buffer Frame<br />
• Club/Heel Separator<br />
6. Wipe the entire exterior of the <strong>toaster</strong> and the<br />
accessories mentioned above with a clean towel<br />
sprayed with a McDonald’s approved sanitizer.<br />
Allow to air dry.<br />
NOTE: Handle accessories with care. If an accessory<br />
becomes bent or damaged, it may not attach to<br />
the unit correctly, which may affect normal operation.<br />
NOTE: Be sure to attach the Bun Feeder so the<br />
tabs are seated properly. Failure to attach the Bun<br />
Feeder properly could cause serious damage to the<br />
<strong>toaster</strong>.<br />
3. Plug the power cord into an appropriate power<br />
outlet. Refer to the specification plate for<br />
the proper voltage.<br />
NOTE: See “Angular Bun Feeder” in the Operations<br />
section of this manual for information on using the<br />
supplementary Angular Bun Feeder.<br />
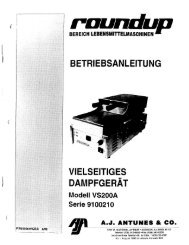
Rear<br />
<strong>Co</strong>nveyor<br />
<strong>Co</strong>ver<br />
Angular<br />
Bun Feeder<br />
Bun Feeder<br />
<strong>Co</strong>ntrol<br />
Panel<br />
NOTE: If any parts are missing or damaged, contact<br />
A.J. <strong>Antunes</strong> Technical Service IMMEDIATELY<br />
at 1-877-392-7854 (North America only), or<br />
630-784-1000.<br />
Location<br />
When placing the <strong>toaster</strong> into service, pay attention to<br />
the following guidelines:<br />
• Make sure power is off and the <strong>toaster</strong> is at room<br />
temperature.<br />
• Do NOT block or cover any openings on the unit.<br />
• Do NOT immerse cord or plug in water.<br />
• Keep cord away from heated surfaces.<br />
• Do NOT allow cord to hang over edge of table or<br />
counter.<br />
1. Place the <strong>toaster</strong> in the required position designated<br />
by McDonald’s.<br />
<strong>Co</strong>mpression<br />
Knob<br />
Front<br />
<strong>Co</strong>nveyor<br />
<strong>Co</strong>ver<br />
Club/Heel<br />
Separator<br />
Bun Buffer<br />
Frame<br />
Figure 1. HEBT-5V <strong>Co</strong>mponents<br />
(Belts not Shown)<br />
2. Attach the Bun Feeder, Bun Buffer Frame, and<br />
Crown\Heel Separator accessories (Figure 1.)<br />
P/N 1011112 Rev. M 02/15<br />
McDonald’s<br />
5<br />
A.J. <strong>Antunes</strong> & <strong>Co</strong>.
HEBT-5V BUN TOASTER<br />
Language Selection<br />
Follow these steps to set the language option for the<br />
HEBT-5V <strong>toaster</strong>.<br />
OPERATION<br />
Operating Instructions<br />
The HEBT-5V toasts Crowns, Heels, Clubs, and other<br />
products. Follow these steps to start the HEBT-5V:<br />
1. Plug in the power cord and turn the <strong>toaster</strong> on.<br />
2. See Figure 1. Press and hold the MENU button for<br />
five seconds.<br />
3. Press the LEFT ARROW button five times so that<br />
the display shows “English”.<br />
4. Press the OK button.<br />
5. Use the LEFT and RIGHT ARROW buttons to<br />
select your preferred language. The available<br />
languages appear in the following order:<br />
• English<br />
• Spanish<br />
• French Canadian<br />
• French<br />
• German<br />
• Portuguese<br />
• Italian<br />
• Swedish<br />
• Russian<br />
• Mandarin Chinese<br />
• Japanese<br />
6. Press the OK button to save the changes.<br />
7. Return the <strong>toaster</strong> to service.<br />
1. Turn on the <strong>toaster</strong> and wait for warm-up to complete.<br />
NOTE: The <strong>toaster</strong> fans turn on after the A, B, or C<br />
Platen temperature reaches 66°C (150°F).<br />
2. Set the <strong>Co</strong>mpression Knob to 4 (recommended).<br />
If you use setting 5, refer to Table 1 (page 8) for<br />
the required internal settings.<br />
3. When the unit reaches operating temperature, the<br />
control panel displays “Ready”.<br />
4. Insert product into the designated area of the Bun<br />
Feeder Assembly with the cut side of the <strong>bun</strong> facing<br />
towards the front. Toasted product drops into<br />
the Bun Buffer.<br />
NOTE: For all HEBT-5V units, the product passthrough<br />
time is 17 seconds (+/- 2 seconds).<br />
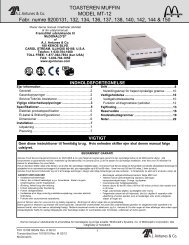
ANGULAR BUN FEEDER<br />
The Angular Bun Feeder can be used to load <strong>bun</strong>s during<br />
high volume times (Figure 2).<br />
Angular <strong>bun</strong><br />
Feeder<br />
Bun Feeder<br />
Figure 2. HEBT-5V Angular Bun Feeder<br />
Display<br />
Menu<br />
Button<br />
Figure 1. HEBT-5V <strong>Co</strong>ntrol Panel and Display<br />
A.J. <strong>Antunes</strong> & <strong>Co</strong>.<br />
6<br />
P/N 1011112 Rev. M 02/15<br />
McDonald’s
HEBT-5V BUN TOASTER<br />
OPERATION<br />
Club Platen OFF units (Mfg. # 9210844 &<br />
9200847)<br />
Units with Manufacturing Numbers 9210844 and<br />
9210847 are shipped with the Club Platen off. Follow<br />
these steps to turn the Club Platen on:<br />
NOTE: This applies ONLY to units with manufacturing<br />
numbers 9210844 & 9210847. All other units are<br />
shipped with the Club Platen turned on.<br />
1. With the <strong>toaster</strong> on, press and hold both the<br />
LEFT and RIGHT arrow buttons for 5 seconds<br />
until “Factory Settings Restored” appears on<br />
the display (Figure 1).<br />
NOTE: This sets the unit to display temperatures in<br />
degrees Celsius (°C).<br />
2. The unit enters <strong>Co</strong>ol Down mode.<br />
3. Turn power switch off and then back on again.<br />
4. The Club Platen is now operational. Allow the unit<br />
to warm up before using.<br />
5. If you want the unit to display temperatures in<br />
degrees Fahrenheit:<br />
a. Press and hold the MENU button for five<br />
seconds (Figure 4). The control panel displays<br />
“A Platen.”<br />
b. Scroll to “Units” with the LEFT or RIGHT arrow<br />
buttons. Press the OK button<br />
c. Scroll to “°F” (Fahrenheit) with the LEFT or<br />
RIGHT arrow buttons. Press the OK button.<br />
NOTE: The “C Platen” remains active if the unit is<br />
reset to factory defaults at any time after performing<br />
these steps.<br />
To turn the Club Platen Off:<br />
NOTE: This applies only to units with manufacturing<br />
numbers 9210844 & 9210847.<br />
1. Set the unit to display temperatures in degrees<br />
Fahrenheit. Press and hold the MENU button for<br />
five seconds (Figure 4). The control panel displays<br />
“A Platen.”<br />
2. Scroll to “Units” with the LEFT or RIGHT arrow<br />
buttons. Press the OK button.<br />
3. Scroll to “°F” (Fahrenheit) with the LEFT or<br />
RIGHT arrow buttons. Press the OK button.<br />
4. Scroll to “C Platen” with the LEFT or RIGHT arrow<br />
buttons. Press the OK button.<br />
5. Change the “C Platen” value to 0 °F (Fahrenheit)<br />
using the LEFT arrow button. Press the OK button.<br />
6. To set the display back to degrees Celsius, scroll<br />
to “Units,” press the OK button, then scroll to “°C”<br />
(Celsius) and Press the OK button.<br />
Arrow<br />
Buttons<br />
Figure 3. HEBT-5V <strong>Co</strong>ntrol Panel and Display<br />
Menu<br />
Button<br />
Arrow<br />
Buttons<br />
P/N 1011112 Rev. M 02/15<br />
McDonald’s<br />
7<br />
Figure 4. HEBT-5V <strong>Co</strong>ntrol Panel<br />
A.J. <strong>Antunes</strong> & <strong>Co</strong>.
HEBT-5V BUN TOASTER<br />
<strong>Co</strong>ntrol Panel LEDs<br />
The LEDs on the control panel light to signify when<br />
each item is operating. The Service LED lights and<br />
the corresponding LED (Motor, A Platen, B Platen, C<br />
Platen) blinks when the unit requires service. A message<br />
also appears on the display.<br />
Settings<br />
Follow these steps to view and adjust <strong>toaster</strong> settings:<br />
1. When the unit is plugged in, press and hold the<br />
MENU button (Figure 4) for five seconds. The<br />
control panel displays “A Platen.” The display<br />
scrolls to show the actual temperature, SSR Duty<br />
cycle, and the setpoint.<br />
Example: A Platen: 271°C 35% 271°C<br />
NOTE: The unit does not have to be turned on in<br />
order to access the settings menu.<br />
2. Use the LEFT and RIGHT arrow buttons (Figure<br />
4) to scroll through the settings, which appear in<br />
the following order:<br />
3. To change a setting, press the OK button and<br />
then use the LEFT and RIGHT arrow buttons to<br />
adjust as needed. Press the OK button again to<br />
save the changes. See Figure 4.<br />
• A Platen<br />
• B Platen<br />
• C Platen<br />
• Units (°C/°F)<br />
• Buzzer (Soft, Loud,<br />
Mute)<br />
NOTE: The S/N (Serial Number), Elapsed Time, and<br />
<strong>Co</strong>ntrol Temperature can not be adjusted.<br />
Adjusting Toast Quality<br />
• Display Languages<br />
• Serial Number<br />
• ET (Elapsed Time)<br />
• <strong>Co</strong>ntrols Temperature<br />
• Motor<br />
There are variations in <strong>bun</strong> products Worldwide that are<br />
used on the A.J <strong>Antunes</strong> HEBT <strong>toaster</strong> such as moisture<br />
content, <strong>bun</strong> formulations, age, tolerances etc. The<br />
HEBT was designed to compensate for <strong>bun</strong> variations<br />
by allowing user to adjust the compression, light/dark<br />
(speed) & temperatures settings in order to achieve a<br />
Gold Standard toasted product.<br />
1. LIGHT DARK ADJUSTMENT: Adjust the light dark<br />
setting with the < or > buttons. The default light/dark<br />
setting on the HEBT from the factory is 0 but can be<br />
adjusted from Lighter 0-10 to Darker 0-10 Light 10 is<br />
the lightest setting and dark 10 is the darkest. Each<br />
increase in “lighter” value will increase the pass through<br />
time and each increase in “darker” value with decrease<br />
the pass through time.<br />
PROGRAMMING<br />
Factory Reset<br />
To reset the unit to the factory default settings, press<br />
and hold the LEFT and RIGHT arrow buttons for 5 seconds<br />
until “Factory Settings Restored” appears on the<br />
display.<br />
NOTE: For ALL Units, this sets the display temperature<br />
to °C (Celsius). Refer to the “Settings” section<br />
of this manual to change the display temperature to<br />
°F (Fahrenheit).<br />
NOTE: For units with Mfg. No. 9210844, this turns<br />
the Club Platen on. To turn the Club Platen off, refer<br />
to the section titled “Club Platen OFF units with<br />
Mfg. No. 9210844 & 9210847” for information.<br />
When the unit is turned on and ready, you can adjust<br />
the toast quality by pressing the LEFT and RIGHT<br />
arrow buttons on the control panel. After making an<br />
adjustment, test several products to verify they are<br />
toasting at the desired quality.<br />
NOTE: This setting is maintained when the unit is<br />
powered off. If at any time the unit displays an error<br />
message or if it fails to operate properly, contact<br />
the factory immediately for service.<br />
2. TEMPERATURE ADJUSTMENT: Adjust the set point<br />
temperature on the platens in the program menu. The<br />
default temperature settings on the HEBT are A Platen:<br />
271°C (520°F) B Platen: 271°C (520°F) C Platen:<br />
254°C (490°F). The temperatures can be increased<br />
to +/- 50°F (10°C) if needed to achieve an acceptable<br />
toast quality.<br />
3. COMPRESSION ADJUSTMENT: Adjust the compression<br />
knob on the left side of the unit. The default<br />
compression setting on the HEBT is 4 but is adjustable<br />
from 1-7. It is acceptable to adjust the compression<br />
from 1-7 is needed to achieve the desired toast quality<br />
and <strong>bun</strong> compression.<br />
A.J. <strong>Antunes</strong> & <strong>Co</strong>.<br />
8<br />
P/N 1011112 Rev. M 02/15<br />
McDonald’s
HEBT-5V BUN TOASTER<br />
Daily Cleaning<br />
1. Turn the <strong>toaster</strong> off. The <strong>toaster</strong> enters a cooldown<br />
mode and will automatically shut down<br />
when complete.<br />
NOTE: You do NOT need to wait for the cool down<br />
to complete.<br />
2. Put on neoprene gloves. Remove the Bun Feeder<br />
and Angular Bun Feeder (Figure 5).<br />
3. Clean the outside surfaces of the <strong>toaster</strong> with<br />
a paper towel sprayed with an approved multisurface<br />
cleaner. Allow to air dry.<br />
4. Wipe the Bun Feeder Assembly with a paper<br />
towel sprayed with an approved multi-surface<br />
cleaner. Allow to air dry.<br />
5. Plug the power cord into the outlet. Turn the unit<br />
on.<br />
MAINTENANCE<br />
Figure 5. Bun Feeder<br />
P/N 1011112 Rev. M 02/15<br />
McDonald’s<br />
9<br />
A.J. <strong>Antunes</strong> & <strong>Co</strong>.
HEBT-5V BUN TOASTER<br />
CLEANING AND SANITIZING THE BELTS (DAILY)<br />
1. Turn the <strong>toaster</strong> off. The <strong>toaster</strong> enters a cooldown<br />
mode and automatically shuts down when<br />
complete.<br />
NOTE: You do NOT need to wait for the cool down<br />
to complete.<br />
MAINTENANCE (continued)<br />
2. Put on neoprene gloves. Remove the Bun Feeder.<br />
3. Clean the exterior of the <strong>toaster</strong> with a paper<br />
towel sprayed with an approved multi-surface<br />
cleaner solution.<br />
4. Remove the Front <strong>Co</strong>nveyor <strong>Co</strong>vers by lifting up<br />
and away from the unit (Figure 9 next page).<br />
NOTE: Replace any Belts that is discolored, torn, or<br />
if any of the Belt snaps are damaged.<br />
NOTE: Only clean the Belt when it is in front of the<br />
Backing Plate. This avoids causing damage to the<br />
belt. The conveyors continue to turn during the<br />
cool-down period, allowing you to clean the entire<br />
Belt.<br />
5. Inspect the front Belt and rear Belts. Refer to<br />
Figures 6, 7, and 8. Replace any belt that is torn,<br />
folded, discolored, missing snaps, or damaged in<br />
any way.<br />
BELT IS MISSING SNAPS<br />
AND IS DAMAGED. REPLACE BELT.<br />
Figure 7. Example of Damaged Belt<br />
Wrinkling<br />
around Snap<br />
BELT IS TORN AND FOLDED.<br />
REPLACE BELT.<br />
Figure 6. Example of Damaged Belt<br />
A.J. <strong>Antunes</strong> & <strong>Co</strong>.<br />
10<br />
BELT IS WRINKLING/DISTRESSED AROUND<br />
SNAPS, HAS LOOSE/DAMAGED SNAPS,<br />
AND IS MISSING SNAPS.<br />
REPLACE DEFECTIVE BELT.<br />
Figure 8. Example of Damaged Belt<br />
P/N 1011112 Rev. M 02/15<br />
McDonald’s
MAINTENANCE (continued)<br />
HEBT-5V BUN TOASTER<br />
CORRECT BELT INSTALLATION<br />
The belts are aligned vertically on the top and bottom rollers. The rollers are not visible when the belts are correctly<br />
positioned because the snaps are properly positioned.<br />
INCORRECT BELT INSTALLATION.<br />
The rollers are visible in the circled section. The belts are not aligned properly. Misaligned belts shift off the rollers<br />
to the left or right. In this image, the belts are shifted to the right and the snaps are not correctly positioned on the<br />
rollers. The belts are stretching which may result in torn belts or broken snaps.<br />
Belts are stretching<br />
due to incorrect<br />
installation<br />
P/N 1011112 Rev. M 02/15<br />
McDonald’s<br />
11<br />
A.J. <strong>Antunes</strong> & <strong>Co</strong>.
HEBT-5V BUN TOASTER<br />
6. If the Belts are all in good condition, spray a<br />
clean, sanitized towel with an approved sanitizer.<br />
Wipe the Front Belt clean.<br />
7. Wipe the Front Belt with a clean, sanitized towel<br />
sprayed with an approved sanitizer. Allow to air<br />
dry.<br />
8. Clean the Rear Belts using the same procedure in<br />
Step 6.<br />
NOTE: Only clean the Belt where it is in front of the<br />
Backing Plate. This avoids causing damage to the<br />
belt (Figure 10).<br />
9. Place all towels used to clean the <strong>toaster</strong> and<br />
belts into the soiled towel bucket.<br />
MAINTENANCE (continued)<br />
10. Clean the Front and Rear <strong>Co</strong>nveyor <strong>Co</strong>vers with<br />
a paper towel sprayed with an approved multisurface<br />
cleaner. Allow to air dry.<br />
Figure 9. Front and Rear <strong>Co</strong>nveyor <strong>Co</strong>vers<br />
11. Re-install the Front and Rear <strong>Co</strong>nveyor <strong>Co</strong>vers<br />
and then re-install the Bun Feeder Assembly.<br />
12. Turn the <strong>toaster</strong> on and test the unit before<br />
returning it to service.<br />
NOTE: For heavy carbon buildup, Steps 6 - 8 may<br />
need to be repeated several times to achieve<br />
desired cleanliness.<br />
FRONT BACKING PLATE<br />
NOTE: Be sure to clean and sanitize the Belts completely.<br />
Failure to properly clean the Belts will shorten<br />
the life of the Belts and result in poor <strong>toaster</strong><br />
performance.<br />
NOTE: Replace the Belts if they show excessive<br />
wear and tear. To obtain new Belts, contact your<br />
Distribution Center (DC) and refer to the item numbers<br />
below:<br />
Figure 10. Front Belt Backing Plate Location<br />
• Item No. 01630-021 (HEBT-5V Crown Belt Wrap)<br />
• Item No. 01630-024 (HEBT-5V Main Belt Wrap)<br />
• Item No. 01630-027 (HEBT-5V Heel/Club Belt<br />
Wrap)<br />
NOTE: Belts should be removed ONLY during Belt<br />
replacement or when required in a service situation.<br />
NOTE: We recommend that Belts be replaced every<br />
quarter.<br />
A.J. <strong>Antunes</strong> & <strong>Co</strong>.<br />
12<br />
P/N 1011112 Rev. M 02/15<br />
McDonald’s
HEBT-5V BUN TOASTER<br />
Replacing Belts (Quarterly)<br />
Over time, the Belts will begin to show signs of wear.<br />
This wear appears in the form of tears or discoloration<br />
of the belt, at which point the belts should be replaced.<br />
MAINTENANCE (continued)<br />
Tense<br />
Tense<br />
NOTE: Belts should be removed ONLY during Belt<br />
Replacement or when required in a service situation.<br />
For proper operation, replace all belts on<br />
a quarterly basis, We recommend that Belts be<br />
replaced every quarter.<br />
Loose<br />
Loose<br />
REMOVING BELTS<br />
1. Turn the <strong>toaster</strong>’s power switch to the off position.<br />
The <strong>toaster</strong> enters a cool-down mode and will<br />
automatically shut down when complete.<br />
Figure 11. <strong>Co</strong>nveyor Rollers<br />
2. Unplug the power cord once the cool-down period<br />
is complete.<br />
3. Put on neoprene gloves. Remove the Bun Feeder.<br />
4. Remove the Front and Rear <strong>Co</strong>nveyor <strong>Co</strong>vers by<br />
lifting up and away from the <strong>toaster</strong>.<br />
5. Set the <strong>Co</strong>mpression Knob to 7.<br />
6. Unlock the latch and open the left side panel.<br />
7. To lock the front <strong>Co</strong>nveyor Roller, face the front<br />
of the <strong>toaster</strong>. Use both hands and push down on<br />
the Front <strong>Co</strong>nveyor Roller and pull towards you.<br />
This removes tension and locks the roller in place<br />
(Figure 11).<br />
8. To lock the Rear Roller, face the rear of the<br />
<strong>toaster</strong>. Use both hands and push down on the<br />
Rear <strong>Co</strong>nveyor Roller and pull towards you. This<br />
removes tension and locks the roller in place<br />
(Figure 11).<br />
9. Lift the upper Belt Frame Lock. Then rotate down<br />
so it rests on the cam shaft of the rear conveyor<br />
roller. (Figure 12).<br />
10. Pull down the lower Belt Frame Lock<br />
(Figure 12).<br />
11. Remove and discard the Front Belt (the recommendation<br />
is to cut it in half so it cannot be used<br />
again). See Figure 13.<br />
12. Remove and discard the Rear Belts (the recommendation<br />
is to cut them in half so they cannot be<br />
used again). See Figure 13.<br />
13. Wipe all four rollers with a clean towel sprayed<br />
with sanitizer. Make sure to remove all debris from<br />
the rollers so they are as clean as possible.<br />
Upper Belt<br />
Frame Lock<br />
Lower Belt<br />
Frame Lock<br />
Club/Heel<br />
Belt Wrap<br />
Crown<br />
Belt Wrap<br />
Figure 12. <strong>Co</strong>nveyor Locks<br />
Crown<br />
Belt Wrap<br />
Main Belt Wrap<br />
Figure 13. Remove and Discard the Belts<br />
DO NOT REUSE THE BELTS!<br />
P/N 1011112 Rev. M 02/15<br />
McDonald’s<br />
13<br />
A.J. <strong>Antunes</strong> & <strong>Co</strong>.
HEBT-5V BUN TOASTER<br />
MAINTENANCE (continued)<br />
INSTALLING BELTS<br />
1. Follow the steps for Removing Belts.<br />
2. Wipe both sides of the new Belts with a clean,<br />
sanitized towel sprayed with an approved sanitizer<br />
and allow to air dry.<br />
3. Wipe all four rollers and the backing plate with<br />
a clean towel sprayed with sanitizer. Make sure<br />
to remove all debris from the rollers and backing<br />
plate so they are as clean as possible.<br />
4. Slide the new front belt gently over the front top<br />
roller and front bottom roller.<br />
NOTE: Make sure the belt lines up properly on the<br />
rollers. The snaps on the belts should face the<br />
inside of the top front roller.<br />
Tense<br />
Tense<br />
Loose<br />
Loose<br />
Figure 14. <strong>Co</strong>nveyor Rollers<br />
5. Slide the first crown belt over the rear top roller<br />
and rear bottom roller. Repeat this step for the<br />
club/ heel belt and the second crown belt.<br />
NOTE: Make sure the belt lines up properly on the<br />
rollers. The snaps on the belts should face the<br />
inside of the top rear roller.<br />
6. Return the Front and Rear Belt Rollers to full tension<br />
by lifting them up so each roller locks into<br />
place (Figure 14).<br />
7. Slowly lift up the Lower Belt Frame Lock so the<br />
Front and Rear Belt Rollers lock into place (Figure<br />
15). If necessary, lift up the cam shaft of the Rear<br />
Belt Roller while lifting the Lower Belt Frame Lock<br />
into place.<br />
8. Re-engage the Upper Belt Frame Lock by lifting<br />
up and then locking it in place on the Front<br />
<strong>Co</strong>nveyor Assembly (Figure 15).<br />
9. Close and latch the Side Panel.<br />
NOTE: Inform the Store Manager after any Belt<br />
Replacement so new Belts can be ordered. To<br />
obtain new Belts, contact the factory at 1-877-392-<br />
7854 (North America only) or 630-784-1000.<br />
Upper<br />
<strong>Co</strong>nveyor<br />
Lock<br />
Lower<br />
<strong>Co</strong>nveyor<br />
Lock<br />
Figure 15. <strong>Co</strong>nveyor Locks<br />
10. Set the <strong>Co</strong>mpression Knob to 4.<br />
11. Re-install the Front and Rear <strong>Co</strong>nveyor <strong>Co</strong>vers<br />
and then the Bun Feeder Assembly.<br />
12. Plug in the <strong>toaster</strong> and test the unit before<br />
returning to service.<br />
A.J. <strong>Antunes</strong> & <strong>Co</strong>.<br />
14<br />
P/N 1011112 Rev. M 02/15<br />
McDonald’s
MAINTENANCE (continued)<br />
HEBT-5V BUN TOASTER<br />
Cleaning the Top <strong>Co</strong>oling Fan and<br />
Electrical Housing (Annually)<br />
Follow these steps to clean the top fan.<br />
1. Turn the power switch to the OFF position. The<br />
<strong>toaster</strong> enters a cool-down mode and will automatically<br />
shut down when complete. Unplug the<br />
power cord.<br />
2. Facing the front of the <strong>toaster</strong>, move to the right<br />
Side Panel. Remove the 2 top screws from the<br />
right Side side Panel and lower the panel (Figure<br />
16).<br />
3. Use a plastic brush or similar tool to brush all 5<br />
fan blades from beneath. Be sure to remove all<br />
debris.<br />
4. Carefully clean any debris from the inside floor<br />
of the control compartment and from all electrical<br />
connections. Be sure to remove any grease, lint,<br />
or debris from these areas.<br />
5. Attach the right Side Panel and secure with<br />
screws.<br />
Cleaning the Rear <strong>Co</strong>oling Fan and<br />
Electrical Housing (Annually)<br />
Follow these steps to clean the rear fan.<br />
1. With the unit off, remove the 3 rear screws securing<br />
the rear access panel and carefully lower the<br />
panel (Figure 17).<br />
2. Use a plastic brush or similar tool to brush all 5<br />
fan blades free of debris.<br />
3. Carefully clean any debris from the floor of the<br />
<strong>toaster</strong> and from all electrical connections. Be<br />
sure to remove any grease, lint, or debris from<br />
these areas.<br />
4. Attach the rear panel and secure with the 3<br />
screws.<br />
NOTE: Be careful not to pinch wiring upon closing<br />
the rear panel.<br />
Figure 16. Accessing Top <strong>Co</strong>oling Fan<br />
Figure 17. Accessing Rear <strong>Co</strong>oling Fan<br />
5. Plug in the power cord, turn the power switch on,<br />
and test the <strong>toaster</strong> for proper operation.<br />
P/N 1011112 Rev. M 02/15<br />
McDonald’s<br />
15<br />
A.J. <strong>Antunes</strong> & <strong>Co</strong>.
HEBT-5V BUN TOASTER<br />
TROUBLESHOOTING<br />
WARNING<br />
To avoid possible personal injury and/or damage to the unit, inspection, test and repair of electrical equipment<br />
should be performed by qualified service personnel. The unit should be unplugged when servicing,<br />
except when electrical tests are required.<br />
If the troubleshooting steps listed do not solve your machine problem, contact an Authorized Service<br />
Agency for further assistance or service.<br />
NOTE: THIS SECTION COVERS DISPLAY TROUBLESHOOTING<br />
Problem Possible Cause <strong>Co</strong>rrective Action<br />
Unit displays error message: “SSR<br />
‘A’ Fail. Toaster Shut Down”.<br />
Followed by a cool down cycle.<br />
Power, Motor, ‘B’, and ‘C’ lights are<br />
solid and Service and ‘A’ lights are<br />
flashing.<br />
Unit displays error message: “SSR<br />
‘B’ Fail. Toaster Shut Down”.<br />
Followed by a cool down cycle.<br />
Power, Motor, ‘A’, and ‘C’ lights are<br />
solid and Service and ‘B’ lights are<br />
flashing.<br />
Unit displays error message: “SSR<br />
‘C’ Fail. Toaster Shut Down”.<br />
Followed by a cool down cycle.<br />
Power, Motor, ‘A’, and ‘B’ lights are<br />
solid and Service and ‘C’ lights are<br />
flashing.<br />
Unit displays error message:<br />
“High Limit Tripped. Toaster<br />
Shut Down”. Followed by a cool<br />
down cycle.<br />
Unit displays error message:<br />
“<strong>Co</strong>nveyor Stopped. Toaster<br />
Shut Down”. Followed by a cool<br />
down cycle. Power, ‘A’, ‘B’, and<br />
‘C’ lights are solid and Service and<br />
Motor lights are flashing.<br />
Unit displays error message:<br />
“Internal Error. Power Plug:<br />
Out/In”.<br />
Unit displays error message:<br />
“<strong>Co</strong>ntrol Temperature Fail.<br />
Toaster Shut Down”. Followed<br />
by a cool down cycle. The control<br />
compartment’s ambient temperature<br />
is above 60°C (140°C).<br />
SSR is stuck closed causing platen ‘A’ temperature<br />
to exceed 343°C (650°F).<br />
Failed Display Board.<br />
Failed I/O Board.<br />
SSR is stuck closed causing platen ‘B’ temperature<br />
to exceed 343°C (650°F).<br />
Failed Display Board.<br />
Failed I/O Board.<br />
SSR is stuck closed causing platen ‘C’ temperature<br />
to exceed 343°C (650°F).<br />
Failed Display Board.<br />
Failed I/O Board.<br />
Failed Platen Thermocouple causing the<br />
High Limit to trip.<br />
Defective High Limit<br />
Mechanical bind in one of the conveyors.<br />
Defective Motor<br />
Damaged Ball Bearing(s).<br />
Drive chain or sprockets are damaged.<br />
Failed Display Board.<br />
Failed I/O Board.<br />
Internal board error.<br />
<strong>Co</strong>oling Fan(s) are dirty and need to be<br />
cleaned.<br />
Failed <strong>Co</strong>oling Fan(s).<br />
Failed Display Board.<br />
Failed I/O Board.<br />
Cycle power off and on if fault message<br />
persist; contact your Maintenance person<br />
or Authorized Service Agency for service.<br />
Cycle power off and on if fault message<br />
persist; contact your Maintenance person<br />
or Authorized Service Agency for service.<br />
Cycle power off and on if fault message<br />
persist; contact your Maintenance person<br />
or Authorized Service Agency for service.<br />
Allow unit to cool and reset the High Limit.<br />
If the High Limit trips again, contact your<br />
Maintenance person or Authorized Service<br />
Agency for service.<br />
Cycle power off and on if fault message<br />
persist; contact your Maintenance person<br />
or Authorized Service Agency for service.<br />
Turn unit off and unplug . Plug unit back in,<br />
Turn unit on and if error persists; contact<br />
your Maintenance person or Authorized<br />
Service Agency for service.<br />
Verify vents on <strong>toaster</strong> are unblocked and<br />
not near other heating appliances. Clean<br />
fans describe in the Maintenance section of<br />
this manual. If error persists contact your<br />
maintenance person or Authorized Service<br />
Agency for service.<br />
A.J. <strong>Antunes</strong> & <strong>Co</strong>.<br />
16<br />
P/N 1011112 Rev. M 02/15<br />
McDonald’s
TROUBLESHOOTING (continued)<br />
HEBT-5V BUN TOASTER<br />
Problem Possible Cause <strong>Co</strong>rrective Action<br />
Unit displays fault message: “’A’<br />
System Fail”. Followed by a<br />
graphic display. Power, Motor, ‘B’,<br />
and ‘C’ lights are solid and Service<br />
and ‘A’ lights are flashing.<br />
Unit displays fault message: “’B’<br />
System Fail”. Followed by a<br />
graphic display. Power, Motor, ‘A’,<br />
and ‘C’ lights are solid and Service<br />
and ‘B’ lights are flashing.<br />
Unit displays fault message: “’C’<br />
System Fail”. Followed by a<br />
graphic display. Power, Motor, ‘A’,<br />
and ‘B’ lights are solid and Service<br />
and ‘C’ lights are flashing.<br />
Unit displays fault message: “’A’<br />
Platen Low”. Followed by a<br />
graphic display. Power, Motor, ‘B’,<br />
and ‘C’ lights are solid and Service<br />
and ‘A’ lights are flashing.<br />
Unit displays fault message: “’B’<br />
Platen Low”. Followed by a<br />
graphic display. Power, Motor, ‘A’,<br />
and ‘C’ lights are solid and Service<br />
and ‘B’ lights are flashing.<br />
SSR is stuck open causing platen ‘A’ to not<br />
reach set point within 30 minutes.<br />
Failed Platen ‘A’ Heater.<br />
Failed Display Board<br />
Failed I/O Board.<br />
Loose wire or connection.<br />
Failed thermocouple.<br />
SSR is stuck open causing platen ‘B’ to not<br />
reach set point within 30 minutes.<br />
Failed Platen ‘B’ Heater.<br />
Failed Display Board<br />
Failed I/O Board.<br />
Loose wire or connection.<br />
Failed thermocouple.<br />
SSR is stuck open causing platen ‘C’ to not<br />
reach set point within 30 minutes.<br />
Failed Platen ‘C’ Heater.<br />
Failed Display Board<br />
Failed I/O Board.<br />
Failed thermocouple.<br />
Loose wire or connection.<br />
SSR is stuck open causing platen ‘A’ temperature<br />
to decrease by 27° C (50° F) after<br />
achieving set point.<br />
Failed Platen ‘A’ Heater.<br />
Failed Display Board<br />
Failed I/O Board.<br />
Loose wire or connection.<br />
Failed thermocouple.<br />
SSR is stuck open causing platen ‘B’ temperature<br />
to decrease by 27° C (50° F) after<br />
achieving set point.<br />
Failed Platen ‘B’ Heater.<br />
Failed Display Board<br />
Failed I/O Board.<br />
Loose wire or connection.<br />
Failed thermocouple.<br />
Cycle power off and on if fault message<br />
persist; contact your Maintenance person<br />
or Authorized Service Agency for service.<br />
Cycle power off and on if fault message<br />
persist; contact your Maintenance person<br />
or Authorized Service Agency for service.<br />
Cycle power off and on if fault message<br />
persist; contact your Maintenance person<br />
or Authorized Service Agency for service.<br />
Cycle power off and on if fault message<br />
persist; contact your Maintenance person<br />
or Authorized Service Agency for service.<br />
Cycle power off and on if fault message<br />
persist; contact your Maintenance person<br />
or Authorized Service Agency for service.<br />
P/N 1011112 Rev. M 02/15<br />
McDonald’s<br />
17<br />
A.J. <strong>Antunes</strong> & <strong>Co</strong>.
HEBT-5V BUN TOASTER<br />
Problem Possible Cause <strong>Co</strong>rrective Action<br />
Unit displays fault message: “’C’<br />
Platen Low”. Followed by a<br />
graphic display. Power, Motor, ‘A’,<br />
and ‘B’ lights are solid and Service<br />
and ‘C’ lights are flashing.<br />
Unit displays fault message: “’A’<br />
Sensor Open”. Followed by a<br />
graphic display. Power, Motor, ‘B’,<br />
and ‘C’ lights are solid and Service<br />
and ‘A’ lights are flashing.<br />
Unit displays fault message: “’B’<br />
Sensor Open”. Followed by a<br />
graphic display. Power, Motor, ‘A’,<br />
and ‘C’ lights are solid and Service<br />
and ‘B’ lights are flashing.<br />
Unit displays fault message: “’C’<br />
Sensor Open”. Followed by a<br />
graphic display. Power, Motor, ‘A’,<br />
and ‘B’ lights are solid and Service<br />
and ‘C’ lights are flashing.<br />
Unit displays fault message:<br />
“Motor Running Slow. See<br />
Operators Manual”. Power, ‘A’,<br />
‘B’, and ‘C’ lights are solid and<br />
Service and ‘Motor’ lights are<br />
flashing.<br />
Unit displays: “Display BD U2”,<br />
“Display BD U4”, Display BD<br />
U6”, Display BD U7”, “I/O BD<br />
U1”, “I/O BD U2”, “I/O BD U10”,<br />
“Calibration Fault”.<br />
TROUBLESHOOTING (continued)<br />
SSR is stuck open causing platen ‘C’ temperature<br />
to decrease by 27° C (50° F) after<br />
achieving set point.<br />
Failed Platen ‘C’ Heater.<br />
Failed Display Board<br />
Failed I/O Board.<br />
Failed thermocouple.<br />
Loose wire or connection.<br />
Disconnected/Failed Platen ‘A’<br />
Thermocouple.<br />
Failed Display Board.<br />
Disconnected/Failed Platen ‘B’<br />
Thermocouple.<br />
Failed Display Board.<br />
Disconnected/Failed Platen ‘C’<br />
Thermocouple.<br />
Failed Display Board.<br />
Mechanical bind in one of the conveyors.<br />
Damaged Ball Bearing(s).<br />
Drive chain or sprockets are damaged.<br />
Defective Motor<br />
Failed Display Board<br />
Failed I/O Board.<br />
Internal board error.<br />
Cycle power off and on if fault message<br />
persist; contact your Maintenance person<br />
or Authorized Service Agency for service.<br />
Cycle power off and on if fault message<br />
persist; contact your Maintenance person<br />
or Authorized Service Agency for service.<br />
Cycle power off and on if fault message<br />
persist; contact your Maintenance person<br />
or Authorized Service Agency for service.<br />
Cycle power off and on if fault message<br />
persist; contact your Maintenance person<br />
or Authorized Service Agency for service.<br />
Cycle power off and on if fault message<br />
persist; contact your Maintenance person<br />
or Authorized Service Agency for service.<br />
Turn unit off and unplug. Plug unit back in.<br />
Turn unit back on. If error persists; contact<br />
your Maintenance person or Authorized<br />
Service Agency for service.<br />
A.J. <strong>Antunes</strong> & <strong>Co</strong>.<br />
18<br />
P/N 1011112 Rev. M 02/15<br />
McDonald’s
TROUBLESHOOTING (continued)<br />
HEBT-5V BUN TOASTER<br />
NOTE: THIS SECTION COVERS<br />
NON-ERROR/FAULT DISPLAY TROUBLESHOOTING<br />
Problem Possible Cause <strong>Co</strong>rrective Action<br />
Buns not toasting adequately<br />
Buns must be forced<br />
into the <strong>toaster</strong>. Buns<br />
Sticking and burning.<br />
Toaster makes unusual<br />
sounds.<br />
<strong>Co</strong>mpression side door<br />
will not close.<br />
Fan(s) are making an<br />
unusual sound.<br />
<strong>Co</strong>nveyor Belts not<br />
rotating.<br />
Belts are worn or need cleaning (replace<br />
quarterly).<br />
One of the conveyor’s top shafts is stuck in<br />
lower lock position.<br />
Either or both Upper/Lower <strong>Co</strong>nveyor Locks<br />
are not properly locked in place.<br />
Buns do not meet specifications.<br />
Toaster Settings need to be adjusted.<br />
Belts are worn or need cleaning (replace<br />
quarterly).<br />
Chain and/or sprockets are worn and/or<br />
loose.<br />
<strong>Co</strong>mpression setting is incorrect.<br />
Buns are not inserted into the <strong>toaster</strong> properly.<br />
<strong>Co</strong>mpression setting is incorrect.<br />
Belts are installed incorrectly.<br />
Belts are worn or need cleaning (replace<br />
quarterly).<br />
Motor Drive chain needs lubrication.<br />
Bearing(s)are worn and/or binding.<br />
Either or both Upper/Lower <strong>Co</strong>nveyor Locks<br />
are not properly locked in place.<br />
Failed <strong>Co</strong>oling Fan(s).<br />
<strong>Co</strong>oling Fan(s) are dirty and need to be<br />
cleaned.<br />
One of the <strong>Co</strong>nveyor’s top shafts is<br />
stuck in lower lock position<br />
Inspect belts for cleanliness, worn spots, tears, or<br />
wrinkles. Clean or replace belts as described in the<br />
Maintenance section of this manual.<br />
Inspect position of the shafts as described in the<br />
Maintenance section of this manual.<br />
Inspect the proper position of the Locks as described<br />
in the Maintenance section of this manual.<br />
<strong>Co</strong>ntact your <strong>bun</strong> supplier.<br />
Adjust <strong>toaster</strong> settings to match the toast quality specifications<br />
shown on page 8 of the Programming section<br />
of this manual.<br />
Inspect belts for cleanliness, worn spots, tears, or<br />
wrinkles. Clean or replace belts as described in the<br />
Maintenance section of this manual.<br />
<strong>Co</strong>ntact your maintenance person or an Authorized<br />
Service Agency for service.<br />
Use recommended setting of 4. See the Programming<br />
section of this Manual if using a setting of 5.<br />
Verify <strong>bun</strong>s are being inserted into the designated area<br />
of the Bun Feeder Assembly with the cut side of the<br />
<strong>bun</strong> facing towards the front of the unit.<br />
Use recommended setting of 4. See the Programming<br />
section of this Manual if using a setting of 5.<br />
Belts must be installed as described in the<br />
Maintenance section of this manual.<br />
Inspect belts for cleanliness, worn spots, tears, or<br />
wrinkles. Clean or replace belts as described in the<br />
Maintenance section of this manual.<br />
Lubricate the Drive Chain carefully with Lubit-8 (P/N<br />
2140152) at least once a year.<br />
<strong>Co</strong>ntact your maintenance person or an Authorized<br />
Service Agency for service.<br />
Inspect the proper position of the Locks as described<br />
in the Maintenance section of this manual.<br />
Verify vents on <strong>toaster</strong> are unblocked and not near<br />
other heating appliances. Clean fans describe in<br />
the Maintenance section of this manual. If error persists<br />
contact your maintenance person or Authorized<br />
Service Agency for service.<br />
Inspect position of the shafts as described in the<br />
Maintenance section of this manual.<br />
P/N 1011112 Rev. M 02/15<br />
McDonald’s<br />
19<br />
A.J. <strong>Antunes</strong> & <strong>Co</strong>.
HEBT-5V BUN TOASTER<br />
REPLACEMENT PARTS<br />
1<br />
2<br />
6<br />
8<br />
9<br />
7<br />
5<br />
3<br />
4<br />
Item Part No. Description Qty.<br />
1 0021770 Angular Feeder, End Housing Side 1<br />
2 0012774 Bun Feeder Assembly 1<br />
3 0506184 Bun Stop Bracket 1<br />
4 0021733 Club Base Divider Weldment 1<br />
5 7000884 Damper Replacement Kit 1<br />
Incl. Items 6, 7, 8, & 9<br />
6 0400425 Damper 2<br />
7 0506300 Damper Support 2<br />
8 0600132 Spring, Damper Support 2<br />
9 306P104* Screw, Mach. #06-32 x 1/4 8<br />
* Items available in packages of ten (10)<br />
A.J. <strong>Antunes</strong> & <strong>Co</strong>.<br />
20<br />
P/N 1011112 Rev. M 02/15<br />
McDonald’s
REPLACEMENT PARTS (continued)<br />
HEBT-5V BUN TOASTER<br />
20<br />
21<br />
22<br />
23<br />
24<br />
25<br />
26<br />
17<br />
26<br />
11<br />
12<br />
14<br />
8<br />
9<br />
7<br />
17<br />
27<br />
31<br />
15<br />
12<br />
4<br />
5<br />
6<br />
10<br />
13<br />
7<br />
16<br />
12<br />
18<br />
11<br />
19<br />
28<br />
3<br />
1<br />
2<br />
Item Part No. Description Qty. Item Part No. Description Qty.<br />
1 2100253 Knob, 1/4” Shaft, Push-On 1<br />
2 1001417 Label, <strong>Co</strong>mpression 1<br />
3 0506179 End Housing Panel 1<br />
4 325P193* Screw, Hex Head, #1/4-20 X 1.375” 1<br />
5 0506188 Bracket, Housing Locking 1<br />
6 2120216 Spacer,Upper Locking Plate, Front 1<br />
7 310P146* Nut, Hex ‘KEPS’ #10-32 1<br />
(see Item 29, 30,, & 31)<br />
8 325P176* Screw, Flange Hex Head Cap 1<br />
(see item 30 & 31)<br />
9 0506291 Bracket, Tensioner- 1<br />
End Housing, Rear (See item 31)<br />
10 0506292 Bracket, Tensioner- 1<br />
End Housing, Front (see item 30)<br />
11 2150285 Bearing, Single Groove S/S 8<br />
(See Item 29, 30 & 31)<br />
12 0504320 Spacer 0.781 X 1.125 X 0.06” 10<br />
(see Item 29, 30 & 31)<br />
13 0600158 Spring, Roller Tension 4<br />
(see item 30 & 31)<br />
14 0506293 Plate, Tensioner - End Housing, Rear 1<br />
(see item 31)<br />
15 0506294 Plate, Tensioner - End Housing, Front 1<br />
(See item 30)<br />
16 0506167 Bracket, Bearing 2<br />
17 325P194* Screw, Hex Head, 4<br />
#1/4-20 X 2.00”, S.S.<br />
18 0021714 Weldment, End Housing Rod Support 1<br />
19 0400418 Push In Grommet For 1-1/8” Dia. Hole 1<br />
20 0021725 Weldment, Bearing Bracket 1<br />
& Spring Guide LH (see item 30)<br />
21 0021724 Weldment, Bearing Bracket 1<br />
& Spring Guide RH (See item 30)<br />
22 308P145* Nut, Hex Acorn #08-32 11<br />
23 0600156 Spring, Cam Adjustment 2<br />
24 0012814 Cam Bracket & Thrust Strip<br />
Assembly, LH 1<br />
25 2120223 Sleeve Bearing, .50” Od X .75” LG 2<br />
26 2120213 Spacer, Frame & Platen LH 4<br />
27 2150322 Cam, HEBT 2<br />
28 310P110* Screw, Mach. #10-32 X 1/2” 2<br />
29 7000856 Bearing Kit (incl. items 7, 11, & 12) 1<br />
30 7000859 Idler Shaft Tensioner Assy. Front End 1<br />
Hsg. Side Kit (Incl. items 7, 8, 10, 11,<br />
12, 13, 15, & 21)<br />
7000860 Idler Shaft Tensionser Assy. Rear End 1<br />
Hsg. Side Kit (Incl. items 7, 8, 9, 11,<br />
12, 13, 14, & 20)<br />
31 0600143 Spring, <strong>Co</strong>mpression Setting 1<br />
* Items available in packages of ten (10)<br />
P/N 1011112 Rev. M 02/15<br />
McDonald’s<br />
21<br />
A.J. <strong>Antunes</strong> & <strong>Co</strong>.
HEBT-5V BUN TOASTER<br />
REPLACEMENT PARTS (continued)<br />
1<br />
2<br />
3<br />
4<br />
5<br />
5<br />
5<br />
6<br />
12<br />
7<br />
8<br />
10<br />
11<br />
13<br />
14<br />
9<br />
15<br />
13<br />
29<br />
28<br />
27<br />
16<br />
26<br />
21<br />
17<br />
25<br />
24<br />
23<br />
13<br />
20<br />
30<br />
22<br />
19<br />
18<br />
Item Part No. Description Qty. Item Part No. Description Qty.<br />
1 308P151* Screw, SEMS #8-32 x 5/16” 1<br />
2 0506155 Duct, Fan 1<br />
3 3100213 Screw, PHPNHD #10-16 x 3/4” 1<br />
THRD Form, #3 PT<br />
4 7000913 Fan Kit (Incl. Item 3) 1<br />
5 4030352 Thermostat, Hi-Limit 3<br />
6 4060387 Terminal Block, 2 Pole 1<br />
7 306P105* Screw, Mach #6-32 x 1/4 1<br />
8 0400375 Strain Relief, <strong>Co</strong>rd 1<br />
9 0400376 Lock-nut, <strong>Co</strong>nduit 1<br />
10 308P193* Screw, Mach #08-32 x 1 1/4 1<br />
11 4060398 Terminal Block, S-Series 1<br />
12 0700588 Power <strong>Co</strong>rd (Mfg. No. 9210840 & 844) 1<br />
7000465 Power <strong>Co</strong>rd (Mfg. No. 9210845) 1<br />
0700687 Power <strong>Co</strong>rd (Mfg. No. 9210841 & 842) 1<br />
7000463 Power <strong>Co</strong>rd (Mfg. No. 9210846) 1<br />
0700437 Power <strong>Co</strong>rd (Mfg. No. 9210847 & 848) 1<br />
13 304P105* Nut, Hex KEPS #4-40 Zinc 1<br />
14 7000870 I/O Board Kit (Mfg. No. 9210840, 1<br />
841, 842, 844, 845 & 846)<br />
7000889 I/O Board Kit (Mfg. No. 9210847 & 848) 1<br />
15 7000869 Display Board Kit (Mfg. No 9210840, 1<br />
841, 842, 844, 845, & 846)<br />
7000888 Display Board Kit 1<br />
(Mfg. No. 9210847 & 848)<br />
16 1001399 Label, <strong>Co</strong>ntrol 1<br />
17 1001394 Label, Smart Enabled MCD 1<br />
18 2100212 Handle, Pull, Snap-in 3<br />
19 0506139 <strong>Co</strong>ntrol Panel 1<br />
20 1001213 Label, Shock Hazard 1<br />
21 1001434 Label, Thermocouple 1<br />
22 2090163 Filter, RFI 250VAC 1<br />
23 306P103* Screw, Mach #06 x 3/80 1<br />
24 4050240 Relay, Solid State Dual Pole 1<br />
With <strong>Co</strong>nn-receptical<br />
25 0506156 Heat Sink, Relay 1<br />
26 7000370 Solid State Relay Kit 1<br />
27 7000868 Switch Kit, Power 1<br />
28 2110199 Clip “C” type 9<br />
29 7000871 Varistor Board Kit 1<br />
30 1000900 Label, Service 1<br />
* Items available in packages of ten (10)<br />
A.J. <strong>Antunes</strong> & <strong>Co</strong>.<br />
22<br />
P/N 1011112 Rev. M 02/15<br />
McDonald’s
REPLACEMENT PARTS (continued)<br />
HEBT-5V BUN TOASTER<br />
2<br />
1<br />
6<br />
7<br />
5<br />
3<br />
4<br />
See Next Page<br />
for Detail<br />
18<br />
29<br />
8<br />
19<br />
10<br />
9<br />
20<br />
13<br />
21<br />
22<br />
21<br />
11<br />
1<br />
28<br />
27<br />
21<br />
1<br />
12<br />
27<br />
1<br />
1<br />
14<br />
26<br />
21<br />
25<br />
24<br />
15<br />
25<br />
16<br />
23<br />
17<br />
Item Part No. Description Qty. Item Part No. Description Qty.<br />
1 310P124* Screw, #10-32 X 2-1/4” 1<br />
Truss Head S/S<br />
2 0506093 Support Bracket, LH 1<br />
3 0506149 <strong>Co</strong>ver, Adj. Platen 1<br />
4 0021780 Crown Plate Weldment 1<br />
End Housing Side<br />
5 0100272 Platen, Club 1<br />
6 0506178 Plate, Heel Platen 1<br />
7 0506168 Plate, Crown 1<br />
8 0021719 Weldment, Idler Roller Rear Top 1<br />
9 0021718 Weldment, Idler Roller Front Top 1<br />
10 0021707 Weldment, Adj. Platen Frame 1<br />
11 2150303 Cam Shaft 1<br />
12 0021711 Weldment, Fixed Platen Frame 1<br />
13 0021721 Weldment, Drive Roller Rear Bottom 1<br />
14 0021720 Weldment, Drive Roller Front Bottom 1<br />
15 7000795 HEBT Crown Belt 1<br />
16 7000797 HEBT Heel/Club Belt 1<br />
17 7000796 HEBT Main Belt 1<br />
18 0100266 Platen, Main (see Item 29) 1<br />
19 0400416 Insulation, Main Platen (see Item 29) 1<br />
20 308P102* Washer, Int. Tooth #08 Steel 1<br />
Zinc Plated (see Item 29)<br />
21 308P164* Screw, Mach. #8-32 x 1” LG 1<br />
(see Item 29)<br />
22 0506092 Support Bracket, RH 1<br />
23 7000799 HEBT Belt Kit (incl. items 15, 16 & 17) 1<br />
24 0506150 <strong>Co</strong>ver, Fixed Platen 1<br />
25 0400290 Insulator, Electrical 4<br />
26 0506158 Insulation Plate 1<br />
27 308P151* Screw, SEMS #8-32 x 5/16” Flex Line 1<br />
(see Item 29)<br />
28 0506183 Retainer Plate, Thermocouple 1<br />
(see Item 29)<br />
29 7000857 Main Platen Kit (Mfg. No. 9210840,<br />
841, 842, & 844) Incl. Items 18, 19, 20,<br />
21, 28, & 27)<br />
7000876 Main Platen Kit (Mfg. No. 9210845) 1<br />
Incl. Items 18, 19, 20, 21, 28, & 27)<br />
* Items available in packages of ten (10)<br />
P/N 1011112 Rev. M 02/15<br />
McDonald’s<br />
23<br />
A.J. <strong>Antunes</strong> & <strong>Co</strong>.
HEBT-5V BUN TOASTER 16<br />
16<br />
14<br />
8<br />
15<br />
15<br />
8<br />
16<br />
14<br />
8<br />
13<br />
16<br />
REPLACEMENT 13<br />
PARTS (continued)<br />
12<br />
13<br />
14<br />
8<br />
16<br />
16<br />
14<br />
8<br />
13<br />
16<br />
13<br />
2<br />
16<br />
13<br />
15<br />
8<br />
16<br />
14<br />
8<br />
3<br />
16<br />
13<br />
16<br />
14<br />
8<br />
15<br />
13<br />
10<br />
12<br />
12<br />
9<br />
10<br />
9<br />
6<br />
11<br />
11<br />
7<br />
17<br />
5<br />
6<br />
4<br />
Item Part No. Description Qty. Item Part No. Description Qty.<br />
1 0012594 Adj. Platen Assembly 1<br />
2 0021710 Weldment, Back Plate Adj. Platen 1<br />
3 0021712 Weldment, Crown Plate 1<br />
4 0021780 Crown Plate Weldment 1<br />
End Housing Side<br />
5 0100271 Platen, Club 230 VAC, 900W 1<br />
(See Item 17)<br />
6 0400290 Insulator, Electrical 1<br />
7 0400417 Insulation, Fiberglass Club Platen 1<br />
(See Item 17)<br />
8 0506083 Spacer 8<br />
9 0506178 Plate, Heel Platen 1<br />
10 0506198 Spacer, .625 OD x .218 x .075 Thick 2<br />
(See Item 17)<br />
11 2120226 Spacer, .50 OD x .203 ID x .328 Thick 2<br />
(See Item 17)<br />
12 2120227 Spacer, .50 OD x 203” ID x .265 Thick 2<br />
(See Item 17)<br />
13 310P102* Washer, Lock #10 S/S Internal Tooth 1<br />
(See Item 17)<br />
14 310P140* Washer, Flat #10 Stl/ZN 1<br />
.219 x .500 x .049 (See Item 17)<br />
15 310P209* Screw, Mach #10-24 x 3/4” 1<br />
Slotted TrussHD 18-8SS<br />
16 310P214* Screw, Hex #10-322 x 1/4 1<br />
Thrd Cutting Type F, SS<br />
17 7000858 Club Platen Assy. Kit 1<br />
(Mfg. No. 9210845) (Incl. Items 5, 7,<br />
10, 11, 12, 13, & 14)<br />
7000875 Club Platen Assy. Kit 1<br />
(Mfg. No. 9210840, 841, 842, & 844)<br />
(Incl. Items 5, 7, 10, 11, 12, 13, & 14)<br />
* Items available in packages of ten (10)<br />
A.J. <strong>Antunes</strong> & <strong>Co</strong>.<br />
24<br />
P/N 1011112 Rev. M 02/15<br />
McDonald’s
REPLACEMENT PARTS (continued)<br />
HEBT-5V BUN TOASTER<br />
1<br />
5<br />
3<br />
2<br />
6<br />
27<br />
1<br />
2<br />
3<br />
4<br />
7<br />
8<br />
48<br />
29<br />
12<br />
9 10 13<br />
11<br />
28<br />
14<br />
27<br />
26<br />
20<br />
25<br />
24<br />
16<br />
30<br />
12<br />
13<br />
31<br />
23<br />
22<br />
17<br />
20<br />
19<br />
18<br />
17<br />
9<br />
16<br />
10<br />
14<br />
15<br />
21<br />
Item Part No. Description Qty. Item Part No. Description Qty.<br />
2 2150285 Bearing, Single Groove S/S 8<br />
(See Item 32)<br />
3 0504320 Spacer (See Item 32) 10<br />
4 2120221 Spacer, .69 x .503 x .359 S/S 2<br />
5 0506144 Plate, Tensioner RH (See Item 32) 2<br />
6 0021724 Weldment, Bearing Bracket-RH 1<br />
(See Item 32)<br />
0021725 Weldment, Bearing Bracket-LH 1<br />
(See Item 32)<br />
7 0506163 Bracket Tensioner (See Item 32) 2<br />
8 310P146* Nut, Hex KEPS #10-32 (See Item 32) 1<br />
9 2120214 Spacer, Adj. Frame RH 2<br />
10 2120224 Sleeve Bearing 2<br />
11 0506095 Cam Bracket, RH 1<br />
12 0600143 Spring, <strong>Co</strong>mpression 2<br />
13 308P145* Nut, Hex Acorn #08-32 1<br />
14 3250193 Screw, Hex Head, 1/4-20 1<br />
15 2150322 Cam, HEBT 1<br />
16 3310103 Shoulder Bolt 2<br />
P/N 1011112 Rev. M 02/15<br />
McDonald’s<br />
25<br />
17 2150313 Flanged Bearing 2<br />
18 212P118 Flat Washer Stainless Steel 1<br />
19 2150312 Sprocket, 25B14 2<br />
20 331P101* Nut, Hex 5/16-18 Stl Zn 1<br />
21 310P199* Screw, #10-32 x 3/8 LG 1<br />
22 0506185 Bracket, Chain 1<br />
23 0600157 Spring, Chain Tension 2<br />
24 2150185 Sprocket, 25B18 1/2” Bore 2<br />
25 2150312 Sprocket, 25B14 (See Item 33) 2<br />
26 2150324 Chain, Drive 1<br />
28 0506146 Retainer, Idler 1<br />
29 0600158 Spring, Roller Tension (See Item 32) 4<br />
30 2150303 Cam Shaft 1<br />
31 7000867 Drive Motor Kit 1<br />
32 7000861 Idler Shaft Tensioner Kit 1<br />
(Incl. Items 2, 3, 5, 6, 7, 8, & 29)<br />
33 7000872 Idler Sprocket Assy. Kit 1<br />
* Items available in packages of ten (10)<br />
A.J. <strong>Antunes</strong> & <strong>Co</strong>.
HEBT-5V BUN TOASTER<br />
REPLACEMENT PARTS (continued)<br />
1<br />
6<br />
4<br />
3<br />
2<br />
5<br />
8<br />
7<br />
8<br />
9<br />
13<br />
14<br />
15<br />
12<br />
11<br />
Item Part No. Description Qty.<br />
1 4050241 <strong>Co</strong>ntactor, 4 Pole 1<br />
2 7000886 Snubber Board Kit 1<br />
3 7000913 Fan - Axial, 200/230 VAC 1<br />
4 300P102* Nut, Speed #8-32 “U” 1<br />
5 4070170 MCD Vert Toaster Filter Board 1<br />
6 304P105* Nut, Hex KEPS #4-40 Zinc 1<br />
7 4010221 Cap-MP, Motor Run 1<br />
8 4050242 Filter, Power Line, 10A 2<br />
120/250 V, 50-60 HZ<br />
9 308P143 Nut, Hex KEPS #08-32 1<br />
11 0506181 Elec. Panel 1<br />
12 308P124* Screw, Mach #8-32 x 1/2” 1<br />
13 308P157* Screw, Tap #08-32 x 3/8 1<br />
14 310P103* Screw, Mach #10-32 x 1/4 1<br />
15 0506170 Fan <strong>Co</strong>ver 1<br />
* Items available in packages of ten (10)<br />
A.J. <strong>Antunes</strong> & <strong>Co</strong>.<br />
26<br />
P/N 1011112 Rev. M 02/15<br />
McDonald’s
HEBT-5V BUN TOASTER<br />
WIRING DIAGRAM<br />
P/N 1011112 Rev. M 02/15<br />
McDonald’s<br />
27<br />
A.J. <strong>Antunes</strong> & <strong>Co</strong>.