Karcher WV 75 plus

You also want an ePaper? Increase the reach of your titles
YUMPU automatically turns print PDFs into web optimized ePapers that Google loves.
Environmental protection<br />
The packaging material can be recycled.<br />
Please do not place the packaging<br />
into the ordinary refuse for disposal, but<br />
arrange for the proper recycling.<br />
Old appliance contain valuable recyclable<br />
materials and substances that<br />
must not be released into the environment.<br />
Thus, the appliance and the accumulator<br />
contained must not be disposed of via<br />
the domestic waste. The disposal can take<br />
place via locally available return and collection<br />
systems free of charge.<br />
Notes about the ingredients (REACH)<br />
You will find current information about the<br />
ingredients at:<br />
www.kaercher.com/REACH<br />
Symbols in the operating instructions<br />
Danger<br />
Immediate danger that can cause severe<br />
injury or even death.<br />
Warning<br />
Possible hazardous situation that could<br />
lead to severe injury or even death.<br />
Caution<br />
Possible hazardous situation that could<br />
lead to mild injury to persons or damage to<br />
property.<br />
Start up<br />
Description of the Appliance<br />
When unpacking the product, make sure<br />
that no accessories are missing and that<br />
none of the package contents have been<br />
damaged. If you detect any transport damages<br />
please contact your dealer.<br />
Illustrations on Page 2<br />
Illustration<br />
1 Charger with charging cable<br />
2 Basic appliance<br />
3 Charging box<br />
4 Charge/operations display<br />
5 Support leg<br />
6 Handle<br />
7 ON/OFF switch for appliance<br />
8 Dirt water reservoir, removable<br />
EN – 4<br />
9 Lock, dirt water reservoir<br />
10 Separator<br />
11 Unlocking device, separator<br />
12 Attachment with removable lips, wide<br />
13 Attachment with removable lips, narrow<br />
14 Unlocking device, suction nozzle<br />
15 Spray bottle<br />
16 Spray lever<br />
17 Wiping attachment<br />
18 Fastening ring for the wiper attachment<br />
19 Micro-fibre wiping pad<br />
20 Window cleaner concentrate<br />
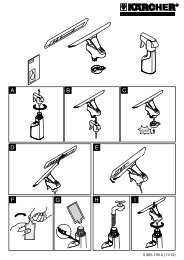
Assemble the appliance<br />
Illustration<br />
Attach the suction nozzle to the separator<br />
until it snaps in place audibly<br />
Note: Depending on the size and accessibility<br />
of the surface to be cleaned, use the<br />
appropriate suction nozzle. For example, a<br />
narrow suction nozzle for multi-pane windows,<br />
a wide suction nozzle for large windows.<br />
Attach the spray bottle and wiper<br />
attachment and fill it with detergent<br />
Note: Please note that after first activation<br />
of the spray head transport lock will loosen.<br />
Attach the wiping attachment<br />
Illustration<br />
Remove the spray head from the spray<br />
bottle.<br />
Attach the wiper attachment to the<br />
spray head.<br />
Secure the wiper attachment and the<br />
spray head with the fixating ring.<br />
Illustration<br />
Attach the wiper pad to the wiper attachment<br />
and secure with Velcro.<br />
Fill the spray bottle<br />
Illustration<br />
Fill the included concentrate (1 x 20 ml)<br />
into the spray bottle and fill the bottle<br />
slowly with clear water (makes 250 ml<br />
of detergent solution).<br />
Close the bottle.<br />
9