Karcher WV 75 plus

Create successful ePaper yourself
Turn your PDF publications into a flip-book with our unique Google optimized e-Paper software.
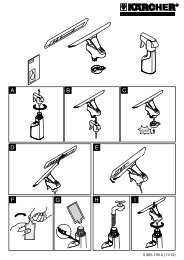
Charge the battery<br />
Illustration<br />
Insert the charger delivered with the appliance<br />
into a proper socket.<br />
Insert the charging cable plug to the<br />
back of the appliance.<br />
Note: During the charging process, the<br />
charge/operating display blinks. Once<br />
the battery is fully charged, it will be permanently<br />
illuminated.<br />
Start working<br />
Cleaning with spray bottle and wiper<br />
attachment<br />
Illustration<br />
Press the spray lever on the bottle to<br />
apply the detergent and spray the surface<br />
evenly; after that, loosen the dirt<br />
using the wiping pad.<br />
Note: Rinse pad under running water if<br />
needed!<br />
Illustration<br />
Switch the appliance on, the charge/operations<br />
display will illuminate.<br />
Important: Prior to use, ensure that the<br />
squeegees are free of soiling.<br />
Pull the appliance from the top to the<br />
bottom to vacuum up the detergent.<br />
Note: Hard to reach areas can be vacuumed<br />
vertically or horizontally (limited areas).<br />
Notes:<br />
If the battery is low, the charging / power indicator<br />
starts flashing slowly and the appliance<br />
switches off after a certain time. If this<br />
is the case, charge the battery.<br />
The appliance can be switched off while the<br />
spray bottle is in use. This significantly increases<br />
the operating time per battery<br />
charge.<br />
Cleaning without the spray bottle<br />
Apply the detergent as usual according<br />
to manufacturer's instructions and loosen<br />
the dirt.<br />
Further procedure same as the "Cleaning<br />
with spray bottle and wiper attachment",<br />
see illustration .<br />
Interrupting the work<br />
Illustration<br />
Switch off the appliance and set it down<br />
on the pedestal (parking position).<br />
Emptying the reservoir during<br />
operation<br />
Once the max. fill level (mark) of the dirt<br />
water reservoir is reached, please empty<br />
the tank.<br />
Illustration<br />
Turn off the appliance.<br />
Illustration<br />
Pull off the lock of the dirt water reservoir<br />
and empty the tank.<br />
Close the closure of the wastewater<br />
tank.<br />
Finish up your work / clean<br />
appliance<br />
Illustration<br />
Turn off the appliance.<br />
Illustration<br />
Unlock the suction nozzle first and remove<br />
it from the separator, then unlock<br />
the separator and remove it, too.<br />
Clean the separator and the suction<br />
nozzle under running water (not dishwasher<br />
safe).<br />
Illustration<br />
Caution: The basic appliance contains<br />
electrical components. Do not clean this<br />
under running water!<br />
Remove the dirt water reservoir, rotate<br />
the lock and pull out.<br />
Empty the reservoir and rinse with clear<br />
water. Close the reservoir again.<br />
Remove the wiping cover from the<br />
spray bottle and rinse it under running<br />
water. The wiping cover can also be<br />
washed in the washing machine at a<br />
temperature of up to 60°C (without the<br />
use of fabric softeners).<br />
Let the cleaned appliance dry prior to<br />
assembly.<br />
Charge the battery.<br />
10 EN – 5