

workbench-en.a4

You also want an ePaper? Increase the reach of your titles
YUMPU automatically turns print PDFs into web optimized ePapers that Google loves.
Chapter 7. Creating Tables<br />
7.1. Adding Tables to the Physical Schemata<br />
Double clicking the Add table icon in the Physical Schemata section of the MySQL Model page adds a table with the<br />
default name of table1. If a table with this name already exists, the new table is named table2.<br />
Adding a new table automatically op<strong>en</strong>s the table editor docked at the bottom of the application. Using the table editor is described<br />
in Section 7.3, “The MySQL Table Editor”.<br />
Right clicking a table op<strong>en</strong>s a pop-up m<strong>en</strong>u with the following options:<br />
• RENAME<br />
• CUT 'TABLE_NAME'<br />
• COPY 'TABLE_NAME'<br />
• EDIT TABLE...<br />
• EDIT IN NEW WINDOW<br />
• COPY SQL TO CLIPBOARD<br />
• DELETE 'TABLE_NAME'<br />
If the table editor is not op<strong>en</strong> the EDIT TABLE ... option op<strong>en</strong>s it. If it is already op<strong>en</strong>, the selected table replaces the previous one.<br />
EDIT IN NEW WINDOW op<strong>en</strong>s a new table editor tab.<br />
The cut and copy options are useful for copying tables betwe<strong>en</strong> differ<strong>en</strong>t schemata and COPY SQL TO CLIPBOARD copies the CRE-<br />
ATE TABLE statem<strong>en</strong>t to the clipboard.<br />
Warning<br />
Use the DELETE 'TABLE_NAME' to remove a table from the database. There will be no confirmation dialog box.<br />
Any tables added to the Physical Schemata also show up in the Catalog palette on the right side of the application. They<br />
may be added to an EER Diagram by dragging and dropping them from this palette.<br />
7.2. Adding Tables to an EER Diagram<br />
Tables can also be added to an EER Diagram using the table tool on the vertical toolbar. To do this make sure that the EER<br />
Diagram tab is selected, and right click the table icon on the vertical toolbar. The table icon is the rectangular tabular icon.<br />
Clicking the mouse on this icon changes the mouse pointer to a table pointer. You can also change the mouse pointer to a table<br />
pointer by pressing the T key.<br />
Choosing the table tool changes the cont<strong>en</strong>ts of the toolbar that appears immediately below the m<strong>en</strong>u bar. Wh<strong>en</strong> the Tables<br />
pointer is active, this toolbar contains a drop down list box of schemata, a drop down list box of <strong>en</strong>gines, a drop down list box of<br />
collations, and a drop down color chart. Use these list boxes to select the appropriate schema, <strong>en</strong>gine, collation, and color acc<strong>en</strong>t for<br />
the new table. Make sure that you associate the new table with a database. The <strong>en</strong>gine and collation of a table can easily be changed<br />
from the table editor and the color of your table can be changed later using the Properties palette. The Default Engine<br />
and Default Collation values refer to the database defaults.<br />
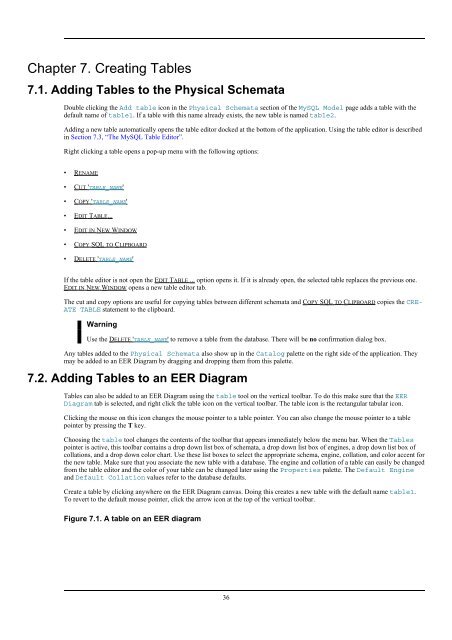
Create a table by clicking anywhere on the EER Diagram canvas. Doing this creates a new table with the default name table1.<br />
To revert to the default mouse pointer, click the arrow icon at the top of the vertical toolbar.<br />
Figure 7.1. A table on an EER diagram<br />
36
