sebia
sebia® - Sebia Electrophoresis
sebia® - Sebia Electrophoresis
- No tags were found...

You also want an ePaper? Increase the reach of your titles
YUMPU automatically turns print PDFs into web optimized ePapers that Google loves.
PH02<br />
<strong>sebia</strong> ®<br />
electrophoresis<br />
Advanced Backup Quick Reference Guide (for use with CD-Rs)<br />
1. Before starting Phoresis, create a new folder on the desktop by right clicking the mouse, and then selecting New ►<br />
Folder.<br />
2. Rename the newly created folder Phoresis Backup by right clicking on the folder’s icon ►Rename►typing in<br />
“Phoresis Backup”. Keep the folder on your desktop for future backups (i.e, omit steps one and two after the first<br />
data backup).<br />
3. Within Phoresis, go to Advanced Backup (Database►Backup►Advanced Backup).<br />
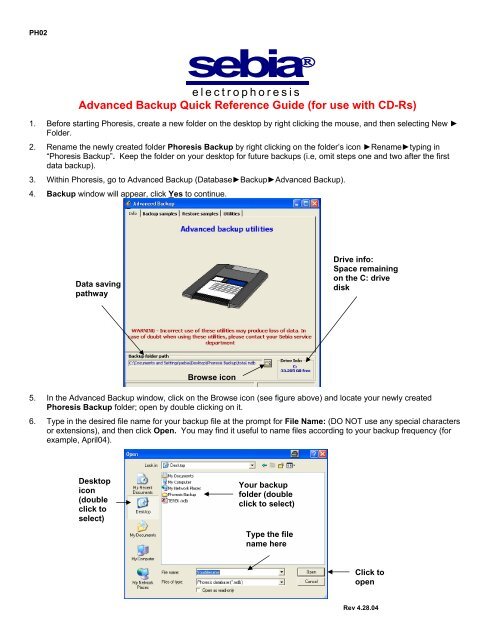
4. Backup window will appear, click Yes to continue.<br />
Data saving<br />
pathway<br />
Drive info:<br />
Space remaining<br />
on the C: drive<br />
disk<br />
Browse icon<br />
5. In the Advanced Backup window, click on the Browse icon (see figure above) and locate your newly created<br />
Phoresis Backup folder; open by double clicking on it.<br />
6. Type in the desired file name for your backup file at the prompt for File Name: (DO NOT use any special characters<br />
or extensions), and then click Open. You may find it useful to name files according to your backup frequency (for<br />
example, April04).<br />
Desktop<br />
icon<br />
(double<br />
click to<br />
select)<br />
Your backup<br />
folder (double<br />
click to select)<br />
Type the file<br />
name here<br />
Click to<br />
open<br />
Rev 4.28.04
(continued)<br />
7. Select the Backup samples tab from the top of the Advanced Backup window.<br />
8. At the data file tree, select program types and dates to be backed up (left click on the box to the left from date or<br />
program of interest). See figure below for more details.<br />
a. There is no limit to the number of files to be backed up. Important: Prior to backing up, ensure that the<br />
disk selected for backup is large enough to accommodate all data.<br />
9. Select Copy or Move (Move will remove data from Phoresis source folder).<br />
10. Backup samples window will appear. Click Yes to backup samples, No to exit.<br />
11. When data are successfully copied or moved to Phoresis Backup folder, insert CD-R or CD-RW disk in your CD-<br />
RW drive (drive D:). Open Phoresis Backup folder (located on your desktop), click on the backup file, right<br />
click►Send to►D: In My Computer, double click D: ►Write these files to CD (top left corner).<br />
Computer will write the selected file on the medium. The disk will eject automatically when finished.<br />
View data either by<br />
Year(s) or Program(s)<br />
Refresh<br />
data<br />
Displays individual sample(s)<br />
in selected folder<br />
“+” will<br />
expand<br />
all the<br />
data for<br />
the<br />
assays by<br />
year,<br />
month,<br />
and day.<br />
“-“ will<br />
reduce all<br />
the data.<br />
Samples<br />
selected for<br />
either saving,<br />
moving, or<br />
deleting.<br />
By inserting a check mark<br />
you select samples for<br />
saving, moving, or deletion.<br />
Copy data onto the C: drive.<br />
Move data onto the C: drive.<br />
Data will be removed from<br />
Phoresis folder.<br />
Displays specifics of the data that<br />
will be copied, moved, or deleted.<br />
For further instructions, please refer to the operator’s manual.<br />
Displays<br />
cards for<br />
Proteins<br />
and IFEs.<br />
Size of<br />
file to<br />
be<br />
copied,<br />
moved<br />
or<br />
deleted.<br />
Delete<br />
files<br />
from the<br />
Phoresis<br />
folder<br />
without<br />
copying<br />
or<br />
moving.<br />
Drive info:<br />
Space<br />
remaining<br />
on the disk