La ceramica per titanio e ossido di zirconio
989-643-51_Modalità d'uso Triceram.pdf - Dentaurum Italia
989-643-51_Modalità d'uso Triceram.pdf - Dentaurum Italia
- No tags were found...

Create successful ePaper yourself
Turn your PDF publications into a flip-book with our unique Google optimized e-Paper software.
triceram ® modalità d'uso<br />
it<br />
<strong>La</strong> <strong>ceramica</strong> <strong>per</strong><br />
<strong>titanio</strong> e <strong>ossido</strong> <strong>di</strong> <strong>zirconio</strong><br />
Informazioni sul prodotto e modalità d'uso
Titanio / I suoi vantaggi in breve<br />
Per pazienti sod<strong>di</strong>sfatti<br />
Il <strong>titanio</strong> ha un'elevata resistenza alla corrosione<br />
Il <strong>titanio</strong> non si corrode. Grazie alla formazione <strong>di</strong> una pellicola su<strong>per</strong>ficiale <strong>di</strong><br />
<strong>ossido</strong>, non crea reazioni con l'ambiente circostante. Viene anche definito<br />
„chimicamente inerte“.<br />
Il <strong>titanio</strong> è biocompatibile<br />
Il <strong>titanio</strong> non rilascia ioni e non scatena reazioni patologiche nell'organismo.<br />
Il <strong>titanio</strong> è il metallo più biotollerato<br />
Si è imposto in me<strong>di</strong>cina ed in odontoiatria.<br />
Il <strong>titanio</strong> ha una bassa conducibilità termica<br />
Il paziente può assumere alimenti cal<strong>di</strong> o fred<strong>di</strong> senza avvertire fasti<strong>di</strong> dentali.<br />
L'oro possiede una conducibilità termica 15 volte su<strong>per</strong>iore a quella del <strong>titanio</strong>,<br />
provocando al paziente una maggiore sensibilizzazione al caldo o al freddo.<br />
Il <strong>titanio</strong> è insapore<br />
<strong>La</strong> su<strong>per</strong>ficie passivata del <strong>titanio</strong> previene qualsiasi reazione tra metallo, saliva<br />
ed alimenti. Il paziente non avverte quel tipico e fasti<strong>di</strong>oso sapore metallico.<br />
Il <strong>titanio</strong> offre svariate possibilità d'impiego<br />
È possibile utilizzare il <strong>titanio</strong> <strong>per</strong> un'ampia varietà <strong>di</strong> in<strong>di</strong>cazioni <strong>di</strong>verse, con il<br />
vantaggio <strong>di</strong> impiantare in bocca un solo tipo <strong>di</strong> metallo.<br />
Il <strong>titanio</strong> è leggero<br />
Questa caratteristica è molto apprezzata dai pazienti. L'oro è 4 volte più<br />
pesante e ciò influisce sul comfort della protesi dentaria, specie se <strong>di</strong> molti elementi.<br />
Il <strong>titanio</strong> possiede un'elevata resistenza, senza<br />
essere né troppo duro né troppo tenero.<br />
Il <strong>titanio</strong> resiste <strong>per</strong>fettamente agli elevati carichi masticatori, ma al tempo<br />
stesso può essere lavorato con facilità nel laboratorio odontotecnico.<br />
Immagini:<br />
Foto: by Dentaurum<br />
Pag. 20: Dentallabor Bischoff, Northeim<br />
2 triceram ® modalità d'uso it
In<strong>di</strong>ce<br />
Pagina<br />
1. Dati tecnici ...................................................................................................................................... 4<br />
2. Istruzioni tecniche <strong>per</strong> la costruzione <strong>di</strong> strutture in <strong>titanio</strong>.................................. 6<br />
2.1. Progettazione e con<strong>di</strong>zionamento della struttura ............................................................ 6<br />
2.1.1. Generalità ........................................................................................................................ 6<br />
2.1.2. Rifinitura delle strutture in <strong>titanio</strong> .................................................................................... 7<br />
2.2. Ceramizzazione ................................................................................................................ 8<br />
2.2.1. Tabella <strong>di</strong> combinazione colori ........................................................................................ 8<br />
2.2.2. Tabella cotture ................................................................................................................ 8<br />
2.2.3. Prove <strong>di</strong> cottura / Taratura del forno ................................................................................ 9<br />
2.2.4. Stesura del bonder .......................................................................................................... 10<br />
2.2.5. AESTHETIC UNIVERSAL Bonder ........................................................................................ 11<br />
2.2.6. Stesura dell'opaco ............................................................................................................ 12<br />
2.2.7. Impiego delle masse spalla .............................................................................................. 13<br />
2.2.8. Stratificazione <strong>di</strong> dentina e masse incisali ........................................................................ 15<br />
2.2.8.1. Schema <strong>di</strong> stratificazione ................................................................................................ 15<br />
2.2.8.2. Avvertenze sull'uso <strong>di</strong> masse e liqui<strong>di</strong> .............................................................................. 15<br />
2.2.8.3. Stratificazione standard step-by-step ................................................................................ 18<br />
2.2.8.4. Stratificazione in<strong>di</strong>viduale step-by-step ............................................................................ 20<br />
2.2.9. Impiego delle masse gengivali .......................................................................................... 21<br />
2.2.10. Impiego della massa <strong>di</strong> correzione .................................................................................... 21<br />
2.2.11. Preparazione della <strong>ceramica</strong> Triceram ® ............................................................................ 21<br />
3. Modalità d'uso dei Liners Triceram ® su strutture in <strong>ossido</strong> <strong>di</strong> <strong>zirconio</strong> ............ 22<br />
4. Accessori <strong>per</strong> la rifinitura della <strong>ceramica</strong> ........................................................................ 23<br />
5. Triceram ® Programma completo .............................................................................................. 24<br />
6. Triceram ® Assortimenti ................................................................................................................ 25<br />
7. Tabelle <strong>di</strong> cottura <strong>per</strong> strutture in <strong>titanio</strong> ........................................................................ 26<br />
8. Tabelle <strong>di</strong> cottura <strong>per</strong> strutture in <strong>ossido</strong> <strong>di</strong> <strong>zirconio</strong> ................................................ 27<br />
Garanzia<br />
Tutti i dati relativi ai prodotti ed alle procedure o<strong>per</strong>ative <strong>per</strong> il loro impiego sono il frutto della nostra es<strong>per</strong>ienza,<br />
ma non sono vincolanti, fatta eccezione <strong>per</strong> le in<strong>di</strong>cazioni riguardanti il confezionamento e le quantità dei<br />
singoli articoli. Tutti i nostri prodotti sono in continua evoluzione e <strong>per</strong>tanto ci riserviamo il <strong>di</strong>ritto <strong>di</strong> apportare<br />
mo<strong>di</strong>fiche.<br />
triceram ® modalità d'uso it 3
1. Dati tecnici<br />
CET e tem<strong>per</strong>ature <strong>di</strong> cottura<br />
Il <strong>titanio</strong> puro necessita <strong>di</strong> una <strong>ceramica</strong> con caratteristiche<br />
particolari.<br />
<strong>La</strong> <strong>ceramica</strong> deve avere un CET (coefficiente <strong>di</strong> espansione termica) che sia compatibile<br />
con il <strong>titanio</strong> (9.6 x 10 -6 + K -1 25 - 500°C) ed inoltre la sua tem<strong>per</strong>atura <strong>di</strong><br />
cottura non deve su<strong>per</strong>are gli 800° C. Infatti, come noto, oltre tale tem<strong>per</strong>atura il<br />
<strong>titanio</strong> subisce una trasformazione cristallina da evitare e tende a reagire con l'ambiente<br />
che lo circonda.<br />
<strong>La</strong> Triceram ® è una <strong>ceramica</strong> monofase che possiede queste specifiche caratteristiche.<br />
<strong>La</strong> sua tem<strong>per</strong>atura <strong>di</strong> cottura non su<strong>per</strong>a i 795° C ed il suo CET è compatibile<br />
con quello del <strong>titanio</strong> (ve<strong>di</strong> tabella „Valori CET delle singole masse Triceram ® “<br />
e grafico „Dipendenza termica del CET“).<br />
Resistenza alla flessione e stabilità chimica<br />
Ancora <strong>di</strong> più: Triceram ® sod<strong>di</strong>sfa e ad<strong>di</strong>rittura su<strong>per</strong>a i requisiti minimi imposti<br />
dalla normativa internazionale in materia (EN ISO 6872, EN ISO 9693) e presenta<br />
una solubilità chimica <strong>di</strong> gran lunga inferiore al valore massimo <strong>per</strong>messo (ve<strong>di</strong><br />
tabella „Solubilità in<strong>di</strong>viduale delle masse Triceram ® “).<br />
Adesione<br />
L'adesione tra la <strong>ceramica</strong> e la struttura sottostante ha giocato un ruolo molto<br />
importante nello sviluppo <strong>di</strong> questa <strong>ceramica</strong>. Con i suoi 42 MPa, Triceram ® va ben<br />
oltre a quanto viene richiesto nella norma EN ISO 9693 (25 MPa) (ve<strong>di</strong> grafico „Test<br />
<strong>di</strong> flessione“). <strong>La</strong> libertà estetica nella realizzazione dei bor<strong>di</strong> marginali viene<br />
ottenuta grazie all'uso del bianco bonder Triceram ® senza <strong>per</strong>altro dover scendere<br />
a compromessi <strong>di</strong> adesione. Inoltre, con l'AESTHETIC UNIVERSAL bonder possono<br />
essere raggiunti nuovi limiti estetici e <strong>di</strong> adesione (oltre 52 MPa).<br />
Affidabilità<br />
<strong>La</strong> scelta delle materie prime impiegate ed il protocollo <strong>di</strong> utilizzo della <strong>ceramica</strong><br />
Triceram ® è stato notevolmente subor<strong>di</strong>nato alle caratteristiche meccaniche ed<br />
estetiche del prodotto finito. <strong>La</strong> produzione <strong>di</strong> CARMEN ® , la <strong>ceramica</strong> <strong>di</strong><br />
Dentaurum <strong>per</strong> leghe convenzionali, ha <strong>di</strong>mostrato che evitare l'uso <strong>di</strong> materiali<br />
prime naturali e <strong>per</strong> contro adottare comprovate tecniche produttive come la<br />
termo-pigmentazione, consente <strong>di</strong> ottenere un prodotto <strong>di</strong> elevata affidabilità.<br />
.<br />
4 triceram ® modalità d'uso it
Espansione (µm)<br />
90<br />
80<br />
70<br />
60<br />
Coefficiente <strong>di</strong> espansione<br />
termica (CTE 25-400 °C):<br />
50<br />
40<br />
30<br />
20<br />
10<br />
0<br />
Tg<br />
0 100 200 300 400 500 600 700<br />
Tem<strong>per</strong>atura (°C)<br />
Espansione termica del <strong>titanio</strong> e <strong>di</strong> Triceram ®<br />
Bonder Triceram ® : 9,2 x 10 -6 K -1<br />
Opaco Triceram ® : 8,8 x 10 -6 K -1<br />
Dentina Triceram ® : 8,6 x 10 -6 K -1<br />
Incisale Triceram ® : 8,5 x 10 -6 K -1<br />
Valori CET delle singole masse Triceram ®<br />
MPa<br />
100<br />
90<br />
80<br />
70<br />
60<br />
50<br />
40<br />
30<br />
20<br />
10<br />
0<br />
min. (stand.)<br />
Resistenza alla flessione<br />
( <strong>di</strong> Triceram ® ISO 9693)<br />
opaco<br />
dentina<br />
incisale<br />
Solubilità:<br />
<strong>La</strong> solubilità massima prevista dalla<br />
normativa ISO 9693 con testi <strong>di</strong><br />
idrolisi è <strong>di</strong> 100 µg/cm 2<br />
Valori osservati <strong>per</strong> le masse Triceram ® :<br />
opaco: 55 µg/cm 2<br />
dentina: 31 µg/cm 2<br />
incisale: 31 µg/cm 2<br />
<strong>La</strong> solubilità è quin<strong>di</strong> ben inferiore<br />
al valore limite specificato.<br />
Resistenza alla flessione<br />
Solubilità in<strong>di</strong>viduale delle masse Triceram ®<br />
Test <strong>di</strong> flessione (ISO 9693)<br />
(secondo Schwickerath)<br />
<strong>ceramica</strong> Triceram ®<br />
MPa<br />
50<br />
40<br />
30<br />
20<br />
10<br />
0<br />
min.( stand.)<br />
Triceram ®<br />
Adesione<br />
triceram ® modalità d'uso it 5
2. Istruzioni tecniche <strong>per</strong> la costruzione <strong>di</strong><br />
strutture in <strong>titanio</strong><br />
2.1. Progettazione e con<strong>di</strong>zionamento della<br />
struttura<br />
2.1.1. Generalità<br />
<strong>La</strong> corretta preparazione della struttura in <strong>titanio</strong> ed il suo successivo con<strong>di</strong>zionamento,<br />
sono fattori determinanti <strong>per</strong> ottenere un rivestimento ceramico valido<br />
esteticamente e duraturo nel tempo. L'esatta conoscenza delle caratteristiche fisiche<br />
del <strong>titanio</strong> è la base <strong>per</strong> qualsiasi lavoro protesico <strong>di</strong> successo.<br />
Le informazioni possono essere acquisite dalle aziende produttrici dei vari sistemi <strong>di</strong><br />
fusione del <strong>titanio</strong>, come ad esempio il sistema Rematitan ® <strong>di</strong> Dentaurum.<br />
È <strong>per</strong>ciò in<strong>di</strong>spensabile seguire le in<strong>di</strong>cazioni del produttore relativamente alla<br />
modellazione, all'im<strong>per</strong>niazione, alla messa in rivestimento ed alla fusione.<br />
Si devono tuttavia tenere in debita considerazione le <strong>di</strong>fferenze esistenti tra un<br />
sistema e l'altro. Le in<strong>di</strong>cazioni che seguono si basano sull'es<strong>per</strong>ienza acquisita su<br />
strutture in <strong>titanio</strong> ottenute con il sistema Rematitan ® della Dentaurum, ma molti<br />
aspetti possono essere adattati ad altre sistematiche <strong>di</strong> lavoro.<br />
Le strutture in <strong>titanio</strong> da ceramizzare possono essere realizzate sia con sistemi <strong>di</strong><br />
fusione che tramite fresaggio o elettroerosione, oppure essere elementi preformati<br />
(ad esempio elementi <strong>per</strong> impianto-protesi). L'importante è <strong>di</strong>sporre <strong>di</strong> su<strong>per</strong>fici<br />
completamente prive <strong>di</strong> α -case.<br />
6 triceram ® modalità d'uso it
2.1.2. Rifinitura delle strutture in <strong>titanio</strong><br />
Attenzione! Durante la separazione dei <strong>per</strong>ni, non<br />
surriscaldare la struttura metallica. Raffreddare<br />
spesso il pezzo in acqua e non angolare il <strong>di</strong>sco.<br />
Dischi separatori consigliati:<br />
Dischi separatori ST (REF 130-100-00)<br />
<strong>per</strong> <strong>per</strong>ni grossi<br />
Dischi separatori STM (REF 130-110-00)<br />
(rapida o manipoli)<br />
Dischi separratori TX (REF 130-512-00)<br />
<strong>per</strong> <strong>per</strong>ni sottili<br />
Frese in tungsteno raccomandate<br />
(catalogo Dentaurum):<br />
Fresa tungsteno, mini (REF 123-610-00)<br />
Fresa tungsteno, mi<strong>di</strong> (REF 123-611-00)<br />
Fresa tungsteno, maxi (REF 123-612-00)<br />
Fresa tungsteno, maxi plus (REF 123-613-00)<br />
No/giri massimo: 10 000 g/min, con poca pressione.<br />
<br />
<br />
<br />
<br />
<br />
<br />
<br />
Rifinitura delle su<strong>per</strong>fici da ceramizzare:<br />
generalmente, <strong>per</strong> il con<strong>di</strong>zionamento delle su<strong>per</strong>fici<br />
da ceramizzare si deve tenere conto non solo del sistema<br />
<strong>di</strong> fusione impiegato, ma anche del tipo <strong>di</strong> materiale<br />
refrattario utilizzato e <strong>di</strong> conseguenza valutare lo<br />
spessore <strong>di</strong> α -case prodotto in proporzione allo spessore<br />
della cappetta. L'α -case è, tra l'altro, ricco <strong>di</strong> ossigeno<br />
è <strong>di</strong> altre sostanze che reagiscono negativamente<br />
con la <strong>ceramica</strong>. In altri termini, una maggiore o<br />
minore rifinitura della struttura <strong>di</strong>penderà dal sistema<br />
<strong>di</strong> fusione e dal rivestimento impiegato nonchè dallo<br />
spessore delle corone.<br />
Come regola generale si consiglia <strong>di</strong>:<br />
• rifinire leggermente le su<strong>per</strong>fici <strong>di</strong> cappette <strong>di</strong><br />
piccolo o me<strong>di</strong>o spessore<br />
• o rifinire maggiormente le corone <strong>di</strong> spessore<br />
più grosso e gli elementi interme<strong>di</strong>.<br />
Utilizzare solo frese in carburo <strong>di</strong> tungsteno fresando<br />
sempre nella stessa <strong>di</strong>rezione <strong>di</strong> taglio. Per il <strong>titanio</strong> sono<br />
particolarmente in<strong>di</strong>cate le frese a taglio incrociato con<br />
spirale <strong>di</strong> raffreddamento. È in<strong>di</strong>spensabile asportare<br />
completamente l'α -case.<br />
A causa della scarsa conducibilità termica del <strong>titanio</strong>,<br />
pressioni troppo forti possono surriscaldare<br />
localmente la struttura metallica ed inoltre possono<br />
comportare la ritenzione <strong>di</strong> truciolo, con conseguente<br />
sovrapposizione sulla struttura stessa.<br />
Non utilizzare mai le frese destinate al <strong>titanio</strong> <strong>per</strong><br />
lavori su altri metalli. Non utilizzare abrasivi ceramici<br />
o frese <strong>di</strong>amantate <strong>per</strong> <strong>ceramica</strong>! (rischio <strong>di</strong> porosità<br />
nella <strong>ceramica</strong>!). Controllare che la fresa non si impasti<br />
con truciolo <strong>di</strong> <strong>titanio</strong> e, nel caso, ripulirla con una<br />
spazzola metallica. Terminata la rifinitura, sabbiare le<br />
su<strong>per</strong>fici della struttura con <strong>ossido</strong> <strong>di</strong> alluminio (125-<br />
250 µm) orientando l'ugello a 45°. Pressione d'esercizio:<br />
2 - 3 bar.<br />
A pressioni più basse, il con<strong>di</strong>zionamento delle<br />
su<strong>per</strong>fici risulta inadeguato, mentre a pressioni<br />
più alte se ne può provocare l'inquinamento.<br />
<strong>La</strong> struttura così sabbiata e pulita (vaporizzata) non deve<br />
più essere toccata con le mani.<br />
Non immergere mai le strutture in <strong>titanio</strong> in<br />
acido fluoridrico in quanto il metallo si corrode<br />
molto rapidamente.<br />
Rispettare i tempi <strong>di</strong> passivazione (min. 10' max 30')!<br />
triceram ® modalità d'uso it 7
2.2. Ceramizzazione<br />
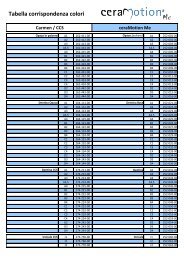
2.2.1. Tabella <strong>di</strong> combinazione colori<br />
Colore A1 A2 A3 A3,5 A4 B1 B2 B3 B4 C1 C2 C3 C4 D2 D3 D4<br />
Opachi O A1 O A2 O A3 O A3,5 O A4 O B1 O B2 O B3 O B4 O C1 O C2 O C3 O C4 O D2 O D3 O D4<br />
Dentine opache<br />
OD A1 OD A2 OD A3 OD A3,5 OD A4 OD B1 OD B2 OD B3 OD B4 OD C1 OD C2 OD C3 OD C4 OD D2 OD D3 OD D4<br />
Dentine D A1 D A2 D A3 D A3,5 D A4 D B1 D B2 D B3 D B4 D C1 D C2 D C3 D C4 D D2 D D3 D D4<br />
Incisali IT 57 IT 57 IT 59 IT 59 IT 60 IT 57 IT 59 IT 59 IT 59 IT 59 IT 59 IT 59 IT 60 IT 59 IT 59 IT 59<br />
Masse spalla* 1/2 A 2/3 A 3/4 A 1/1 A 1/1 A 1/2 B 2/3 B 1/1 B 1/1 B 2/3 C 3/4 C 3/4 C 1/1 C 1/3 A 1/2 A 1/1 D<br />
1/3 D 1/4 D<br />
*Parte <strong>di</strong> massa spalla corrispondente, il resto SM mo<strong>di</strong>ficatore bianco.<br />
2.2.2. Tabella cotture<br />
Tem<strong>per</strong>atura Tempo <strong>di</strong> Velocità <strong>di</strong> Inizio Fine Tem<strong>per</strong>atura Manteni- Raffreddainiziale*<br />
asciugatura salita/min. vuoto vuoto finale mento mento<br />
Bonder in polvere 500 °C 4 min. 65 °C/min. 500 °C 795 °C 795 °C 1 min. 0 min.<br />
con vuoto<br />
Bonder in pasta 500 °C 6 min. 65 °C/min. 500 °C 795 °C 795 °C 1 min. 0 min.<br />
con vuoto<br />
Opaco 1+2 500 °C 4 min. 65 °C/min. 500 °C 795 °C 795 °C 1 min. 0 min.<br />
con vuoto<br />
Massa spalla 500 °C 6 min. 55 °C/min. 500 °C 785 °C 785 °C 1 min. 0 min.<br />
con vuoto<br />
Dentina 500 °C 6 min. 55 °C/min. 500 °C 755 °C 755 °C 1 min. 0 min.<br />
(con liquido LV univ.)**<br />
con vuoto<br />
Correzione 500 °C 4 min. 55 °C/min. 500 °C 755 °C 755 °C 1 min. 0 min.<br />
(con liquido LV univ.)**<br />
con vuoto<br />
Glasure 500 °C 2 min. 55 °C/min. -- -- 755 °C*** 1 min.**** 0 min.<br />
Massa <strong>di</strong> correzione 500 °C 4 min. 55 °C/min. 500 °C 715 °C 715 °C 1 min. 0 min.<br />
con vuoto<br />
Massa gengivale 500 °C 6 min. 55 °C/min. 500 °C 755 °C 755 °C 1 min. 0 min.<br />
con vuoto<br />
* Inserire l'oggetto solo al raggiungimento della tem<strong>per</strong>atura in<strong>di</strong>cata.<br />
** Con il liquido <strong>di</strong> modellazione universale MV, osservare i <strong>di</strong>fferenti valori <strong>di</strong> cottura (ve<strong>di</strong> pag. 16).<br />
*** Riducendo (adattando) le tem<strong>per</strong>ature <strong>di</strong> cottura, è possibile ottenere un <strong>di</strong>verso grado <strong>di</strong> brillantezza.<br />
**** <strong>La</strong> glasure può essere fatta con o senza il vuoto. Il grado <strong>di</strong> brillantezza può essere aumentato prolungando il tempo <strong>di</strong><br />
mantenimento.<br />
I dati sopra riportati si riferiscono a forni tarati con<br />
argento fine e quin<strong>di</strong> possono <strong>di</strong>fferenziarsi da forno<br />
a forno. È, <strong>per</strong>tanto, consigliato l'adattamento delle<br />
tem<strong>per</strong>ature <strong>di</strong> cottura in quanto i forni sono, generalmente<br />
tarati <strong>per</strong> tem<strong>per</strong>ature più elevate. L'ideale<br />
sarebbe utilizzare un forno esclusivamente <strong>per</strong> il <strong>titanio</strong>.<br />
Se, invece, lo stesso forno viene impiegato <strong>per</strong> la cottura<br />
<strong>di</strong> ceramiche <strong>di</strong>verse tra loro, sarà necessario decontaminare<br />
la camera con le modalità previste dal costruttore.<br />
Ciò eviterà l'inquinamento della struttura in <strong>titanio</strong><br />
con elementi <strong>di</strong> altre leghe ed il verificarsi <strong>di</strong> caratterizzazioni<br />
cromatiche indesiderate.<br />
8 triceram ® modalità d'uso it
2.2.3. Prove <strong>di</strong> cottura / Taratura del forno<br />
Per tarare correttamente il proprio forno <strong>per</strong> <strong>ceramica</strong>, si consiglia <strong>di</strong> eseguire una cottura <strong>di</strong> prova al fine <strong>di</strong><br />
prevenire <strong>di</strong>screpanze con i valori riportati in tabella.<br />
A questo scopo, è possibile utilizzare la massa NT (neutro trasparente) miscelata con il liquido <strong>di</strong> modellazione<br />
universale LV+. Cuocere il provino impostando i seguenti parametri:<br />
• Tem<strong>per</strong>atura iniziale 500 °C<br />
• Asciugatura 6 minuti<br />
• Velocità <strong>di</strong> salita 55 °C/min.<br />
• Inizio vuoto 500 °C<br />
• Fine vuoto alla tem<strong>per</strong>atura finale 755 °C<br />
• Mantenimento <strong>di</strong> 1 minuto con vuoto<br />
Appoggiare il provino su un foglio <strong>di</strong> platino e non sul tra<strong>di</strong>zionale supporto, in quanto si rischierebbe l'intorbi<strong>di</strong>mento.<br />
Fig. 1: Provino cotto a tem<strong>per</strong>atura corretta<br />
Fig. 1a: Provino cotto a tem<strong>per</strong>atura troppo bassa<br />
<strong>La</strong> tem<strong>per</strong>atura del forno è corretta se il provino assume un aspetto chiaro, trasparente e con angoli vivi (Fig. 1). Al<br />
contrario, se la tem<strong>per</strong>atura finale è troppo elevata, il provino appare eccessivamente lucido e con gli angoli arrotondati,<br />
mentre se la tem<strong>per</strong>atura finale è troppo bassa, il provino appare bianco lattiginoso (Fig. 2). Si consiglia<br />
<strong>di</strong> incrementare o <strong>di</strong>minuire la tem<strong>per</strong>atura finale <strong>di</strong> 10 °C ad ogni ripetizione <strong>di</strong> cottura del provino.<br />
Pulitura del forno<br />
Il forno <strong>per</strong> <strong>ceramica</strong> deve essere ripulito con regolarità al fine <strong>di</strong> evitare le contaminazioni provenienti dall'interno<br />
della camera <strong>di</strong> cottura. A tal fine raccoman<strong>di</strong>amo <strong>di</strong>:<br />
• utilizzare frequentemente i decontaminatori <strong>per</strong> forno (REF 260-317-00)<br />
• decontaminare anche il supporto <strong>di</strong> cottura ed i pin<br />
• tem<strong>per</strong>atura iniziale: 600 °C<br />
• asciugatura: 1 minuto<br />
• velocità <strong>di</strong> salita: 100 – 120 °C <strong>per</strong> min<br />
• tem<strong>per</strong>atura finale: 1050 °C<br />
• mantenimento: 10 minuti.<br />
Eseguire il ciclo termico in atmosfera. Seguire le in<strong>di</strong>cazioni del produttore del forno impiegato!<br />
Mantenere sempre il forno chiuso <strong>per</strong> evitare l'inclusione <strong>di</strong> umi<strong>di</strong>tà nella camera. Chiudere il forno dopo ogni<br />
uso o impostare la modalità „Notte“.<br />
triceram ® modalità d'uso it 9
2.2.4. Stesura del bonder<br />
Dopo la sabbiatura, lasciare la struttura a riposo <strong>per</strong> 10 minuti <strong>per</strong> consentire la passivazione delle<br />
su<strong>per</strong>fici. Applicare il bonder entro i 30 minuti successivi.<br />
Tem<strong>per</strong>atura Tempo <strong>di</strong> Velocità Inizio Fine Tem<strong>per</strong>atura Manteni- Raffreddainiziale<br />
asciugatura salita/min. vuoto vuoto finale mento mento<br />
Bonder in polvere 500 °C 4 min. 65 °C/min. 500 °C 795 °C 795 °C 1 min. 0 min.<br />
con vuoto<br />
Bonder in pasta 500 °C 6 min. 65 °C/min. 500 °C 795 °C 795 °C 1 min. 0 min.<br />
con vuoto<br />
Se viene usato il bonder in pasta, ricordarsi <strong>di</strong> mischiarlo nel suo flacone prima dell'uso aggiungendo, se necessario,<br />
del liquido <strong>per</strong> bonder in pasta universale, REF 299-170-40, <strong>per</strong> ottenere una consistenza cremosa.<br />
Attenzione: osservare un tempo <strong>di</strong> asciugatura più lungo.<br />
Miscelare il bonder in polvere con il liquido universale B.O.L., REF 299-180-40, servendosi della spatola <strong>di</strong> vetro<br />
fino ad ottenere una consistenza cremosa (fig. 2).<br />
Applicare un sottile strato <strong>di</strong> bonder con lo strumento <strong>di</strong> vetro o con un pennello, fino a totale co<strong>per</strong>tura.<br />
Evitare un'eccessiva umettazione nonché la formazione <strong>di</strong> bolle. <strong>La</strong> vera e propria co<strong>per</strong>tura del metallo verrà<br />
realizzata successivamente con la cottura dell'opaco.<br />
Il bonder non è l'opaco!<br />
Dopo la cottura del bonder, le su<strong>per</strong>fici devono avere un aspetto lucido ed uniforme.<br />
Fig. 2:<br />
miscelazione del bonder con lo strumento <strong>di</strong> vetro e consistenza<br />
cremosa dell'impasto.<br />
Fig. 3a:<br />
ponte <strong>di</strong> 3 elementi su modello. Struttura metallica con<strong>di</strong>zionata.<br />
Corona su centrale accorciata <strong>per</strong> l'applicazione<br />
della massa spalla.<br />
Fig. 3b:<br />
ponte <strong>di</strong> 3 elementi con bonder (prima della cottura).<br />
Fig. 3c:<br />
ponte <strong>di</strong> 3 elementi con bonder (dopo la cottura).<br />
10 triceram ® modalità d'uso it
2.2.5. AESTHETIC UNIVERSAL Bonder<br />
Applicazione<br />
Attenzione: se si utilizza l'AESTHETIC UNIVERSAL bonder su strutture in <strong>titanio</strong>, non è più necessario<br />
l'uso del bonder Triceram ® !<br />
1. <strong>La</strong> preparazione della struttura avviene secondo le modalità riportate a pag. 6.<br />
Sabbiare la struttura, ripulirla con cura e, successivamente, scaldarla brevemente<br />
ponendola vicino alla camera a<strong>per</strong>ta del forno <strong>per</strong> <strong>ceramica</strong>.<br />
In<strong>di</strong>cazioni <strong>di</strong> stoccaggio:<br />
tempi lunghi <strong>di</strong> immagazzinamento possono provocare la se<strong>di</strong>mentazione della polvere d'oro<br />
nella siringa. A tal fine, consigliamo <strong>di</strong> girare quest'ultima <strong>di</strong> tanto in tanto. Se all'interno della<br />
siringa è visibile la scomposizione del prodotto, agire nel seguente modo:<br />
• rimuovere il tappo <strong>di</strong> chiusura;<br />
• estrarre quasi completamente lo stantuffo ed appoggiare la siringa in verticale su quest'ultimo;<br />
• la pasta colerà verso il basso;<br />
• premere con cautela lo stantuffo verso l'alto fino a quando la pasta avrà raggiunto l'estremità<br />
della siringa. Ripetere la stessa procedura due o tre volte;<br />
• nel caso in cui l'AESTHETIC UNIVERSAL bonder non fosse sufficientemente spalmabile, è possibile<br />
aggiungere una piccola quantità <strong>di</strong> liquido AESTHETIC UNIVERSAL bonder, REF 299-200-10.<br />
Scaricare la pasta in un contenitore e mescolarla aggiungendo qualche goccia <strong>di</strong> liquido.<br />
Confezioni:<br />
Set<br />
(siringa da 4gr, pennello,<br />
liquido e recipiente)<br />
REF 292-200-15<br />
Siringa<br />
(4g)<br />
REF 292-200-10<br />
Pennello No. 4<br />
REF 260-905-00<br />
Liquido<br />
REF 299-200-10<br />
Importante: utilizzare pochissimo liquido! Se necessario, allungare i tempi <strong>di</strong> asciugatura. In caso contrario è possibile<br />
l'inclusione <strong>di</strong> bolle d'aria.<br />
2. Applicare un sottile strato <strong>di</strong> AESTHETIC UNIVERSAL bonder con un pennello pulito (pennello Esprident-<br />
No. 4,REF 260-905-00). Stendere bene la pasta sulla struttura metallica fino ad ottenere uno spessore omogeneo.<br />
3. L'AESTHETIC UNIVERSAL bonder deve essere applicato in forma liquida ma ben coprente. Per evitare la successiva<br />
comparsa <strong>di</strong> bolle, applicare l'AESTHETIC UNIVERSAL bonder in modo uniforme.<br />
4. Asciugare il bonder <strong>per</strong> almeno 5 minuti ponendo la struttura vicino alla camera a<strong>per</strong>ta del forno alla tem<strong>per</strong>atura<br />
<strong>di</strong> 400°C. Le su<strong>per</strong>fici da lucide <strong>di</strong>ventano opache. L'oggetto non deve essere riscaldato oltre<br />
150°C. Se necessario, stendere un'altra mano <strong>di</strong> AESTHETIC UNIVERSAL bonder ed asciugare con le stesse<br />
modalità descritte in precedenza.<br />
Importante: è assolutamente necessario asciugare in modo corretto l'AESTHETIC UNIVERSAL bonder prima<br />
della sua cottura <strong>per</strong>chè, in caso contrario, il liquido potrebbe rimanere imprigionato e liberarsi durante le<br />
successive cotture <strong>di</strong> dentina, creando bolle nella <strong>ceramica</strong>. Durante l'asciugatura, la struttura deve avere,<br />
in<strong>di</strong>pendentemente dal programma del forno, una tem<strong>per</strong>atura <strong>di</strong> 100 – 120°C, ma <strong>per</strong> nessuna ragione<br />
su<strong>per</strong>are i 150°C. Qualora il calore proveniente dalla camera a<strong>per</strong>ta non fosse sufficiente, aumentare la tem<strong>per</strong>atura.<br />
L'asciugatura può anche essere fatta in un forno <strong>di</strong> preriscaldo (innalzando la tem<strong>per</strong>atura lentamente<br />
a 130°C e mantenendola <strong>per</strong> 5 minuti) oppure in un forno d'essiccazione (a 120°C da mantenere<br />
<strong>per</strong> 5 minuti).<br />
5. Dopo la cottura, deve risultare ben visibile la ripartizione omogenea delle particelle ceramiche sulla struttura<br />
(su<strong>per</strong>ficie ruvida). Eventualmente eseguire un ulteriore passaggio.<br />
6. Applicare infine l'opaco come descritto al § 2.2.6. Generalmente è sufficiente una sola cottura.<br />
Tabella <strong>di</strong> cottura<br />
Tem<strong>per</strong>atura Tempo <strong>di</strong> Velocità <strong>di</strong> Inizio Fine Tem<strong>per</strong>atura Manteni- Raffreddainiziale<br />
asciugatura salita/min. vuoto vuoto finale mento mento<br />
AESTHETIC<br />
UNIVERSAL bonder<br />
400 °C min. 5 min 55 °C/min. 400 °C 800 °C 800 °C<br />
1 min.<br />
con vuoto<br />
0 min<br />
triceram ® modalità d'uso it 11
2.2.6. Stesura dell'opaco<br />
Con lo strumento <strong>di</strong> vetro, miscelare la polvere dell'opaco con il liquido universale B.O.L. fino ad ottenere<br />
una consistenza cremosa.<br />
Tem<strong>per</strong>atura Tempo <strong>di</strong> Velocità <strong>di</strong> Inizio Fine Tem<strong>per</strong>atura Manteni- Raffreddainiziale*<br />
asciugatura salita/min. vuoto vuoto finale mento mento<br />
Opaco 1+2 500 °C 4 min. 65 °C/min. 500 °C 795 °C 795 °C 1 min. 0 min.<br />
con vuoto<br />
Per la prima cottura, si proceda alla co<strong>per</strong>tura del<br />
bonder con uno strato sottile <strong>di</strong> opaco (fig. 4a).<br />
Utilizzare il terminale sferico dello strumento <strong>di</strong><br />
vetro. Dopo la cottura, la struttura dovrà presentare<br />
una su<strong>per</strong>ficie lucida come la seta (fig. 4b).<br />
Per la seconda cottura, l'opaco deve essere applicato<br />
con uno strato sottile ma coprente. Il risultato deve<br />
essere quello <strong>di</strong> una su<strong>per</strong>ficie compatta e lucida<br />
(fig. 4c).<br />
Fig. 4a:<br />
ponte <strong>di</strong> 3 elementi prima della cottura dell'opaco.<br />
Fig. 4b:<br />
ponte <strong>di</strong> 3 elementi dopo la prima cottura <strong>di</strong> opaco.<br />
Fig. 4c:<br />
ponte <strong>di</strong> 3 elementi dopo la seconda cottura <strong>di</strong> opaco.<br />
12 triceram ® modalità d'uso it
2.2.7. Impiego delle masse spalla<br />
Il sistema Triceram ® comprende quattro <strong>di</strong>verse<br />
masse spalla sud<strong>di</strong>vise nei gruppi <strong>di</strong> colore A-B-C-D.<br />
Tutte le varianti <strong>di</strong> colore da A1 a D4 possono essere<br />
ricavate aggiungendo il mo<strong>di</strong>ficatore SM „bianco“<br />
nelle proporzioni riportate in tabella.<br />
L'aggiunta della massa spalla SM „trasparente“ rafforza<br />
la trasparenza della spalla nonché l'effetto <strong>di</strong><br />
profon<strong>di</strong>tà. Per la miscelazione, utilizzare l'apposito<br />
liquido universale.<br />
Per consentire un buon <strong>di</strong>stacco della <strong>ceramica</strong> dal<br />
moncone in gesso e <strong>per</strong> evitare colorazioni indesiderate,<br />
si consiglia l'uso dell'isolante SM-Isofit.<br />
Consigli <strong>di</strong> miscelazione<br />
A B C D bianco<br />
Colore<br />
dente<br />
A1 1/2 - - - 1/2<br />
A2 2/3 - - - 1/3<br />
A3 3/4 - - - 1/4<br />
A3,5 1/1 - - - -<br />
A4 1/1 - - - -<br />
B1 - 1/2 - - 1/2<br />
B2 - 2/3 - - 1/3<br />
B3 - 1/1 - - -<br />
B4 - 1/1 - - -<br />
C1 - - 2/3 - 1/3<br />
C2 - - 3/4 - 1/4<br />
C3 - - 3/4 - 1/4<br />
C4 - - 1/1 - -<br />
D2 1/3 - - 1/3 1/3<br />
D3 1/2 - - 1/4 1/4<br />
D4 - - - 1/1 -<br />
Isolante SM-Isofit<br />
REF 260-324-01<br />
20 ml<br />
Isola in modo ottimale il gesso dalla <strong>ceramica</strong> e la<br />
<strong>ceramica</strong> dalla <strong>ceramica</strong>. Indurire i monconi o i modelli,<br />
sigillarli o rivestirli con una lacca spaziatrice.<br />
triceram ® modalità d'uso it 13
Applicazione delle masse spalla<br />
Isolare il moncone in gesso con l'isolante SM-Isofit nella zona che verrà interessata dalla massa spalla. <strong>La</strong> massa<br />
del colore prescelto può ora essere applicata.<br />
Miscelare la polvere della massa spalla con l'apposito liquido universale e applicarla dal margine <strong>di</strong> preparazione<br />
al bordo della cappetta. Asciugare il materiale con un fon o con un kleenex, sfilare la cappetta dal moncone e<br />
cuocere in forno seguendo il programma specifico.<br />
Tem<strong>per</strong>atura Tempo <strong>di</strong> Velocità <strong>di</strong> Inizio Fine Tem<strong>per</strong>atura Manteni- Raffreddainiziale<br />
asciugatura salita/min. vuoto vuoto finale mento mento<br />
Massa spalla 500°C 6 min. 55 °C/min. 500 °C 785 °C 785 °C 1 min. 0 min.<br />
con vuoto<br />
Per compensare la naturale contrazione della massa spalla dovuto all'accorciamento della cappetta (in funzione<br />
del tipo <strong>di</strong> preparazione), può essere necessaria una seconda cottura. Ripetere, quin<strong>di</strong>, le o<strong>per</strong>azioni <strong>di</strong> separazione<br />
con l'isolante SM-Isofit nelle zone da correggere ed integrare le stesse con altra massa spalla.<br />
Cuocere con gli stessi parametri utilizzati <strong>per</strong> la prima cottura. Dopo la seconda cottura, rifinire ed adattare la<br />
massa spalla in <strong>ceramica</strong> con strumenti appropriati (numero <strong>di</strong> giri massimo: 15 000giri/min.).<br />
Fig. 5a:<br />
la corona opacizzata con massa spalla prima della cottura.<br />
Fig. 5b:<br />
la corona dopo la prima cottura <strong>di</strong> massa spalla.<br />
Fig. 5c:<br />
la corona con massa spalla prima della seconda cottura.<br />
Fig. 5d:<br />
la corona dopo l'adattamento.<br />
14 triceram ® modalità d'uso it
2.2.8. Stratificazione <strong>di</strong> dentina e masse incisali<br />
2.2.8.1. Schema <strong>di</strong> stratificazione<br />
Scelta la massa secondo la specifica colorazione,<br />
si può iniziare la stratificazione della <strong>ceramica</strong><br />
seguendolo schema a fianco illustrato.<br />
Consigli <strong>per</strong> la stratificazione: al fine <strong>di</strong> evitare una<br />
netta demarcazione della struttura metallica sottostante,<br />
è preferibile lavorare con dentina opaca<br />
(OD). Ciò impe<strong>di</strong>rà il trasparire della struttura opacizzata.<br />
Con le dentine opache è inoltre possibile controllare<br />
il valore <strong>di</strong> lucentezza in<strong>di</strong>viduale semplicemente<br />
aggiungendo alla dentina la dentina opaca.<br />
Con spessori <strong>di</strong> <strong>ceramica</strong> su<strong>per</strong>iore a 0,9 mm la<br />
dentina opaca può essere evitata.<br />
Schema <strong>di</strong> stratificazione<br />
Massa incisale<br />
Dentina<br />
Dentina opaca<br />
Massa spalla<br />
Opaco<br />
Bonder<br />
Struttura in <strong>titanio</strong><br />
Neutro trasparente<br />
(se necessario)<br />
2.2.8.2. Avvertenze sull'uso <strong>di</strong> masse e liqui<strong>di</strong><br />
Tutte le masse – dentina opaca, dentina, incisale,<br />
neutro trasparente, effetto trasparente, gengivale e<br />
<strong>di</strong> correzione – vengono miscelate con il liquido universale<br />
LV+ e vanno mantenute umide tutte nella<br />
stessa maniera. Nel caso in cui fosse necessario aggiungere<br />
altro liquido, utilizzare sempre quello LV+.<br />
Dentine opache OD<br />
• effetto <strong>di</strong> profon<strong>di</strong>tà tri<strong>di</strong>mensionale<br />
(a lavoro finito)<br />
• sostegno del reale colore del dente<br />
(anche in con<strong>di</strong>zioni sfavorevoli <strong>di</strong> spazio)<br />
Dentine D<br />
• cromaticamente stabili<br />
• effetto prismatico<br />
• fluorescenza naturale<br />
Dentine Chroma<br />
• <strong>per</strong> incrementare l’intensità <strong>di</strong> ciascun croma<br />
• aumenta l’intensità cromatica nel corpo del dente<br />
anche in presenza <strong>di</strong> grossi spessori<br />
Dentine Intensive Fluo IFD<br />
• dentina con marcato mo<strong>di</strong>ficatore fluorescente<br />
• <strong>per</strong> aumentare il grado <strong>di</strong> luminosità nella <strong>ceramica</strong><br />
Incisali trasparenti IT<br />
Tabella <strong>di</strong> classificazione<br />
A1 IT 57 B4 IT 59<br />
A2 IT 57 C1 IT 59<br />
A3 IT 59 C2 IT 59<br />
A3,5 IT 59 C3 IT 59<br />
A4 IT 60 C4 IT 60<br />
B1 IT 57 D2 IT 59<br />
B2 IT 59 D3 IT 59<br />
B3 IT 59 D4 IT 59<br />
Con la massa IT 58 è possibile creare effetti ad<strong>di</strong>zionali <strong>di</strong><br />
grigio nelle zone posteriori.<br />
Incisali opalescenti IO<br />
• stratificazione del terzo incisale<br />
• opalescenza: effetto bluastro alla luce riflessa,<br />
effetto arancio alla luce passante<br />
• incremento della naturale interruzione della luce<br />
• applicazione in zona incisale<br />
triceram ® modalità d'uso it 15
Masse effetto trasparenti TE<br />
Queste masse sono state create <strong>per</strong> migliorare l'effetto<br />
vitale delle zone incisali, <strong>per</strong> in<strong>di</strong>vidualizzare e <strong>per</strong><br />
caratterizzare.<br />
• stratificazione del terzo incisale<br />
• applicazione in zona incisale<br />
• rifrazione naturale della luce<br />
Stains universali ST<br />
Con gli stains si possono creare mo<strong>di</strong>ficazioni cromatiche.<br />
Le polveri possono essere unite o miscelate<br />
fino ad un massimo del 10 % con le altre masse<br />
(SM, OD,D, IT, IO, TE, NT + G). Inoltre, se miscelate<br />
con lo specifico liquido universale, possono essere<br />
usate <strong>per</strong> colorare le su<strong>per</strong>fici in <strong>ceramica</strong>.<br />
Questo materiale offre la possibilità <strong>di</strong> caratterizzare<br />
in<strong>di</strong>vidualmente il lavoro conferendo un effetto <strong>di</strong><br />
profon<strong>di</strong>tà.<br />
■■ Body ST A<br />
■■ Body ST B<br />
■■ Body ST C<br />
■■ ST 0 neutro<br />
■■ ST 1 bianco<br />
■■ ST 2 vaniglia<br />
■■ ST 3 giallo<br />
■■ ST 45 arancio plus<br />
■■ ST 6 rosa<br />
■■ ST 7 rosa scuro<br />
■■ ST 8 lilla<br />
■■ ST 9 blu<br />
■■ ST 10 grigio<br />
■■ ST 11 verde oliva<br />
■■ ST 12 giallo oliva<br />
■■ ST 13 bruno me<strong>di</strong>o<br />
■■ ST 14 rosso-bruno<br />
■■ ST 15 nero<br />
Nota:<br />
gli stains universali ST possono essere usati anche<br />
con la <strong>ceramica</strong> CARMEN ® (uniti o mescolati).<br />
Tabella cotture <strong>per</strong> dentina e masse <strong>di</strong> correzione.<br />
Tabella cotture <strong>per</strong> dentina e masse <strong>di</strong> correzione<br />
con liquido <strong>di</strong> miscelazione universale LV+<br />
I liqui<strong>di</strong>:<br />
Liquido <strong>per</strong> stains universali<br />
• <strong>per</strong> miscelare gli stains universali ST<br />
• in<strong>di</strong>cato anche <strong>per</strong> la glasure<br />
Liquido universale <strong>per</strong> masse spalla<br />
• <strong>per</strong> miscelare le masse spalla<br />
• aumenta la stabilità <strong>di</strong> modellazione<br />
Liquido universale B.O.L.<br />
• <strong>per</strong> miscelare il bonder in polvere, gli opachi ed i<br />
liner<br />
Liquido universale <strong>per</strong> bonder in pasta<br />
• <strong>per</strong> miscelare il bonder in pasta<br />
Liquido universale <strong>di</strong> modellazione MV<br />
• in<strong>di</strong>cato <strong>per</strong> aumentare la plasticità<br />
• adatto a climi particolarmente cal<strong>di</strong><br />
• allunga i tempi <strong>di</strong> modellazione<br />
Liquido universale <strong>di</strong> modellazione LV+<br />
• ridotta contrazione<br />
Liquido universale <strong>di</strong> modellazione LV<br />
• liquido standard ad impiego universale <strong>per</strong> impastare<br />
e mantenere umide le masse mescolate<br />
Importante:<br />
se viene usato il liquido universale <strong>di</strong> miscelazione MV<br />
è necessario fare riferimento alla sua specifica tabella<br />
<strong>di</strong> cottura e non a quella del liquido universale LV+<br />
(ve<strong>di</strong> sotto). Non mischiare i due liqui<strong>di</strong> in quanto ciò<br />
potrebbe provocare la formazione <strong>di</strong> bolle!<br />
Nota:<br />
i liqui<strong>di</strong> universali possono essere usati anche con le<br />
masse del sistema CARMEN ® .<br />
Tem<strong>per</strong>atura Tempo <strong>di</strong> Mantenim. Velocità <strong>di</strong> Inizio Fine Tem<strong>per</strong>atura Manteni- Raffreddainiziale<br />
asciugatura temp.iniziale salita/min. vuoto vuoto finale mento mento<br />
Dentina 500 °C 6 min. 0 min. 55 °C/min. 500 °C 755 °C 755 °C 1 min. 0 min.<br />
(con liquido univ LV+)<br />
con vuoto<br />
Correzione 500 °C 4 min. 0 min. 55 °C/min. 500 °C 755 °C 755 °C 1 min. 0 min.<br />
(con liquido univ LV+)<br />
con vuoto<br />
con liquido <strong>di</strong> miscelazione universale MV<br />
Dentina 500 °C 4 min. 4 min. 55 °C/min. 500 °C 755 °C 755 °C 1 min. 0 min.<br />
(con liquido univ MV)<br />
con vuoto<br />
Correzione 500 °C 3 min. 3 min. 55 °C/min. 500 °C 755 °C 755 °C 1 min. 0 min.<br />
(con liquido univ MV)<br />
con vuoto<br />
16 triceram ® modalità d'uso it
<strong>La</strong> <strong>ceramica</strong><br />
<strong>per</strong> <strong>ossido</strong> <strong>di</strong> <strong>zirconio</strong> e <strong>titanio</strong><br />
due materiali – una <strong>ceramica</strong><br />
NEW<br />
NEW<br />
NEW<br />
Triceram ® <strong>per</strong> Ti<br />
Bonder in pasta<br />
Triceram ® <strong>per</strong> ZrO2<br />
Liner<br />
Triceram ® <strong>per</strong> Ti e ZrO2<br />
Dentine Chroma<br />
Dentine intensive Fluo<br />
Opaco gengivale<br />
Incisali opalescenti<br />
Legenda immagini:<br />
Dr. Eric Sanchez · Mexiko City / Mexiko<br />
Axel Seeger · Berlin<br />
triceram ® modalità d'uso it 17
2.2.8.3. Stratificazione standard step-by-step<br />
1. Applicare la dentina opaca (OD) su tutta la su<strong>per</strong>ficie.<br />
Poi, sempre con OD, allungare i bor<strong>di</strong> incisali oltre la<br />
struttura <strong>di</strong> <strong>titanio</strong> (effetto <strong>di</strong> rafforzamento dei flussi<br />
<strong>di</strong> luce).<br />
2. Completare la modellazione anatomica del dente con<br />
la dentina (D).<br />
3. Tagliare la dentina (D) nella zona incisale, al fine <strong>di</strong><br />
creare lo spazio necessario <strong>per</strong> la massa incisale trasparente<br />
(IT).<br />
4. Applicare la massa IT nella zona incisale.<br />
5. Nella modellazione dei ponti, prima <strong>di</strong> cuocere la<br />
dentina, è necessario separare la massa <strong>ceramica</strong> con<br />
la spatola a coltello fino allo strato <strong>di</strong> opaco/liner<br />
(sia dal lato vestibolare che da quello palatale/linguale).<br />
6. Correzione della forma dopo la cottura della dentina<br />
(prima della cottura <strong>di</strong> correzione).<br />
18 triceram ® modalità d'uso it
7. Dopo la cottura <strong>di</strong> correzione, procedere con l'adattamento<br />
della forma (<strong>per</strong> i <strong>di</strong>schi in<strong>di</strong>cati ve<strong>di</strong> § 4 a pag. 23).<br />
8. Rifinire con frese <strong>di</strong>amantate il ponte ceramizzato (<strong>per</strong><br />
le frese in<strong>di</strong>cate ve<strong>di</strong> § 4 a pag. 23).<br />
9. <strong>La</strong> glasure viene realizzata senza l'impiego <strong>di</strong> una massa<br />
specifica. Gli effetti cromatici speciali possono essere creati<br />
con gli stains <strong>di</strong>rettamente sulle su<strong>per</strong>fici ceramizzate.<br />
10. Il lavoro finito dopo la glasure.<br />
Tabella cotture <strong>per</strong> dentina e masse <strong>di</strong> correzione:<br />
con liquido <strong>di</strong> miscelazione universale LV+<br />
Tem<strong>per</strong>atura Tempo <strong>di</strong> Mantenim. Velocità <strong>di</strong> Inizio Fine Tem<strong>per</strong>atura Manteni- Raffreddainiziale<br />
asciugatura temp. iniziale salita/min. vuoto vuoto finale mento mento<br />
Dentina 500 °C 6 min. 0 min. 55 °C/min. 500 °C 755 °C 755 °C 1 min. 0 min.<br />
(con liquido univ LV+)<br />
con vuoto<br />
Correzione 500 °C 4 min. 0 min. 55 °C/min. 500 °C 755 °C 755 °C 1 min. 0 min.<br />
(con liquido univ LV+)<br />
con vuoto<br />
con liquido <strong>di</strong> miscelazione universale MV<br />
Dentina 500 °C 4 min. 4 min. 55 °C/min. 500 °C 755 °C 755 °C 1 min. 0 min.<br />
(con liquido univ MV)<br />
con vuoto<br />
Correzione 500 °C 3 min. 3 min. 55 °C/min. 500 °C 755 °C 755 °C 1 min. 0 min.<br />
(con liquido univ MV)<br />
con vuoto<br />
Tabella cottura <strong>per</strong> glasure:<br />
Tem<strong>per</strong>atura Tempo <strong>di</strong> Velocità <strong>di</strong> Inizio Fine Tem<strong>per</strong>atura Manteni- Raffreddainiziale<br />
asciugatura salita/min. vuoto vuoto finale mento mento<br />
Glasure 500 °C 2 min. 55 °C/min. -- -- 755 °C* 1 min.** 0 min.<br />
* Diminuendo (adattando) la tem<strong>per</strong>atura <strong>di</strong> cottura si ottiene la lucentezza desiderata.<br />
** <strong>La</strong> glasure può essere fatta con o senza il vuoto. Il mantenimento deve essere almeno <strong>di</strong><br />
1 minuto. Il gra<strong>di</strong>o <strong>di</strong> lucentezza può essere incrementato prolungando il mantenimento.<br />
triceram ® modalità d'uso it 19
2.2.8.4. Stratificazione in<strong>di</strong>viduale step-by-step<br />
1. Mo<strong>di</strong>ficazioni cromatiche create con gli stains universali<br />
sulla struttuta opacizzata.<br />
2. Applicazione <strong>di</strong> dentina opaca (OD). Caratterizzazioni<br />
più intense possono essere ottenute aggiungendo<br />
gli stains alla dentina opaca (OD).<br />
3. Stratificazione in<strong>di</strong>viduale <strong>di</strong> dentina, dentina e stains<br />
miscelati assieme e completamento con massa incisale<br />
e massa effetto trasparente.<br />
4. Correzione delle forme e controllo dell'effetto trasparente.<br />
5. Dopo la correzione e la definizione delle forme, è possibile<br />
creare gli effetti cromatici con gli stains <strong>di</strong>rettamente<br />
sulle su<strong>per</strong>fici.<br />
6. Il ponte finito dopo la glasure.<br />
20 triceram ® modalità d'uso it
2.2.9. Impiego delle masse gengivali<br />
Massa gengivale G (chiara) e GD (scura)<br />
• in<strong>di</strong>cate <strong>per</strong> la ricostruzione <strong>di</strong> gengive e papille<br />
• <strong>per</strong>mettono la correzione <strong>di</strong> <strong>di</strong>fetti mucosi<br />
• l'opaco gengivale consente <strong>di</strong> mascherare parti della struttura in <strong>titanio</strong><br />
Tem<strong>per</strong>atura Tempo <strong>di</strong> Velocità <strong>di</strong> Inizio Fine Tem<strong>per</strong>atura Manteni- Raffreddainiziale<br />
asciugatura salita/min. vuoto vuoto finale mento mento<br />
Massa gengivale 500 °C 6 min. 55 °C/min. 500 °C 755 °C 755 °C 1 min. 0 min.<br />
con vuoto<br />
2.2.10. Impiego della massa <strong>di</strong> correzione<br />
Questa massa ha lo scopo <strong>di</strong> correggere piccoli <strong>di</strong>fetti come punti <strong>di</strong> contatto, piani occlusali ecc.<br />
Per ottenere un risultato esteticamente valido, si consiglia <strong>di</strong> miscelare la massa <strong>di</strong> correzione con dentina (D) o<br />
massa incisale (IT) (proporzioni secondo necessità: 50 : 50).<br />
Tem<strong>per</strong>atura Tempo <strong>di</strong> Velocità <strong>di</strong> Inizio Fine Tem<strong>per</strong>atura Manteni- Raffreddainiziale<br />
asciugatura salita/min. vuoto vuoto finale mento mento<br />
Cottura <strong>di</strong> correzione 500 °C 4 min. 55 °C/min. 500 °C 715 °C 715 °C 1 min. 0 min.<br />
con vuoto<br />
2.2.11. Preparazione della <strong>ceramica</strong> Triceram ®<br />
Per ottenere su<strong>per</strong>fici compatte ed omogenee si consiglia l'uso <strong>di</strong> frese e <strong>di</strong>schi <strong>di</strong>amantati sinterizzati a grana<br />
su<strong>per</strong>fine. <strong>La</strong> finitura e la lucidatura delle su<strong>per</strong>fici (prima della glasure) viene realizzata con lucidatori a fibre<br />
speciali impregnati <strong>di</strong> pasta <strong>di</strong>amantata e con feltri impregnati <strong>di</strong> pasta <strong>di</strong>amantata microfine (<strong>per</strong> la lucidatura<br />
degli spazi interdentali e piani occlusali). Con la <strong>ceramica</strong> Triceram ® non è necessario l'uso <strong>di</strong> masse specifiche<br />
<strong>per</strong> la glasure.<br />
triceram ® modalità d'uso it 21
3. Modalità d'uso dei Liners Triceram ® su<br />
strutture in <strong>ossido</strong> <strong>di</strong> <strong>zirconio</strong><br />
Poichè l'<strong>ossido</strong> <strong>di</strong> <strong>zirconio</strong> presenta caratteristiche termiche <strong>di</strong>fferenti dal <strong>titanio</strong>, <strong>per</strong> ottenere un corretto grado <strong>di</strong> cottura<br />
della <strong>ceramica</strong> Triceram® su <strong>zirconio</strong>, è necessario aumentare le tem<strong>per</strong>ature <strong>di</strong> cottura nonché allungare i tempi<br />
<strong>di</strong> mantenimento. Come <strong>per</strong> la metallo-<strong>ceramica</strong>, anche in questo caso valgono gli stessi requisiti <strong>di</strong> base, vale a <strong>di</strong>re la<br />
<strong>di</strong>mensione della struttura deve essere più piccola <strong>di</strong> quella finale. Inoltre lo spessore <strong>di</strong> <strong>ceramica</strong> deve essere il più uniforme<br />
possibile. Osservare quin<strong>di</strong> attentamente la sottostante tabella <strong>di</strong> cottura.<br />
Preparazione della struttura<br />
Per la rifinitura della struttura fare riferimento alle specifiche<br />
istruzioni del produttore del sistema impiegato.<br />
Applicazione dei Liners Triceram ®<br />
Miscelare il Liner del colore desiderato (ve<strong>di</strong> tabella a fianco) con il<br />
liquido universale B.O.L., REF 299-180-40 fino ad ottenere una consistenza<br />
cremosa. Per la prima cottura, applicare un sottile strato<br />
coprente <strong>di</strong> Liner.<br />
Ripetere l'o<strong>per</strong>azione una seconda volta assicurandosi <strong>di</strong> coprire<br />
completamente la struttura. Dopo la cottura, le su<strong>per</strong>fici appariranno<br />
lucide come seta.<br />
Consigli <strong>di</strong> miscelazione<br />
Colore<br />
dente L 1 L 2 L 3 L 4 L 5 L 6<br />
A1 1/3 2/3<br />
A2 2/3 1/3<br />
A3 1<br />
A3,5 3/4 1/4<br />
A4 1/2 1/2<br />
B1 1/3 2/3<br />
B2 2/3 1/3<br />
B3 3/4 1/4<br />
B4 1<br />
C1 1/3 2/3<br />
C2 2/3 1/3<br />
C3 3/4 1/4<br />
C4 1<br />
D2 2/3 1/3<br />
D3 3/4 1/4<br />
D4 1/3 2/3<br />
Applicazione delle masse Triceram ® come <strong>di</strong> consueto<br />
(ve<strong>di</strong> pag. 18)<br />
Si tenga presente che tutte le tem<strong>per</strong>ature <strong>di</strong> cottura dovranno essere elevate da 5 °C/ a 10 °C<br />
rispetto ai valori utilizzati <strong>per</strong> il <strong>titanio</strong> e che il mantenimento della dentina deve essere innalzato<br />
a 1,5 - 2 minuti (ve<strong>di</strong> tabella sotto).<br />
Forni <strong>di</strong>fferenti possono richiedere aggiustamenti delle tem<strong>per</strong>ature. Consigli <strong>per</strong> la taratura dei forni sono <strong>di</strong>sponibili<br />
a pag. 9.<br />
Tem<strong>per</strong>ature <strong>di</strong> cottura consigliate su <strong>ossido</strong> <strong>di</strong> <strong>zirconio</strong><br />
Tem<strong>per</strong>atura Tempo <strong>di</strong> Velocità <strong>di</strong> Inizio Fine Tem<strong>per</strong>atura Manteni- Raffredda-<br />
Iniziale asciugatura salita vuoto vuoto finale mento mento<br />
Liner 1+2 500 °C 4 min. 65 °C/min. 500 °C 800 °C 800 °C 1 min. 0 min.<br />
con vuoto<br />
Massa spalla 500 °C 6 min. 55 °C/min. 500 °C 790 °C 790 °C 1 min. 0 min.<br />
con vuoto<br />
Dentina I cottura 500 °C 6 min. 55 °C/min. 500 °C 760 °C 760 °C 1,5 - 2 min. 0 min.<br />
con vuoto<br />
Dentina II cottura 500 °C 4 min. 55 °C/min. 500 °C 760 °C 760 °C 1,5 - 2 min. 0 min.<br />
con vuoto<br />
Glasure 500 °C 2 min. 55 °C/min. – – 760 °C 1 min.* 0 min.<br />
* <strong>La</strong> glasure può essere fatta con o senza il vuoto. Il grado <strong>di</strong> lucentezza può essere aumentato prolungando il tempo<br />
<strong>di</strong> mantenimento.<br />
Al posto dei Liners Triceram ® è possibile utilizzare anche il Bonder Triceram ® e l'opaco Triceram ® .<br />
22 triceram ® modalità d'uso it
4. Accessori <strong>per</strong> la rifinitura della <strong>ceramica</strong><br />
A B C D<br />
A<br />
B<br />
REF 260-803-01 A Si<strong>di</strong>o I<br />
1 pezzo Diamante sinterizzato su<strong>per</strong>fine <strong>per</strong> la strutturazione margi-<br />
Velocità:<br />
nale del bordo in <strong>ceramica</strong> nonche' <strong>per</strong> gran<strong>di</strong> su<strong>per</strong>fici <strong>di</strong><br />
10 000-20 000 giri/min. parti orali o parti vestibolari dei molari e delle su<strong>per</strong>fici<br />
Mandrino Ø 2.35 mm labiali.<br />
REF 260-803-02 B Si<strong>di</strong>o II<br />
1 pezzo Diamante sinterizzato su<strong>per</strong>fine <strong>per</strong> la strutturazione<br />
Velocità:<br />
occlusale della <strong>ceramica</strong> nonche' <strong>per</strong> la preparazione<br />
10 000-20 000 giri/min. delle fessure.<br />
Mandrino Ø 2,35 mm<br />
REF 260-803-03 C Si<strong>di</strong>o III<br />
1 pezzo Diamante sinterizzato su<strong>per</strong>fine <strong>per</strong> la strutturazione<br />
Velocità:<br />
delle parti frontali linguali, nonche' <strong>per</strong> la strutturazione<br />
10 000-20 000 giri/min. delle su<strong>per</strong>fici labiali.<br />
Mandrino Ø 2,35 mm<br />
REF 260-803-04 D Si<strong>di</strong>o IV<br />
1 pezzo Diamante sinterizzato su<strong>per</strong>fine <strong>per</strong> la finitura delle<br />
Velocità:<br />
fessure e <strong>per</strong> la strutturazione dei passaggi<br />
10 000-20 000 giri/min. interprossimali.<br />
Mandrino Ø 2,35 mm<br />
REF 260-804-02 A Highflex<br />
1 pezzo Disco <strong>di</strong>amantato su<strong>per</strong>flessibile <strong>per</strong> la separazione e la<br />
Velocità:<br />
profilatura della <strong>ceramica</strong> (spessore 0,15mm), nonche' <strong>per</strong><br />
3 000-5 000 giri/min. la normale strutturazione interprossimale (moderata<br />
Mandrino Ø 2,35 mm pressione).<br />
REF 260-804-01 B Dia-Miniflex<br />
1 pezzo Disco <strong>di</strong>amantato su<strong>per</strong>fine <strong>per</strong> correzioni estremamente<br />
Velocità:<br />
fini in settori interprossimali ed incisali.<br />
5 000-10 000 giri/min.<br />
Mandrino Ø 2,35 mm<br />
A<br />
B<br />
REF 260-805-01 A Kerofix I<br />
2 pezzi Lucidatori a fibre speciali impregnate <strong>di</strong> pasta <strong>di</strong>amantata<br />
Velocità:<br />
prelucidatura della <strong>ceramica</strong>.<br />
2 000-3 000 giri/min. Importante! <strong>La</strong>vorare con movimenti intermittenti<br />
Mandrino Ø 2,35 mm leggermente rotatori a forte pressione.<br />
REF 260-805-02 B Kerofix II<br />
2 pezzi Lucidatori a fibre speciali impregnate <strong>di</strong> pasta <strong>di</strong>amantata<br />
Velocità:<br />
<strong>per</strong> la lucidatura a specchio della <strong>ceramica</strong>.<br />
2 000-3 000 giri/min. Importante! <strong>La</strong>vorare con movimenti intermittenti<br />
Mandrino Ø 2,35 mm leggermente rotatori a forte pressione.<br />
A<br />
B<br />
REF 260-806-01 A Diafix I<br />
10 pezzi Lucidatori a feltro che non si seccano, impregnati <strong>di</strong><br />
(1 montato + 9 non montati) micro<strong>di</strong>amante <strong>per</strong> la lucidatura a specchio delle zone<br />
Velocità:<br />
interprossimali e occlusali.<br />
2 000-3 000 giri/min.<br />
Mandrino Ø 2,35 mm<br />
REF 260-806-02 B Diafix II<br />
10 pezzi Lucidatori a feltro che non si seccano, impregnati <strong>di</strong><br />
(1 montato + 9 non montati) micro<strong>di</strong>amante <strong>per</strong> la lucidatura a specchio identica a<br />
Velocità:<br />
quella naturale delle su<strong>per</strong>fici vestibolari e orali<br />
2 000-3 000 giri/min. in <strong>ceramica</strong>.<br />
Mandrino Ø 2,35 mm<br />
Set Kera 10 pezzi<br />
REF 260-800-12<br />
Contenuto:<br />
Si<strong>di</strong>o I, Si<strong>di</strong>o II, Si<strong>di</strong>o III,<br />
Si<strong>di</strong>o IV, Highflex,<br />
Dia-Miniflex, Kerofix I,<br />
Kerofix II, Diafix I, Diafix II<br />
triceram ® modalità d'uso it 23
5. Programma completo<br />
Prodotti<br />
Bonder<br />
Componenti<br />
in polvere, in pasta<br />
Liner L 1, 2, 3, 4, 5, 6<br />
Masse spalla SM<br />
Mo<strong>di</strong>ficatori SM<br />
Opachi O<br />
Dentine opache OD<br />
Dentine D<br />
Dentine Chroma<br />
Dentine intensive Fluo IFD<br />
A, B, C, D<br />
bianco, trasparente<br />
A1, A2, A3, A3.5, A4, B1, B2, B3, B4, C1, C2, C3, C4, D2, D3, D4, G<br />
A1, A2, A3, A3.5, A4, B1, B2, B3, B4, C1, C2, C3, C4, D2, D3, D4<br />
A1, A2, A3, A3.5, A4, B1, B2, B3, B4, C1, C2, C3, C4, D2, D3, D4<br />
A, B, C<br />
Incisali trasparenti IT 57, 58, 59, 60<br />
Incisali opalescenti IO<br />
Neutro transparente NT<br />
Massa <strong>di</strong> correzione CM<br />
Effetti trasparenti TE<br />
Masse gengivali G, GD<br />
crema, giallo, arancio, arancio plus<br />
ice white, polar white, snow white, sky blue, amber<br />
NT<br />
CM<br />
bianco, giallo, rosa, miele, blu, marrone<br />
chiara, scura<br />
Stains universali A, B, C, 0, 1, 2, 3, 45, 6, 7, 8, 9, 10, 11, 12, 13, 14, 15<br />
Liqui<strong>di</strong> universali<br />
paste universali, massa spalla, Stains universali,<br />
modellazione MV,modellazione LV+,B.O.L.,SM-Isofit<br />
Ruota colori Triceram ® , masse base,<br />
REF 291-000-04<br />
Ruota colori Triceram ® , masse effetto,<br />
REF 291-000-05<br />
24 triceram ® modalità d'uso it
6. Assortimenti<br />
Cofano prova REF 290-113-01<br />
1 bonder in polvere 3 g<br />
1 bonder in pasta 3 g<br />
1 opaco O A3 15 g<br />
1 dentina opaca OD A3 15 g<br />
1 dentina D A3 15 g<br />
1 incisale trasparente IT 59 15 g<br />
1 neutro trasparente NT 15 g<br />
1 liquido universale B.O.L. 20 ml<br />
1 liquido universale <strong>di</strong> modellazione LV+ 20 ml<br />
1 strumento in vetro <strong>per</strong> bonder ed opaco<br />
1 pennello No.6 <strong>per</strong> opaco<br />
Cofano master (1) REF 290-112-01<br />
1 bonder in polvere 15 g<br />
17 opachi O A1-D4 + G 15 g cad.<br />
16 dentine opache OD A1-D4 15 g cad.<br />
16 dentine D A1-D4 15 g cad.<br />
4 incisali trasparenti IT 57-60 15 g cad.<br />
5 incisali opalescenti IO 1-5 15 g cad.<br />
1 neutro trasparente NT 15 g<br />
1 massa <strong>di</strong> correzione CM 3 g<br />
6 effetti trasparenti TE 1-6 15 g cad.<br />
4 masse spalla SM A-D 15 g cad.<br />
2 mo<strong>di</strong>ficatori masse spalla SM W, SM T 15 g cad.<br />
2 masse gengivali G, GD 15 g cad.<br />
15 Stains universali ST 0-15 3 g cad.<br />
1 liquido <strong>per</strong> Stains universali 20 ml<br />
1 liquido universale <strong>per</strong> masse spalla 20 ml<br />
1 liquido universale B.O.L. 100 ml<br />
1 liquido <strong>di</strong> modellazione universale MV 20 ml<br />
1 liquido <strong>di</strong> modellazione universale LV+ 100 ml<br />
1 SM-Isofit 20 ml<br />
1 strumento in vetro <strong>per</strong> bonder ed opaco<br />
1 pennello No. 6 <strong>per</strong> opaco<br />
1 ruota colori masse effetto<br />
1 ruota colori Stains universali<br />
Cofano master (2) REF 290-112-11<br />
Contenuto identico al 290-112-01, ma con bonder in pasta anzichè in polvere<br />
Cofano Stains universali REF 296-000-01<br />
15 Stains universali 0-15 3 g cad.<br />
1 liquido Stains universali 20 ml<br />
1 ruota colori Stains universali<br />
triceram ® modalità d'uso it 25
7. Tabelle <strong>di</strong> cottura <strong>per</strong> strutture in <strong>titanio</strong><br />
Austromat 3001<br />
Bonder in polvere C500 T60 T180 · L9 V9 TO65 · C795 T60 V0 CO LO T2 C500<br />
Bonder in pasta C500 T60 T300 · L9 V9 TO65 · C795 T60 V0 CO LO T2 C500<br />
Opaco 1+2 C500 T60 T180 · L9 V9 TO65 · C795 T60 V0 CO LO T2 C500<br />
Massa spalla C500 T60 T360 · L9 V9 TO55 · C785 T60 V0 CO LO T2 C500<br />
Dentina C500 T60 T360 · L9 V9 TO55 · C755 T60 V0 CO LO T2 C500<br />
(con liquido LV+ universale) **<br />
Correzione C500 T60 T240 · L9 V9 TO55 · C755 T60 V0 CO LO T2 C500<br />
(con liquido LV+ universale) **<br />
Glasure C500 T60 T120 · L9 TO55 · C755 T60 CO LO T2 C500<br />
Massa <strong>di</strong> correzione C500 T60 T240 · L9 V9 TO55 · C715 T60 V0 CO LO T2 C500<br />
Massa gengivale C500 T60 T360 · L9 V9 TO55 · C755 T60 V0 CO LO T2 C500<br />
Vacumat 100/200/50<br />
Tem<strong>per</strong>atura<br />
finale<br />
Asciugatura<br />
(min.)<br />
Velocità <strong>di</strong><br />
salita (min.)<br />
Mantenimento Vuoto<br />
(min.)<br />
Raffred.<br />
Bonder in polvere 795°C 4 5 1 min. 6 –<br />
con vuoto<br />
Bonder in pasta 795°C 6 5 1 min. 6 –<br />
con vuoto<br />
Opaco 1+2 795°C 4 5 1 min. 6 –<br />
con vuoto<br />
Massa spalla 785°C 6 5 1 min. 6 –<br />
con vuoto<br />
Dentina 755°C 6 5 1 min. 6 –<br />
(con liquido LV+ universale) **<br />
con vuoto<br />
Correzione 755°C 4 5 1 min. 6 –<br />
(con liquido LV+ universale) **<br />
con vuoto<br />
Glasure 755°C 2 5 1 min.**** **** –<br />
con vuoto<br />
Massa <strong>di</strong> correzione 715°C 6 5 1 min. 6 –<br />
con vuoto<br />
Massa gengivale 755°C 6 5 1 min. 6 –<br />
con vuoto<br />
Multimat MCII (Mach1/Mach2)<br />
Tem<strong>per</strong>atura Asciug. Preriscaldo Vuoto Tempo <strong>di</strong> Tem<strong>per</strong>atura Velocità <strong>di</strong> Vuoto<br />
<strong>di</strong> preriscaldo (min.) (min.) (min.) cottura (min.) <strong>di</strong> cottura salita min.<br />
Bonder in polvere 500°C 3 1 1,0 2,0 815°C 65°C 50<br />
Bonder in pasta 500°C 5 1 1,0 2,0 815°C 65°C 50<br />
Opaco 1+2 500°C 3 1 1,0 2,0 815°C 65°C 50<br />
Massa spalla 500°C 4 2 1,0 2,0 805°C 55°C 50<br />
Dentina 500°C 4 2 1,0 2,0 775°C 55°C 50<br />
(con liquido LV+ universale) **<br />
Correzione 500°C 4 2 1,0 2,0 775°C 55°C 50<br />
(con liquido LV+ universale) **<br />
Glasure 500°C 2 2 **** 1,5 775°C 55°C ****<br />
Massa <strong>di</strong> correzione 500°C 4 2 1,0 2,0 735°C 55°C 50<br />
Massa gengivale 500°C 4 2 1,0 2,0 775°C 55°C 50<br />
** Se viene usato il liquido universale <strong>di</strong> miscelazione MV è necessario fare riferimento alla sua specifica tabella <strong>di</strong> cottura.<br />
**** <strong>La</strong> glasure può essere fatta con o senza il vuoto. Il mantenimento deve essere almeno <strong>di</strong> 1 minuto. Il grado <strong>di</strong><br />
lucentezza può essere incrementato prolungando il mantenimento.<br />
26 triceram ® modalità d'uso it
8. Tabelle <strong>di</strong> cottura <strong>per</strong> strutture in <strong>zirconio</strong><br />
Austromat 3001<br />
Liner 1+2 C500 T60 T180 · L9 V9 TO65 · C800 T60 V0 CO LO T2 C500<br />
Massa spalla C500 T60 T360 · L9 V9 TO65 · C790 T60 V0 CO LO T2 C500<br />
Dentina C500 T60 T360 · L9 V9 TO55 · C760 T90-120 V0 CO LO T2 C500<br />
(con liquido LV+ universale) **<br />
Correzione C500 T60 T240 · L9 V9 TO55 · C760 T90-120 V0 CO LO T2 C500<br />
(con liquido LV+ universale) **<br />
Glasure C500 T60 T120 · L9 TO55 · C760 T60 CO LO T2 C500<br />
Il mantenimento <strong>per</strong> la cottura della dentina e la cottura <strong>di</strong> correzione<br />
deve essere tra 90 e 120 secon<strong>di</strong>.<br />
Vacumat 100/200/50<br />
Tem<strong>per</strong>atura<br />
finale<br />
Asciugatura<br />
(min.)<br />
Velocità <strong>di</strong><br />
salita (min.)<br />
Mantenimento Vuoto<br />
(min.)<br />
Raffred.<br />
Liner 1+2 800°C 4 5 1 min. 6 –<br />
con vuoto<br />
Massa spalla 790°C 6 5 1 min. 6 –<br />
con vuoto<br />
Dentina 760°C 6 5 1,5 - 2 min. 6,5 - 7,0 –<br />
(con liquido LV+ universale) **<br />
con vuoto<br />
Correzione 760°C 4 5 1,5 - 2 min. 6,5 - 7,0 –<br />
(con liquido LV+ universale) **<br />
con vuoto<br />
Glasure 760°C 2 5 1 min.**** **** –<br />
con vuoto<br />
Multimat MCII (Mach1/Mach2)<br />
Tem<strong>per</strong>atura Asciug. Preriscaldo Vuoto Tempo <strong>di</strong> Tem<strong>per</strong>atura Velocità <strong>di</strong> Vuoto<br />
<strong>di</strong> preriscaldo (min.) (min.) (min.) cottura (min.) <strong>di</strong> cottura salita min.<br />
Liner 1+2 500°C 3 1 1,0 2,0 820°C 65°C 50<br />
Massa spalla 500°C 4 2 1,0 2,0 810°C 55°C 50<br />
Dentina 500°C 4 2 1,0 2,5 - 3,0 780°C 55°C 50<br />
(con liquido LV+ universale) **<br />
Correzione 500°C 4 2 1,0 2,5 - 3,0 780°C 55°C 50<br />
(con liquido LV+ universale) **<br />
Glasure 500°C 2 2 **** 1,5 780°C 55°C ****<br />
Annotazioni:<br />
I valori riportati rappresentano solo delle linee guida e dovrebbero essere adattate in<strong>di</strong>vidualmente in funzione della specifica<br />
situazione, età e tipologia del forno impiegato.<br />
Le tabelle <strong>di</strong> cottura si riferiscono a forni appena calibrati con argento fino.<br />
triceram ® modalità d'uso it 27
Assistenza<br />
Noi poniamo grande attenzione all'assistenza ed al sostegno tecnico dei nostri clienti.<br />
A tal proposito è stato creato un team <strong>di</strong> es<strong>per</strong>ti ceramisti in grado <strong>di</strong> rispondere anche<br />
ai quesiti più <strong>di</strong>fficili. Gli or<strong>di</strong>ni <strong>di</strong> materiale possono esserci inviati <strong>di</strong>rettamente <strong>per</strong> telefono,<br />
<strong>per</strong> fax o <strong>per</strong> e-mail ai seguenti numeri:<br />
Tel.: 051/86.25.80 · Fax: 051/86.32.91 · e-mail: or<strong>di</strong>ni@dentaurum.it<br />
Non solo la qualità delle materie prime impiegate influisce sulla bontà del lavoro, ma<br />
anche la <strong>per</strong>fetta conoscenza delle tecniche d'impiego dei materiali stessi. Nel nostro<br />
centro viene svolto annualmente un ampio programma <strong>di</strong> corsi, seminari ed incontri <strong>per</strong><br />
il <strong>per</strong>fezionamento delle proprie conoscenze tecnico-professionali. Per ricevere il calendario<br />
completo degli eventi in progetto, basta telefonare al numero sotto evidenziato<br />
o scaricarlo <strong>di</strong>rettamente dal nostro sito internet:<br />
Centro Corsi: 051/86.19.35 · Internet: www.dentaurum.it<br />
Per domande sull'uso dei nostri prodotti, è a <strong>di</strong>sposizione il servizio <strong>di</strong> assistenza odontotecnica<br />
ai seguenti numeri telefonici:<br />
335/69.05.545 oppure 051/86.50.084<br />
Informazioni aggiornate ed in<strong>di</strong>cazioni d'uso complete relative ai prodotti Dentaurum<br />
sono <strong>di</strong>sponibili consultando in nostro sito internet. Le informazioni possono anche<br />
essere scaricate entrando nell'apposita sezione <strong>di</strong> download.<br />
www.dentaurum.com<br />
Data dell'informazione: 07/05<br />
989-643-51 Printed by Dentaurum Italia Italy 07/05<br />
dentaurum<br />
france<br />
Dentaurum Italia S.p.a. · Via degli Speziali, 142/144 · Blocco 33 · CENTERGROSS · 40050 FUNO (BO)<br />
italia s.p.a.<br />
Tel.: 051/86.25.80 españa · Fax: 051/86.32.91<br />
s.a.<br />
· www.dentaurum.it · E-Mail: info@dentaurum.it<br />
belgium