
You also want an ePaper? Increase the reach of your titles
YUMPU automatically turns print PDFs into web optimized ePapers that Google loves.
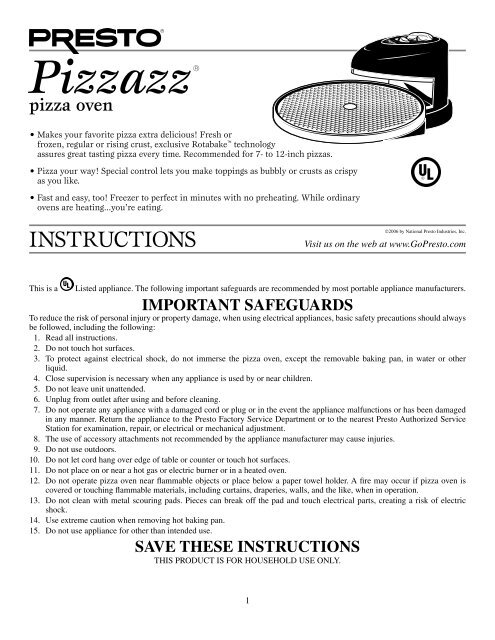
<strong>Pizzazz®</strong><br />
pizza oven<br />
• Makes your favorite pizza extra delicious! Fresh or<br />
frozen, regular or rising crust, exclusive Rotabake technology<br />
assures great tasting pizza every time. Recommended for 7- to 12-inch pizzas.<br />
• Pizza your way! Special control lets you make toppings as bubbly or crusts as crispy<br />
as you like.<br />
• Fast and easy, too! Freezer to perfect in minutes with no preheating. While ordinary<br />
ovens are heating...you’re eating.<br />
InStRuctIonS<br />
1<br />
©2006 by National <strong>Presto</strong> Industries, Inc.<br />
Visit us on the web at www.Go<strong>Presto</strong>.com<br />
This is a Listed appliance. The following important safeguards are recommended by most portable appliance manufacturers.<br />
IMPORTANT SAFEGUARDS<br />
To reduce the risk of personal injury or property damage, when using electrical appliances, basic safety precautions should always<br />
be followed, including the following:<br />
1. Read all instructions.<br />
2. Do not touch hot surfaces.<br />
3. To protect against electrical shock, do not immerse the pizza oven, except the removable baking pan, in water or other<br />
liquid.<br />
4. Close supervision is necessary when any appliance is used by or near children.<br />
5. Do not leave unit unattended.<br />
6. Unplug from outlet after using and before cleaning.<br />
7. Do not operate any appliance with a damaged cord or plug or in the event the appliance malfunctions or has been damaged<br />
in any manner. Return the appliance to the <strong>Presto</strong> Factory Service Department or to the nearest <strong>Presto</strong> Authorized Service<br />
Station for examination, repair, or electrical or mechanical adjustment.<br />
8. The use of accessory attachments not recommended by the appliance manufacturer may cause injuries.<br />
9. Do not use outdoors.<br />
10. Do not let cord hang over edge of table or counter or touch hot surfaces.<br />
11. Do not place on or near a hot gas or electric burner or in a heated oven.<br />
12. Do not operate pizza oven near flammable objects or place below a paper towel holder. A fire may occur if pizza oven is<br />
covered or touching flammable materials, including curtains, draperies, walls, and the like, when in operation.<br />
13. Do not clean with metal scouring pads. Pieces can break off the pad and touch electrical parts, creating a risk of electric<br />
shock.<br />
14. Use extreme caution when removing hot baking pan.<br />
15. Do not use appliance for other than intended use.<br />
SAVE THESE INSTRUCTIONS<br />
ThIS PRoDUCT IS FoR hoUSehoLD USe oNLy.
Important Cord and plug InformatIon<br />
A short power supply cord is provided to reduce the risk resulting from becoming entangled in or tripping over a longer<br />
cord. DO NOT USE WITH AN EXTENSION CORD.<br />
As a safety feature, this appliance has a polarized plug (one blade is wider than the other). This plug will fit in a polarized<br />
outlet only one way. If the plug does not fit fully in the outlet, reverse the plug. If it still does not fit, contact a qualified<br />
electrician. Do not attempt to defeat this safety feature.<br />
getting acquainted<br />
your Pizzazz ® pizza oven will cook 7-<br />
to 12-inch pizzas fast and easy without<br />
preheating. Use it to make frozen, takeand-bake,<br />
deli, or homemade pizza. The<br />
selectable heating elements (LoWeR–<br />
DUAL–UPPeR) let you make pizza the<br />
way you like best. Begin by using the<br />
recommended settings in the cooking<br />
chart on page 4. For your convenience,<br />
the chart is also on the back of the pizza<br />
oven. At the end of the recommended<br />
cooking time if you want your toppings<br />
more done, select UPPeR. If you want<br />
a crispier crust, select LoWeR. Then<br />
reset the timer by turning it beyond the<br />
“4” minute mark and then back to 1 or 2<br />
minutes and cook until pizza is done to<br />
your satisfaction. To avoid overcooking,<br />
do not leave unit unattended.<br />
Whenever the unit is plugged in and<br />
the baking pan is correctly positioned,<br />
the motor will turn on and the pan will<br />
rotate. once the timer is set, the heating<br />
elements will turn on. When the time<br />
has expired, the timer will ring and the<br />
heating elements will shut off. The pan<br />
will continue to rotate until either it is<br />
removed or the unit is unplugged.<br />
How to use<br />
Fig. A<br />
Removable<br />
Baking Pan<br />
Unit Assembled<br />
2<br />
Drive Shaft<br />
Before using for the first time, become familiar with the Pizzazz ® pizza<br />
oven (Fig. A). Wash the baking pan in warm, soapy water; rinse and dry<br />
thoroughly.<br />
1. Set pizza oven on a flat, dry countertop away from countertop edge.<br />
2. Locate the two “curls” on the lower element tray (see Fig. A). Position<br />
the baking pan over the lower heating element at an angle so the back<br />
inside rim of the pan rests against the back of the “curls”. Now center<br />
the pan so the pan hub is over the drive shaft (Fig. B). The pan must be<br />
pulled forward against the “curls” for the hub to align with the drive shaft.<br />
Lower the pan so that the drive shaft is seated into the hub. The pan may<br />
rotate slightly while it drops into position, when the hub and drive shaft<br />
engage.<br />
Heat Element Selector Switch<br />
(LOWER–DUAL–UPPER)<br />
Upper Heating<br />
Element<br />
Cooking<br />
Chart<br />
Baking Pan<br />
“Curl”<br />
Pan Hub<br />
“Curl”<br />
Drive<br />
Shaft<br />
Fig. B<br />
Lower Heating<br />
Element<br />
Element Tray<br />
Lower Element<br />
Tray<br />
Timer<br />
“Curl”<br />
“Curl”
3. Remove pizza from box or wrapper and cardboard disk. Center pizza on baking pan. When baking take-out pizza or rising<br />
crust pizza, you may use the baking wheel or special baking tray if provided by the pizza manufacturer.<br />
4. Plug the unit in. The motor will turn on and the baking pan will begin to rotate. note: If the baking pan does not rotate, the<br />
pan hub is probably not centered over the drive shaft (Fig. B). Reposition the pan following the instructions in step 2.<br />
5. Slide the heat element selector switch to the appropriate setting (LoWeR–DUAL–UPPeR). Refer to the cooking chart on<br />
page 4 or on back of pizza oven.<br />
6. Press the timer dial down and rotate it clockwise to the desired baking time. Refer to the cooking chart on page 4 or on back<br />
of pizza oven, rather than the pizza manufacturer’s instructions. Typically, pizzas will cook faster on the Pizzazz ® pizza oven<br />
than in a conventional oven. once the timer is set, the heating elements will turn on and the pizza will begin to cook. Do not<br />
preheat the pizza oven.<br />
Be sure to always rotate the timer dial beyond the “4” minute mark then back to the desired time when selecting a<br />
setting of four minutes or less.<br />
note: When the heating elements are turned on, the metal surrounding the heating elements will expand. You may hear a light<br />
humming or vibrating sound, or a slight pop, as the metal expands. This is normal.<br />
7. If timer goes off and additional baking time is needed, simply reset timer to desired time. To cook 4 minutes or less, rotate<br />
the dial beyond “4” and then back to time desired. This will activate the heating elements and timer function. When<br />
pizza appears done, press down on the timer dial and turn it to “0” if it is not at “0” already. The heating elements will turn<br />
off when the timer is at the “0” position. Note: You will hear a clicking sound periodically whenever the unit is plugged<br />
in, the pan is in place, and the timer is at the “0” position. This is normal.<br />
8. Then while the pan continues to rotate, using hot pads carefully lift the baking pan and pizza off the pizza oven, being careful<br />
pizza does not touch the upper heating element. Set hot baking pan on a heat resistant surface. Note: As soon as you lift the<br />
baking pan from the pizza oven, the automatic shut-off switch will shut the pizza oven off.<br />
9. Unplug the unit. Allow the unit to cool before cleaning or storing.<br />
10. Carefully slide pizza onto cardboard circle or pizza plate. Cut and serve. Do not cut pizza on the baking pan. For best results<br />
use nylon, plastic, wooden or rubber utensils. Do not use metal utensils as they may scratch the nonstick surface.<br />
Warnings<br />
NEVER LEAVE UNIT UNATTENDED. Pizza ingredients burn and smoke when overcooked and in extreme situations may<br />
even ignite. The amount of rising that occurs on rising crust pizzas varies from pizza to pizza. In rare instances, at the end of the<br />
cooking cycle, a rising crust may rise so high that it touches the upper heating element, scorching the crust and overcooking the<br />
pizza toppings. either situation can be avoided simply by turning the timer dial to “0” before the overcooking/overrising occurs.<br />
DO NOT PREHEAT PIzzA OVEN. With the Pizzazz ® pizza oven, no preheating is necessary. Preheating an empty baking pan<br />
may damage the pan finish.<br />
BE SURE TO ALWAYS ROTATE THE TIMER DIAL BEYOND THE “4” MINUTE MARk THEN BACk TO THE<br />
DESIRED TIME WHEN SELECTING A SETTING OF FOUR MINUTES OR LESS. This will activate the heating<br />
elements and timer function.<br />
NEVER WRAP BAkING PAN OR ANY PORTION OF THE PIzzA OVEN WITH ALUMINUM FOIL.<br />
NEVER OPERATE THE UNIT IF THE PAN IS NOT ROTATING.<br />
CLOSE ADULT SUPERVISION IS NECESSARY WHENEVER USING THIS APPLIANCE WITH CHILDREN<br />
PRESENT.<br />
NEVER TOUCH THE PIzzA OR ANY METAL PARTS ON THE UNIT WHILE IT IS OPERATING. THEY ARE VERY<br />
HOT.<br />
ALWAYS REMOVE BAkING PAN FROM UNIT WHEN BAkING IS COMPLETED. operating the pizza oven with an empty<br />
baking pan or placing an empty baking pan on the unit before the unit has cooled may result in damage to the baking pan finish.<br />
3
Cooking Chart<br />
The following times are for cooking 9- to 12-inch pizzas. The times are approximate. If cooking 7- or 8-inch pizzas, you may<br />
need to reduce the cooking times by 1 to 2 minutes. When the cheese is melted and bubbling, the pizza is done. At the end of the<br />
cooking time if you would like a crispier crust, slide the switch to LoWeR; if you would like the toppings more done, slide the<br />
switch to UPPeR. Then reset the timer by turning it beyond “4” and then back to 1 or 2 minutes and cook until pizza is done to<br />
your satisfaction. To avoid overcooking, do not leave unit unattended.<br />
APPROXIMATE<br />
TYPE OF PIzzA ELEMENT SETTING COOkING TIME**<br />
FROzEN (9” – 12”)<br />
Regular Crust DUAL 12-15 minutes<br />
Rising Crust* LOWER then 10-12 minutes<br />
DUAL 10-12 minutes<br />
Stuffed Crust LOWER then 7 minutes<br />
DUAL 12-15 minutes<br />
Regular Crust, DUAL then 15 minutes<br />
extra topping UPPER 3-4 minutes<br />
FRESH* (9” – 12”) DUAL 11-13 minutes<br />
Questions and answers<br />
When I plug my pizza oven in and set the timer nothing happens. Why?<br />
The baking pan may not be positioned correctly on the unit. In order for the pan to rotate and the unit to heat, the pan hub must be<br />
seated over the drive shaft (see Fig. B, page 2). Reposition the pan making sure the hub is on the drive shaft.<br />
the baking pan rotates, but my pizza does not cook. Why?<br />
you have failed to turn on the timer. The timer has a dual function. once the timer is set, the heating elements will turn on and<br />
begin cooking the pizza. When the time has expired, the timer will ring and the heating elements will shut off.<br />
my pizza does not cook evenly. What am I doing wrong?<br />
1. If the bottom is done and the top isn’t or if the top is done and the bottom isn’t, you probably have not selected the correct setting<br />
for the type of pizza you are cooking. Refer to the cooking chart above or on back of pizza oven for recommended guidelines.<br />
Most pizzas should be cooked using the dual setting for part of the cooking time.<br />
2. The ingredients on your pizza are not distributed evenly. If that is the case, allow the pizza to cook slightly and then redistribute<br />
the ingredients with a fork. This will allow the pizza to cook more evenly.<br />
How do I get a crispier crust or make my toppings browner?<br />
Always begin cooking your pizza using the recommended settings in the cooking chart above or on back of pizza oven. Then at<br />
the end of the recommended cooking time if you would like a crispier crust, slide the switch to LoWeR; if you would like the<br />
toppings more done, slide the switch to UPPeR. Then reset the timer by turning it beyond “4” and then back to 1 or 2 minutes<br />
and cook until pizza is done to your satisfaction. To avoid overcooking, do not leave unit unattended.<br />
When I try to brown the top or crisp the crust for a couple of additional minutes, nothing happens. Why?<br />
you did not rotate the timer beyond the “4” minute mark when setting the timer for the couple of additional minutes. When selecting<br />
a setting of four minutes or less, you must always rotate the dial beyond “4” minutes and then back to the desired time.<br />
When I cook rising crust pizza, sometimes the crust seems doughy or sometimes the crust doesn’t rise very much. Why?<br />
your problem is caused by one of two things:<br />
1. you did not follow the recommended cooking settings––cook 9- to 12-inch pizzas 10 to 12 minutes first on LoWeR and then<br />
10 to 12 minutes on DUAL. OR<br />
2. The yeast in your pizza crust is no longer fully active. The amount of rising and the consistency of a rising crust is dependent<br />
upon the conditions of the yeast. Freshness, freezer temperatures, packaging (vacuum packaged is best), and original dough<br />
quality are all important factors. Generally, more consistent results will be secured by nationally branded pizzas since they abide<br />
by more rigorous packaging and quality standards than many regional/grocery store pizzas.<br />
4<br />
* you may use baking wheel or tray, if<br />
provided.<br />
** Cooking times will vary depending on household<br />
voltage. The higher the voltage the shorter the<br />
cooking time; the lower the voltage the longer<br />
the cooking time.<br />
Note: When using the Pizzazz ® pizza<br />
oven, the cooking times will generally<br />
be shorter than if cooking the pizza in<br />
a conventional oven. DO NOT LEAVE<br />
UNIT UNATTENDED.
Can I use my pizzazz ® pizza oven to reheat pizza or to cook other foods besides pizza?<br />
Such use is not recommended. The product was designed for cooking whole (7- to 12-inch) pizzas. Reheating less than a whole pizza<br />
or cooking other foods will not cover the baking pan the way a whole pizza does. As a result, the pan’s finish may be damaged.<br />
Care and Cleaning<br />
1. Always remove baking pan from unit when baking is completed.<br />
2. Unplug pizza oven from outlet and allow entire unit to cool completely before cleaning.<br />
3. Wash the nonstick baking pan in warm sudsy water, rinse, and dry.<br />
4. occasionally, wipe the exterior of the pizza oven with a damp cloth and dry thoroughly. Never immerse the pizza oven, except<br />
the baking pan, in water or other liquid. Do not wash in the dishwasher.<br />
5. If necessary, the outer rim of the element trays may be cleaned with a nylon mesh pad to remove any food residue. Do not<br />
use steel wool scouring pads or abrasive kitchen cleansers on any part of the pizza oven.<br />
Try this quick and easy recipe with your favorite toppings for a pizza with great homemade taste.<br />
1 loaf of frozen bread dough, thawed OR<br />
1 ⁄2 (12 ounces) of Homestyle pizza<br />
dough mix*. Prepare as directed.<br />
1 ⁄2 cup commercial pizza sauce OR<br />
1 ⁄2 cup tomato puree mixed with<br />
1 ⁄2 Homestyle seasoning packet.<br />
Homemade pizza<br />
5<br />
1 ⁄2 cup of favorite toppings (see<br />
suggestions below)<br />
1 cup shredded part-skim milk<br />
mozzarella cheese<br />
Form bread loaf or Homestyle pizza dough into a ball; place ball in center of baking pan and roll or<br />
stretch dough to a 10 to 12-inch circle.‡ Lightly prick dough with fork. Spread pizza sauce evenly over<br />
dough. Place toppings evenly over sauce; sprinkle with mozzarella cheese. Place loaded baking pan on<br />
pizza oven and bake using the DUAL setting for 11 to 13 minutes or until cheese is melted and bubbling.<br />
If you prefer a crisp crust and have a large amount of toppings, it may be desirable to use the LoWeR<br />
setting for 4 to 6 minutes before switching to DUAL for 11 to 13 minutes.<br />
*Makes two 12-inch pizzas. Second piece of dough may be frozen for future use.<br />
‡To make baking pan more stable for rolling or stretching dough, place a kitchen towel under baking pan.<br />
Suggestions for Pizza Toppings:<br />
spicy sausage/onions/black olives<br />
spicy chicken/yellow and red pepper<br />
Canadian bacon/pineapple<br />
squash/sun-dried tomatoes<br />
pepperoni/mushrooms<br />
ham/sauerkraut<br />
spinach/onions/garlic<br />
artichoke hearts/tomatoes
Consumer Service Information<br />
If you have any questions regarding the operation of your <strong>Presto</strong> ® appliance or need parts for your appliance, contact us by one<br />
of these methods:<br />
• Call 1-800-877-0441 weekdays 8:00 AM to 4:30 PM (Central Time)<br />
• Email us at our website www.Go<strong>Presto</strong>.com<br />
• WRITE: NATIONAL PRESTO INDUSTRIES, INC.<br />
Consumer Service Department<br />
3925 North Hastings Way, Eau Claire, WI 54703-3703<br />
When contacting the consumer service department, please indicate the model number for the pizza maker and the 4 digit date code.<br />
These numbers can be found on the bottom of the pizza maker. The date code is stamped into the metal plate.<br />
Inquiries will be answered promptly by telephone, email, or letter. When emailing or writing, please include a phone number and<br />
a time when you can be reached during weekdays if possible.<br />
Any maintenance required for this product, other than normal household care and cleaning, should be performed by our Factory<br />
Service Department or any <strong>Presto</strong> Authorized Service Station. Be sure to indicate date of purchase and a description of defect when<br />
sending an appliance for repair. Send appliances for repair to:<br />
CANTON SALES AND STORAGE COMPANY<br />
<strong>Presto</strong> Factory Service Department<br />
555 Matthews Dr., Canton, MS 39046-0529<br />
Appliances may also be repaired at any <strong>Presto</strong> Authorized Service Station. Check your yellow pages for Service Stations near you.<br />
The <strong>Presto</strong> Factory Service Department and <strong>Presto</strong> Authorized Service Stations are equipped to service all PReSTo ® appliances and<br />
supply genuine PReSTo ® parts. Genuine PReSTo ® replacement parts are manufactured to the same exacting quality standards as<br />
PReSTo ® appliances and are engineered specifically to function properly with its appliances. <strong>Presto</strong> can only guarantee the quality<br />
and performance of genuine PReSTo ® parts. “Look-alikes” might not be of the same quality or function in the same manner. To<br />
ensure that you are buying genuine PReSTo ® replacement parts, look for the PReSTo ® trademark.<br />
PRESTO ® Limited Warranty<br />
This quality PReSTo ® appliance is designed and built to provide many years of satisfactory performance under normal<br />
household use. <strong>Presto</strong> pledges to the original owner that should there be any defects in material or workmanship<br />
during the first year after purchase, we will repair or replace it at our option. our pledge does not apply to damage<br />
caused by shipping. To obtain service under the warranty, return this PReSTo ® appliance, shipping prepaid, to the<br />
<strong>Presto</strong> Factory Service Department or to the nearest <strong>Presto</strong> Authorized Service Station. When returning a product,<br />
please include a description of the defect and indicate the date the appliance was purchased.<br />
We want you to obtain maximum enjoyment from using this PReSTo ® appliance and ask that you read and follow the<br />
instructions enclosed. Failure to follow instructions, damage caused by improper replacement parts, abuse or misuse<br />
will void this pledge. This warranty gives you specific legal rights, and you may also have other rights which vary from<br />
state to state. This is <strong>Presto</strong>’s personal pledge to you and is being made in place of all other express warranties.<br />
NATIONAL PRESTO INDUSTRIES, INC.<br />
Eau Claire, WI 54703-3703<br />
U.S. Pat. Nos.: 6,125,740; 6,354,194; D439,792 and other domestic and foreign patents pending. P.R.C. ZL00306132.9 Form 72-527B<br />
6