Food Plot Spreader Front R5 - EBSCO Information Services
Food Plot Spreader Front R5 - EBSCO Information Services
Food Plot Spreader Front R5 - EBSCO Information Services
- No tags were found...

Create successful ePaper yourself
Turn your PDF publications into a flip-book with our unique Google optimized e-Paper software.
Instructions for ATV <strong>Food</strong> <strong>Plot</strong> <strong>Spreader</strong><br />
THANK YOU for your purchase of the <strong>Food</strong> <strong>Plot</strong> <strong>Spreader</strong>, a<br />
top quality Moultrie product. Please read both sides of this sheet<br />
before operating this unit. If you should have any questions<br />
about this or any other Moultrie product, please contact us using<br />
the information on the reverse side.<br />
To help us better serve you, please complete and mail the<br />
enclosed Warranty Card.<br />
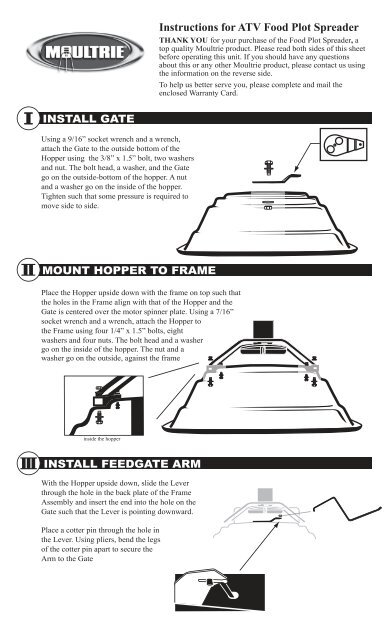
INSTALL GATE<br />
Using a 9/16” socket wrench and a wrench,<br />
attach the Gate to the outside bottom of the<br />
Hopper using the 3/8” x 1.5” bolt, two washers<br />
and nut. The bolt head, a washer, and the Gate<br />
go on the outside-bottom of the hopper. A nut<br />
and a washer go on the inside of the hopper.<br />
Tighten such that some pressure is required to<br />
move side to side.<br />
MOUNT HOPPER TO FRAME<br />
Place the Hopper upside down with the frame on top such that<br />
the holes in the Frame align with that of the Hopper and the<br />
Gate is centered over the motor spinner plate. Using a 7/16”<br />
socket wrench and a wrench, attach the Hopper to<br />
the Frame using four 1/4” x 1.5” bolts, eight<br />
washers and four nuts. The bolt head and a washer<br />
go on the inside of the hopper. The nut and a<br />
washer go on the outside, against the frame<br />
inside the hopper<br />
INSTALL FEEDGATE ARM<br />
With the Hopper upside down, slide the Lever<br />
through the hole in the back plate of the Frame<br />
Assembly and insert the end into the hole on the<br />
Gate such that the Lever is pointing downward.<br />
Place a cotter pin through the hole in<br />
the Lever. Using pliers, bend the legs<br />
of the cotter pin apart to secure the<br />
Arm to the Gate
MOUNT ON ATV RACK<br />
Slide the two square channel Mounting Tubes onto the frame assembly such that they angle out - away<br />
from the <strong>Spreader</strong>. Insert the C clips into the holes on the Mounting Tabs. Pull the Lever all the way<br />
out (fully closed).<br />
Hold the fully assembled <strong>Food</strong> <strong>Plot</strong> <strong>Spreader</strong> over the rear rack of the ATV such that there is<br />
approximately a 1” gap between the Lever and the rear of ATV rack. Use the provided four U bolts,<br />
top plates, and nuts to clamp the locations in which the Mounting Tube cross/intersect the bars on the<br />
ATV rack.<br />
Once the U bolts are connected, the C clips may be removed for a quick disconnect of the <strong>Food</strong> <strong>Plot</strong><br />
<strong>Spreader</strong>.<br />
CONNECT POWER CABLE<br />
BE SURE SWITCH IS IN THE OFF POSITION.<br />
Plug the provided Power Cable into the wire connector on the motor.<br />
Attach the positive alligator clip to the positive battery terminal and the negative alligator clip to the<br />
negative battery terminal on the ATV.<br />
OPERATING INSTRUCTIONS<br />
ADJUST DISPENSING AMOUNT<br />
The adjustment stop on the Lever allows you to<br />
set the opening on the bottom of the hopper to the<br />
amount of material you wish to dispense. Set the<br />
adjustment stop on the Lever to the desired opening.<br />
ADD MATERIAL<br />
Add desired material such as feed, fertilizer, seed,<br />
etc. to the hopper. Cover the hopper with the<br />
plastic cover to prevent spillage.<br />
SPREAD MATERIAL<br />
You are now ready to use the <strong>Food</strong> <strong>Plot</strong><br />
<strong>Spreader</strong>. Turn the motor switch to the “On”<br />
position. If the motor will not spin, check the<br />
battery connections. While driving forward,<br />
push Lever to open Gate. Pull Lever to close Gate.<br />
CLEAN AND STORE SPREADER<br />
Completely wash and dry the <strong>Food</strong> <strong>Plot</strong> <strong>Spreader</strong>. A light coat of oil on metal parts and motor will<br />
help prevent rusting. Store <strong>Spreader</strong> in a dry location.<br />
032005R05 / MFK-FPS