ThermaCELL Heated Insoles Instructions
ThermaCELL® Heated Insoles Instructions
ThermaCELL® Heated Insoles Instructions
- No tags were found...

Create successful ePaper yourself
Turn your PDF publications into a flip-book with our unique Google optimized e-Paper software.
<strong>ThermaCELL</strong> ® <strong>Heated</strong> <strong>Insoles</strong> <strong>Instructions</strong><br />
Package Contents<br />
The <strong>ThermaCELL</strong> ® <strong>Heated</strong> <strong>Insoles</strong> box contains two <strong>Heated</strong> <strong>Insoles</strong>, one Remote Control<br />
Unit, one Global Charger, one Lanyard, and one Drawstring Travel Bag.<br />
Getting Started<br />
<strong>Instructions</strong> for Cutting <strong>Insoles</strong> to Size:<br />
<strong>Insoles</strong> may be trimmed to fit shoes or boots if needed. Be sure to follow the WARNING<br />
statement printed on the bottom of the <strong>Insoles</strong>! The two cutting lines are for reference only.<br />
When sizing the <strong>Heated</strong> Insole be certain to take into consideration the thickness of the<br />
socks that you will use with your footwear.<br />
Caution: Do not cut beyond the solid line or excessively bend the <strong>Insoles</strong>. This will<br />
cause damage to the heating elements and the product.<br />
Charging and Recharging:<br />
The ON/OFF Switch and Recharge Port for the <strong>Insoles</strong> are located at the back or heel of<br />
each Insole. A soft plastic black cap protects the recharge port.<br />
To begin the charging process, the ON/OFF Switches located at the heel of each Insole<br />
must be in the left (OFF) position.<br />
The <strong>ThermaCELL</strong> <strong>Heated</strong> <strong>Insoles</strong> must be fully charged before the first use. For best results,<br />
charge <strong>Insoles</strong> at room temperature. A full charge is indicated when the LED light on the<br />
Global Charger glows green with brief flashes of red. This may take up to 3 hours for the<br />
first charge and less time for subsequent charges depending upon the state of the batteries.<br />
Plug the charger into an electrical outlet. The LED light on the charger will glow green.<br />
Insert each of the two charging cables into each Insole Recharging Port. The LED light on<br />
the charger will glow red while the <strong>Insoles</strong> are charging.<br />
As the batteries near full charge, the LED light on the charger will flicker between red<br />
and green. This is normal indicating that the batteries are approximately 80% charged.<br />
After the charging process is complete, the charging system provides a low current<br />
maintenance charge to keep the batteries at an optimal level and will remain in this<br />
mode until the charger is disconnected from the insole. In this mode, the LED light on the<br />
charger will display a continuous green with an occasional flash of red.<br />
Once the charger is removed from the wall socket, it should be disconnected from<br />
the <strong>Insoles</strong>.<br />
How to Charge and Recharge <strong>Insoles</strong><br />
1. Set the ON/OFF Switch on the back of each Insole to the left (OFF) position.<br />
2. Plug the Global Charger into an electrical outlet; the LED light on the charger will<br />
glow green.<br />
3. Plug the Global Charger cables into each Insole Recharge Port located at the heel of<br />
each Insole. Once the connections are established, the charger LED light will glow red<br />
indicating that the charging process is ongoing.<br />
4. Charge <strong>Insoles</strong> until the Global Charger LED light glows green with brief flashes of red,<br />
indicating that the <strong>Insoles</strong> are fully charged.<br />
5. Unplug the Global Charger and remove the cables from each Insole. The <strong>ThermaCELL</strong><br />
<strong>Heated</strong> <strong>Insoles</strong> are now ready for use.<br />
To Activate the <strong>Insoles</strong><br />
1. Turn each <strong>Heated</strong> Insole on by moving the ON/OFF Switch at the heel of the Insole<br />
to the right position (ON). The red LED light on each Insole will flash intermittently<br />
and <strong>Insoles</strong> will default to the No Heat setting on the Remote Control Unit. Note: If<br />
no specific heat setting is selected, the <strong>Insoles</strong> do not generate heat and use minimal<br />
battery power.<br />
2. Unpack the Remote Control Unit and remove the protective tab to enable the<br />
already installed replaceable battery to activate.<br />
3. Select a setting on the Remote by using the buttons indicating: High (111°F),<br />
Medium (100°F) or No Heat. The LEDs on the <strong>Insoles</strong> flash repeatedly 1 time every<br />
several seconds in the No Heat setting; on Medium they flash 2 times every several<br />
seconds; and on High they flash 3 times every several seconds.<br />
4. Insert the <strong>Insoles</strong> into shoes or boots by following directions located at the bottom of<br />
the <strong>Insoles</strong>. Trim <strong>Insoles</strong> to fit if needed. Insert into shoes with fabric side up.<br />
5. Use the Remote Control unit to operate the <strong>Insoles</strong> while shoes or boots are on<br />
feet. The LED light on the remote will flash once to confirm a heat setting has been<br />
transmitted to the Insole.<br />
6. Remote can be used up to 7 feet from insoles.<br />
7. Note: The heating element in each Insole extends from the toe area to the ball of the<br />
feet. The arch and heel areas are not heated.<br />
Two Ways to Turn Off the <strong>Insoles</strong><br />
1. When <strong>Insoles</strong> are being used in a shoe, remove the <strong>Insoles</strong> and turn the ON/OFF<br />
Switch at the heel of the <strong>Insoles</strong> to the left position (OFF). The Remote Control Unit<br />
will turn off automatically when <strong>Insoles</strong> are switched off.<br />
2. When <strong>Insoles</strong> are seated in the shoe and one does not wish to remove them from the<br />
shoe, use the Remote Control Unit’s No Heat setting.<br />
Remote Control Battery Replacement<br />
The Remote Control Unit comes equipped with one Lithium Cell # CR2032. The<br />
battery should last approximately two years under normal usage. However, to insure<br />
uninterrupted service from the remote, replace the battery annually. To replace the<br />
battery:<br />
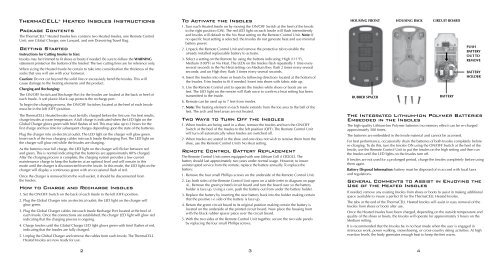
1. Remove the four small Phillips screws on the underside of the Remote Control Unit.<br />
2. Lay both sides of the Remote Control Unit open on a table (refer to diagram on page<br />
4).. Remove the green printed circuit board and turn the board over so the battery<br />
holder is face up. Using a coin, push the battery out from under the battery holder.<br />
3. Replace the battery by inserting the new battery back into the holder making certain<br />
that the positive (+) side of the battery is face up.<br />
4. Return the green circuit board to its original position making certain the battery is<br />
located on the underside of the printed circuit board. Now place the housing front<br />
with the black rubber spacer piece over the circuit board.<br />
5. With the two sides of the Remote Control Unit together, secure the two side panels<br />
by replacing the four small Phillips screws.<br />
Housing Front<br />
Rubber Spacer<br />
Housing Back<br />
Circuit Board<br />
Battery<br />
Push<br />
battery<br />
out to<br />
remove<br />
Battery<br />
Holder<br />
The Integrated Lithium-Ion Polymer Batteries<br />
Embedded in the <strong>Insoles</strong><br />
The high-quality Lithium-Ion Polymer batteries (no memory effect) can be re-charged<br />
approximately 500 times.<br />
The batteries are embedded in the Insole material and cannot be accessed.<br />
For best performance, occasionally drain the batteries of both <strong>Insoles</strong> completely before<br />
re-charging. To do this, turn the <strong>Insoles</strong> ON using the ON/OFF Switch at the heel of the<br />
Insole, use the Remote Control Unit to put the <strong>Insoles</strong> on the high setting and then run<br />
the <strong>Insoles</strong> until the LED lights on the <strong>Insoles</strong> turn off.<br />
If <strong>Insoles</strong> are not used for a prolonged period, charge the <strong>Insoles</strong> completely before using<br />
them again.<br />
Battery Disposal Information: battery must be disposed of in accord with local laws<br />
and regulations.<br />
General Comments to Assist in Enjoying the<br />
Use of the <strong>Heated</strong> <strong>Insoles</strong><br />
If needed, remove any existing <strong>Insoles</strong> from shoes or boots to assist in making additional<br />
space available to insure a perfect fit for the <strong>ThermaCELL</strong> <strong>Heated</strong> <strong>Insoles</strong>.<br />
The tabs at the end of the <strong>ThermaCELL</strong> <strong>Heated</strong> <strong>Insoles</strong> will assist in easy removal of the<br />
<strong>Insoles</strong> from shoes or boots after use.<br />
Once the <strong>Heated</strong> <strong>Insoles</strong> have been charged, depending on the outside temperature and<br />
quality of the shoes or boots, the <strong>Insoles</strong> will operate for approximately 5 hours on the<br />
Medium setting.<br />
It is recommended that the <strong>Insoles</strong> be in no heat mode when the user is engaged in<br />
strenuous work, power walking, snowshoeing, or cross-country skiing activities. At high<br />
exertion levels, the body generates enough heat to keep the feet warm.<br />
2 3 4
Maintaining a comfortable heat level and warmth while using the <strong>Heated</strong> <strong>Insoles</strong><br />
depends upon not only proper installation and activation of the <strong>Insoles</strong>, but upon the<br />
type, fit, and dryness of the footwear and/or socks being worn.<br />
It is recommended that a medium weight sock be worn that wicks away moisture and<br />
keeps feet dry.<br />
Care <strong>Instructions</strong><br />
• Turn off the <strong>Insoles</strong> when not in use.<br />
• Store the <strong>Insoles</strong> and Global Charger in a clean and dry place.<br />
• Only use the <strong>ThermaCELL</strong> <strong>Heated</strong> <strong>Insoles</strong> Global Charger to charge the <strong>Insoles</strong>.<br />
• Only charge the <strong>Insoles</strong> when they are outside of shoes or boots.<br />
• Do not damage the heating elements by bending the <strong>Insoles</strong>.<br />
• Cut the <strong>Insoles</strong> to size only as indicted in instructions.<br />
• Clean with a damp cloth only.<br />
• Do not submerge in water. <strong>Insoles</strong> are water resistant, not waterproof. If <strong>Insoles</strong><br />
become submerged in water, air dry before using.<br />
• Air-dry the <strong>Insoles</strong> only. Do not place them on radiators or any other hot surface.<br />
• Let the <strong>Insoles</strong> dry completely before charging again.<br />
• The switch on the <strong>Heated</strong> <strong>Insoles</strong> must be set to the OFF (left) position when charging<br />
the <strong>Insoles</strong>.<br />
Helpful Information if <strong>Insoles</strong> are Not<br />
Heating or Operating Correctly<br />
Perform the following actions if the <strong>Insoles</strong> are not heating correctly:<br />
1. Charge the <strong>Insoles</strong> completely.<br />
2. Disconnect the charger.<br />
3. Now turn ON the <strong>Insoles</strong> (switch to the right) and the LED light on the <strong>Insoles</strong> will<br />
flash once every few seconds. Using the Remote Control Unit, press the High button.<br />
Now the LED light on each Insole will flash in groups of three.<br />
4. Place the <strong>Insoles</strong> in the refrigerator for 5 – 10 minutes.<br />
5. After taking the <strong>Insoles</strong> out of the refrigerator, again check the LED lights of both<br />
<strong>Insoles</strong>. The LED lights should be flashing in groups of three.<br />
6. If the light is flashing in groups of three, then the <strong>Insoles</strong> are in the heating mode and<br />
you should feel the warmth on the upper and lower sides of the <strong>Insoles</strong> with your<br />
hands or your cheek.<br />
Perform the following actions if the Remote is not activating the <strong>Insoles</strong>:<br />
If the Remote does not properly activate the <strong>Insoles</strong> per the instructions enclosed, you<br />
will need to repair the Remote and the <strong>Insoles</strong>. <strong>ThermaCELL</strong> <strong>Heated</strong> <strong>Insoles</strong> and the<br />
Remote that controls them are keyed at the factory so that your Remote will only operate<br />
your <strong>Insoles</strong>. Please follow the directions below to reset your <strong>Insoles</strong> to the original<br />
factory settings.<br />
1. Each Insole must be “paired” with your Remote and is easiest to do one Insole at a time.<br />
2. Turn the Insole switch on the back of each Insole to the “ON” (right) position. Insert<br />
and quickly remove the charging cable twice (2 times), very quickly, into the Recharge<br />
Port located at the back or heel of the Insole. The cable must be inserted quickly<br />
and rapidly repeated two (2) times. Make sure the charging cable plug is inserted<br />
completely into the Insole jack each time.<br />
3. The Insole LED will start flashing a sequence of one (1) long flash followed by four (4)<br />
very short flashes to indicate the “pairing” mode is in process. The flash sequence will<br />
repeat four (4) times. During this process you must press the MEDIUM button located<br />
on the Remote (if you do not press the MEDIUM button in time, simply repeat the<br />
process from Step 2). This will reset your <strong>Insoles</strong>. If successful, the LED flash sequence<br />
will be two (2) flashes every four (4) seconds.<br />
4. Repeat Steps 1-3 with the other Insole.<br />
5. This completes the reset of your <strong>Heated</strong> <strong>Insoles</strong>. If you are not going to be using your<br />
<strong>Insoles</strong> immediately, turn the Insole switch on the back of each Insole to the “OFF”<br />
(left) position.<br />
If you still have problems operating your <strong>ThermaCELL</strong> <strong>Heated</strong> <strong>Insoles</strong>:<br />
• Refer to the website for instructions, tips, and how-to videos at www.thermacell.com.<br />
• Call Customer Service at (781) 541-6900 between the hours of 8:30 AM and 4:30 PM<br />
Eastern time.<br />
If with the above actions the <strong>Insoles</strong> still are not heating correctly, drain the batteries of<br />
both <strong>Insoles</strong> completely before re-charging. To do this, turn the <strong>Insoles</strong> ON using the ON/<br />
OFF Switch at the heel of the Insole. Use the Remote Control Unit to put the <strong>Insoles</strong> on<br />
the high setting and then run the <strong>Insoles</strong> until the LED lights on the <strong>Insoles</strong> turn off. Now<br />
repeat the re-charging process.<br />
<strong>Heated</strong> Insole Accessories<br />
Accessories available for the <strong>ThermaCELL</strong> <strong>Heated</strong> Insole system include: the Remote<br />
Control, a Car Charger, and a Global Charger. Contact <strong>ThermaCELL</strong> Customer Service at<br />
866-753-3837 or visit www.<strong>ThermaCELL</strong>.com for the location of a retail outlet stocking<br />
these items in your area.<br />
Cautions: Be Aware of Burn Possibilities<br />
• Properly use <strong>ThermaCELL</strong> <strong>Heated</strong> <strong>Insoles</strong> according to instructions.<br />
• Users of <strong>Heated</strong> <strong>Insoles</strong> need to be aware of early sensations of a burn, including when<br />
an area of a foot becomes hot; or, when any area of your foot feels like you are standing<br />
on a small pebble or pointed object and may or may not feel hot.<br />
• If you feel the early warning of a foot burn, immediately discontinue use of the Insole<br />
and make certain your foot is not at risk of being burned. See a physician immediately<br />
if you think you have a burn.<br />
RADIO AND TELEVISION INTERFERENCE<br />
This equipment has been tested and found to comply with the limits for a Class B digital device, pursuant<br />
to Part 15 of the FCC rules. These limits are designed to provide reasonable protection against harmful<br />
interference in a residential installation. This equipment generates, uses and can radiate radio frequency<br />
energy and, if not installed and used in accordance with the instructions, may cause harmful interference<br />
to radio communications. However, there is no guarantee that interference will not occur in a particular<br />
installation. If this equipment does cause harmful interference to radio or television reception, which<br />
can be determined by turning the equipment off and on, the user is encouraged to try to correct the<br />
interference by one or more of the following measures:<br />
- Reorient or relocate the receiving antenna.<br />
- Increase the separation between the equipment and the receiver.<br />
- Connect the equipment into an outlet on a circuit different from that to which the receiver is connected.<br />
- Consult the dealer or an experienced radio/TV technician for help.<br />
This device complies with Part 15 of the FCC Rules. Operation is subject to the following two conditions:<br />
(1) this device may not cause harmful interference, and (2) this device must accept any interference<br />
received, including interference that may cause undesired operation.<br />
Changes and Modifications not expressly approved by The Schawbel Corporation can void your authority to<br />
operate this equipment under Federal Communications Commission’s rules.<br />
This device complies with Industry Canada license-exempt RSS standard(s). Operation is subject to the<br />
following two conditions: (1) this device may not cause interference, and (2) this device must accept any<br />
interference, including interference that may cause undesired operation of the device.<br />
The Schawbel Corporation<br />
26 Crosby Drive<br />
Bedford, MA 01730<br />
www.<strong>ThermaCELL</strong>.com<br />
Patent Pending<br />
Made in China<br />
Welcome to <strong>ThermaCELL</strong> ® Technology<br />
Dear <strong>ThermaCELL</strong>® <strong>Heated</strong> <strong>Insoles</strong> Purchaser:<br />
We are pleased that you made the decision to purchase<br />
<strong>ThermaCELL</strong> <strong>Heated</strong> <strong>Insoles</strong>, featuring wireless remote control<br />
and rechargeable embedded Lithium-Ion Polymer batteries. Your<br />
purchase features patented rechargeable <strong>Heated</strong> <strong>Insoles</strong> with<br />
Remote Control ON/OFF heat operation.<br />
The <strong>ThermaCELL</strong> self-contained advanced heat technology<br />
is great for cold weather activities. The technology enables<br />
purchasers to control temperature adjustments remotely while<br />
wearing shoes or boots. Operating <strong>Instructions</strong> included within<br />
this document provide clear and concise directions on how to<br />
set up your <strong>Insoles</strong> for remote control temperature operation.<br />
<strong>ThermaCELL</strong> products, including the <strong>ThermaCELL</strong> mosquito<br />
repellent product line, enable outdoor enthusiasts to enjoy<br />
their activities (hunting, fishing, camping, etc) with confidence<br />
and in comfort. We thank you for your purchase of <strong>ThermaCELL</strong><br />
<strong>Heated</strong> <strong>Insoles</strong> and are confident your cold weather activities<br />
will be more comfortable and enjoyable.<br />
Enjoy your purchase.<br />
The <strong>ThermaCELL</strong> Product Group<br />
5 6