RUGER SR-SERIES
SR-Series Pistol Instruction Manual - Amazon Web Services SR-Series Pistol Instruction Manual - Amazon Web Services
TO REASSEMBLE 1. Be certain the chamber and magazine are empty. Always keep the pistol pointed in a safe direction. 2. With the slide held upside down, replace the barrel and push it rearward into its locked position. (See Figure 23.) 1 2 Figure 23 3. Place the recoil spring assembly into position. Make sure that the plastic end of the recoil spring goes into the slide. (See Figure 24.) Figure 24 Ejector Down Figure 25 4. Be certain that ejector is pulled down and locked in its lower (forward) position. Push the trigger into its fully forward position. (See Figure 25.) 1 2 28
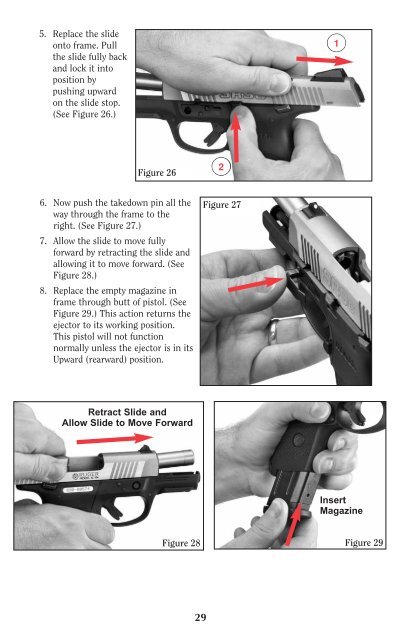
5. Replace the slide onto frame. Pull the slide fully back and lock it into position by pushing upward on the slide stop. (See Figure 26.) 1 Figure 26 2 6. Now push the takedown pin all the way through the frame to the right. (See Figure 27.) 7. Allow the slide to move fully forward by retracting the slide and allowing it to move forward. (See Figure 28.) 8. Replace the empty magazine in frame through butt of pistol. (See Figure 29.) This action returns the ejector to its working position. This pistol will not function normally unless the ejector is in its Upward (rearward) position. Figure 27 Retract Slide and Allow Slide to Move Forward Insert Magazine Figure 28 Figure 29 29
- Page 1 and 2: S INSTRUCTION MANUAL FOR BLUED & ST
- Page 3 and 4: Maine: “ENDANGERING THE WELFARE O
- Page 5 and 6: FIREARMS SAFETY IS YOUR RESPONSIBIL
- Page 7 and 8: Sights have high-visibility white d
- Page 9 and 10: Use the Correct Lock: While the bas
- Page 11 and 12: The user of this or any autoloading
- Page 13 and 14: STRIKER STATUS INDICATOR Your SR-SE
- Page 15 and 16: TO LOAD AND FIRE Practice this impo
- Page 17 and 18: OPERATION OF LOADED CHAMBER INDICAT
- Page 19 and 20: DRY FIRING Going through the action
- Page 21 and 22: 4. To close the slide, again check
- Page 23 and 24: 3. Release the slide to move forwar
- Page 25 and 26: TO DISASSEMBLE Be sure pistol is un
- Page 27: 7. Move the barrel slightly foward
- Page 31 and 32: 3. Now reverse the backstrap (see F
- Page 33 and 34: WARNING - LUBRICATION Firing a pist
- Page 35 and 36: Guns should be sent prepaid. We wil
- Page 37 and 38: RUGER ® SR9 ® , SR40 ® & SR45 P
- Page 39 and 40: RUGER ® SR9 ® , SR40 ® & SR45 E
- Page 41 and 42: Key No. Part Name Part No. Model 44
- Page 43 and 44: THE BASIC RULES OF SAFE FIREARMS HA
- Page 45 and 46: 5. BE SURE OF YOUR TARGET BEFORE YO
- Page 47 and 48: A BRIEF ACCOUNT OF AN EXTRAORDINARY
5. Replace the slide<br />
onto frame. Pull<br />
the slide fully back<br />
and lock it into<br />
position by<br />
pushing upward<br />
on the slide stop.<br />
(See Figure 26.)<br />
1<br />
Figure 26<br />
2<br />
6. Now push the takedown pin all the<br />
way through the frame to the<br />
right. (See Figure 27.)<br />
7. Allow the slide to move fully<br />
forward by retracting the slide and<br />
allowing it to move forward. (See<br />
Figure 28.)<br />
8. Replace the empty magazine in<br />
frame through butt of pistol. (See<br />
Figure 29.) This action returns the<br />
ejector to its working position.<br />
This pistol will not function<br />
normally unless the ejector is in its<br />
Upward (rearward) position.<br />
Figure 27<br />
Retract Slide and<br />
Allow Slide to Move Forward<br />
Insert<br />
Magazine<br />
Figure 28<br />
Figure 29<br />
29


