Floors & Ceilings
SRS Ulimate Acoustic Solutions for Floors and Ceilings - Sound ...
SRS Ulimate Acoustic Solutions for Floors and Ceilings - Sound ...

You also want an ePaper? Increase the reach of your titles
YUMPU automatically turns print PDFs into web optimized ePapers that Google loves.
Installation Guide<br />
Maxi 60 ceiling<br />
Maxiboard ceilings –<br />
Timber Framed Buildings<br />
Maxi 60 Ceiling<br />
1 Hour Fire Rated<br />
ACOUSTIC<br />
DATA 9<br />
FIRE<br />
DATA 24<br />
Installation<br />
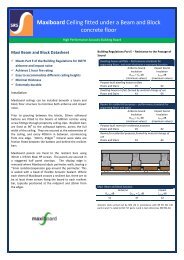
Maxiboard can be installed onto a ceiling in order to meet<br />
Approved Document E of the Building Regulations (2003) and<br />
also achieves 1 hours fire protection. Firstly 100mm 45kg/m 3<br />
mineral wool slabs are friction fitted between the joists. SRS Maxi<br />
Resilient Bars are then fixed to span the timber joists across the<br />
full width of ceiling, using 70mm x 5mm self-drilling screws. They<br />
are fitted at the edges of the ceiling and at a maximum of 300mm<br />
centres in between.<br />
The Maxiboard panels are fixed into the resilient bars using<br />
30mm x 3.9mm Maxi HP screws. Fixing must be to the resilient<br />
bar alone and not through into the timber joists. The Maxiboards<br />
are secured in a staggered half panel overlap, with the 10mm<br />
white gypsum layer facing outwards, unless specification<br />
requirements determine otherwise. The screw fixings are at a<br />
maximum of 300mm centres, positioned 20mm from the edges<br />
of each board and at the midpoint. A bead of SRS Gripfix is<br />
applied to each panel’s shiplap edge prior to installation. Where<br />
the Maxiboard panels adjoin a perimeter wall, the shiplap edge<br />
should be removed, and a bead of SRS Acoustic Sealant applied<br />
to the edge. It is essential that no gaps occur between the<br />
Maxiboard panels.<br />
12.5mm fire rated plasterboards are then fixed through the<br />
Maxiboard and into the resilient bars using 50mm drywall screws.<br />
Please see ‘Finishing and Plastering’ section on page 25 for<br />
finishing details.<br />
14