NEW
Acoustilay Datasheet - Sound Reduction Systems Ltd.
Acoustilay Datasheet - Sound Reduction Systems Ltd.
- No tags were found...

You also want an ePaper? Increase the reach of your titles
YUMPU automatically turns print PDFs into web optimized ePapers that Google loves.
the timber floor and the perimeter wall and services. This should<br />
be filled with a flexible sealer.<br />
For confirmation of the suitability of your timber floor for use with<br />
Acoustilay, you should check with the floor finish manufacturer<br />
prior to installation. If the manufacturer feels that the resilience<br />
of the Acoustilay is excessive, or if the installation occurs<br />
anywhere other than a domestic environment, the timber floor<br />
should be supported by installing a layer of Acoustilay MDF,<br />
bonded to the top of the Acoustilay. In this situation the full<br />
instructions of the ‘Vinyl Flooring, Carpet Tile & Bonded Carpet’<br />
section should be followed.<br />
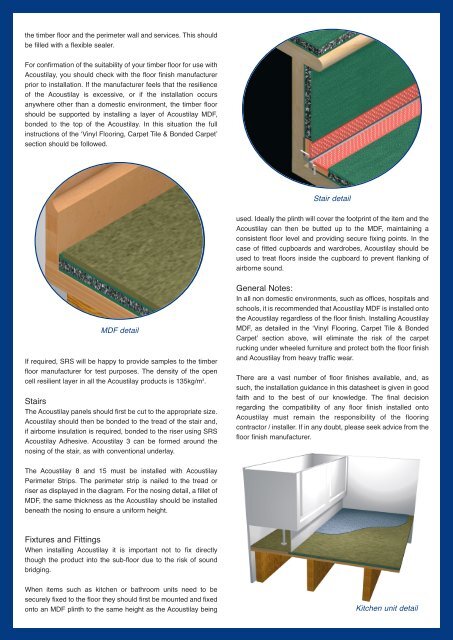
Stair detail<br />
used. Ideally the plinth will cover the footprint of the item and the<br />
Acoustilay can then be butted up to the MDF, maintaining a<br />
consistent floor level and providing secure fixing points. In the<br />
case of fitted cupboards and wardrobes, Acoustilay should be<br />
used to treat floors inside the cupboard to prevent flanking of<br />
airborne sound.<br />
MDF detail<br />
If required, SRS will be happy to provide samples to the timber<br />
floor manufacturer for test purposes. The density of the open<br />
cell resilient layer in all the Acoustilay products is 135kg/m 3 .<br />
Stairs<br />
The Acoustilay panels should first be cut to the appropriate size.<br />
Acoustilay should then be bonded to the tread of the stair and,<br />
if airborne insulation is required, bonded to the riser using SRS<br />
Acoustilay Adhesive. Acoustilay 3 can be formed around the<br />
nosing of the stair, as with conventional underlay.<br />
General Notes:<br />
In all non domestic environments, such as offices, hospitals and<br />
schools, it is recommended that Acoustilay MDF is installed onto<br />
the Acoustilay regardless of the floor finish. Installing Acoustilay<br />
MDF, as detailed in the ‘Vinyl Flooring, Carpet Tile & Bonded<br />
Carpet’ section above, will eliminate the risk of the carpet<br />
rucking under wheeled furniture and protect both the floor finish<br />
and Acoustilay from heavy traffic wear.<br />
There are a vast number of floor finishes available, and, as<br />
such, the installation guidance in this datasheet is given in good<br />
faith and to the best of our knowledge. The final decision<br />
regarding the compatibility of any floor finish installed onto<br />
Acoustilay must remain the responsibility of the flooring<br />
contractor / installer. If in any doubt, please seek advice from the<br />
floor finish manufacturer.<br />
The Acoustilay 8 and 15 must be installed with Acoustilay<br />
Perimeter Strips. The perimeter strip is nailed to the tread or<br />
riser as displayed in the diagram. For the nosing detail, a fillet of<br />
MDF, the same thickness as the Acoustilay should be installed<br />
beneath the nosing to ensure a uniform height.<br />
Fixtures and Fittings<br />
When installing Acoustilay it is important not to fix directly<br />
though the product into the sub-floor due to the risk of sound<br />
bridging.<br />
When items such as kitchen or bathroom units need to be<br />
securely fixed to the floor they should first be mounted and fixed<br />
onto an MDF plinth to the same height as the Acoustilay being<br />
Kitchen unit detail