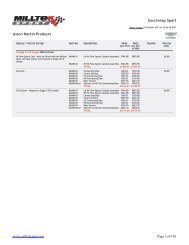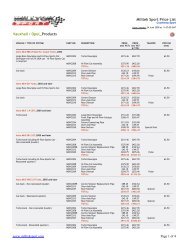
vauxtech
vauxtech ASTRA VXR SUSPENSION UPGRADE - Courtenay Sport
vauxtech ASTRA VXR SUSPENSION UPGRADE - Courtenay Sport

You also want an ePaper? Increase the reach of your titles
YUMPU automatically turns print PDFs into web optimized ePapers that Google loves.
<strong>vauxtech</strong><br />
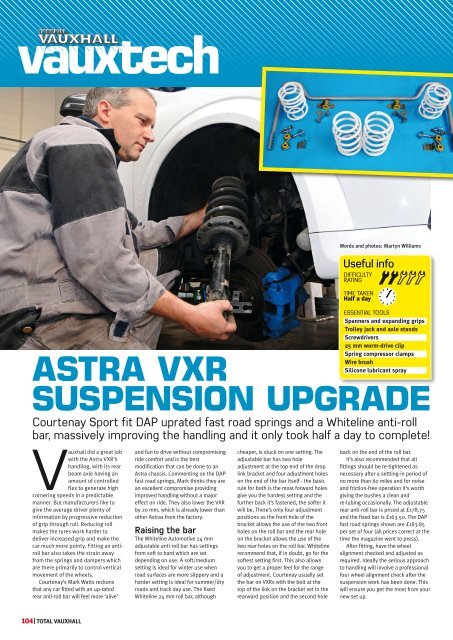
Words and photos: Martyn Williams<br />
Useful info<br />
DIFFICULTY<br />
RATING<br />
TIME TAKEN<br />
Half a day<br />
ASTRA VXR<br />
ESSENTIAL TOOLS<br />
Spanners and expanding grips<br />
Trolley jack and axle stands<br />
Screwdrivers<br />
25 mm worm-drive clip<br />
Spring compressor clamps<br />
Wire brush<br />
Silicone lubricant spray<br />
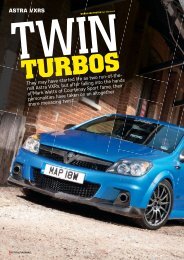
SUSPENSION UPGRADE<br />
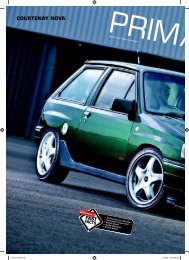
Courtenay Sport fit DAP uprated fast road springs and a Whiteline anti-roll<br />
bar, massively improving the handling and it only took half a day to complete!<br />
Vauxhall did a great job<br />
with the Astra VXR’s<br />
handling, with its rear<br />
beam axle having an<br />
amount of controlled<br />
flex to generate high<br />
cornering speeds in a predictable<br />
manner. But manufacturers like to<br />
give the average driver plenty of<br />
information by progressive reduction<br />
of grip through roll. Reducing roll<br />
makes the tyres work harder to<br />
deliver increased grip and make the<br />
car much more pointy. Fitting an antiroll<br />
bar also takes the strain away<br />
from the springs and dampers which<br />
are there primarily to control vertical<br />
movement of the wheels.<br />
Courtenay’s Mark Watts reckons<br />
that any car fitted with an up-rated<br />
rear anti-roll bar will feel more ‘alive’<br />
and fun to drive without compromising<br />
ride comfort and is the best<br />
modification that can be done to an<br />
Astra chassis. Commenting on the DAP<br />
fast road springs, Mark thinks they are<br />
an excellent compromise providing<br />
improved handling without a major<br />
effect on ride. They also lower the VXR<br />
by 20 mm, which is already lower than<br />
other Astras from the factory.<br />
Raising the bar<br />
The Whiteline Automotive 24 mm<br />
adjustable anti-roll bar has settings<br />
from soft to hard which are set<br />
depending on use. A soft/medium<br />
setting is ideal for winter use when<br />
road surfaces are more slippery and a<br />
harder setting is ideal for summer/dry<br />
roads and track day use. The fixed<br />
Whiteline 24 mm roll bar, although<br />
cheaper, is stuck on one setting. The<br />
adjustable bar has two hole<br />
adjustment at the top end of the drop<br />
link bracket and four adjustment holes<br />
on the end of the bar itself - the basic<br />
rule for both is the most forward holes<br />
give you the hardest setting and the<br />
further back it’s fastened, the softer it<br />
will be. There’s only four adjustment<br />
positions as the front hole of the<br />
bracket allows the use of the two front<br />
holes on the roll bar and the rear hole<br />
on the bracket allows the use of the<br />
two rear holes on the roll bar. Whiteline<br />
recommend that, if in doubt, go for the<br />
softest setting first. This also allows<br />
you to get a proper feel for the range<br />
of adjustment. Courtenay usually set<br />
the bar on VXRs with the bolt at the<br />
top of the link on the bracket set in the<br />
rearward position and the second hole<br />
back on the end of the roll bar.<br />
It’s also recommended that all<br />
fittings should be re-tightened as<br />
necessary after a settling-in period of<br />
no more than 60 miles and for noise<br />
and friction-free operation it’s worth<br />
giving the bushes a clean and<br />
re-lubing occasionally. The adjustable<br />
rear anti-roll bar is priced at £178.75<br />
and the fixed bar is £163.50. The DAP<br />
fast road springs shown are £183.85<br />
per set of four (all prices correct at the<br />
time the magazine went to press).<br />
After fitting, have the wheel<br />
alignment checked and adjusted as<br />
required. Ideally the serious approach<br />
to handling will involve a professional<br />
four wheel alignment check after the<br />
suspension work has been done. This<br />
will ensure you get the most from your<br />
new set up.<br />
104|TOTAL VAUXHALL
<strong>vauxtech</strong><br />
FRoNt SPRINGS<br />
1<br />
2<br />
Grab the tab of the brake pipe retaining clip and slide out.<br />
The pad sensor connector slides off the bracket. Lever the locking tab to release<br />
the plug clip and withdraw.<br />
3<br />
4<br />
Two bolts holding the hub assembly and a nut on the link arm are the only other<br />
items to separate to make the strut ready for removal.<br />
The top of the strut is released by simply levering open the jaws of the clip either<br />
side and using a second screwdriver to lever the two halves apart.<br />
The strut can be<br />
dropped out<br />
followed by<br />
raising the<br />
gaiter and fitting<br />
a worm-drive<br />
clip. The clip<br />
stops the piston<br />
rod dropping<br />
down which is<br />
difficult to pull<br />
back out.<br />
5 6<br />
Once the spring is compressed, the damper rod nut can be undone - avoid letting<br />
the compressors slide from their 180 degree position as you loosen them.<br />
TOTAL VAUXHALL |105
<strong>vauxtech</strong><br />
7<br />
8<br />
The spring platform<br />
tends to<br />
accumulate dirt<br />
and rust sets in<br />
early so it’s worth<br />
cleaning up with a<br />
wire brush.<br />
The end sleeve needs to be removed and fitted to the new spring.<br />
9<br />
The complete<br />
assembly - make<br />
sure the bottom<br />
end of the new<br />
spring fits into<br />
the shaped spiral<br />
depression in the<br />
platform.<br />
10<br />
Strut replacement is just a reversal - large expanding jaw pliers clamp the strutretaining<br />
clip. They can break - Courtenay recommend ordering a couple of pairs<br />
along with the springs - only £5.<br />
REAR SPRINGS<br />
11<br />
12<br />
First step is to remove the damper top bolt - raise the car just enough to get at the<br />
bolt but no further. By doing this you take some of the car’s weight off the bolt<br />
which makes it much easier to remove.<br />
Once the top of the damper is detached, raise the wheel off the ground. It will now<br />
be easy to wiggle out the spring.<br />
106|TOTAL VAUXHALL
<strong>vauxtech</strong><br />
13<br />
14<br />
Remove the bump stop from the old spring and use a silicon spray or similar<br />
lubricant to make it easier to push into the new spring.<br />
The new spring can be fitted and at this point if the job is being done on hardstanding,<br />
the car is gently lowered to allow the top damper bolt to be inserted.<br />
Anti Roll Bar Fitting<br />
15<br />
The car can<br />
then be<br />
jacked up<br />
again and<br />
put on axle<br />
stands if you<br />
haven’t got<br />
use of a<br />
hoist, and<br />
the hole<br />
directly in<br />
line with the<br />
centre of the<br />
spring<br />
enlarged to<br />
allow the<br />
anti-roll bar<br />
bracket to<br />
be fitted.<br />
16<br />
Courtenay always touches-in the exposed metal with rust-protection paint.<br />
17<br />
18<br />
The bracket bolt can then be inserted with its large washer in the top of the arm<br />
and the bracket fitted - the bracket has been designed to slot neatly between the<br />
spring platform reinforcement.<br />
Remove the arm pivot nut and fit the bush platform bracket.<br />
TOTAL VAUXHALL |107
<strong>vauxtech</strong><br />
19<br />
20<br />
Before fitting the bush and retainer to the bar, apply the lube supplied on both the<br />
inside and outside of the bush to prevent wear.<br />
Fully tighten the bracket bolts and the bar is fitted but leave the pivot nut untill<br />
the bar is fully fitted.<br />
21<br />
Courtenay don’t<br />
normally attach<br />
the bushed link<br />
to the forward<br />
hole of the<br />
bracket on VXRs<br />
but here the<br />
customer<br />
requested a<br />
harder setting.<br />
22<br />
It’s recommended that the second hole from the front of the bar is used. The front<br />
hole has a greater anti-roll effect and using the rearmost hole has the softest<br />
effect on the suspension.<br />
23<br />
Thanks<br />
Thanks to all at Courtenay Sport,<br />
Jon and Mark and the team<br />
including Dave who showed us<br />
how the job was done. Visit their<br />
website at<br />
www.courtenaysport.co.uk or call<br />
01692 404313.<br />
The final step is to retighten the pivot nut when the anti-roll bar is in its natural<br />
ride height position. A final loosen/tighten is ideally done on a garage ramp/hoist.<br />
108|TOTAL VAUXHALL