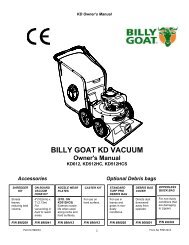
KD511H - Billy Goat
KD511H - Billy Goat
KD511H - Billy Goat
- No tags were found...

Create successful ePaper yourself
Turn your PDF publications into a flip-book with our unique Google optimized e-Paper software.
2<br />
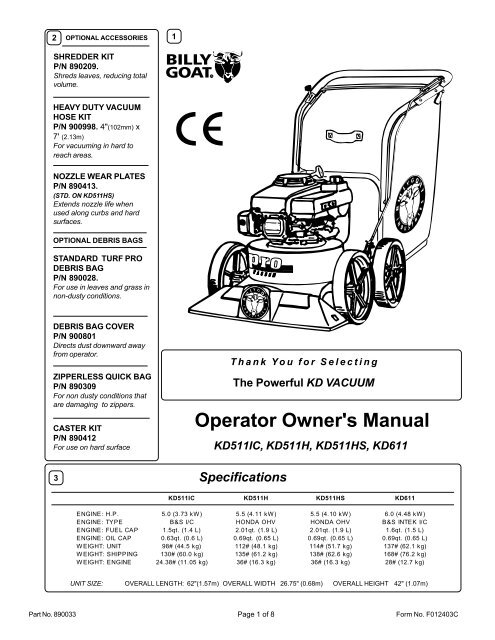
OPTIONAL ACCESSORIES<br />
1<br />
SHREDDER KIT<br />
P/N 890209.<br />
Shreds leaves, reducing total<br />
volume.<br />
HEAVY DUTY VACUUM<br />
HOSE KIT<br />
P/N 900998. 4"(102mm) x<br />
7' (2.13m)<br />
For vacuuming in hard to<br />
reach areas.<br />
NOZZLE WEAR PLATES<br />
P/N 890413.<br />
(STD. ON <strong>KD511H</strong>S)<br />
Extends nozzle life when<br />
used along curbs and hard<br />
surfaces.<br />
OPTIONAL DEBRIS BAGS<br />
STANDARD TURF PRO<br />
DEBRIS BAG<br />
P/N 890028.<br />
For use in leaves and grass in<br />
non-dusty conditions.<br />
DEBRIS BAG COVER<br />
P/N 900801<br />
Directs dust downward away<br />
from operator.<br />
ZIPPERLESS QUICK BAG<br />
P/N 890309<br />
For non dusty conditions that<br />
are damaging to zippers.<br />
CASTER KIT<br />
P/N 890412<br />
For use on hard surface<br />
Thank You for Selecting<br />
The Powerful KD VACUUM<br />
Operator Owner's Manual<br />
KD511IC, <strong>KD511H</strong>, <strong>KD511H</strong>S, KD611<br />
3<br />
Specifications<br />
KD511IC <strong>KD511H</strong> <strong>KD511H</strong>S KD611<br />
ENGINE: H.P. 5.0 (3.73 kW) 5.5 (4.11 kW) 5.5 (4.10 kW) 6.0 (4.48 kW)<br />
ENGINE: TYPE B&S I/C HONDA OHV HONDA OHV B&S INTEK I/C<br />
ENGINE: FUEL CAP 1.5qt. (1.4 L) 2.01qt. (1.9 L) 2.01qt. (1.9 L) 1.6qt. (1.5 L)<br />
ENGINE: OIL CAP 0.63qt. (0.6 L) 0.69qt. (0.65 L) 0.69qt. (0.65 L) 0.69qt. (0.65 L)<br />
WEIGHT: UNIT 98# (44.5 kg) 112# (48.1 kg) 114# (51.7 kg) 137# (62.1 kg)<br />
WEIGHT: SHIPPING 130# (60.0 kg) 135# (61.2 kg) 138# (62.6 kg) 168# (76.2 kg)<br />
WEIGHT: ENGINE 24.38# (11.05 kg) 36# (16.3 kg) 36# (16.3 kg) 28# (12.7 kg)<br />
UNIT SIZE: OVERALL LENGTH: 62"(1.57m) OVERALL WIDTH 26.75" (0.68m) OVERALL HEIGHT 42" (1.07m)<br />
Part No. 890033 Page 1 of 8<br />
Form No. F012403C
16 OPERATION<br />
INTENDED USE: This machine is designed for vacuuming<br />
leaves, grass clippings and other types of organic litter and<br />
for chipping brush, limbs, corn and sunflower stalks and<br />
palm fronds.<br />
Debris mixed with cans, bottles and small amounts of sand<br />
can be vacuumed; however, it is not this machine's primary<br />
purpose. Vacuuming cans, bottles and sand will affect the<br />
longevity of your machine.<br />
Do not operate if excessive vibration occurs. If excessive<br />
vibration occurs, shut engine off immediately and check for<br />
damaged or worn impeller, loose impeller bolt, loose impeller<br />
key, loose engine or lodged foreign objects. Note: See parts<br />
list for proper impeller bolt torque specifications. (See trouble<br />
shooting section on page 12).<br />
Inspect machine work area and machine before operating.<br />
Make sure that all operators of this equipment are<br />
trained in general machine use and safety.<br />
16.1<br />
PUT OIL IN ENGINE BEFORE STARTING.<br />
STARTING<br />
ENGINE: See engine manufacturer’s instructions<br />
for type and amount of oil and gasoline used.<br />
Engine must be level when checking and filling oil and<br />
gasoline.<br />
ENGINE SPEED: Controlled by throttle lever on the handle.<br />
Under normal conditions, operate at minimum throttle to<br />
accomplish your current cleaning task.<br />
FUEL VALVE: Move fuel valve to "ON" position (when<br />
provided on engine).<br />
CHOKE: Operated with throttle control (Honda only).<br />
PRIMER: Push primer per engine instructions ( B&S only).<br />
THROTTLE: Move remote throttle control to fast position.<br />
Pull starting rope to start engine.<br />
IF YOUR UNIT FAILS TO START:<br />
See Troubleshooting on page 12.<br />
16.2<br />
Like all mechanical tools, reasonable care must<br />
be used when operating machine.<br />
VACUUMING OPERATION<br />
VACUUM NOZZLE HEIGHT ADJUSTMENT: is<br />
raised and lowered by pulling slightly upward on handle and<br />
pulling height adjust rod (item 23) up at left rear of machine.<br />
FOR MAXIMUM PICKUP: Adjust nozzle close to<br />
debris, but without blocking airflow into the nozzle. NOTE: Never<br />
bury nozzle into debris.<br />
CLEARING A CLOGGED NOZZLE<br />
& EXHAUST: Turn engine off and wait for impeller to<br />
stop completely and disconnect spark plug wire.<br />
Wearing durable gloves, remove clog. Danger, the<br />
clog may contain sharp materials. Reconnect spark<br />
plug wire.<br />
16.3<br />
HANDLING & TRANSPORTING:<br />
Using two people to lift machine is recommended. Lift holding the<br />
handle and front of nozzle. Secure in place during transport.<br />
16.4<br />
DEBRIS BAG<br />
Debris bags are normal replaceable wear items.<br />
Note: Frequently empty debris to prevent bag overloading with<br />
more weight than you can lift.<br />
An optional bag and dust cover is available for use where debris will be<br />
vacuumed in dusty conditions (see Optional Accessories shown on<br />
page 1).<br />
DO NOT place bag on or near hot surface, such as engine. Run<br />
engine at 1/2 throttle for first 1/2 hour to condition new bag. Your<br />
new bag requires a break-in period to condition the pores of the<br />
material against premature blockage. The entire bag surface<br />
serves as a filter, and must be able to breath to have good vacuum<br />
performance.<br />
Be sure engine has come to a complete stop before removing<br />
or emptying bag.<br />
This vacuum is designed for picking up trash, organic<br />
material and other similar debris (see Safety Warnings page 2-3).<br />
However, many vacuums are used where dust is mixed with<br />
trash. Your unit can intermittently vacuum in dusty areas. Dust<br />
is the greatest cause of lost vacuum performance. However,<br />
following these rules will help maintain your machine's ability to<br />
vacuum in dusty conditions:<br />
• Run machine at idle to quarter throttle.<br />
• The debris bag must be cleaned more frequently. A vacuum<br />
with a clean, pillow soft bag will have good pickup performance.<br />
One with a dirty, tight bag will have poor pickup performance. If<br />
dirty, empty debris and vigorously shake bag free of dust.<br />
• Pressure-wash debris bag if normal cleaning does not fully<br />
clean bag. Bag should be thoroughly dry before use.<br />
NOTE: Having one or more spare debris bags is a good way to reduce<br />
down time while dirty bags are being cleaned.<br />
DO NOT leave debris in bag while in storage.<br />
16.5<br />
Never store engine indoors or in enclosed poorly ventilated<br />
areas with fuel in tank, where fuel fumes may reach an open<br />
flame, spark or pilot light, as on a furnace, water heater, clothes<br />
dryer or other gas appliance.<br />
If engine is to be unused for 30 days or more, prepare as<br />
follows:<br />
Be sure engine is cool. Do not smoke. Remove all<br />
gasoline from carburetor and fuel tank to prevent gum deposits<br />
from forming on these parts and causing possible malfunction of<br />
engine. Drain fuel outdoors, into an approved container, away<br />
from open flame. Run engine until fuel tank is empty and<br />
engine runs out of gasoline.<br />
NOTE: Fuel stabilizer (such as Sta-Bil) is an acceptable alternative in minimizing the<br />
formation of fuel gum deposits during storage. Add stabilizer to gasoline in fuel tank or storage<br />
container. Always follow mix ratio found on stabilizer container. Run engine at least 10 min.<br />
after adding stabilizer to allow it to reach the carburetor.<br />
16.6<br />
STORAGE<br />
Do not store with debris in bag.<br />
COMPOST<br />
Vacuumed leaves, grass and other organic material from your own<br />
yard can be emptied into a pile or composter to provide enriched soil<br />
for later use as fertilizer in gardens and flower beds (see fig. 3).<br />
NOTE: Allow green chips to dry before spreading around living plants.<br />
Part No. 890033 Page 5 of 8<br />
Form No. F012403C
18<br />
* Denotes<br />
standard<br />
hardware<br />
item that<br />
may be<br />
purchased<br />
locally.<br />
<br />
<br />
<br />
<br />
<br />
<br />
<br />
<br />
<br />
<br />
<br />
<br />
<br />
<br />
<br />
<br />
<br />
<br />
<br />
<br />
<br />
<br />
<br />
<br />
<br />
<br />
<br />
<br />
<br />
<br />
<br />
<br />
<br />
<br />
<br />
<br />
<br />
<br />
<br />
<br />
<br />
<br />
<br />
<br />
<br />
<br />
<br />
<br />
<br />
<br />
<br />
<br />
<br />
<br />
<br />
<br />
<br />
<br />
<br />
<br />
<br />
<br />
<br />
<br />
<br />
<br />
<br />
<br />
<br />
<br />
<br />
<br />
<br />
<br />
Part No. 890033 Page 7 of 8<br />
Form No. F012403C