WNC-0300 54 / 108 Mbps Wireless PCI Adapter Bruger manual Version 2.0
LevelOne WNC-0300 54 / 108 Mbps Wireless PCI Adapter Bruger ... LevelOne WNC-0300 54 / 108 Mbps Wireless PCI Adapter Bruger ...
from llgroup.dk
More from this publisher
03.09.2015
Views
17. Select “User Certificate request”, and click “Next” to continue. 18. Click “Submit >” to continue. 50
19. The Certificate Service is now processing the certificate request. 20. The certificate is issued by the server, click “Install this certificate” to download and store the certificate to your local computer. 51
- Page 1 and 2: LevelOne WNC-0300 54 / 108 Mbps Wir
- Page 3 and 4: Indholdsfortegnelse. Introduktion 4
- Page 5 and 6: KOM I GANG Lær LevelOne WNC-0300 A
- Page 7 and 8: Installér dit LevelOne WNC-0300 Ut
- Page 9 and 10: Klik “Next” for at starte insta
- Page 11 and 12: Ovenstående billede fremkommer nå
- Page 13 and 14: Konf iguration Denne side benyttes
- Page 15 and 16: vet i IEEE Std 802.11b). Hos modtag
- Page 17 and 18: Available Network - vis de trådlø
- Page 19 and 20: Denne side viser noget information
- Page 21 and 22: Klik på ”Hardware” 21
- Page 23 and 24: Højre-klik på den trådløse netv
- Page 25 and 26: Gå til Start menu > Kontrolpanel >
- Page 27 and 28: 1. Skriv en kort beskrivelse for di
- Page 29 and 30: Du kan oprette en netværks diskett
- Page 31 and 32: Klik “Færdig” for at afslutte
- Page 33 and 34: Skriv cmd, “ipconfig /renew” i
- Page 35 and 36: Dynamisk Tildelt IP Adresse 35
- Page 37 and 38: Trådløst Netværk Under Windows 2
- Page 39 and 40: Vælg “Brug følgende IPadresse
- Page 41 and 42: TCP/IP egenskabs vinduet kommer fre
- Page 43 and 44: APPENDIX C: 802.1x Genkendelse Der
- Page 45 and 46: 5. Click on the “Wireless Network
- Page 47 and 48: TLS Authentication 7. Select “The
- Page 49: 14. Enter your user name and passwo
- Page 53 and 54: 23. Windows XP will prompt you to s
- Page 55 and 56: Please note that that value of Netw
- Page 57 and 58: Authenticator: Wireless Network Acc
- Page 59 and 60: 5. Select “Enterprise root CA”,
- Page 61 and 62: 12. Right-click on domain, and sele
- Page 63 and 64: 17. The Automatic Certificate Reque
- Page 65 and 66: 25. Right-click “Client”, and s
- Page 67 and 68: 31. Unless you want to specify the
- Page 69 and 70: For TLS Authentication Setup (Steps
- Page 71 and 72: 38. Go to the “Dial-in” tab, an
- Page 73 and 74: 41. Select “Group Policy” tab,
- Page 75 and 76: 45. Go to Users. Right-click on the
- Page 77 and 78: 51. Right-click “MD5”, and sele
- Page 79 and 80: 1. Open System : Genkendelse som å
- Page 81 and 82: Kryptering ~ En sikkerheds metode s
- Page 83: Interface PCI Standard v2.2 Power V
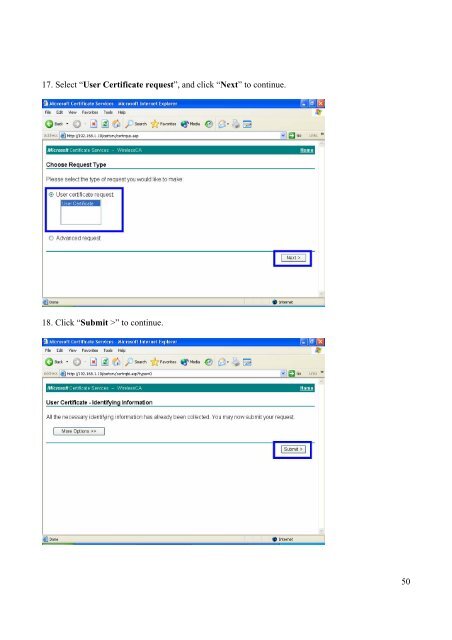
17. Select “User Certificate request”, and click “Next” to continue.<br />
18. Click “Submit >” to continue.<br />
50


