

268954910-Renault-Scenic.pdf
- No tags were found...

Create successful ePaper yourself
Turn your PDF publications into a flip-book with our unique Google optimized e-Paper software.
STEERING ASSEMBLY<br />
Steering rack gaiter: Removal - Refitting<br />
36A<br />
REMOVAL<br />
REFITTING<br />
I - REMOVAL PREPARATION OPERATION<br />
a Position the vehicle on a two-post lift (see Vehicle:<br />
Towing and lifting) (02A, Lifting equipment).<br />
a Remove:<br />
-the front wheel (see 35A, Wheels and tyres,<br />
Wheel: Removal - Refitting, page 35A-1) ,<br />
- the track rod, (see 36A, Steering assembly,<br />
Track rod: Removal - Refitting, page 36A-3)<br />
- the wheel alignment adjusting lock nut.<br />
II - OPERATION FOR REMOVAL OF PART<br />
CONCERNED<br />
I - REFITTING PREPARATION OPERATION<br />
a Always replace:<br />
- the steering box gaiter,<br />
- the retaining clips.<br />
a Clean the contact surfaces between the steering box<br />
and the gaiter using SURFACE CLEANER (see Vehicle:<br />
Parts and ingredients for the repairwork) .<br />
a Coat the gaiter bearing face on the axial ball joint<br />
with SILICONE LUBRICANT (see Vehicle: Parts<br />
and ingredients for the repairwork) to prevent the<br />
gaiter from twisting.<br />
Note:<br />
Be sure to centre the steering to ensure the air in<br />
the gaiters is equalised.<br />
Note:<br />
Be careful not to damage the gaiters: risk of irreversible<br />
damage.<br />
a<br />
105678<br />
II - REFITTING OPERATION FOR PART<br />
CONCERNED<br />
a Refit:<br />
-a new steering box gaiter,<br />
- new retaining clips.<br />
Note:<br />
When removing the steering gaiter, blast the gaiter<br />
surfaces with compressed air to eliminate any<br />
impurities that could enter the steering box.<br />
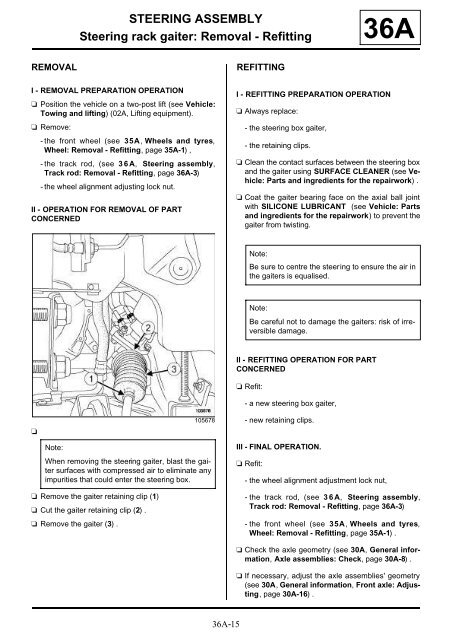
a Remove the gaiter retaining clip (1)<br />
a Cut the gaiter retaining clip (2) .<br />
a Remove the gaiter (3) .<br />
III - FINAL OPERATION.<br />
a Refit:<br />
- the wheel alignment adjustment lock nut,<br />
- the track rod, (see 36A, Steering assembly,<br />
Track rod: Removal - Refitting, page 36A-3)<br />
-the front wheel (see 35A, Wheels and tyres,<br />
Wheel: Removal - Refitting, page 35A-1) .<br />
a Check the axle geometry (see 30A, General information,<br />
Axle assemblies: Check, page 30A-8) .<br />
a If necessary, adjust the axle assemblies' geometry<br />
(see 30A, General information, Front axle: Adjusting,<br />
page 30A-16) .<br />
36A-15
