Uncontrolled
Uncontrolled Copy - DTL Connectors
Uncontrolled Copy - DTL Connectors
- No tags were found...

Create successful ePaper yourself
Turn your PDF publications into a flip-book with our unique Google optimized e-Paper software.
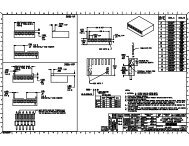
PROCEDURE DE CABLAGE<br />
WIRING INSTRUCTIONS<br />
Les outils de mise en oeuvre ont un rôle prépondérant dans la phase Wiring tools are most important. It is imperative that they<br />
de câblage. Il est impératif qu’ils soient en excellent état. Un outil ébréché, are in good condition. A chipped or badly adjusted tool will affect the<br />
mal réglé, nuira à la qualité ainsi qu’aux caractéristiques des produits quality as well as the characteristics of Amphenol Air LB products.<br />
Amphenol Air LB.<br />
Insertion and extraction of contacts are done with plastic or metallic<br />
L’insertion et l’extraction des contacts s’effectuent avec des outils plastiques tools.<br />
ou métalliques.<br />
SERTISSAGE<br />
CRIMPING<br />
1 Les câbles doivent être dénudés au moyen d’un outil approprié<br />
pour éviter de blesser l’âme et la gaine isolante.<br />
Dénuder le câble sur une longueur correspondant à la cote de<br />
perçage du fût de contact.<br />
1<br />
2 Le sertissage des contacts sur le câble s’effectue avec un outil<br />
de sertissage complété d’un positionneur réglé pour la taille du<br />
contact. L’outil doit être conforme à la norme MIL C 22520.<br />
3 En fonction du jeu entre le diamètre de l’âme du câble et le diamètre<br />
du fût du contact, deux possibilités se présentent :<br />
1-jeu important : mettre le contact dans les mors de l’outil, le fût étant<br />
placé vers l’opérateur, insérer le câble dénudé dans le fût du contact.<br />
2-jeu faible : placer le câble dans le fût du contact et insérer<br />
l’ensemble dans le mors de l’outil.<br />
4 La pince ne libérera le contact que lorsque le cycle de sertissage<br />
complet aura été effectué<br />
a - Le câble doit apparaître dans le trou de regard du contact,<br />
il indique que le câble est correctement présenté au sertissage.<br />
a<br />
1 The cables must be stripped with a suitable tool to avoid<br />
damaging the core and the insulating sheath.<br />
Strip the cable over a length corresponding to the drilling<br />
dimension of the cup.<br />
Positionneur<br />
Locator<br />
Pince à sertir<br />
Crimping tool<br />
2 The crimping of contacts on the cable is done with a crimping<br />
tool complete with a locator adjusted to the contact size. The<br />
tool must comply with MIL C 22520 standard.<br />
3 According to the space between the cable diameter and the<br />
cup diameter, one of two ways of crimping must be choosen :<br />
1-important space : place the contact in the jaws of the tool with<br />
the cup toward the operator.Insert the stripped cable in<br />
the contact cup.<br />
2-low space : place the cable in the contact cup and insert the<br />
group in the jaws of the tool.<br />
4 The tool will not release the contact until the crimping is fully<br />
completed<br />
<strong>Uncontrolled</strong> Copy<br />
4<br />
2<br />
1<br />
3<br />
INSERTION CONTACT<br />
L’insertion des contacts s’effectue avec l’outil côté COULEUR qui<br />
correspond à la taille des contacts.<br />
1 Tenir l’outil et insérer le câble dans la gorge longitudinale de l’outil.<br />
2 Tirer le fil vers l’arrière à travers l’outil jusqu’à ce que l’extrémité de<br />
l’outil repose sur l’épaulement de la collerette du contact.<br />
a - The cable must be visible through the peep hole thus<br />
ensuring that it is correctly crimped.<br />
CONTACT INSERTION<br />
The contact insertion is made with the tool COLOUR side<br />
according to the contact sizes.<br />
1 Hold the tool and insert the cable into the longitudinal groove.<br />
2 Pull the cable to the rear of the tool until the end of the tool is<br />
resting on the contact shoulder.<br />
2<br />
105<br />
Côté couleur<br />
Colour side