LA500 Autogyro - HeliFleet.com
LA500 Autogyro - HeliFleet.com
LA500 Autogyro - HeliFleet.com
- No tags were found...

You also want an ePaper? Increase the reach of your titles
YUMPU automatically turns print PDFs into web optimized ePapers that Google loves.
Pre-rotation system:<br />
- !!!Attention - pre-rotation must NOT be used as THE main driving force !!!<br />
- Pre-rotation is used only for the time needed to achieve full rotation of the rotor<br />
- Precise balancing of the rotor head and the blades must be done before the very first spin up.<br />
(if the rotor is not balanced, the motor might be overloaded and damaged)<br />
How to use pre-rotation of the main rotor<br />
- provided that the system is balanced as requested above, use the pre-rotation system as per following steps:<br />
1. On TX, select an easy to access switch for the control of the pre-rotation ESC and assign it to the appropriate channel.<br />
2. Turn the switch ON - pre-retation motore begins to spin the main rotor for 8 - 11 second. This time is determined by the setting<br />
of the ESC.<br />
3. After this period, the switch should be turned OFF. The ESC will stay in the ON state for 5 more seconds<br />
4. The above 5 seconds is available time for your attempt to take off. If the takeoff is not successful (for any reason),you must<br />
repeat the previous steps.<br />
5. Before a start, check the temperature of the pre-rotation motor! If the motor is hot (after repeated starts), wait until the<br />
motor cools off - otherwise the motor could be damaged!<br />
6. It is re<strong>com</strong>mended to (mildly) spin the pre-rotation motor just before its activation with the hand. It will help to control its<br />
temperature and might prolong its serviceable life.<br />
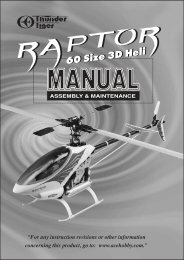
250 g / 8.82 oz<br />
250 g / 8.82 oz<br />
90°<br />
Basic setup:<br />
Center Of Gravity<br />
- To determine CG, do the following:<br />
1. Prepare digital scale (min. 1000g/1g resolution)<br />
2. Stand model with its front gear wheel on the scale.<br />
3. Support the main gear wheels such as to have the mast J002 vertical (90° as shown on the picture).<br />
4. Take the model off, reset (calibrate) the scale and set the model on the scale and support again (e.g. front wheel on the<br />
scale,main gear wheels on the support such as to have the mast vertical)<br />
5. Add or remove weights until the scale reads 250g (8.82 oz) on the scale.<br />
6. Correctly balanced, the model (ready to fly) should show 250 g (8.82 oz) on the scale.<br />
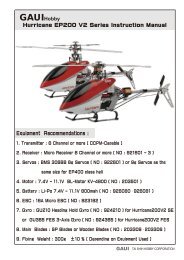
Model setup<br />
- Basic setup of the main rotor - rear view - rotor forms an angle with the mast J0102 - 2° to the right<br />
- Basic setup of the main rotor - side view - rotor forms an angle with the mast J0102 - 13° backwards<br />
- Basic setup of the rudder - rudder is positioned 5° left (to <strong>com</strong>pensate for motor torque)<br />
- Re<strong>com</strong>mended movement for aileron - 28° left, 28° right<br />
- Re<strong>com</strong>mended movement for elevator- 17° down, 15° up<br />
- Re<strong>com</strong>mended movement for rudder - 40° left, 40° right<br />
- Re<strong>com</strong>mended movement for front gear wheel - 30° left, 30° right<br />
www.laheli.<strong>com</strong> 9


![Spartan Quark Gyro Installation Guide [Doc. v1.0] - Spartan RC](https://img.yumpu.com/53147979/1/190x196/spartan-quark-gyro-installation-guide-doc-v10-spartan-rc.jpg?quality=85)