You also want an ePaper? Increase the reach of your titles
YUMPU automatically turns print PDFs into web optimized ePapers that Google loves.
<strong>VoIP</strong> <strong>Phone</strong> <strong>snom</strong> <strong>220</strong><br />
IP phone for superior communication<br />
Manual v3.40 English<br />
26 Aug 2004<br />
1
2<br />
<strong>snom</strong> technology AG<br />
Pascalstr. 10b<br />
10587 Berlin, Germany<br />
© 2004 <strong>snom</strong> technology Aktiengesellschaft.<br />
All Rights Reserved. This document is supplied by <strong>snom</strong> technology AG.<br />
No part of this document may be reproduced, republished or<br />
retransmitted in any form or by any means whatsoever, whether<br />
electronically or mechanically, including, but not limited to, by way of<br />
photocopying, recording, information recording or through retrieval<br />
systems, without the express written permission of <strong>snom</strong> technology<br />
AG.<br />
<strong>snom</strong> technology AG reserves the right to revise this document and<br />
make changes at any time and without the obligation to notify any<br />
person and/or entity of such revisions and/or changes.<br />
Trademarks<br />
PowerDsine is a registered trademark of PowerDsine LTD.<br />
RedHawk is a registered trademark of Red Hawk/CDT.<br />
All other trademarks and registered trademarks are the property of their<br />
respective owners.
Foreword<br />
Congratulations on the purchase of your <strong>snom</strong> <strong>220</strong> Voice over IP<br />
telephone!<br />
Telephony is part of our everyday life. Over a period of more than 100<br />
years a form of communication has evolved which we feel cannot be<br />
ignored. In spite of the new technology base of the <strong>snom</strong> <strong>220</strong>, most of<br />
its look and feel will be very familiar to you and you should be able to<br />
use it intuitively.<br />
On the other hand, the world of the Internet has opened a whole range<br />
of new possibilities. Many users are using web browsers and own one or<br />
more e-mail accounts. They will find it easy to manage the phone via its<br />
web interface or to make a call to “sip:john@domain.de”, for example.<br />
We are confident that developments in the computer industry will follow<br />
those in the telecom world.<br />
<strong>VoIP</strong> is not only about transporting speech over data networks. It is<br />
about interoperability and breaking up a vertical market, as well as<br />
streamlining business processes by seamlessly integrating the telephone<br />
into computer networks and applications. With its technical flexibility,<br />
our commitment to all open and relevant standards and our cooperation<br />
with other vendors in the <strong>VoIP</strong> industry, the <strong>snom</strong> <strong>220</strong> represents a safe<br />
investment for the future.<br />
We would like to take this opportunity to wish you a great experience in<br />
the <strong>VoIP</strong> world.<br />
<strong>snom</strong> technology AG<br />
Note to the reader<br />
This manual is describing the <strong>snom</strong><strong>220</strong> running in administrator<br />
mode.<br />
The current version of this manual can be obtained from:<br />
http://www.<strong>snom</strong>.com/<strong>snom</strong><strong>220</strong>_en.php<br />
3
4<br />
Table of Contents<br />
Foreword............................................................................3<br />
Note to the reader..............................................................3<br />
Table of Contents ...............................................................4<br />
1. Installation .................................................................6<br />
Delivery Content ..............................................................................................................6<br />
Safety Notes....................................................................................................................6<br />
Power supply................................................................................................................6<br />
Setting up the <strong>Phone</strong>.....................................................................................................6<br />
Cleaning ......................................................................................................................6<br />
Connecting the phone .......................................................................................................6<br />
Keypad ...........................................................................................................................7<br />
Initialization ....................................................................................................................8<br />
Booting .......................................................................................................................8<br />
DHCP Configuration.......................................................................................................9<br />
Selecting the IP Address ................................................................................................9<br />
Selecting the Netmask................................................................................................. 10<br />
Selecting the IP Gateway ............................................................................................. 10<br />
Selecting the DNS Server............................................................................................. 10<br />
Selecting the Tone Scheme .......................................................................................... 10<br />
Selecting the Timezone ............................................................................................... 11<br />
Logging on the first account ......................................................................................... 11<br />
2. Logon ........................................................................12<br />
Mobility......................................................................................................................... 12<br />
Logon Wizard................................................................................................................. 12<br />
<strong>snom</strong> Menu ................................................................................................................... 13<br />
Logon User ................................................................................................................ 13<br />
Logoff User ................................................................................................................ 13<br />
Logoff All ................................................................................................................... 13<br />
Select Outgoing Line ................................................................................................... 13<br />
DND Mode on/off ........................................................................................................ 14<br />
Challenge/Authentication ................................................................................................ 14<br />
3. Basic Functions .........................................................16<br />
Idle State......................................................................................................................16<br />
Dialing .......................................................................................................................... 16<br />
Input Modes............................................................................................................... 17<br />
Dialing a phone number............................................................................................... 17<br />
Dialing an H.323/SIP Address....................................................................................... 18<br />
Dialing an IP Address .................................................................................................. 20<br />
Number guessing........................................................................................................ 20<br />
Terminating a call ....................................................................................................... 20<br />
Incoming Call ................................................................................................................ 21<br />
Accepting a Call.......................................................................................................... 21<br />
Denying/Blocking a Call .................................................................................................. 22<br />
Adjusting the Volume ..................................................................................................... 22<br />
Mute / Unmute .............................................................................................................. 22<br />
Handset / Handsfree / Headset ........................................................................................ 23<br />
Programmable Keys........................................................................................................ 23<br />
Line .......................................................................................................................... 23<br />
Destination ................................................................................................................ 24<br />
Intercom ................................................................................................................... 24<br />
Park orbit .................................................................................................................. 25
Table of Contents<br />
DTMF ........................................................................................................................ 25<br />
Main Menu..................................................................................................................... 25<br />
Adjusting the Volume in Idle Mode ................................................................................... 26<br />
Ring Tones .................................................................................................................... 26<br />
About ...........................................................................................................................27<br />
4. Advanced Functions ..................................................28<br />
Hold and Resume ........................................................................................................... 28<br />
Transfer ........................................................................................................................28<br />
Direct Transfer ........................................................................................................... 28<br />
Consultation Transfer .................................................................................................. 29<br />
Conference.................................................................................................................... 29<br />
Call Diversion ................................................................................................................ 30<br />
Diverting all calls ........................................................................................................ 30<br />
Divert when Busy ....................................................................................................... 30<br />
Divert when not answered ........................................................................................... 30<br />
On “busy” (CCBS) ....................................................................................................... 30<br />
On “no response” (CCNR) ............................................................................................ 31<br />
DTMF Tones................................................................................................................... 32<br />
Short Messages (SMS) .................................................................................................... 32<br />
Message Waiting Indication (MWI).................................................................................... 33<br />
Conducting a Software Update ......................................................................................... 34<br />
Additional PBX Features .................................................................................................. 35<br />
Pickup ....................................................................................................................... 35<br />
Conference ................................................................................................................ 35<br />
5. Call Register..............................................................36<br />
<strong>Phone</strong> Book ................................................................................................................... 36<br />
Adding an entry.......................................................................................................... 36<br />
Editing an entry.......................................................................................................... 37<br />
Export ....................................................................................................................... 39<br />
Import....................................................................................................................... 39<br />
Preview.........................................................................................................................40<br />
Call Lists ....................................................................................................................... 41<br />
Speed Dial..................................................................................................................... 42<br />
Dialing ...................................................................................................................... 43<br />
Editing speed dial entries ............................................................................................. 43<br />
Deny List.......................................................................................................................43<br />
Browsing ................................................................................................................... 43<br />
Adding a number ........................................................................................................ 44<br />
Removing a number.................................................................................................... 45<br />
6. Settings.....................................................................46<br />
Settings via <strong>Phone</strong>.......................................................................................................... 46<br />
Settings via Web Browser................................................................................................ 46<br />
Settings Options ............................................................................................................ 46<br />
Setup Preferences....................................................................................................... 46<br />
Setup Speed Dial ........................................................................................................ 46<br />
Setup Line1-7 ............................................................................................................ 46<br />
Setup Advanced ......................................................................................................... 46<br />
Setup Update ............................................................................................................. 46<br />
H.323........................................................................................................................ 46<br />
Status ....................................................................................................................... 46<br />
7. Appendix ...................................................................46<br />
Standard Conformance ................................................................................................... 46<br />
8. Index ........................................................................46<br />
5
6<br />
1. Installation<br />
Delivery Content<br />
Please check whether the delivery contains the following parts:<br />
The base unit with display and keypad<br />
The handset<br />
The handset cable<br />
The power supply (optional)<br />
Safety Notes<br />
!<br />
Please observe the following safety advice. It is crucial for the safe and<br />
reliable operation of the device.<br />
Power supply<br />
You have two options for providing the <strong>snom</strong> <strong>220</strong> with power:<br />
An external power supply (48 V)<br />
Power feeding over the network cable (PowerDsine product family 4000<br />
and 6000)<br />
If you want to use an external power supply, use the one that is<br />
included in the package. Other power-supplies may cause damage to<br />
the phone, affect its behavior, or induce noise.<br />
Setting up the <strong>Phone</strong><br />
The <strong>snom</strong> <strong>220</strong> must be placed on an even, horizontal surface that gives<br />
the rubber pads a secure grip. Do not place the <strong>snom</strong> <strong>220</strong> on carpets or<br />
other materials containing fibers that could block the air vents and<br />
cause overheating.<br />
Cleaning<br />
To clean the <strong>snom</strong> <strong>220</strong>, use an anti-static cloth. Please avoid cleaning<br />
liquids as they might damage the surface or internal electronics of the<br />
phone.<br />
Connecting the phone<br />
First connect one end of the handset cable to the handset and then to<br />
the jack on the left-hand side of the phone.<br />
Next plug the Ethernet (network) cable into the RJ45 connector, which<br />
is named “NET” and is the nearest to the middle of the phone and plug<br />
the other end into the network side to establish a data link. The second<br />
RJ45 connector named “PC” is for daisy-chaining further Ethernet<br />
devices without the need for a second Ethernet connection line.<br />
If you are using an external power supply, please insert the plug of the<br />
power supply into the connector next to the data line and hook up the<br />
casing into the mains.
Installation<br />
Keypad<br />
If you want to use a headset, it can be connected to the audio jacks on<br />
the rear side of the <strong>snom</strong> <strong>220</strong>. The connector named “In” is for the<br />
microphone.<br />
The numeric keypad with the keys 0 to 9, * and # is used to enter digits<br />
and letters. Depending on the operating mode, different actions can be<br />
performed (see the table below):<br />
Entry of digits only (e.g., when dialing a phone number),<br />
Typing in letters and digits by pressing the keys repeatedly (similar to a<br />
cellular phone).<br />
The MENU key is used to invoke the main menu. To cancel<br />
actions or input, the CANCEL key can be used. The ENTER key<br />
confirms actions, selections and inputs.<br />
Depending on the operating mode, the keys can have context-specific<br />
meanings which are described in this manual.<br />
The soft keys F1 to F4 located below the display are context-sensitive<br />
function keys. Their current mapping is depicted with symbols in the<br />
bottom line on the display.<br />
The five keys on the right with LEDs on them are the programmable<br />
function keys that different functionalities can be mapped onto.<br />
The keys of the numeric block in different operating modes:<br />
7
Installation<br />
8<br />
Initialization<br />
Booting<br />
Key Digits Lower case Upper case<br />
0 0 (SPC)_0 (SPC)_0<br />
1 1 .@1,?!-<br />
/():;&%*#+$[]<br />
.@1,?!-<br />
/():;&%*#+$[]<br />
2 2 abc2 ABC2<br />
3 3 def3 DEF3<br />
4 4 ghi4 GHI4<br />
5 5 jkl5 JKL5<br />
6 6 mno6 MNO6<br />
7 7 pqrs7$ PQRS7$<br />
8 8 tuv8 TUV8<br />
9 9 wxyz9 WXYZ9<br />
# # # or after timeout, # or after timeout,<br />
number guessing if number guessing if<br />
not numeric<br />
not numeric<br />
* * Toggles upper and lower case<br />
The booting process comprises a series of different configuration steps<br />
that set up the phone for future use by any user.<br />
Selecting the language<br />
The default language setting is English. To change to a different<br />
language, press the MENU key , go to the submenu “Settings”<br />
with or and press ENTER to select this menu entry.<br />
Select “Base” and press ENTER .
Installation<br />
Select “Language”<br />
and set it to your choice, e.g., “English”.<br />
Press ENTER to activate your selection.<br />
DHCP Configuration<br />
If the network supports DHCP, then on bootup select when this<br />
screen appears:<br />
The phone has a built-in DHCP client. It will receive an IP address and<br />
other network-related settings (Netmask, IP gateway, DNS server) from<br />
the DHCP server.<br />
If DHCP is not used, select in the screen above. The user will<br />
subsequently be asked for the following settings:<br />
Selecting the IP Address<br />
The user can provide a static IP address for the phone if DHCP is not<br />
used.<br />
9
Installation<br />
10<br />
A valid IP address appropriate to the network in which the phone is<br />
being used can be provided.<br />
Selecting the Netmask<br />
Similarly, the user will be asked to provide a Netmask:<br />
Selecting the IP Gateway<br />
If a valid Netmask has been provided, the user will be asked for the IP<br />
address of the IP gateway:<br />
Selecting the DNS Server<br />
The last item for this series of network-related configuration is the IP<br />
address for the DNS server:<br />
Selecting the Tone Scheme<br />
The user will then be asked for the tone scheme to be used on the<br />
phone:
Installation<br />
Selecting the Timezone<br />
The timezone to be used on the phone can also be selected by moving<br />
through the different timezone options available in the menu and<br />
pressing to activate your selection.<br />
If the settings explained above are set up properly, the phone will ask<br />
for the first account registration.<br />
Logging on the first account<br />
If no number is assigned to the phone, you will be prompted to type in<br />
your account name. This consists of your phone number succeeded by<br />
@ and the address of your registrar (for SIP) or gatekeeper (H.323).<br />
The phone tries to guess the correct registrar/gatekeeper address, so it<br />
could look something like this:<br />
After typing in your account name, confirm your account by pressing the<br />
key.<br />
The phone tries to register your given account name at the given<br />
registrar/gatekeeper. The idle screen is shown and if no crossed box but<br />
a phone symbol is displayed in front of your just configured identity,<br />
your registration has been successful.<br />
When this state has been reached, the time and date are displayed on<br />
the display.<br />
11
12<br />
2. Logon<br />
Mobility<br />
In business office environments, desktops are sometimes shared by<br />
different employees at the same time or at different points in time (e.g.,<br />
employees working different shifts, etc). The phones located at the<br />
desktops need to be able to cater to this.<br />
To ease the effort of assigning the appropriate phone number to the<br />
phone for each different employee, the <strong>snom</strong><strong>220</strong> offers so-called<br />
mobility features, which are described in the following subchapters.<br />
Logon Wizard<br />
If no number is assigned to the phone, it displays a logon screen.<br />
After pressing a button, you will be prompted to type in your account<br />
name.<br />
After typing in your account name followed by “@” and the registrar (for<br />
SIP) or gatekeeper (H.323), confirm your account with the ENTER key<br />
.<br />
The phone tries to register your given account name at the given<br />
registrar/gatekeeper. The idle screen is shown and the first line displays<br />
your registration.
Logon<br />
<strong>snom</strong> Menu<br />
In idle screen, the soft key is assigned to the <strong>snom</strong> menu. The<br />
following menu items are among those available in SIP if the “Logon<br />
Wizard” is configured to be active. For H.323 a few items are hidden.<br />
Logon User<br />
When you select this item and press ENTER , you can register an<br />
additional account to the phone. Up to seven accounts can be assigned<br />
in this way.<br />
Logoff User<br />
Here you are able to logoff a registered account. A list with the currently<br />
assigned registrations is shown. Select the registration you want to<br />
logoff and press the ENTER key . The selected registration is logged<br />
off and, if it was the only one registered, the logon wizard is displayed<br />
again. Otherwise the idle screen is displayed.<br />
Logoff All<br />
When you select this menu item and press ENTER , you will be<br />
asked if you really want to logoff all users.<br />
If you confirm by pressing the ENTER key, all currently logged-in SIP<br />
registrations are logged off and the logon wizard is displayed again.<br />
Select Outgoing Line<br />
Selecting this menu item will provide a list of currently registered SIP<br />
lines.<br />
13
Logon<br />
14<br />
By choosing a different line, your originator phone number is changed to<br />
this line. This means that different people can start calls from the same<br />
phone with their own originator phone number and the called phone will<br />
display the current outgoing line information. The current outgoing line<br />
is marked on the idle screen with a black-colored phone icon in front of<br />
the registered SIP line.<br />
DND Mode on/off<br />
Independent from Logon Wizard settings, the DND functionality is<br />
available in the <strong>snom</strong> menu. DND is short for “Do Not Disturb”. When<br />
this mode is activated, incoming calls will no longer come through to the<br />
phone and you will be completely undisturbed by the phone. If there is<br />
a mailbox set up for you, the call is redirected to it. Before this mode is<br />
activated, you will be asked if you really want to change to this mode.<br />
In idle mode, “DND active!” is displayed in the bottom left-hand corner<br />
of the screen when DND is activated.<br />
Please, keep in mind that contact type “VIP” overrides the DND mode,<br />
i.e., a call from a number you have defined as contact type “VIP” will be<br />
put through to your phone even when DND is active.<br />
Challenge/Authentication<br />
In SIP, a user can also set up authentication requirements for each<br />
registration on the phone. The password for each account name can be<br />
set up via the web interface of the phone in Lin1-7 / Login Information /<br />
Password.<br />
If the authentication password is not set, or set wrongly, the account<br />
will not register on that domain and the phone will be challenged for
Logon<br />
that line. A challenge response will ask for the correct password. This<br />
can look like:<br />
The default mode for password input is integer. You can switch to other<br />
input modes by pressing , , or . The password is hidden<br />
and replaced by a series of *s to keep it hidden from prying eyes.<br />
Repeat the same procedure for all accounts with authentication. The<br />
challenge responses are stored in the phone and will be used at reregistration<br />
or on reboot. You can also edit this information via the web<br />
interface.<br />
15
16<br />
3. Basic Functions<br />
Idle State<br />
Dialing<br />
In idle state the phone shows:<br />
the date and time,<br />
the first five registered users,<br />
the connection state of each of the first 5 registered users.<br />
An empty box ( ) before the account indicates that the registration<br />
process is in progress. A phone symbol ( ) means that the account is<br />
successfully registered. A black colored phone symbol ( ) means that<br />
the account is successfully registered and that the line is the active line<br />
for outgoing calls. A box with a cross ( ) signals an unsuccessful<br />
registration attempt.<br />
There are two methods to begin a call from the idle state of <strong>snom</strong> <strong>220</strong>.<br />
You can either dial with the handset resting in the cradle and then pick<br />
it up, or you can pick up the handset and then dial the number. In the<br />
latter case press ENTER to indicate that the number is complete and<br />
dialling can commence.<br />
The <strong>snom</strong> <strong>220</strong> shows the current communication status in the display.
Basic Functions<br />
Input Modes<br />
Dependent on the context, various types of inputs are possible. The<br />
active input mode is indicated in the bottom right-hand corner of the<br />
display:<br />
123 Only digits can be entered.<br />
ABC Upper case mode. Press * to activate lower<br />
case mode.<br />
abc Lower case mode. Press * to activate upper<br />
case mode.<br />
Key mapping for input:<br />
Moves the cursor to the left.<br />
Moves the cursor to the right.<br />
Deletes the character to the left of the<br />
cursor.<br />
Changes input mode to numbers.<br />
Changes input mode to capital letters.<br />
Changes input mode to small letters.<br />
As mentioned in the table above, you use , or to change<br />
the input mode. After using a specific input mode for dialing a number,<br />
the phone saves this mode as default for future use. If you want to use<br />
a different mode, begin dialing and, if the mode is wrong, choose your<br />
preferred mode and continue dialing.<br />
Dialing a phone number<br />
A telephone number is dialed with the numeric keypad.<br />
If block dial, the default setting, is on and the user has not pressed any<br />
keys for a few seconds, the phone will remind the user to press ENTER<br />
in order to start the call.
Basic Functions<br />
18<br />
TIP<br />
Key mapping:<br />
ENTER<br />
Moves the cursor to the left.<br />
Moves the cursor to the right.<br />
Deletes the character to the left of the<br />
cursor.<br />
Changes input mode to numbers.<br />
Changes input mode to capital letters.<br />
Changes input mode to small letters.<br />
Dials the number.<br />
CANCEL Aborts the dialing.<br />
E.164 numbers<br />
E.164 is the standard that defines normal phone<br />
numbers. They may contain digits from 0-9, *,<br />
and #. H.323 differentiates between these<br />
numbers and “H.323 addresses” that may<br />
contain alphanumeric characters. Several<br />
Gatekeeper implementations do not differentiate<br />
between E.164 numbers and H.323 addresses.<br />
If you encounter problems, try specifying the<br />
number as an H.323 address.<br />
Dialing an H.323/SIP Address<br />
Enter an H.323/SIP address via the alphanumeric block. To find the “@”<br />
symbol, press the numeric key “1” several times.<br />
Key mapping:<br />
Moves the cursor to the left.<br />
Moves the cursor to the right.
Basic Functions<br />
ENTER<br />
Cancel<br />
Deletes the character to the left of the<br />
cursor.<br />
Changes input mode to numbers.<br />
Changes input mode to capital letters.<br />
Changes input mode to small letters.<br />
Dials the H.323/SIP address if entered<br />
correctly.<br />
Aborts the dialing.<br />
19
Basic Functions<br />
20<br />
TIP<br />
Dialing an IP Address<br />
Enter the IP address via the numeric block. Use the “*” key instead of<br />
the dot (“.”) or press the hash “#” key a little longer and the hash<br />
character will change to a dot!<br />
Key mapping:<br />
Moves the cursor to the left.<br />
Moves the cursor to the right.<br />
Deletes the character to the left of the<br />
cursor.<br />
Changes input mode to numbers.<br />
Changes input mode to capital letters.<br />
Changes input mode to small letters.<br />
ENTER Dials the IP address if entered correctly.<br />
CANCEL<br />
Number guessing<br />
Aborts the dialing of the IP address.<br />
Dialing an IP Address<br />
When you are calling an IP address, the called phone or computer cannot<br />
determine which user you want to reach. In SIP mode it is assumed that<br />
“anonymous” is being called and with H.323 no assumptions are made. This is<br />
the case with many phones and applications. Therefore, you should only use this<br />
method in exceptional cases, as the entry of IP addresses is rather cumbersome.<br />
For your convenience this functionality offers you the first number from<br />
dialed numbers, missed calls, received calls, or numbers in the<br />
phonebook that match the beginning of the number you have already<br />
typed in.<br />
If the displayed number is not the one you wanted, you can either keep<br />
pressing the “#” key (in alphanumeric modes) to get the next matching<br />
number or continue typing your desired number, or press the<br />
function key to temporarily switch off the number guessing for this<br />
session of editing a phone number.<br />
Terminating a call<br />
You can end a call by setting the handset on its cradle, pressing the<br />
hook switch, or pressing CANCEL . The <strong>snom</strong> <strong>220</strong> will terminate the<br />
call and return to the idle state.
Basic Functions<br />
Incoming Call<br />
When your <strong>snom</strong> <strong>220</strong> is called, it rings and displays the following<br />
screen.<br />
Accepting a Call<br />
Picking up the handset or pressing ENTER will accept the call. The<br />
<strong>snom</strong> <strong>220</strong> is now in a call.<br />
Press / for scrolling to the next / previous set of softkeys.<br />
Key mapping:<br />
, Hold / Resume call<br />
Transfer call<br />
, Handsfree mode on/off<br />
Scroll forward to next softkey set<br />
Scroll back to previous softkey set<br />
Mutes / Unmutes the microphone<br />
Changes the volume<br />
See below for a further description.<br />
21
Basic Functions<br />
22<br />
Denying/Blocking a Call<br />
When the <strong>snom</strong> <strong>220</strong> signals an incoming call, you have the option to<br />
deny the call with .<br />
If you decide to press , the caller will be placed on the deny list and<br />
will always be denied automatically. If is not displayed, it is<br />
switched off in the settings. You can enable it again via the web<br />
interface (“Deny All” feature).<br />
Adjusting the Volume<br />
While making a call, you can use the and the keys to<br />
the right of the display to increase or lower the volume.<br />
Key mapping:<br />
ENTER<br />
CANCEL<br />
Mute / Unmute<br />
Reduces the volume in steps.<br />
Increases the volume in steps.<br />
Sets the volume and returns.<br />
Returns without setting the volume.<br />
To mute the microphone during a call, press the softkey “Mute” or .<br />
Press the softkey “Unmute” or to enable the microphone again.
Basic Functions<br />
Handset / Handsfree / Headset<br />
The <strong>snom</strong><strong>220</strong> supports calls being made while using the handset or the<br />
handsfree capability. During a call it is possible to switch between both<br />
modes by pressing the function keys / or the Speaker key<br />
on the right side beside the display.<br />
If a headset is connected and the audio output is set to headset (“RJ<br />
Conn” or “Chinch”), the <strong>snom</strong><strong>220</strong> will treat the headset as the output<br />
device for calls. When the <strong>snom</strong> <strong>220</strong> is used in a call center<br />
environment, the connected headset will be the default setting for<br />
speaking on the phone. The ENTER key is therefore used to accept<br />
incoming calls.<br />
Key mapping:<br />
ENTER<br />
CANCEL<br />
Programmable Keys<br />
/ Switch to handsfree mode and back.<br />
Accept incoming calls in headset mode.<br />
Returns the phone to the idle state.<br />
The five keys to the right of the numbers block are the programmable<br />
function keys that have the following options:<br />
Line<br />
Destination<br />
Intercom<br />
Park Orbit<br />
Voice Recorder<br />
DTMF (H.323 only)<br />
Each of these buttons has an LED indicating the status of the respective<br />
programmable key at any given time.<br />
Some features are common to all keys:<br />
Pressing a key when its LED is blinking and the phone is ringing will<br />
receive the call.<br />
Pressing the key when a call is in progress at that key, as indicated by<br />
the constantly lighted LED, will put the call on hold.<br />
Pressing the key twice while editing a number for dialing at that key,<br />
with the receiver in the cradle, will return the phone will go to idle state.<br />
Pressing the key twice while editing a number for dialing at that key,<br />
with the receiver off the hook, will erase the number.<br />
Line<br />
Each of these different options will now be explained in detail.<br />
'Line' can be used in one of the following ways:<br />
23
Basic Functions<br />
24<br />
a. To map a local SIP line: A user can assign the local lines to<br />
programmable keys by selecting this option and setting the URL of the<br />
local line as argument to that key setting. For example, if a phone has 2<br />
registrations, 501@my.proxy.com and 502@my.proxy.com, the user has<br />
the option to map two programmable keys to each one of these lines by<br />
selecting 'Line' and setting the respective SIP URL as argument. In this<br />
case, all the calls to a particular line will go to its matching programmable<br />
key, e.g., if 502@my.proxy.com is mapped at key P2, the LED on that key<br />
will start blinking when there is an incoming call on that line. Similarly, if<br />
the user presses P2 in the idle state with the receiver on hook,<br />
502@my.proxy.com will become the active line for that call. This feature<br />
enables the customer to use his different SIP accounts as he would use<br />
different PSTN phone lines. It is also possible to assign different ringtones<br />
to each SIP line in order to make an acoustic differentiation. This can be<br />
done either on the proxy or on the phone’s web interface page Setup/Config<br />
Line 1-7.<br />
b. To map a SIP URL for call pickup: Selecting this option with a SIP URL<br />
as argument will subscribe to dialog state changes of the phone with that<br />
registration. The LED on that key will show the status of the registration<br />
as idle, talking, or ringing by varying frequencies of blinking. This allows<br />
the user to pick up a ringing call remotely by simply pressing a key. An<br />
example of its usage would be the mapping of the office reception phone<br />
line to the phone of a secretary. If for some reason a ringing phone is not<br />
answered at the reception, the secretary can see its ringing status by the<br />
blinking LED and pick up the call by pressing that programmable key.<br />
This way, no calls go unanswered.<br />
c. Free Key: 'Line' is also the default setting for the programmable keys. If<br />
no argument is set, the keys are treated as free. Outgoing and incoming<br />
calls not bound to any other key go to the first such free key.<br />
Destination<br />
The user can map a SIP URL to a particular programmable key by<br />
setting this option and providing the URL as argument. This option can<br />
be used in the following ways:<br />
a. If the sip line 505@my.proxy.com is bound to key P3 with this option, all<br />
calls coming to the phone from this number will go to P3.<br />
b. If P3 is pressed during the idle state, 505@my.proxy.com will be dialed,<br />
as it is set as destination for this key.<br />
c. In the ringing state, if the call comes from any line other than<br />
505@my.proxy.com, pressing P3 will transfer the incoming call to<br />
505@my.proxy.com.<br />
Intercom<br />
This option is similar to 'Destination' with the exception that pressing<br />
the key bound to 'Intercom' enables the intercom mode and the phone<br />
will be directly connected to the set <strong>snom</strong> phone if authentication is set<br />
up properly. This feature is useful in an office environment as a quick<br />
access key to connect to the operator or the secretary.
Basic Functions<br />
Park orbit<br />
<strong>snom</strong>4s provides its customers with the opportunity to set up parking<br />
orbits on the media server, where calls can be parked and picked up.<br />
The option 'Park Orbit' enables the phone to provide this feature.<br />
Suppose key P4 is bound to orbit1@my.proxy.com. The LED on this key<br />
now displays the status of calls, if any, parked on this orbit. A blinking<br />
LED indicates that a call is parked there; the user can pick up this call<br />
by pressing P4. Pressing P4 during a call will park it at<br />
orbit1@my.proxy.com until the same or another user picks it up later.<br />
The caller will hear the holding music. This feature is useful for call<br />
center environments and all places where there is a great inflow of calls<br />
and some kind of queuing is required to manage them.<br />
Voice recorder<br />
This option can be set up with a valid voice recording account. Suppose<br />
that vr@my.proxy.com offers voice recording and is bound to key P5 on<br />
the phone. Its usage is as follows:<br />
During a call, the user is able to record his conversation with the other<br />
party by pressing P5. Pressing button P5 again will end the recording<br />
process.<br />
The recorded media can later be listened to by accessing the recorder<br />
account vr@my.proxy.com.<br />
This feature is also useful for recording short messages or memos to<br />
self. By pressing P5 in the idle state a user can record an important<br />
message to be listened to later.<br />
The same applies to the recording of a debate or discussion, to keep<br />
audio minutes of a meeting, or to record an important conference call<br />
hosted on the phone.<br />
DTMF<br />
Main Menu<br />
In H.323 mode, this line type offers the ability to set up the<br />
programmable keys as additional function keys concerning PBX<br />
functionality controlled via DTMF key codes. Upon a key press to the<br />
programmable key set up as DTMF line type, the specified number<br />
sequence is dialed as DTMF key codes.<br />
By pressing the MENU key in the idle state the main menu is<br />
invoked. The following submenus are available: <strong>Phone</strong>book, Call List,<br />
Deny List, Tones, Settings, and About.<br />
25
Basic Functions<br />
26<br />
Key mapping:<br />
Moves the cursor down.<br />
Moves the cursor up.<br />
/ENTER Enters the submenu.<br />
/CANCEL Returns the phone to the idle state.<br />
Adjusting the Volume in Idle Mode<br />
Via the main menu item “Tones”, the following window is activated:<br />
Here, the volume of the casing speaker, handset speaker, or headset<br />
speaker can be adjusted. Select one of the three choices.<br />
A tone is played back at the selected volume and you can decide on the<br />
desired setting.<br />
Key mapping:<br />
ENTER<br />
Ring Tones<br />
CANCEL<br />
Reduces the volume in steps.<br />
Increases the volume in steps.<br />
Sets the volume and returns.<br />
Returns without setting the volume.<br />
Via the main menu item “Tones” the following window is called up:
Basic Functions<br />
About<br />
Select the submenu “Ringtone”. Here, the ring tone can be set.<br />
The selected ring tone is played back and you can decide on the desired<br />
setting.<br />
Key mapping:<br />
Moves the cursor to the next ring<br />
tone.<br />
Moves the cursor to the previous ring<br />
tone.<br />
/ENTER Activates the selection and returns.<br />
/CANCEL Returns without changing the ring<br />
tone.<br />
Via the main menu item “About”, the following window is activated:<br />
This indicates the type of your phone, the software version, the<br />
currently assigned IP address, and the MAC address of the phone.<br />
27
28<br />
4. Advanced Functions<br />
Hold and Resume<br />
Transfer<br />
When a call is in progress, pressing the flash key or<br />
(language dependent) puts the call on hold, i.e., the speech is set to<br />
mute (neither party can hear the other).<br />
Pressing the flash key again will resume the call. While a call is on hold,<br />
you can establish another call by dialing the desired number.<br />
When more than one call is on hold the following window appears.<br />
Select the party you wish to talk to with the keys / . Press the<br />
ENTER/Flash key to get connected.<br />
Key mapping:<br />
CANCEL<br />
,<br />
The call being held is terminated.<br />
Resumes the call being held.<br />
Transfers the call being held.<br />
*,#,digits Can be used to initiate another call.<br />
, Handsfree mode on/off.<br />
Direct Transfer<br />
During a call press the transfer key to put the connected party on<br />
hold, then dial the number the call is to be directly transferred to.
Advanced Functions<br />
As soon as you press ENTER , the <strong>snom</strong> <strong>220</strong> will transfer the held<br />
party to that number.<br />
Key mapping:<br />
ENTER<br />
CANCEL<br />
Moves the cursor to the left.<br />
Moves the cursor to the right.<br />
Deletes the character to the left of the<br />
cursor.<br />
Changes input mode to capital letters.<br />
Changes input mode to small letters.<br />
Changes input mode to numbers.<br />
The <strong>snom</strong> <strong>220</strong> transfers the call.<br />
Aborts the transfer.<br />
Consultation Transfer<br />
During a call in progress, put the connected party on hold by pressing<br />
the hold key or .<br />
While the call is on hold, you can establish a second call by dialing the<br />
desired number and pressing ENTER . When the second call is<br />
established, you can consult the second party, e.g., to announce the<br />
call. You can connect the two parties by pressing the transfer key<br />
or the hook on the handset.<br />
Conference<br />
If the phone is connected with two calls, one on hold and one active,<br />
you can connect all three phones in a conference by pressing the<br />
function key .<br />
29
Advanced Functions<br />
30<br />
By pressing the function key , the conference is disconnected and<br />
the calls are dropped.<br />
Call Diversion<br />
All kinds of call diversions can be set, changed, and deactivated in the<br />
menu “Settings/Redirection”.<br />
Diverting all calls<br />
By setting the option “Settings / Redirection / Redirection” to “always”,<br />
every incoming call is diverted immediately to the number set in<br />
“Settings / Redirection / Redirect Target” without the phone ringing.<br />
To disable this feature set the “Settings / Redirection / Redirection” to<br />
“never”.<br />
Divert when Busy<br />
By activating the option “Settings / Redirection / Redirection / When<br />
Busy”, every incoming call is diverted to the number set in “Settings /<br />
Redirection / Busy Target” if another call is already in progress.<br />
Divert when not answered<br />
You can set the number of seconds in “Settings / Redirection / Redirect<br />
Time” after which every incoming unanswered call is diverted to the<br />
number set in “Settings / Redirection / Redirect Target”.<br />
Note: To activate call divert immediately, see above.<br />
Call Completion<br />
The call completion functionality allows the user to establish calls<br />
successfully when the other party is busy or not answering.<br />
On “busy” (CCBS)<br />
When the party you are trying to reach is busy, the following window<br />
will appear during a call attempt:
Advanced Functions<br />
By pressing the key, call completion is activated and the phone<br />
waits for the other party to return to idle.<br />
If you wish to receive and make calls while you are waiting for call<br />
completion, press again to return to the idle screen which now<br />
shows the letters ‘CC’ in the lower left corner. (Pressing “CANCEL”<br />
cancels the call completion procedure.)<br />
When the other party becomes idle, the following window appears:<br />
If you press the key, the phone will dial the number again in order<br />
to establish a connection to the other party.<br />
On “no response” (CCNR)<br />
When the phone signals “no response” to your call, activate call<br />
completion by pressing the CC key.<br />
31
Advanced Functions<br />
32<br />
The phone will now wait for the dial destination to become active again.<br />
If you wish to receive and make calls while you are waiting for call<br />
completion, press again to return to the idle screen which now<br />
shows the letters ‘CC’ in the lower left corner. (Pressing “CANCEL”<br />
cancels the call completion procedure.)<br />
When the other side is available, the display will prompt you to dial the<br />
number again.<br />
DTMF Tones<br />
During a call, e.g. with a voicemail system, pressing the digits 0-9, *, or<br />
# will generate and send DTMF tones to the other party.<br />
Short Messages (SMS)<br />
Incoming short messages are automatically displayed when the phone is<br />
in idle state.<br />
Key mapping:
Advanced Functions<br />
ENTER<br />
Scrolls the message forward.<br />
Scrolls the message backward.<br />
Shows the next message or the idle<br />
screen.<br />
Short messages can be received from clients like Microsoft Messenger,<br />
etc.<br />
Message Waiting Indication (MWI)<br />
If you did not answer a call and the mailbox recorded a message for<br />
you, the idle screen shows that a recorded message is waiting for you.<br />
33
Advanced Functions<br />
34<br />
On the idle screen, the letter icon to the left of the SIP registration line<br />
indicates the registered phone number the call was recorded for.<br />
After you press the function key , the phone displays more<br />
information about the number of new and old recorded messages.<br />
To connect to the mailbox in order to listen to the recorded messages,<br />
press function key or take the handset off the hook.<br />
Key mapping:<br />
,<br />
Handset<br />
off hook<br />
ENTER<br />
Scrolls the message forward.<br />
Scrolls the message backward.<br />
Call mailbox to listen to recorded<br />
messages.<br />
Back to idle screen.<br />
Conducting a Software Update<br />
If your provider/administrator is offering you a new software version for<br />
your phone, a “SW” is displayed in the left lower corner of the idle<br />
screen.
Advanced Functions<br />
In this case, an additional entry “SW Update” can be found in the <strong>snom</strong><br />
menu ( ).<br />
Pressing the /ENTER key reboots your phone after a few seconds.<br />
During boot-up the phone asks you whether or not it should proceed<br />
with the boot loader and/or firmware update.<br />
Additional PBX Features<br />
When the phone is set up to use H.323 protocol, additional PBX features<br />
are available if they are enabled.<br />
Pickup<br />
If someone else’s phone is ringing and you want to pick up the call on<br />
your own phone, press the key or the function key at the<br />
idle screen to scroll to the second set of available function keys. Then<br />
press the function key .<br />
Conference<br />
If the phone is connected with two calls, one on hold and one active,<br />
pressing function key will connect all three involved phones in a<br />
conference.<br />
Pressing function key will disconnect the conference.<br />
35
36<br />
5. Call Register<br />
<strong>Phone</strong> Book<br />
The <strong>snom</strong> <strong>220</strong> contains an internal phone book that can be reached<br />
from the phone’s idle state by pressing the phone book key .<br />
Key mapping:<br />
ENTER /<br />
Off Hook<br />
CANCEL<br />
Adding an entry<br />
Scrolls to the next item.<br />
Scrolls to the previous item.<br />
Enters the edit mode for the selected<br />
entry.<br />
Deletes current item.<br />
Dials the number of the selected entry.<br />
Returns to the idle state.<br />
In order to add a new entry, go on to the list item and<br />
press .<br />
Enter the name and phone number and confirm each item by pressing<br />
ENTER.
Call Register<br />
The title of the window indicates which input is expected. Pressing<br />
CANCEL aborts the addition of a new entry.<br />
Key mapping:<br />
ENTER<br />
CANCEL<br />
Editing an entry<br />
Changes input mode to capital letters.<br />
Changes input mode to small letters.<br />
Changes input mode to numbers.<br />
Deletes the character to the left of the<br />
cursor.<br />
Moves the cursor to the left.<br />
Moves the cursor to the right.<br />
Accepts the entry.<br />
Cancels the entry.<br />
After pressing the edit key on the entry to be modified, the name<br />
and phone number will be brought up in sequence. Confirm each item<br />
by pressing ENTER .<br />
The title of the window indicates which input is expected. ENTER<br />
accepts the data, CANCEL aborts the editing.<br />
Key mapping:<br />
ENTER<br />
CANCEL<br />
Changes input mode to capital letters.<br />
Changes input mode to small letters.<br />
Changes input mode to numbers.<br />
Deletes the character to the left of the<br />
cursor.<br />
Moves the cursor to the left.<br />
Moves the cursor to the right.<br />
Accepts the entry.<br />
Aborts the editing process.<br />
37
38<br />
Please, keep in mind that the contact type “VIP” overrides the DND<br />
mode, i.e., calls from someone on your “VIP”-list will be put through to<br />
your phone even when DND is ‘active!’.
Call Register<br />
Export<br />
To save the content from an already filled phonebook, right-click onto<br />
the “Click here” link at the bottom of the “Addressbook” page on your<br />
built-in web interface (“Click here to save the current address book”).<br />
With “Save Target As…” you can save the phone book content in a<br />
comma-separated file containing the current address book entries (CSV<br />
= Comma-Separated Values).<br />
Import<br />
To load an address book from a file, click on the “Browse” button on the<br />
“Addressbook” page in the section entitled "Import Address Book<br />
(CSV)". Select the pre-stored CSV file from the storage medium and<br />
then press the 'Load' button.<br />
39
Call Register<br />
40<br />
Preview<br />
It should not matter if some of the entries already exist in the phone<br />
book. They will not be duplicated if both name and number are exactly<br />
the same respectively. If the number field is the same but the name is<br />
not, the file entries will replace the old ones (just like editing the old<br />
entry to save a different name). If the name is the same but the<br />
number is not, a new file entry will be made.<br />
You will first receive a<br />
A preview feature is available while importing files for the phone book.<br />
One way to do this is to use a Comma Separated Values (CSV) file. A<br />
CSV file has entries separated by a comma (and without spaces<br />
between the comma and the preceding and following entry). It can look<br />
like this:<br />
The first line represents the header, which shouldn’t be imported, that is<br />
why the option “without header” has to be selected in this case.<br />
Selecting a CSV or Unicode TAB-separated file is possible through the<br />
web interface, as shown in the following:
Call Register<br />
Call Lists<br />
After choosing a file, a preview of the selected file contents will be<br />
shown.<br />
Now assign the three possible data types (name, number, contact type),<br />
which can be imported, to the columns in the preview representing<br />
those kinds of data.<br />
Once satisfied with the preview, pressing “Save” will save the file<br />
contents to the phone book, which could look like this:<br />
These new entries will become part of the existing phonebook. They will<br />
be stored on the flash and can be retrieved anytime until they are<br />
deleted or a factory reset is performed.<br />
The <strong>snom</strong> <strong>220</strong> maintains lists of missed, received, and dialed calls that<br />
can be accessed by pressing the call list key from the idle state.<br />
For example, after choosing the missed calls, the most recent missed<br />
call is displayed first.<br />
41
Call Register<br />
42<br />
Key mapping:<br />
ENTER /<br />
Off Hook<br />
CANCEL<br />
Scrolls to the next call.<br />
Scrolls to the previous call.<br />
Shows details of this call.<br />
Deletes the current entry.<br />
Dials the number of the current entry.<br />
Returns to the idle state.<br />
By pressing the key you can get details about this missed call.<br />
Information regarding “To”, “From”, “Time”, and “Missed” (i.e., number<br />
of missed calls) is provided.<br />
Key mapping:<br />
Speed Dial<br />
ENTER /<br />
Off Hook<br />
CANCEL<br />
You can use the current entry for your<br />
next call and possibly edit the number<br />
before calling it.<br />
Saves the current calling party to the<br />
phone book.<br />
Step to the next kind of information: To,<br />
From, Time and Number of calls<br />
Deletes the current entry.<br />
Dials the number of the current entry.<br />
Returns to the idle state.<br />
The <strong>snom</strong> <strong>220</strong> supports speed dial of up to 33 numbers. These are<br />
mapped onto the numbers 0-30, *, and #.
Call Register<br />
Dialing<br />
Speed dialing is initiated by typing in a number from 0-30, *, or #,<br />
respectively, and confirming with the key. In this way, 33 speed<br />
dial numbers can be called up without having to look at the display.<br />
Editing speed dial entries<br />
Deny List<br />
Set up the speed dial numbers on the built-in web interface page of<br />
your phone.<br />
The <strong>snom</strong> <strong>220</strong> gives you the option of putting numbers on a deny list to<br />
prevent calls from these numbers.<br />
Browsing<br />
You get to the deny list window via the submenu “Deny List” on your<br />
phone’s display.<br />
43
Call Register<br />
44<br />
The numbers to be denied are displayed here.<br />
Key mapping:<br />
CANCEL<br />
Scrolls to the next number.<br />
Scrolls to the previous number.<br />
Deletes the current number.<br />
Pressing this on will add a<br />
new entry.<br />
Returns to the idle state.<br />
Or use the web interface “Address Book” page:<br />
The numbers to be denied are displayed and marked with contact type<br />
“deny”.<br />
Adding a number<br />
While you are being called you can press the deny list key . This<br />
will not only deny the present call, but will also add the number to the<br />
deny list.
Call Register<br />
In addition, any number can be added to the deny list by selecting<br />
in the deny list of the phone directly.<br />
After the number has been entered, it is added to the deny list.<br />
Or add a new deny list entry on the “Address Book” webpage and mark<br />
it “deny”.<br />
Pressing on an incoming call will only deny that particular call and<br />
will not put the caller on the Deny List.<br />
Removing a number<br />
There are three ways to remove a number from the deny list: (1) Press<br />
the “clear” key on your phone while viewing the deny list. (2) On<br />
the “Address Book” webpage click onto the small red crossed icon at the<br />
end of the line you want to delete. (3) Change the contact type on the<br />
“Address Book” webpage!<br />
45
Settings<br />
46<br />
6. Settings<br />
A long list of different settings is available that can be used to control<br />
the behavior of the <strong>snom</strong><strong>220</strong>. These settings are explained in the FAQ<br />
“Configuring <strong>snom</strong> phones for Mass Deployment”, which you will find<br />
under http://www.<strong>snom</strong>.com/faq_en.php. The FAQ “How can I<br />
update a <strong>snom</strong> phone?” describes the different options available to<br />
update the phone, also via setting file.<br />
The settings can be specified in different ways:<br />
Via the phone<br />
Via web browser on a PC<br />
Settings via <strong>Phone</strong><br />
Press the MENU key in the idle state of the phone. With the<br />
function keys and you can navigate in the menu. Scroll to<br />
the submenu “Settings” and press ENTER .<br />
You are now in the “Settings” menu, which has the following submenus:<br />
Redirection<br />
Base<br />
SIP<br />
Codecs<br />
Miscellaneous<br />
Network<br />
Key Mapping<br />
Administrator Mode<br />
Reset Values<br />
Use the keys and to scroll within the “Settings” menu. Press<br />
the ENTER key to select a submenu.<br />
Now the list of settings of the selected submenu is displayed. Use the<br />
and to scroll within the list. By pressing ENTER the value<br />
of the setting can be viewed or modified.<br />
Some entries cannot be set to any variable value. Instead they offer a<br />
list of allowed values from which one has to be selected. Use the<br />
and to scroll within the list to set the desired value. Press ENTER<br />
to set the value. Press CANCEL if you decide not to change the<br />
value.
Other settings require the editing of numbers or strings. This can be<br />
done with the keypad of the phone. Digits are entered directly via the<br />
keys and letters can be called up by pressing a key repeatedly. You can<br />
toggle between lower case letters ("a") and upper case letters ("A") with<br />
the * key.<br />
Key mapping:<br />
ENTER<br />
CANCEL<br />
Moves the cursor to the left.<br />
Moves the cursor to the right.<br />
Deletes the character to the left of the<br />
cursor.<br />
Changes input mode to capital letters.<br />
Changes input mode to small letters.<br />
Changes input mode to numbers.<br />
Accepts the entry.<br />
Aborts the changes.<br />
Settings via Web Browser<br />
It is usually more convenient to use a web browser to configure the<br />
settings. The <strong>snom</strong> <strong>220</strong> has an integrated web server for this purpose.<br />
If the phone is connected to a network that provides DHCP, it can be<br />
immediately accessed via the browser after boot-up. If you do not want<br />
to use DHCP, you must specify the IP address, netmask, gateway, DNS<br />
domain, and DNS server statically to ensure correct operation.<br />
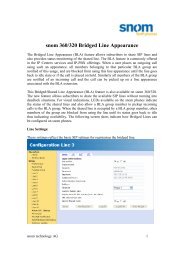
Illustration 1: Web configuration<br />
Start your web browser.<br />
Enter the IP address of the phone as the URL (e.g. 192.168.0.100). (If<br />
you do not know the IP address, you can look it up on the phone’s<br />
display by pressing the menu key, scrolling to the “About” submenu,<br />
and pressing ENTER .)<br />
On the left side of the web page there is a selection menu.<br />
47
Settings<br />
48<br />
Just click on the desired submenu and the current settings of this<br />
submenu will be displayed on the right.<br />
You can now modify and store the values by using the mouse and<br />
keyboard. To store the changes made, click on the SAVE button. Do<br />
not press SAVE if you want to discard the changes.<br />
Settings Options<br />
The following options are available in administrator mode via web<br />
interface.<br />
Setup Preferences<br />
GENERAL INFORMATION<br />
The webpage may look like this:<br />
Webinterface Language<br />
The web interface can be displayed in different languages independent<br />
from the current language used on the phone (see below).<br />
Language<br />
Your phone is able to show all display texts in different languages. Here<br />
you can select the language that suits you the best.<br />
Number Display Style<br />
Specifies the display of incoming and outgoing calls:<br />
Full Contact: Shows the complete URL<br />
Name: Only the name is displayed<br />
Number: Only the number is displayed<br />
Name + Number: Name and number are displayed<br />
Tone Scheme<br />
Select the dialtone you prefer for your phone.<br />
MWI Notification<br />
Specify the type of MWI notification that will inform you when a new<br />
message arrives.
Settings<br />
MWI Dial Tone<br />
Set the dialtone to stutter mode in case of an active MWI.<br />
Use Headset Device<br />
Select the headset device you would like to use. Select “none” if you<br />
don’t want to use a headset.<br />
Use Backlight<br />
The <strong>snom</strong><strong>220</strong>’s display has a built-in backlight. If you set this function<br />
to ‘on’, the backlight will be turned on when you press a key on the<br />
phone. It is automatically switched off after a short time.<br />
REDIRECTION<br />
You can have all incoming calls diverted to a specific number.<br />
The following options for redirection are available:<br />
Never: This deactivates all call diverts.<br />
Always: All calls are diverted to the number specified in “Number<br />
Redirect”.<br />
When Busy: When a call is in progress, any other call made to that<br />
number is rejected and will receive a busy indication. The phone can be<br />
set in such a way that the second caller is diverted to another number<br />
set in “Number Busy”.<br />
After Timeout: Calls are diverted after the timeout in seconds specified<br />
in “Timeout” to the number specified in “Number Redirect.<br />
The following fields for diversion are available:<br />
Timeout<br />
Specifies the timeout in seconds after which the call should be diverted.<br />
Number redirect<br />
Specifies the number to which the calls should be diverted.<br />
Number busy<br />
Specifies the number to which the calls should be diverted if the phone<br />
is busy.<br />
RINGTONES<br />
This section looks like the following:<br />
49
Settings<br />
50<br />
Default Selection<br />
Select the criterion according to which the ringing melody is selected for<br />
incoming calls, i.e., based on the caller or callee address.<br />
Contact Type Specific Ringers<br />
Specify the ringing melodies for different contact types from your<br />
personalized phone book entries. These melodies will be used only if you<br />
selected “Source” in the “Default Selection” setting above.<br />
Ringer Device for Headset<br />
In case you want to hear the ring tone via the headset only, choose<br />
“headset”, otherwise “speaker” as usual.<br />
Default Ringer<br />
Choose the default ringing melody for your <strong>snom</strong> phone through this<br />
setting.<br />
Custom Melody URL<br />
Specify an URL to your own ringing melody. The type of files that should<br />
be supplied to the phone is: "PCM 8 kHz 16 bit/sample (linear) mono<br />
WAV”.<br />
AUTO ANSWER<br />
<strong>snom</strong> phones have auto-answering capabilities. Through these settings<br />
you can control the behavior of auto answer. This section looks like this:<br />
Auto Answer<br />
You can disable auto answer on your phone by turning this setting off.<br />
Turn it on to enable auto answer again.<br />
Auto Answer Indication<br />
In case you want to be informed when an incoming call is automatically<br />
answered from your phone, select “on”.
Settings<br />
Type of Answering<br />
If auto answer is on, you can select how you would like to receive the<br />
incoming call, i.e., in hands free mode or on the handset.<br />
PRIVACY SETTINGS:<br />
Presence Inactivity Timeout<br />
This is the time after which, if there is no activity, presence is set to<br />
“closed”. The default is 15 minutes. If it is set to 0, the presence stays<br />
closed and nothing is published. In other words, presence is disabled<br />
for all practical purposes.<br />
Call Line Identification Presentation (CLIP)<br />
Show or hide your own phone number when making a call.<br />
Call Line Identification Restriction (CLIR)<br />
Reject or accept anonymous incoming calls.<br />
Setup Speed Dial<br />
Speed Dial Table<br />
Set up your speed dial numbers via this webpage.<br />
51
Settings<br />
52<br />
Function Keys<br />
You have the option to program up to sixty-five keys with LEDs. This<br />
section helps you achieve this objective. Program the keys P1-P5 or<br />
EK1-EK60 to perform any of the 5 different functions. They include<br />
“Line”, “Destination”, “Intercom”, “Park Orbit” and “Voice Recorder”.<br />
Each of these was explained in detail in the chapter entitled<br />
“Programmable Keys”. You also need to specify the number for each of<br />
the keys in order to enable the specific key utility to work.<br />
The keys EK1-EK0 can be used via up to three cascaded external<br />
keyboards of 20 keys each.<br />
Setup Line1-7<br />
Through this page you can set up SIP lines you would like to use on<br />
your phone. You have the option to set up to seven lines. Each line<br />
setting looks like the following:
Settings<br />
LOGIN INFORMATION<br />
Display Name<br />
Set the name you would like to associate with a line, e.g., “John Smith”.<br />
Account<br />
This is the account with which you would register to a registrar/proxy.<br />
It could be alphanumeric, e.g., “js”, or based on digits like “701” in the<br />
screenshot above.<br />
Password<br />
This is the password to be used for challenge responses. In order to<br />
protect privacy, passwords are not displayed in their true form.<br />
Registrar<br />
Specify the IP address or URL of the registrar/proxy with which you<br />
would like to register this account.<br />
Mailbox<br />
If you have set up a mailbox, specify the account name for that mailbox<br />
here to associate it with this particular SIP line.<br />
Ringtone<br />
Through this setting, you can select a distinctive ring tone that will alert<br />
you when a call comes in on this particular line. In order for this to<br />
work, you will have to have specified “Destination” in the “Default<br />
Selection” in “Preferences”.<br />
ADVANCED LINE SETTINGS<br />
Outbound Proxy<br />
You can specify the outbound proxy here.<br />
Dial Plan String<br />
You can set up the dial plan for this line here.<br />
Q-Value<br />
You can set up the probability of registration for each line through this<br />
setting. The default is 1.0.<br />
Proposed Expiry<br />
You can select the time when the registration on this line expires. The<br />
phone will send a fresh re-registration request at the expired time.<br />
53
Settings<br />
54<br />
Transport<br />
Select the protocol for transport layer communication through this<br />
setting.<br />
Offer ICE<br />
Choose whether you want to use ICE or not.<br />
Codec 1-5<br />
You can select the preferred order for the potential used codec. The<br />
available options are G.711 ulaw, G.711 alaw, GSM, G.726-32 and<br />
G.729a.<br />
Packet size<br />
Select the packet size in bytes. It affects only ulaw and alaw codecs<br />
(other codecs have fixed packet size). Eighty (10 ms), 160 (20 ms),<br />
240 (30 ms) and 320 (40 ms) bytes are available.<br />
Setup Advanced<br />
NETWORK<br />
With these settings you can set up the basic network settings of your<br />
phone. The web interface for this looks like the following:<br />
DHCP<br />
Turn on or off the use of DHCP with this option.<br />
IP address<br />
You can change the IP address of the device through this setting.<br />
Changing this parameter requires a reboot. This parameter is<br />
mandatory in order to enable the ethernet connection.<br />
Netmask<br />
Change the netmask for the device. Changing this parameter also<br />
requires a reboot.<br />
<strong>Phone</strong> name<br />
Change the hostname of the phone here. If this parameter is available,<br />
it is used for identifying the device in SIP signaling.
Settings<br />
IP Gateway<br />
This setting shows the IP address of the default IP gateway (not the<br />
<strong>VoIP</strong> gateway). It is the address to which the packets are routed if the<br />
wanted packet address is not in the current subnet. Setting up this<br />
parameter is mandatory in order to reach an external network.<br />
DNS<br />
Domain<br />
Specify the DNS domain for your phone here.<br />
DNS Server 1<br />
Specify the IP address of the DNS server for your network here.<br />
DNS Server 2<br />
Specify the IP address of a backup DNS server for your network here.<br />
TIME SETTINGS<br />
NTP Time server<br />
Specify the URL or IP address of the NTP server here.<br />
Timezone<br />
Select the time zone of your geographical location through this option.<br />
HTTP<br />
55
Settings<br />
56<br />
User<br />
Here you can select the HTTP username for your phone.<br />
Password<br />
Set up the HTTP password for your phone here.<br />
Authentication Scheme<br />
Define whether “Basic” or “Digest Authentication Scheme” should be<br />
used.<br />
HTTP Proxy<br />
You can select the HTTP proxy address for your phone here.<br />
HTTP port<br />
Specify the HTTP port to be used by your phone through this setting.<br />
HTTPS port<br />
Specify the HTTPS port to be used by your phone for HTTPS<br />
connections.<br />
Register http contact<br />
Should the phone add the http URL of the phone as additional contact<br />
information?<br />
Web server connection type<br />
Set up the type of connection the phone’s web server is willing to<br />
answer to:<br />
http<br />
https<br />
http & https<br />
off<br />
<strong>Phone</strong> Behaviour
Settings<br />
Call Completion<br />
Turning this setting to “On” will prompt the user to activate call<br />
completion, if possible, while dialing a number. When the dialed party<br />
becomes available again, your phone will be able to automatically redial<br />
the number.<br />
IDNA (RFC 3490) Support<br />
Switch on support for Internationalizing Domain Names in Applications<br />
(IDNA).<br />
Action on Ethernet cable replug<br />
Choose the action that should be performed after the network<br />
connection is reestablished: “Do nothing” or “reboot”.<br />
Auto Dial<br />
This setting is switched off by default. You can set a timeout after<br />
which a number is dialed automatically without pressing the key or<br />
taking the handset off the hook.<br />
Number Guessing<br />
Here, the number-guessing functionality can be activated or<br />
deactivated.<br />
Block URL Dialing<br />
You can block the dialing of SIP URLs by turning this setting on. In this<br />
case only numerics will be allowed as input.<br />
Deny All<br />
When turned on, this setting shows the “Deny All” softkey on incoming<br />
calls so that incoming numbers can be put on the “Deny List”. Turning<br />
the setting off will disable this feature.<br />
Challenge Response on <strong>Phone</strong><br />
As explained in an earlier chapter, <strong>snom</strong> phones can handle challenge<br />
responses on the phone. Turning this setting off will disable this feature<br />
and you will only be able to handle authentication through the web<br />
interface of the phone.<br />
Broadsoft Call Control Features<br />
Support for Broadsoft call control can be enabled here.<br />
CMC (Client Matter Code)<br />
When this setting is turned on, the user is offered a softkey during a<br />
call; its use sends a unique code to the server using the INFO message<br />
in SIP. This code can later be used for billing or book keeping along<br />
with the call ID of that call.<br />
57
Settings<br />
58<br />
Dialog-Info Call Pickup<br />
<strong>snom</strong> phones subscribe to the status information of SIP URL's mapped<br />
as “Destination” on the programmable keys. By turning this setting on,<br />
the user will be offered a pickup if a mapped destination gets a call and<br />
is in the ringing state. The display will change in the idle state to show<br />
the source and destination of that call and the user can pick it up by<br />
pressing the ENTER key . The pickup offer will be available as long<br />
as the destination is ringing and disappear when the user of the phone<br />
offering pickup presses CANCEL , when the call is connected, when<br />
the call is cancelled by the caller, or when a third party picks up the call.<br />
Call Waiting Indication<br />
You can enable or disable the CWI on the phone through this setting.<br />
Dialtone during Hold<br />
Turning this setting on will produce a dial tone when a call is being held<br />
and the user is trying to dial a second number. A dial tone will not be<br />
played when this setting is not turned on.<br />
Disconnect on On-hook<br />
Sometimes it is useful to disable the disconnection of a call when the<br />
handset is placed on-hook, e.g., during conference calls or handsfree<br />
mode, etc. This can be achieved by turning this setting off.<br />
Keys<br />
Here you can change the key behaviour on the phone to your wishes.<br />
The web page may look like this:<br />
Break Key<br />
The “Break” key on the phone can be used either to disconnect the<br />
connected call or as a “Transfer” hard key. You can make that choice<br />
through this setting.<br />
Transfer on On-hook<br />
In case the transfer feature triggered by on-hook is confusing you, you<br />
can switch it off here.
Settings<br />
Block DND<br />
Users have an option to disable the DND feature. This can be achieved<br />
by turning the “Block DND” setting on. If this setting is turned on, the<br />
users of the phone will not have the DND option on their phones. This<br />
can be useful in call center environments.<br />
Logon Wizard<br />
Turn this setting on if you want to use the Logon wizard. Switch it off to<br />
disable the Logon wizard.<br />
Prefix<br />
PRESELECTION<br />
This section looks like this:<br />
Specify the number to be prefixed to each dialed number.<br />
AUDIO<br />
Set up audio-related settings on your phone. These settings may look<br />
like this:<br />
Mute Microphone<br />
Setting this to “on” will mute the microphone of the phone. Turning it<br />
off will enable the microphone again. Specify the number to be prefixed<br />
to each dialed number.<br />
Disable Casing Speaker<br />
Turn this setting on to disable your speaker.<br />
DTMF echo on Speaker <strong>Phone</strong><br />
Option to switch off DTMF echo.<br />
Call Releases Notification<br />
Turn this on to enable late media when a call is released. Turning it off<br />
will take you directly to the idle state when a call drops.<br />
59
Settings<br />
60<br />
Advanced Network<br />
In this section you can alter the advanced network settings of your<br />
phone. This page has the following settings:<br />
NAT Detection<br />
Users can select the kind of NAT according to their network through this<br />
setting. Available options are “Automatic”, “UPnP”, “STUN”, “Static” or<br />
“Off”. The default is “Automatic”.<br />
STUN Server (IP-addr:port)<br />
If you selected “STUN” as NAT detection type, specify the address of the<br />
STUN server followed by the port number.<br />
STUN Binding Interval (seconds)<br />
Similarly, set the STUN binding interval time in seconds through this<br />
setting.<br />
Use Mapped Address<br />
Through this setting you can switch the mapped address feature on or<br />
off.<br />
Dynamic RTP port start<br />
If you want to set up the RTP port dynamically, give the start port<br />
number in this setting.
Settings<br />
Dynamic RTP port end<br />
Give the last port number in this setting for dynamic RTP port selection.<br />
Type of Service (TOS)<br />
You can set up the TOS in this setting. A value could, for example, be<br />
160.<br />
DTMF Payload Type<br />
Set up the payload type for Out of band DTMF here, e.g., 101.<br />
Network Identity (host name)<br />
Specify the host name of the Network identity through this setting.<br />
Network Identity (port)<br />
Set the port number of the network identity here.<br />
Local SIP Port<br />
Should both network identity settings following below be used instead of<br />
the default SIP port?<br />
SIP T1 (ms)<br />
Set the re-try timer 1 in milliseconds here.<br />
SIP Session Timer (s)<br />
A user can specify the session timer for SIP in seconds here.<br />
Dirty Host TTL (s)<br />
Specify the “Time to Live” (TTL) for dirty hosts in seconds through this<br />
setting.<br />
SIP Max Forwards<br />
If you want to specify the maximum number of forwards, you can set it<br />
here.<br />
ENUM Suffix<br />
When using ENUM, you can specify a suffix here, if desired.<br />
Music on hold server<br />
If you have configured a “music on hold” server, specify that contact<br />
here. Music from this server will be played to the other side when you<br />
hold a call.<br />
Use user=phone<br />
Turn this setting on if you want to use user=phone in SIP URLs. Select<br />
“off” to disable it.<br />
61
Settings<br />
62<br />
Publish Presence<br />
Control the “presence” status information through this setting.<br />
Refer-To Brackets<br />
To switch additional brackets on or off in the Signaling for Refer-To.<br />
Require PRACK<br />
To force the usage of PRACK, choose “on” here.<br />
Symmetrical RTP<br />
In case you want to use symmetrical RTP, switch it “on” here.<br />
Offer GRUU<br />
This setting is used to toggle the support for GRUU (Globally Routable<br />
User agent URL's) in SIP.<br />
Offer MPO<br />
Using this setting, the user can turn the Media Path Optimization on or<br />
off.<br />
Challenge for Dialog<br />
Turning this setting on enables a challenge response for dialogue<br />
messages.<br />
Challenge for Reboot<br />
This setting enables/disables a challenge response for remote reboot<br />
request.<br />
Challenge for Check-Sync<br />
Turning this setting on enables a challenge response for Check-Sync.<br />
UPDATE<br />
Update Policy<br />
You can select the best possible update policy you would like to adopt<br />
for your phone.<br />
Setting URL<br />
Set up the URL of the settings server from where you would like to<br />
obtain the configuration file to configure your phone.
Settings<br />
VLAN<br />
Id and Priority<br />
Enter your VLAN ID (0..4095) and Priority (0..7) separated by a space<br />
(e.g., "128 5").<br />
DEBUG<br />
LCServer<br />
Specify the IP address of the remote LCServer if you want your phone<br />
to connect to it. Normally, you would not need to set the LCServer<br />
setting. It is for company internal development only.<br />
SECURITY<br />
Administrator Mode<br />
This setting allows you to switch between User and Administrator modes<br />
of the phone.<br />
Administrator Password<br />
In Administrator mode, you can set up the admin password through this<br />
setting. A password can be an alphanumeric string of any length.<br />
Administrator Password (Confirmation)<br />
You have to confirm the password to ensure no typing errors have been<br />
made.<br />
Certificates<br />
Upload Server Certificate<br />
Here you can upload your own server certificate for secure https<br />
communication.<br />
63
Settings<br />
64<br />
Setup Update<br />
MANUAL SOFTWARE UPDATE<br />
Here you can select the binary files to be put on the phone yourself.<br />
This section may look like:<br />
Bootloader<br />
Specify the address for the bootloader file you would like to place on the<br />
phone through this setting.<br />
Firmware<br />
Similarly, you can provide the firmware address in this setting.<br />
Press the “Load” button if you changed anything in these settings and<br />
would like to load the binary files through the newly provided addresses.<br />
H.323<br />
This mode of settings will be available to you if your phone is operating<br />
in H.323 mode.<br />
E.164 Number<br />
Set the E.164 number by which you would like to identify your phone.<br />
H.323 ID<br />
Alternatively, you can specify the H.323 ID for your phone.<br />
URL ID<br />
Set the H.323 ID in the form of an URL through this setting.<br />
GK/GW Mode<br />
Through the GK/GW Mode setting, the user has an option to select the<br />
mode for the registrar to either “Auto”, “Gatekeeper”, “Gateway” or<br />
“None”.<br />
GK/GW Domain<br />
Specify the DNS or IP address of the Gatekeeper or Gateway with which<br />
you would like your phone to register.
Settings<br />
GK TTL<br />
If you selected “Gatekeeper” in the GK/GW Mode above, you can specify<br />
the “Time to Live” (TTL) through this setting.<br />
Message Center Number<br />
Users can set the message center number through this setting.<br />
Fast Start<br />
This setting allows you to enable/disable the “fast start” feature.<br />
Early Start<br />
Here you can switch the early start feature of the H.323 stack on or off.<br />
H.245 Tunneling<br />
Through this setting, users can turn H.245 tunneling on or off.<br />
H.450 Services<br />
With this blanket setting, you can start or stop the H.450 services.<br />
External line prefix<br />
Enter the external line prefix (e.g., 00) for outgoing calls. When you<br />
dial, it will be replaced by the gateway prefix you entered (e.g. *5). If,<br />
for example, you want to call *51234 you dial 001234 for going over<br />
the gateway.<br />
Gateway prefix<br />
The gateway prefix is the Alias with which the gateway is registered<br />
with the gatekeeper. When the gatekeeper receives a call starting with<br />
the gateway prefix, it knows that the call has to be routed to the<br />
gateway.<br />
Status<br />
System Information<br />
Here you find information regarding phone type, MAC Address, IP<br />
Address, firmware version, boot loader and firmware URLs.<br />
Log<br />
Dependent on a selectable log level the log messages are shown here.<br />
SIP Trace<br />
A quite helpful feature to display the SIP signaling.<br />
UPnP Trace<br />
You can discover the UPnP conversation between the phone and other<br />
devices here.<br />
65
Settings<br />
66<br />
Memory<br />
See the current memory usage of your phone.<br />
DNS Cache<br />
An option to look into the current DNS cache.<br />
PCAP Trace<br />
Create packet traces from current network traffic right on your phone!<br />
This is a really powerful tool to find out what is going on in the network<br />
around your phone.<br />
Settings<br />
Displays all settings of your phone including their current values.
Settings<br />
7. Appendix<br />
Standard Conformance<br />
Name and address of manufacturer<br />
<strong>snom</strong> technology AG<br />
Pascalstraße 10B<br />
10587 Berlin<br />
<strong>snom</strong> technology AG assures that the product<br />
Type: <strong>VoIP</strong> <strong>Phone</strong><br />
Model: <strong>snom</strong> <strong>220</strong><br />
conforms to the following standards:<br />
EMC standard 89/336/EWG incl. all appendices<br />
Low voltage standard 73 / 23 / EWG<br />
Safety Standards:<br />
EN 60950 1992 incl. all appendices<br />
Electromagnetic Standards:<br />
EN 55022 / 9.98 Class B<br />
EN 55024 / 9.98<br />
EN 61000-3-2/1995+A1/1998+A2/1998+A14 /2000<br />
EN 61000-3-3/1.95<br />
Place, date Dr. Christian Stredicke<br />
Berlin, 18 August 2004 CEO<br />
67
68<br />
8. Index<br />
A<br />
B<br />
C<br />
D<br />
About..........................................................26<br />
Accepting a Call .........................................20<br />
Account............................................48<br />
Adding a number ........................................41<br />
Adding an entry ..........................................34<br />
Administrator Mode ...................................58<br />
Administrator Password .............................58<br />
Advanced Functions ...................................27<br />
AUDIO .......................................................54<br />
Authentication ............................................14<br />
Auto Answer...............................................46<br />
Auto Dial ....................................................52<br />
Base ..............................................................8<br />
Basic Functions ..........................................16<br />
Block DND.................................................54<br />
Blocking a Call...........................................21<br />
Booting .........................................................8<br />
Bootloader ..................................................58<br />
Browsing ....................................................40<br />
Call Completion ...................................29, 52<br />
Call Diversion.............................................29<br />
Call Lists ....................................................38<br />
Call Register...............................................34<br />
Cleaning .......................................................6<br />
CLIP ...........................................................46<br />
CLIR...........................................................47<br />
CMC...........................................................53<br />
Codec 1-5 ...................................................49<br />
Conference..................................................29<br />
Connecting the phone...................................6<br />
Consultation Transfer .................................28<br />
Custom Melody ..........................................46<br />
DEBUG ......................................................57<br />
Default Ringer ............................................46<br />
Default Selection ........................................45<br />
Deny All .....................................................52<br />
Deny List ....................................................40<br />
Denying ......................................................21<br />
Destination..................................................23<br />
DHCP .....................................................9, 49<br />
Dial Plan.....................................................49<br />
Dialing........................................................16<br />
Direct Transfer ...........................................28<br />
Dirty Host TTL...........................................56<br />
Display Name .............................................48<br />
Diverting all calls .......................................29<br />
DND Mode.................................................14<br />
E<br />
F<br />
G<br />
H<br />
I<br />
L<br />
DNS Cache.................................................60<br />
DNS Server ................................................10<br />
Domain.......................................................50<br />
DTMF.........................................................24<br />
DTMF Tones..............................................31<br />
Dynamic RTP.............................................55<br />
E.164 numbers............................................18<br />
Early Start...................................................59<br />
Editing an entry ..........................................35<br />
ENTER key ..................................................7<br />
ENUM Suffix .............................................56<br />
Export.........................................................36<br />
Fast Start.....................................................59<br />
Firmware ....................................................59<br />
Gateway prefix ...........................................60<br />
GK/GW Mode............................................59<br />
H.245 Tunneling.........................................59<br />
H.323..........................................................59<br />
H.323 ID.....................................................59<br />
H.450 Services ...........................................59<br />
Handset.......................................................21<br />
Handsfree ...................................................21<br />
Headset.......................................................21<br />
Headset Device...........................................44<br />
Hold............................................................27<br />
HTTP..........................................................51<br />
HTTP port ..................................................51<br />
HTTP Proxy ...............................................51<br />
HTTPS port ................................................51<br />
Idle State.....................................................16<br />
Import.........................................................36<br />
Incoming Call.............................................20<br />
Initialization .................................................8<br />
Intercom .....................................................23<br />
IP Address ....................................................9<br />
IP Gateway...........................................10, 50<br />
Language......................................................9<br />
LCServer ....................................................58<br />
LEDs ............................................................8<br />
Line ............................................................22<br />
Logging ......................................................11<br />
Logoff All...................................................13<br />
Logoff User ................................................13
Appendix<br />
M<br />
N<br />
O<br />
P<br />
Q<br />
R<br />
Logon .........................................................12<br />
Logon User.................................................13<br />
Logon Wizard.............................................12<br />
Mailbox ......................................................48<br />
Main Menu .................................................24<br />
MENU key ...................................................7<br />
Message Waiting Indication .......................32<br />
Mobility......................................................12<br />
Mute ...........................................................21<br />
MWI ...........................................................32<br />
MWI Dial Tone ..........................................44<br />
MWI Notification .......................................44<br />
NAT Detection ...........................................55<br />
Netmask......................................................10<br />
NTP Time server ........................................50<br />
Number busy ..............................................45<br />
Number redirect..........................................45<br />
numeric keypad ............................................7<br />
Offer ICE....................................................49<br />
Offer MPO..................................................57<br />
Outbound Proxy .........................................49<br />
Outgoing Line.............................................13<br />
Packet size ..................................................49<br />
Park orbit ....................................................23<br />
Password.....................................................48<br />
PCAP Trace................................................60<br />
<strong>Phone</strong> name ................................................50<br />
Power supply ................................................6<br />
Prefix ..........................................................54<br />
Preview.......................................................37<br />
Programmable Keys ...................................22<br />
Proposed Expiry .........................................49<br />
Q-Value ......................................................49<br />
REDIRECTION .........................................45<br />
Registrar .....................................................48<br />
Removing a number ...................................41<br />
Resume .......................................................27<br />
S<br />
T<br />
U<br />
V<br />
W<br />
Ring Tones .................................................25<br />
Ringtone .....................................................48<br />
Safety Notes .................................................6<br />
Setting up the <strong>Phone</strong>.....................................6<br />
Setting URL ...............................................57<br />
Settings.......................................................42<br />
Settings Options .........................................44<br />
Settings via <strong>Phone</strong> ......................................42<br />
Settings via Web Browser ..........................43<br />
Setup Advanced..........................................49<br />
Setup Line1-7 .............................................48<br />
Setup Preferences .......................................44<br />
Setup Speed Dial ........................................47<br />
Setup Update ..............................................58<br />
Short Messages...........................................31<br />
SMS............................................................31<br />
<strong>snom</strong> Menu.................................................12<br />
Software Update.........................................32<br />
speed dial....................................................39<br />
Speed Dial ..................................................39<br />
Status..........................................................60<br />
STUN Server..............................................55<br />
Terminating a call.......................................19<br />
Timeout ......................................................45<br />
Timezone....................................................11<br />
Tone Scheme........................................10, 44<br />
TOS ............................................................55<br />
Transfer ......................................................28<br />
Transport ....................................................49<br />
Type of Answering.....................................46<br />
Unmute.......................................................21<br />
UPnP Trace ................................................60<br />
URL ID.......................................................59<br />
User ............................................................51<br />
Voice recorder............................................23<br />
Volume.......................................................21<br />
Volume in Idle Mode .................................24<br />
Webinterface Language..............................44<br />
69
© 2004 <strong>snom</strong> technology AG<br />
<strong>snom</strong> technology Aktiengesellschaft · Pascalstr. 10b · D-10587 Berlin<br />
<strong>Phone</strong>: +49 30 39833-0· mailto:info@<strong>snom</strong>.de · http://www.<strong>snom</strong>.com