- Page 1 and 2: GV-Video ServerUser's ManualBefore
- Page 3 and 4: PrefaceWelcome to the GV-Video Serv
- Page 5 and 6: 3.2.13 I/O Control.................
- Page 7 and 8: 7.2 Receiving Cardholder Data from
- Page 10 and 11: 1.1.3 GV-VS12Figure 1-31. AC Power
- Page 12 and 13: 1.5 OptionsOptional devices can exp
- Page 14 and 15: 1.6.1.2 GV-VS02A8761 2 3 4 5Figure
- Page 16 and 17: 1.6.1.4 GV-VS04AFigure 1-8No. NameF
- Page 18 and 19: 1.6.2.2 GV-VS02AFigure 1-10No. Name
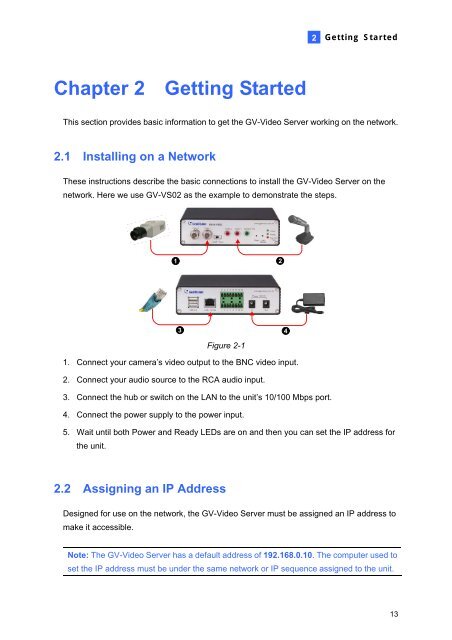
- Page 22 and 23: 1. Open your web browser, and type
- Page 24 and 25: Chapter 3 Accessing the GV-Video Se
- Page 26 and 27: 1110981 2 3 4 5 6 7Figure 3-3No. Na
- Page 28 and 29: 3.2.3 Snapshot of a Live VideoTo ta
- Page 30 and 31: Picture-and-Picture ViewWith the Pi
- Page 32 and 33: • Auto Snapshot: The snapshot of
- Page 34 and 35: 3.2.11 PTZ ControlTo open the PTZ c
- Page 36 and 37: 3.2.13 I/O ControlThe I/O Control w
- Page 38 and 39: Chapter 4 Administrator ModeThe Adm
- Page 40 and 41: 4.1 Video & MotionThis section incl
- Page 42 and 43: 4.1.2 Video SettingsFigure 4-334
- Page 44 and 45: [Video Signal Type]• Auto detect
- Page 46 and 47: 4.1.3 Motion DetectionMotion detect
- Page 48 and 49: 4.1.5 Text OverlayNote this option
- Page 50 and 51: To configure the tampering alarm:1.
- Page 52 and 53: 4.1.8 Video Channel Source Settings
- Page 54 and 55: 4.2.2 Input/Output SettingsInput Se
- Page 56 and 57: 4.2.3 GPS/WiegandYou can select eit
- Page 58 and 59: 4.2.4 BuzzerNote this function is o
- Page 60 and 61: • Send to: Type the e-mail addres
- Page 62 and 63: [Alarm Settings]• Motion Detectio
- Page 64 and 65: To enable the Center V2 connection:
- Page 66 and 67: 3. Port Number: Match the port to P
- Page 68 and 69: To enable the GV-GIS connection:1.
- Page 70 and 71:
3. Port Number: Match the communica
- Page 72 and 73:
4.3.8 ViewLog ServerThe ViewLog Ser
- Page 74 and 75:
4.5 Recording ScheduleThe schedule
- Page 76 and 77:
4.7 NetworkThe Network section incl
- Page 78 and 79:
4.7.2 Wireless-Client ModeTo use th
- Page 80 and 81:
4.7.3 Advanced TCP/IPThis section i
- Page 82 and 83:
4.7.4 UMTSUMTS stands for Universal
- Page 84 and 85:
Figure 4-34• Multicast Host Name:
- Page 86 and 87:
4.8 ManagementThe Management sectio
- Page 88 and 89:
4.8.2 GPS Maps SettingsNote this fu
- Page 90 and 91:
• Keep days (1-255): Specify the
- Page 92 and 93:
4.8.5 Log InformationThe System Boo
- Page 94 and 95:
4.8.7 ToolsThis section allows you
- Page 96 and 97:
5.2.1 Playback Using USB Mass Stora
- Page 98 and 99:
5.2.3 Playback of GPS TracksOn GV-S
- Page 100 and 101:
5.2.4 Playback of Daylight Saving T
- Page 102 and 103:
6.1.1 Using the Web Interface1. In
- Page 104 and 105:
5. Click the Firmware Upgrade tab.
- Page 106 and 107:
6.3 GPS TrackingNote this function
- Page 108 and 109:
6.4 Restoring to Factory Default Se
- Page 110 and 111:
6.5.3 The Watermark Proof Window1 3
- Page 112 and 113:
7.1 Setting Up IP CamerasTo set up
- Page 114 and 115:
Previewing Video and Setting AudioT
- Page 116 and 117:
[GV-GIS Setting]Receive the GPS dat
- Page 118 and 119:
2. At the local computer, open the
- Page 120 and 121:
For details on creating an E-Map fi
- Page 122 and 123:
To define how to display the receiv
- Page 124 and 125:
8.3 Dispatch ServerThe Dispatch Ser
- Page 126 and 127:
9.1.2 Relay OutputThe relay outputs
- Page 128 and 129:
9.2.2 RS-232 Terminal BlockThe RS-2
- Page 130 and 131:
10.1 PDAGView V2 is a remote view a
- Page 132 and 133:
2. Click the button located at the
- Page 134 and 135:
10.1.5 Other FunctionsIn addition t
- Page 136 and 137:
Viewing Input-Triggered EventsAll i
- Page 138 and 139:
Viewing Camera StatusTo view the ca
- Page 140 and 141:
10.2.3 Connecting to GV-Video Serve
- Page 142 and 143:
10.2.4 Playing Back the Recordings
- Page 144 and 145:
10.3.3 Connecting to GV-Video Serve
- Page 146 and 147:
10.4 3G Mobile PhoneWithout install
- Page 148 and 149:
4. Select Live to receive the Live
- Page 150 and 151:
SpecificationsVideoModel GV-VS02 GV
- Page 152 and 153:
EnvironmentModel GV-VS02 GV-VS02A G
- Page 154:
C. Settings for Internet Explore 8I


