GV-DVR System V2
GV-DVR System V2 GV-DVR System V2
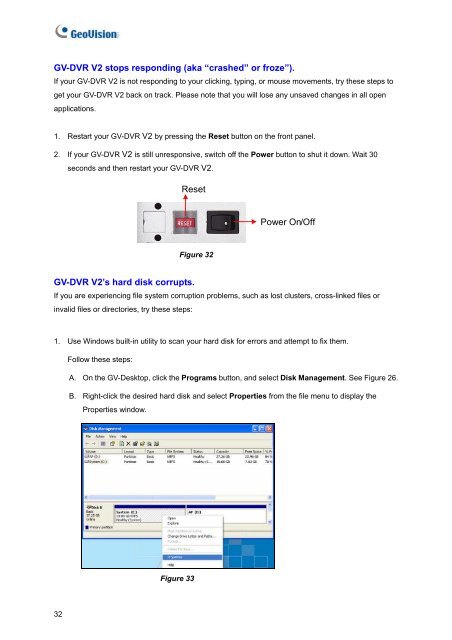
GV-DVR V2 stops responding (aka “crashed” or froze”).If your GV-DVR V2 is not responding to your clicking, typing, or mouse movements, try these steps toget your GV-DVR V2 back on track. Please note that you will lose any unsaved changes in all openapplications.1. Restart your GV-DVR V2 by pressing the Reset button on the front panel.2. If your GV-DVR V2 is still unresponsive, switch off the Power button to shut it down. Wait 30seconds and then restart your GV-DVR V2.ResetPower On/OffFigure 32GV-DVR V2’s hard disk corrupts.If you are experiencing file system corruption problems, such as lost clusters, cross-linked files orinvalid files or directories, try these steps:1. Use Windows built-in utility to scan your hard disk for errors and attempt to fix them.Follow these steps:A. On the GV-Desktop, click the Programs button, and select Disk Management. See Figure 26.B. Right-click the desired hard disk and select Properties from the file menu to display theProperties window.Figure 3332
5TroubleshootingC. Click the Tools tab in the upper portion of the window.D. Under Error-checking, click the Check Now button.Figure 34E. Select Automatically fix file system errors and Scan for and attempt recovery of badsectors.F. Click Start.Figure 352. If the Windows hard disk utility still cannot fix the problem in Partition C, try rebuilding the operationsystem and GV-System Software by using the Recovery DVD. Refer to 3.5 Recovery DVD.3. If the problem persists, replace a hard disk drive.GV-DVR V2 suffers virus attack.GV-DVR V2 is designed and optimized for Windows XP platform. It may be vulnerable to newly createdworms and exploits that attack any of the underlying operating system’s previously undocumentedflaws. If your GV-DVR V2 suffers virus attack, try rebuilding the operation system and GV-SystemSoftware by using the Recovery DVD. Refer to 3.5 Recovery DVD.33
- Page 1 and 2: GV-DVR System V2User’s Manual
- Page 3: User’s Manual for GV-DVR System V
- Page 7: Safety InstructionsObserve these sa
- Page 11 and 12: 1Introduction1.3 OptionsOptional de
- Page 13 and 14: 2Overview2.2 Rear ViewFigure 21 RS-
- Page 15 and 16: 3Getting Started3.2 Turning on the
- Page 17 and 18: 3Getting Started5. Configure a stat
- Page 19 and 20: 3Getting StartedTo modify the defau
- Page 21 and 22: 3Getting Started3.5 Recovery DVDIf
- Page 23 and 24: 3Getting Started3.6 Updating GV-DVR
- Page 25 and 26: 4DVR Health Analysis2. Select Backu
- Page 27 and 28: 4DVR Health Analysis4.3 Information
- Page 29 and 30: 4DVR Health Analysis4.4 Health Anal
- Page 31 and 32: 5TroubleshootingThe Main System can
- Page 33: 5TroubleshootingF. Select Use the f
- Page 37 and 38: SpecificationsSpecificationsSystemM
- Page 39 and 40: SpecificationsRemote Client Softwar
- Page 41 and 42: Warranty PolicyWarranty PolicyWarra
- Page 43: Warranty PolicyWhen you call or e-m
- Page 46: Bar Code:Shipment Date:GeoVision, I
<strong>GV</strong>-<strong>DVR</strong> <strong>V2</strong> stops responding (aka “crashed” or froze”).If your <strong>GV</strong>-<strong>DVR</strong> <strong>V2</strong> is not responding to your clicking, typing, or mouse movements, try these steps toget your <strong>GV</strong>-<strong>DVR</strong> <strong>V2</strong> back on track. Please note that you will lose any unsaved changes in all openapplications.1. Restart your <strong>GV</strong>-<strong>DVR</strong> <strong>V2</strong> by pressing the Reset button on the front panel.2. If your <strong>GV</strong>-<strong>DVR</strong> <strong>V2</strong> is still unresponsive, switch off the Power button to shut it down. Wait 30seconds and then restart your <strong>GV</strong>-<strong>DVR</strong> <strong>V2</strong>.ResetPower On/OffFigure 32<strong>GV</strong>-<strong>DVR</strong> <strong>V2</strong>’s hard disk corrupts.If you are experiencing file system corruption problems, such as lost clusters, cross-linked files orinvalid files or directories, try these steps:1. Use Windows built-in utility to scan your hard disk for errors and attempt to fix them.Follow these steps:A. On the <strong>GV</strong>-Desktop, click the Programs button, and select Disk Management. See Figure 26.B. Right-click the desired hard disk and select Properties from the file menu to display theProperties window.Figure 3332


